Chainlink CCIP
Giới thiệu
Chainlink Cross-Chain Interoperability Protocol (CCIP) cung cấp cho các nhà phát triển và ứng dụng phi tập trung (dApps) một cách an toàn và hiệu quả để tương tác giữa các blockchain. Với CCIP, bạn có thể gửi token và tin nhắn tùy ý để kích hoạt các hành động trên hợp đồng đích, chẳng hạn như đúc NFT, cân bằng lại chỉ số hoặc gọi các hàm tùy chỉnh.
Trong hướng dẫn này, bạn sẽ học cách gửi tin nhắn và token từ hợp đồng thông minh Kaia sang một hợp đồng trên chuỗi khác và cách nhận lại chúng, sử dụng Chainlink CCIP.
Điều kiện tiên quyết.
- Nhà máy đúc đã được lắp đặt
- Cài đặt bằng lệnh
curl -L https://foundry.paradigm.xyz | bashsau đó chạyfoundryup. - Kiểm tra phiên bản bằng cách sử dụng
forge --version,cast --versionvàanvil --version.
- Cài đặt bằng lệnh
- MetaMask ví
- Tạo ví phát triển
- Thêm mạng thử nghiệm Kaia Kairos và mạng Ethereum Sepolia vào MetaMask.
- Kiểm tra token từ các vòi nước
- KAIA: Khí để triển khai và gửi từ Kaia.
- LINK (testnet): Phí CCIP khi thanh toán bằng LINK.
- Token gốc trên chuỗi đích (ví dụ: Sepolia ETH: để triển khai và, nếu được chọn, để thanh toán phí CCIP bằng token gốc).
Bắt đầu
Trong hướng dẫn này, bạn sẽ gửi và nhận tin nhắn xuyên chuỗi giữa Kaia (Kairos Testnet) và Ethereum Sepolia bằng cách sử dụng Chainlink CCIP.
Cuối cùng, bạn sẽ:
- Khởi tạo một dự án Foundry được cấu hình cho Kairos và Sepolia.
- Thêm các hợp đồng và giao diện Chainlink CCIP làm phụ thuộc.
- Thực hiện hợp đồng Messenger cho phép gửi và nhận tin nhắn giữa các chuỗi khối.
- Triển khai lên cả hai mạng và xác minh tin nhắn khứ hồi.
Tạo dự án
Trong phần này, bạn sẽ thiết lập môi trường phát triển sử dụng Foundry. Để tạo một dự án Foundry mới, trước tiên hãy tạo một thư mục mới:
mkdir kaia-foundry-ccip-example
Sau đó chạy:
cd kaia-foundry-ccip-exampleforge init
Điều này sẽ tạo ra một dự án Foundry với bố cục cơ bản sau:
├── foundry.toml├── script├── src└── test
Cài đặt hợp đồng thông minh Chainlink
Để s��ử dụng Chainlink CCIP trong dự án Foundry của bạn, bạn cần cài đặt các hợp đồng thông minh Chainlink CCIP làm phụ thuộc dự án bằng cách sử dụng lệnh forge install.
Để cài đặt hợp đồng thông minh Chainlink CCIP, hãy chạy:
forge install smartcontractkit/chainlink-ccip@2114b90f39c82c052e05af7c33d42c1ae98f4180forge install smartcontractkit/chainlink-evm@ff814eb0a01f89d9a215f825d243bf421e6434a9
Sau khi cài đặt, hãy tạo một tệp remapping.txt:
forge remappings > remappings.txt
Sau đó, hãy dán nội dung sau vào tệp tin mới tạo của bạn:
@chainlink/contracts/=lib/chainlink-evm/contracts/@chainlink/contracts-ccip/=lib/chainlink-ccip/chains/evm/contracts/
Viết hợp đồng thông minh
Trong phần này, bạn sẽ sử dụng mã dưới đây để gửi và nhận tin nhắn giữa các chuỗi khối.
Tạo một tệp mới trong thư mục src của dự án có tên Messenger.sol và sao chép mã dưới đây vào tệp:
// SPDX-License-Identifier: MITpragma solidity ^0.8.0;import { IRouterClient } from "@chainlink/contracts-ccip/interfaces/IRouterClient.sol";import {OwnerIsCreator} from "@chainlink/contracts/src/v0.8/shared/access/OwnerIsCreator.sol";import { Client } from "@chainlink/contracts-ccip/libraries/Client.sol";import { CCIPReceiver } from "@chainlink/contracts-ccip/applications/CCIPReceiver.sol";import {IERC20} from "@chainlink/contracts/src/v0.8/vendor/openzeppelin-solidity/v4.8.3/contracts/token/ERC20/IERC20.sol";import {SafeERC20} from "@chainlink/contracts/src/v0.8/vendor/openzeppelin-solidity/v4.8.3/contracts/token/ERC20/utils/SafeERC20.sol";/** * THIS IS AN EXAMPLE CONTRACT THAT USES HARDCODED VALUES FOR CLARITY. * THIS IS AN EXAMPLE CONTRACT THAT USES UN-AUDITED CODE. * DO NOT USE THIS CODE IN PRODUCTION. *//// @title - A simple messenger contract for sending/receiving string data across chains.contract Messenger is CCIPReceiver, OwnerIsCreator { using SafeERC20 for IERC20; // Custom errors to provide more descriptive revert messages. error NotEnoughBalance(uint256 currentBalance, uint256 calculatedFees); // Used to make sure contract has enough balance. error NothingToWithdraw(); // Used when trying to withdraw Ether but there's nothing to withdraw. error FailedToWithdrawEth(address owner, address target, uint256 value); // Used when the withdrawal of Ether fails. error DestinationChainNotAllowlisted(uint64 destinationChainSelector); // Used when the destination chain has not been allowlisted by the contract owner. error SourceChainNotAllowlisted(uint64 sourceChainSelector); // Used when the source chain has not been allowlisted by the contract owner. error SenderNotAllowlisted(address sender); // Used when the sender has not been allowlisted by the contract owner. error InvalidReceiverAddress(); // Used when the receiver address is 0. // Event emitted when a message is sent to another chain. event MessageSent( bytes32 indexed messageId, // The unique ID of the CCIP message. uint64 indexed destinationChainSelector, // The chain selector of the destination chain. address receiver, // The address of the receiver on the destination chain. string text, // The text being sent. address feeToken, // the token address used to pay CCIP fees. uint256 fees // The fees paid for sending the CCIP message. ); // Event emitted when a message is received from another chain. event MessageReceived( bytes32 indexed messageId, // The unique ID of the CCIP message. uint64 indexed sourceChainSelector, // The chain selector of the source chain. address sender, // The address of the sender from the source chain. string text // The text that was received. ); bytes32 private s_lastReceivedMessageId; // Store the last received messageId. string private s_lastReceivedText; // Store the last received text. // Mapping to keep track of allowlisted destination chains. mapping(uint64 => bool) public allowlistedDestinationChains; // Mapping to keep track of allowlisted source chains. mapping(uint64 => bool) public allowlistedSourceChains; // Mapping to keep track of allowlisted senders. mapping(address => bool) public allowlistedSenders; IERC20 private s_linkToken; /// @notice Constructor initializes the contract with the router address. /// @param _router The address of the router contract. /// @param _link The address of the link contract. constructor(address _router, address _link) CCIPReceiver(_router) { s_linkToken = IERC20(_link); } /// @dev Modifier that checks if the chain with the given destinationChainSelector is allowlisted. /// @param _destinationChainSelector The selector of the destination chain. modifier onlyAllowlistedDestinationChain(uint64 _destinationChainSelector) { if (!allowlistedDestinationChains[_destinationChainSelector]) revert DestinationChainNotAllowlisted(_destinationChainSelector); _; } /// @dev Modifier that checks if the chain with the given sourceChainSelector is allowlisted and if the sender is allowlisted. /// @param _sourceChainSelector The selector of the destination chain. /// @param _sender The address of the sender. modifier onlyAllowlisted(uint64 _sourceChainSelector, address _sender) { if (!allowlistedSourceChains[_sourceChainSelector]) revert SourceChainNotAllowlisted(_sourceChainSelector); if (!allowlistedSenders[_sender]) revert SenderNotAllowlisted(_sender); _; } /// @dev Modifier that checks the receiver address is not 0. /// @param _receiver The receiver address. modifier validateReceiver(address _receiver) { if (_receiver == address(0)) revert InvalidReceiverAddress(); _; } /// @dev Updates the allowlist status of a destination chain for transactions. function allowlistDestinationChain( uint64 _destinationChainSelector, bool allowed ) external onlyOwner { allowlistedDestinationChains[_destinationChainSelector] = allowed; } /// @dev Updates the allowlist status of a source chain for transactions. function allowlistSourceChain( uint64 _sourceChainSelector, bool allowed ) external onlyOwner { allowlistedSourceChains[_sourceChainSelector] = allowed; } /// @dev Updates the allowlist status of a sender for transactions. function allowlistSender(address _sender, bool allowed) external onlyOwner { allowlistedSenders[_sender] = allowed; } /// @notice Sends data to receiver on the destination chain. /// @notice Pay for fees in LINK. /// @dev Assumes your contract has sufficient LINK. /// @param _destinationChainSelector The identifier (aka selector) for the destination blockchain. /// @param _receiver The address of the recipient on the destination blockchain. /// @param _text The text to be sent. /// @return messageId The ID of the CCIP message that was sent. function sendMessagePayLINK( uint64 _destinationChainSelector, address _receiver, string calldata _text ) external onlyOwner onlyAllowlistedDestinationChain(_destinationChainSelector) validateReceiver(_receiver) returns (bytes32 messageId) { // Create an EVM2AnyMessage struct in memory with necessary information for sending a cross-chain message Client.EVM2AnyMessage memory evm2AnyMessage = _buildCCIPMessage( _receiver, _text, address(s_linkToken) ); // Initialize a router client instance to interact with cross-chain router IRouterClient router = IRouterClient(this.getRouter()); // Get the fee required to send the CCIP message uint256 fees = router.getFee(_destinationChainSelector, evm2AnyMessage); if (fees > s_linkToken.balanceOf(address(this))) revert NotEnoughBalance(s_linkToken.balanceOf(address(this)), fees); // Approve the Router to transfer LINK tokens on contract's behalf. It will spend the fees in LINK s_linkToken.approve(address(router), fees); // Send the CCIP message through the router and store the returned CCIP message ID messageId = router.ccipSend(_destinationChainSelector, evm2AnyMessage); // Emit an event with message details emit MessageSent( messageId, _destinationChainSelector, _receiver, _text, address(s_linkToken), fees ); // Return the CCIP message ID return messageId; } /// @notice Sends data to receiver on the destination chain. /// @notice Pay for fees in native gas. /// @dev Assumes your contract has sufficient native gas tokens. /// @param _destinationChainSelector The identifier (aka selector) for the destination blockchain. /// @param _receiver The address of the recipient on the destination blockchain. /// @param _text The text to be sent. /// @return messageId The ID of the CCIP message that was sent. function sendMessagePayNative( uint64 _destinationChainSelector, address _receiver, string calldata _text ) external onlyOwner onlyAllowlistedDestinationChain(_destinationChainSelector) validateReceiver(_receiver) returns (bytes32 messageId) { // Create an EVM2AnyMessage struct in memory with necessary information for sending a cross-chain message Client.EVM2AnyMessage memory evm2AnyMessage = _buildCCIPMessage( _receiver, _text, address(0) ); // Initialize a router client instance to interact with cross-chain router IRouterClient router = IRouterClient(this.getRouter()); // Get the fee required to send the CCIP message uint256 fees = router.getFee(_destinationChainSelector, evm2AnyMessage); if (fees > address(this).balance) revert NotEnoughBalance(address(this).balance, fees); // Send the CCIP message through the router and store the returned CCIP message ID messageId = router.ccipSend{value: fees}( _destinationChainSelector, evm2AnyMessage ); // Emit an event with message details emit MessageSent( messageId, _destinationChainSelector, _receiver, _text, address(0), fees ); // Return the CCIP message ID return messageId; } /// handle a received message function _ccipReceive( Client.Any2EVMMessage memory any2EvmMessage ) internal override onlyAllowlisted( any2EvmMessage.sourceChainSelector, abi.decode(any2EvmMessage.sender, (address)) ) // Make sure source chain and sender are allowlisted { s_lastReceivedMessageId = any2EvmMessage.messageId; // fetch the messageId s_lastReceivedText = abi.decode(any2EvmMessage.data, (string)); // abi-decoding of the sent text emit MessageReceived( any2EvmMessage.messageId, any2EvmMessage.sourceChainSelector, // fetch the source chain identifier (aka selector) abi.decode(any2EvmMessage.sender, (address)), // abi-decoding of the sender address, abi.decode(any2EvmMessage.data, (string)) ); } /// @notice Construct a CCIP message. /// @dev This function will create an EVM2AnyMessage struct with all the necessary information for sending a text. /// @param _receiver The address of the receiver. /// @param _text The string data to be sent. /// @param _feeTokenAddress The address of the token used for fees. Set address(0) for native gas. /// @return Client.EVM2AnyMessage Returns an EVM2AnyMessage struct which contains information for sending a CCIP message. function _buildCCIPMessage( address _receiver, string calldata _text, address _feeTokenAddress ) private pure returns (Client.EVM2AnyMessage memory) { // Create an EVM2AnyMessage struct in memory with necessary information for sending a cross-chain message return Client.EVM2AnyMessage({ receiver: abi.encode(_receiver), // ABI-encoded receiver address data: abi.encode(_text), // ABI-encoded string tokenAmounts: new Client.EVMTokenAmount[](0), // Empty array as no tokens are transferred extraArgs: Client._argsToBytes( // Additional arguments, setting gas limit and allowing out-of-order execution. // Best Practice: For simplicity, the values are hardcoded. It is advisable to use a more dynamic approach // where you set the extra arguments off-chain. This allows adaptation depending on the lanes, messages, // and ensures compatibility with future CCIP upgrades. Read more about it here: https://docs.chain.link/ccip/concepts/best-practices/evm#using-extraargs Client.GenericExtraArgsV2({ gasLimit: 200_000, // Gas limit for the callback on the destination chain allowOutOfOrderExecution: true // Allows the message to be executed out of order relative to other messages from the same sender }) ), // Set the feeToken to a feeTokenAddress, indicating specific asset will be used for fees feeToken: _feeTokenAddress }); } /// @notice Fetches the details of the last received message. /// @return messageId The ID of the last received message. /// @return text The last received text. function getLastReceivedMessageDetails() external view returns (bytes32 messageId, string memory text) { return (s_lastReceivedMessageId, s_lastReceivedText); } /// @notice Fallback function to allow the contract to receive Ether. /// @dev This function has no function body, making it a default function for receiving Ether. /// It is automatically called when Ether is sent to the contract without any data. receive() external payable {} /// @notice Allows the contract owner to withdraw the entire balance of Ether from the contract. /// @dev This function reverts if there are no funds to withdraw or if the transfer fails. /// It should only be callable by the owner of the contract. /// @param _beneficiary The address to which the Ether should be sent. function withdraw(address _beneficiary) public onlyOwner { // Retrieve the balance of this contract uint256 amount = address(this).balance; // Revert if there is nothing to withdraw if (amount == 0) revert NothingToWithdraw(); // Attempt to send the funds, capturing the success status and discarding any return data (bool sent, ) = _beneficiary.call{value: amount}(""); // Revert if the send failed, with information about the attempted transfer if (!sent) revert FailedToWithdrawEth(msg.sender, _beneficiary, amount); } /// @notice Allows the owner of the contract to withdraw all tokens of a specific ERC20 token. /// @dev This function reverts with a 'NothingToWithdraw' error if there are no tokens to withdraw. /// @param _beneficiary The address to which the tokens will be sent. /// @param _token The contract address of the ERC20 token to be withdrawn. function withdrawToken( address _beneficiary, address _token ) public onlyOwner { // Retrieve the balance of this contract uint256 amount = IERC20(_token).balanceOf(address(this)); // Revert if there is nothing to withdraw if (amount == 0) revert NothingToWithdraw(); IERC20(_token).safeTransfer(_beneficiary, amount); }}
Mã code trên là một hợp đồng CCIP hai chiều cho phép gửi và nhận tin nhắn chuỗi ký tự qua các chuỗi được phép, với các kiểm soát do chủ sở hữu quản lý, thanh toán bằng LINK hoặc phí gốc. Hãy cùng xem qua các chức năng chính mà chúng ta sẽ sử dụng trong hợp đồng này:
1. Danh sách cho phép
- allowlistSourceChain(selector, allowed): Kiểm soát các chuỗi nguồn nào được phép gửi tin nhắn đến hợp đồng này.
- allowlistDestinationChain(selector, allowed): Kiểm soát các chuỗi đích mà hợp đồng này được phép gửi đến.
- allowlistedSenders[address] (thông qua allowlistSender(addr, allowed)): Hạn chế các địa chỉ người gửi trên chuỗi nguồn được tin cậy khi một tin nhắn đến.
Đặt các thiết bị này ở cả hai đầu trước khi kiểm tra. Nguồn phải tin tưởng người gửi và chuỗi. Địa chỉ đích cũng phải được thêm vào danh sách cho phép để gửi.
2. Gửi tin nhắn
sendMessagePayLINK(selector, receiver, text): Gửi tin nhắn và thanh toán phí CCIP bằng LINK. Điều này tạo ra một tin nhắn, trích dẫn phí, kiểm tra số dư LINK, phê duyệt Router và sau đó thực thi ccipSend. Khi hoàn tất, nó sẽ trả về một ID duy nhất liên quan đến tin nhắn đã gửi.
sendMessagePayNative(selector, receiver, text): Gửi tin nhắn và thanh toán phí CCIP bằng token gốc. Điều này tạo ra một tin nhắn, trích dẫn phí, kiểm tra số dư gốc và sau đó thực thi ccipSend(value: fees). Sau khi hoàn tất, nó trả về một ID duy nhất liên quan đến tin nhắn đã gửi.
3. Xây dựng thông điệp
_buildCCIPMessage(người nhận, văn bản, địa chỉ token phí) -> EVM2AnyMessage
- Mã hóa người nhận và văn bản
- Không gửi bất kỳ token nào (tokenAmounts trống)
- Sử dụng GenericExtraArgsV2 để đóng gói các tham số bổ sung (extraArgs) với giới hạn gas có thể cấu hình (gasLimit).
- Đặt feeToken thành LINK hoặc địa chỉ (0) cho giao dịch gốc.
4. Nhận tin nhắn
CCIP gọi hàm _ccipReceive(...) trên chuỗi đích. Hợp đồng:
- Xác thực chuỗi nguồn và người gửi so với danh sách cho phép.
- Giải mã chuỗi
- Lưu trữ nó như là gói dữ liệu cuối cùng nhận được.
- Gửi thông báo đã nhận
- Đọc lại dữ liệu tin nhắn đến cuối cùng bằng cách sử dụng: getLastReceivedMessageDetails() -> (messageId, text)
Biên dịch các hợp đồng thông minh
Để biên dịch các hợp đồng thông minh của bạn, hãy chạy:
forge build
Triển khai hợp đồng thông minh
Cài đặt ví của bạn làm trình triển khai
Trước khi có thể triển khai hợp đồng thông minh của bạn lên mạng lưới, bạn cần thiết lập một ví để sử dụng làm ví triển khai. Để thực hiện điều này, bạn có thể sử dụng lệnh cast wallet import để nhập khóa riêng tư của ví vào kho khóa được mã hóa an toàn của Foundry:
cast wallet import deployer --interactive
Sau khi chạy lệnh trên, bạn sẽ được yêu cầu nhập khóa riêng tư của mình, cũng như mật khẩu để ký giao dịch.
Để xác nhận rằng ví đã được nhập vào tài khoản triển khai trong dự án Foundry của bạn, hãy chạy:
cast wallet list
Cấu hình biến môi trường
Để thiết lập môi trường của bạn, hãy tạo một tệp .env trong thư mục gốc của dự án, sau đó thêm các URL RPC, CCIP chain selectors, CCIP router addresses, và LINK token addresses cho cả Kairos Testnet và Ethereum Sepolia:
KAIROS_RPC_URL="https://public-en-kairos.node.kaia.io"ETH_SEPOLIA_RPC_URL="https://ethereum-sepolia-rpc.publicnode.com"KAIROS_CHAIN_SELECTOR=2624132734533621656ETH_SEPOLIA_CHAIN_SELECTOR=16015286601757825753KAIROS_ROUTER_ADDRESS="0x41477416677843fCE577748D2e762B6638492755"ETH_SEPOLIA_ROUTER_ADDRESS="0x0BF3dE8c5D3e8A2B34D2BEeB17ABfCeBaf363A59"KAIROS_LINK_ADDRESS="0xAF3243f975afe2269Da8Ffa835CA3A8F8B6A5A36"ETH_SEPOLIA_LINK_ADDRESS="0x779877A7B0D9E8603169DdbD7836e478b4624789"
Sau khi tệp .env đã được tạo, hãy chạy lệnh sau để tải các biến môi trường vào phiên làm việc hiện tại của dòng lệnh:
source .env
Sau khi đã tổng hợp các hợp đồng thông minh và thiết lập môi trường, bạn đã sẵn sàng để triển khai các hợp đồng thông minh.
Để triển khai hợp đồng thông minh bằng Foundry, bạn có thể sử dụng lệnh forge create. Lệnh này yêu cầu bạn chỉ định hợp đồng thông minh mà bạn muốn triển khai, URL RPC của mạng mà bạn muốn triển khai lên, và tài khoản mà bạn muốn sử dụng để triển khai.
Triển khai hợp đồng Sender lên mạng thử nghiệm Kairos
Để triển khai hợp đồng thông minh Sender lên mạng thử nghiệm Kaia Kairos, hãy chạy lệnh sau:
forge create --rpc-url $KAIROS_RPC_URL --account deployer --broadcast src/Messenger.sol:Messenger --constructor-args $KAIROS_ROUTER_ADDRESS $KAIROS_LINK_ADDRESS
Khi được yêu cầu, hãy nhập mật khẩu mà bạn đã đặt trước đó khi nhập khóa riêng tư của ví.
Sau khi chạy lệnh trên, hợp đồng thông minh sẽ được triển khai trên mạng thử nghiệm Kairos. Bạn có thể xem trạng thái triển khai và hợp đồng bằng cách sử dụng Kaiascan block explorer.
Kích hoạt hợp đồng của bạn để gửi tin nhắn CCIP đến Hợp đồng Nhận trên Ethereum Sepolia.
Đầu tiên, chúng ta cần cập nhật trạng thái danh sách cho phép (allowlist) của chuỗi đích (destination chain) cho các giao dịch. Để thực hiện điều này, hãy chạy lệnh sau:
cast send `SENDER_DEPLOYED_ADDRESS` --rpc-url $KAIROS_RPC_URL "allowlistDestinationChain(uint64, bool)" $ETH_SEPOLIA_CHAIN_SELECTOR true --account deployer
Mã trên gọi hàm allowlistDestinationChain() để thiết lập trình chọn chuỗi đích được phép trên hợp đồng Sender. Mỗi bộ chọn chuỗi được tìm thấy trong CCIP Directory.
Triển khai hợp đồng Receiver lên Ethereum Sepolia
Để triển khai hợp đồng thông minh Receiver lên mạng Ethereum Sepolia, hãy chạy lệnh sau:
forge create --rpc-url $ETH_SEPOLIA_RPC_URL --account deployer --broadcast src/Messenger.sol:Messenger --constructor-args $ETH_SEPOLIA_ROUTER_ADDRESS $ETH_SEPOLIA_LINK_ADDRESS
Khi được yêu cầu, hãy nhập mật khẩu mà bạn đã đặt trước đó khi nhập khóa riêng tư của ví.
Sau khi thực thi lệnh trên, hợp đồng sẽ được triển khai trên Ethereum Sepolia. Bạn có thể xem trạng thái triển khai và hợp đồng bằng cách sử dụng trình khám phá khối ETH Sepolia (https://sepolia.etherscan.io/).
Kích hoạt hợp đồng của bạn để nhận các tin nhắn CCIP từ Hợp đồng Người gửi trên mạng thử nghiệm Kairos.
Đầu tiên, chúng ta cần cập nhật trạng thái danh sách cho phép (allowlist) của chuỗi nguồn (source chain) cho các giao dịch. Để thực hiện điều này, hãy chạy lệnh sau:
cast send `RECEIVER_DEPLOYED_ADDRESS` --rpc-url $ETH_SEPOLIA_RPC_URL "allowlistSourceChain(uint64, bool)" $KAIROS_CHAIN_SELECTOR true --account deployer
Mã trên gọi hàm allowlistSourceChain() để thiết lập trình chọn chuỗi nguồn được phép trên hợp đồng Receiver. Mỗi bộ chọn chuỗi được tìm thấy trong CCIP Directory.
Kích hoạt hợp đồng của bạn để nhận các tin nhắn CCIP từ hợp đồng Sender trên mạng thử nghiệm Kairos.
Để cập nhật trạng thái danh sách cho phép của người gửi cho các giao dịch, hãy chạy lệnh sau:
cast send `RECEIVER_DEPLOYED_ADDRESS` --rpc-url $ETH_SEPOLIA_RPC_URL "allowlistSender(address, bool)" 0x12798F1E2013A110E3C8B23aC1f36c00B8DFD4d9 true --account deployer
Tại thời điểm này, bạn có một hợp đồng người gửi trên Kairos Testnet và một hợp đồng người nhận trên Ethereum Sepolia. Như một phần của các biện pháp bảo mật, bạn đã kích hoạt hợp đồng người gửi để gửi tin nhắn CCIP đến Ethereum Sepolia và hợp đồng người nhận để nhận tin nhắn CCIP từ người gửi và Kairos Testnet.
Tài trợ cho các hợp đồng thông minh của bạn
Để thanh toán các khoản phí liên quan đến việc gửi tin nhắn, hợp đồng Sender cần phải có số dư LINK tokens, ETH và KAIA nếu gửi dữ liệu và thanh toán bằng các token gốc.
LIÊN KẾT
Nạp tiền vào hợp đồng trực tiếp từ ví của bạn, hoặc bằng cách chạy lệnh cast sau:
cast send $KAIROS_LINK_ADDRESS --rpc-url $KAIROS_RPC_URL "transfer(address,uint256)" `SENDER_DEPLOYED_ADDRESS` 5000000000000000000 --account deployer
Lệnh trên gửi 5 token LINK trên mạng thử nghiệm Kairos Testnet đến hợp đồng Sender.
Thay thế SENDER_DEPLOYED_ADDRESS bằng địa chỉ hợp đồng của hợp đồng Sender đã được triển khai của bạn trước khi thực thi lệnh cast được cung cấp.
Tương tác với hợp đồng thông minh
Trong phần này, bạn sẽ tương tác với các hợp đồng thông minh đã được triển khai và gọi các hàm của chúng bằng công cụ dòng lệnh Foundry cast.
Gửi dữ liệu và thanh toán bằng LINK
Trong bước này, bạn sẽ sử dụng CCIP để gửi tin nhắn và ph�í sử dụng CCIP sẽ được thanh toán bằng LINK.
Để thực hiện điều này, bạn sử dụng lệnh cast để gọi hàm sendMessagePayLINK(uint64, address, string) trên hợp đồng Sender được triển khai trên Kairos Testnet nhằm gửi dữ liệu tin nhắn đến hợp đồng Receiver trên Ethereum Sepolia.
Để gọi hàm sendMessagePayLINK(uint64, address, string) của hợp đồng thông minh Sender, hãy thực thi:
cast send `SENDER_DEPLOYED_ADDRESS` --rpc-url $KAIROS_RPC_URL "sendMessagePayLINK(uint64, address, string)" $ETH_SEPOLIA_CHAIN_SELECTOR `RECEIVER_DEPLOYED_ADDRESS` "gKaia builders" --account deployer
Lệnh trên gọi hàm sendMessagePayLINK(uint64, address, string) để gửi một tin nhắn. Các tham số được truyền vào phương thức bao gồm: Bộ chọn chuỗi đến chuỗi đích (Ethereum Sepolia), địa chỉ hợp đồng của người nhận và dữ liệu văn bản cần bao gồm trong tin nhắn (Hello Builders).
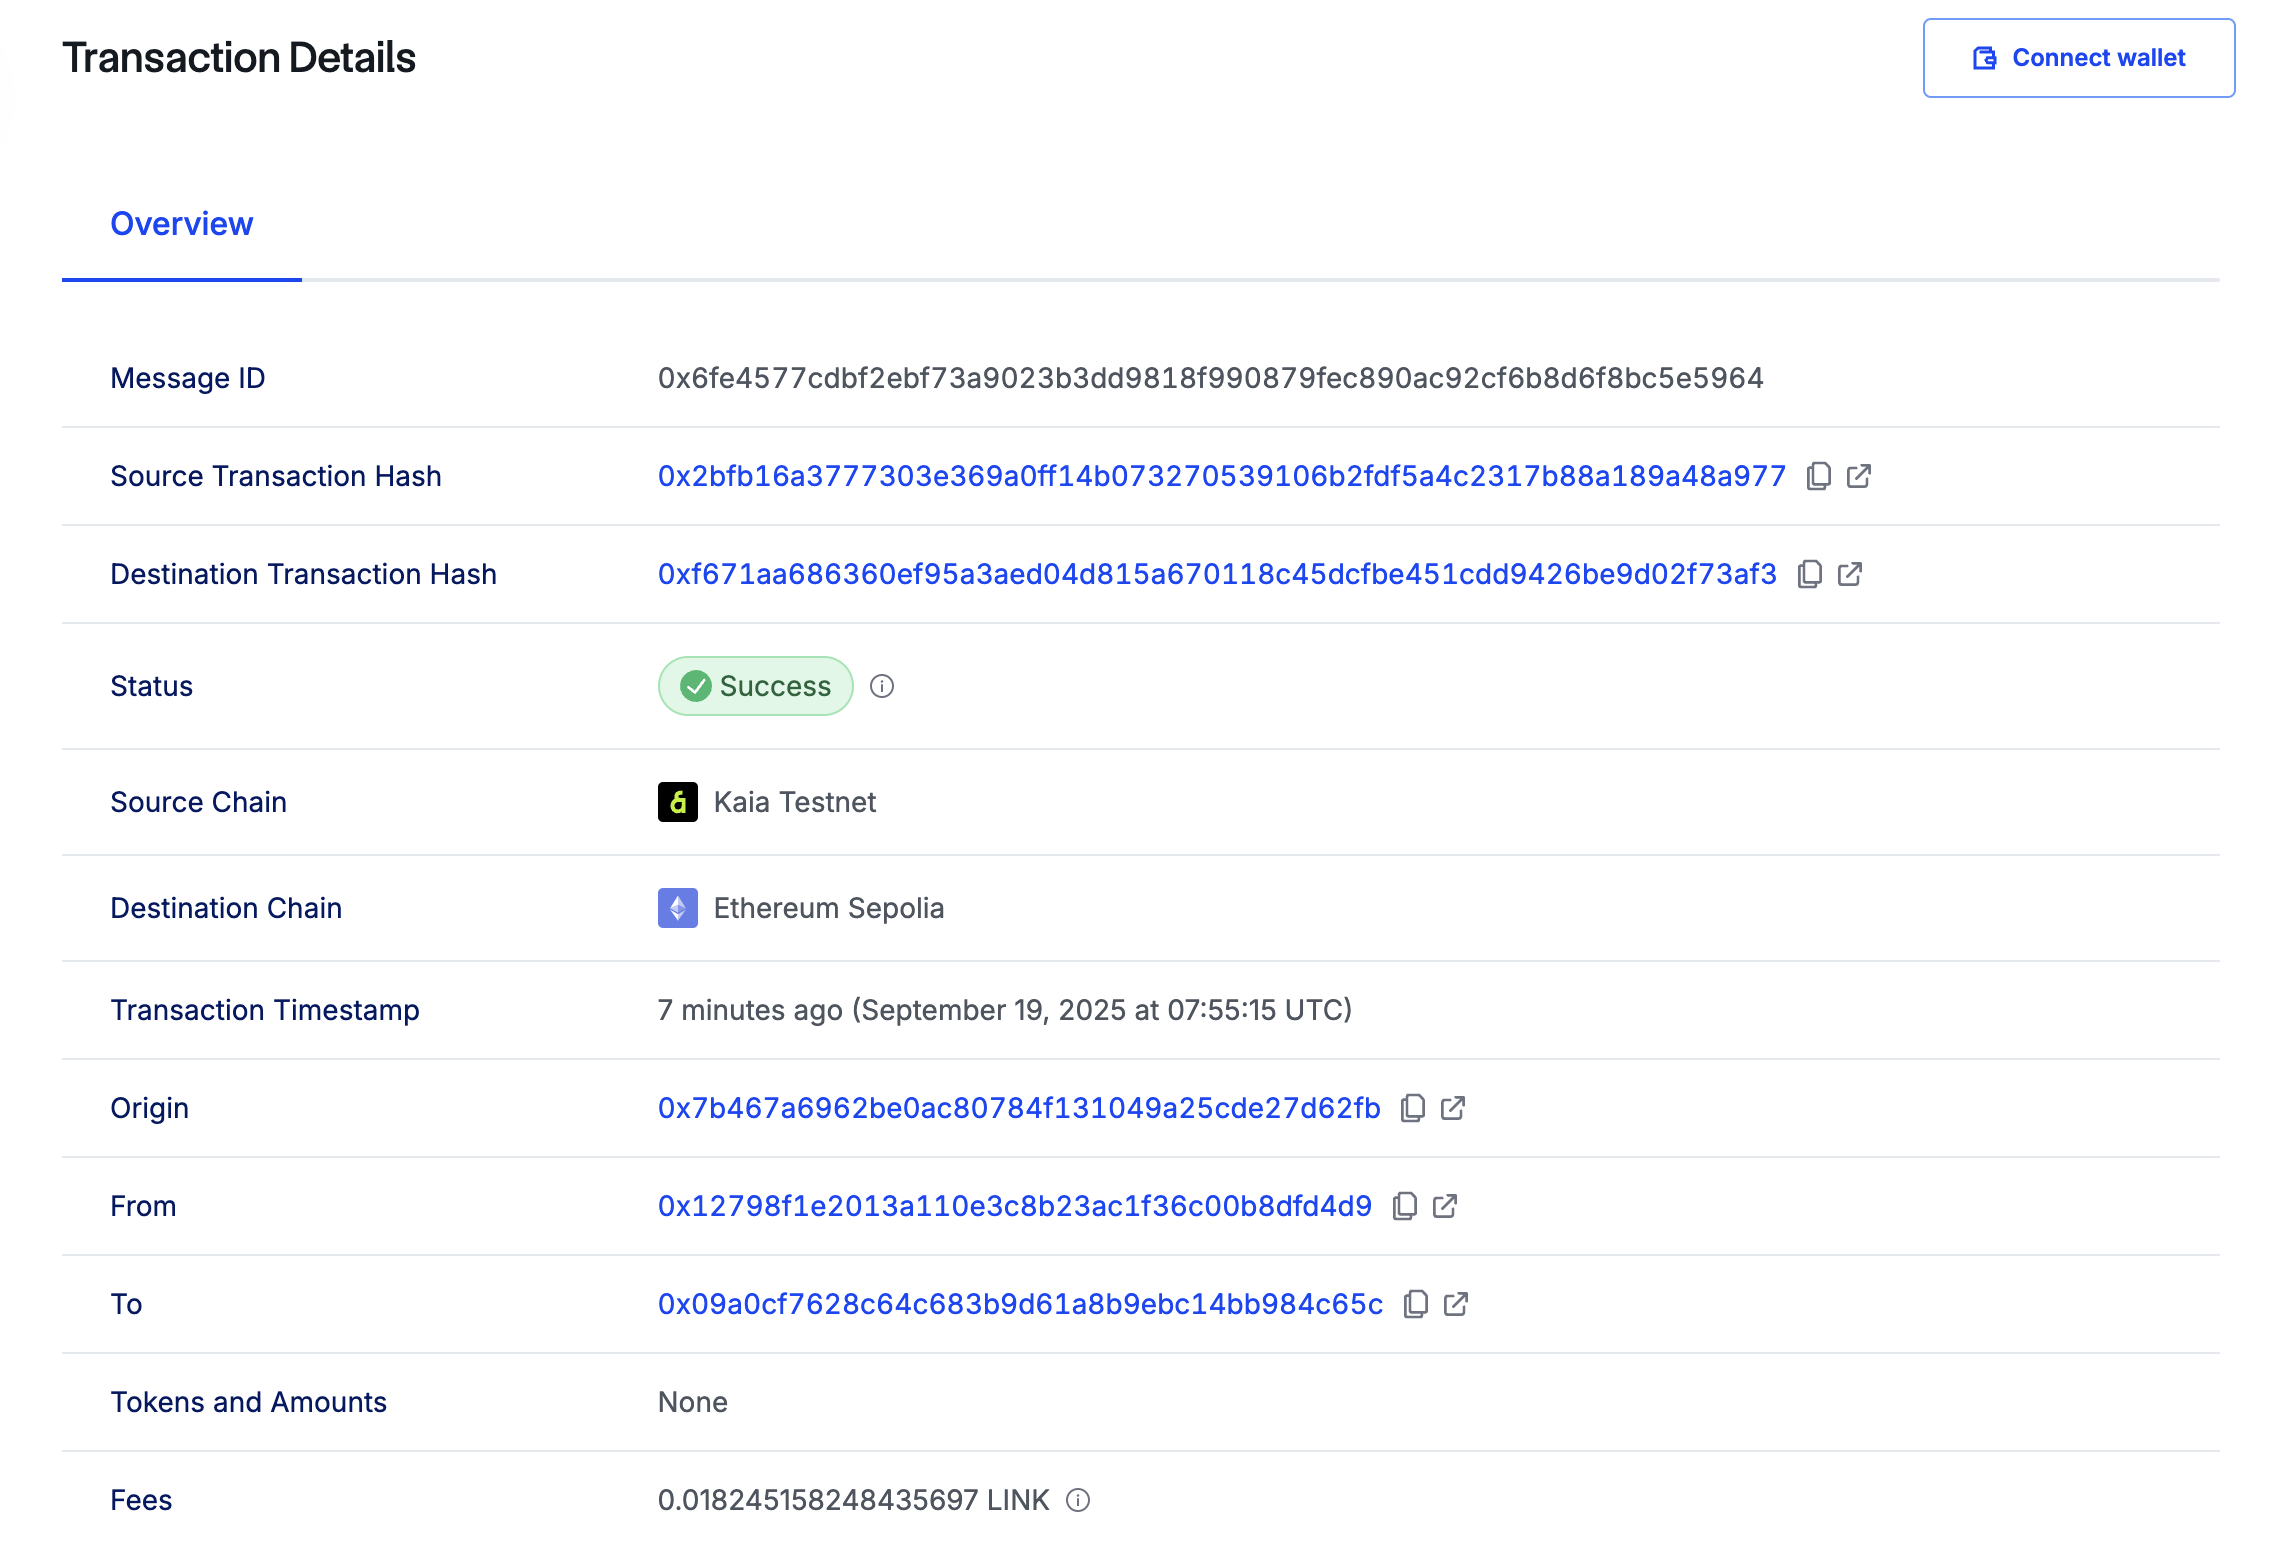
Sau khi thực thi lệnh, một mã thông báo duy nhất (messageId) nên được trả về.
Sau khi giao dịch được hoàn tất, sẽ mất vài phút để CCIP chuyển dữ liệu đến Ethereum Sepolia và gọi hàm ccipReceive trên hợp đồng Receiver. Để xác minh giao dịch chuỗi chéo của bạn, hãy mở CCIP explorer và tìm kiếm bằng cách sử dụng mã giao dịch.
Bước tiếp theo là kiểm tra hợp đồng nhận hàng trên chuỗi đích. Để thực hiện điều này, bạn sẽ gọi phương thức getLastReceivedMessageDetails() bằng cách chạy lệnh sau:
cast call `RECEIVER_DEPLOYED_ADDRESS` --rpc-url $ETH_SEPOLIA_RPC_URL "getLastReceivedMessageDetails()"
Thay thế RECEIVER_DEPLOYED_ADDRESS bằng địa chỉ hợp đồng của hợp đồng Receiver đã được triển khai của bạn trước khi thực thi lệnh cast được cung cấp.
Bạn nên thấy văn bản đã nhận và ID tin nhắn được trả về dưới dạng dữ liệu hex như sau:
0x6fe4577cdbf2ebf73a9023b3dd9818f990879fec890ac92cf6b8d6f8bc5e59640000000000000000000000000000000000000000000000000000000000000040000000000000000000000000000000000000000000000000000000000000000e48656c6c6f206275696c64657273000000000000000000000000000000000000
Để chuyển đổi dữ liệu hex sang chuỗi, đặc biệt là cho văn bản nhận được, hãy chạy lệnh sau:
cast to-utf8 e48656c6c6f206275696c64657273000000000000000000000000000000000000
Bây giờ bạn sẽ thấy Hello builders, có nghĩa là hành động chuỗi chéo của chúng ta đã thành công.
Các hợp đồng mẫu này được thiết kế để hoạt động hai chiều. Bạn có thể sử dụng chúng để chuyển dữ liệu từ Kairos Testnet sang Ethereum Sepolia và từ Ethereum Sepolia trở lại Kairos Testnet.
Gửi dữ liệu và thanh toán bằng tiền tệ địa phương
Trong phần này, bạn sẽ gửi tin nhắn văn bản với CCIP và thanh toán phí bằng token gốc. Bạn sẽ chuyển từ Ethereum Sepolia sang Kaia (Kairos Testnet). Điều này đảo ngược hướng ban đầu, do đó hợp đồng Sepolia đóng vai trò là người gửi và hợp đồng Kairos đóng vai trò là người nhận.
Đầu tiên, chúng ta cần nạp tiền vào hợp đồng người gửi bằng ETH trên Ethereum Sepolia. Để thực hiện điều này, hãy chạy lệnh cast sau:
cast send --rpc-url $ETH_SEPOLIA_RPC_URL `SENDER_DEPLOYED_ADDRESS` --value 300000000000000000 --account deployer
Điều này sẽ chuyển 0.3 ETH trên Ethereum Sepolia đến hợp đồng của người gửi.
Thay thế SENDER_DEPLOYED_ADDRESS bằng địa chỉ hợp đồng của người gửi.
Tiếp theo là cho phép chuỗi đích từ hợp đồng người gửi trên Ethereum Sepolia. Để thực hiện điều này, hãy chạy lệnh sau:
cast send `SENDER_DEPLOYED_ADDRESS` --rpc-url $ETH_SEPOLIA_RPC_URL "allowlistDestinationChain(uint64, bool)" $KAIROS_CHAIN_SELECTOR true --account deployer
Bước tiếp theo là cho phép chuỗi nguồn từ hợp đồng nhận trên Kairos Testnet. Để thực hiện điều này, hãy chạy lệnh sau:
cast send `RECEIVER_DEPLOYED_ADDRESS` --rpc-url $KAIROS_RPC_URL "allowlistSourceChain(uint64, bool)" $ETH_SEPOLIA_CHAIN_SELECTOR true --account deployer
Sau đó, thực thi hàm allowlistSender trên hợp đồng receiver trên mạng thử nghiệm Kairos bằng cách chạy lệnh sau:
cast send `RECEIVER_DEPLOYED_ADDRESS` --rpc-url $KAIROS_RPC_URL "allowlistSender(address, bool)" 0x09a0CF7628c64c683B9d61a8B9EBc14BB984c65c true --account deployer
Sau khi đã kết nối các hợp đồng của bạn với nhau, bạn có thể chạy lệnh này để gửi dữ liệu đến hợp đồng nhận:
cast send `SENDER_DEPLOYED_ADDRESS` --rpc-url $ETH_SEPOLIA_RPC_URL "sendMessagePayNative(uint64, address, string)" $KAIROS_CHAIN_SELECTOR 0x12798F1E2013A110E3C8B23aC1f36c00B8DFD4d9 "gKaia Builders" --account deployer
Lệnh trên gọi hàm sendMessagePayNative(uint64, address, string) để gửi một tin nhắn. Các tham số được truyền vào phương thức bao gồm: Bộ chọn chuỗi đến chuỗi đích (Kairos Testnet), địa chỉ hợp đồng của người nhận và dữ liệu văn bản cần bao gồm trong tin nhắn (gKaia Builders).
Sau khi thực thi lệnh, một mã thông báo duy nhất (messageId) nên được trả về.
Sau khi giao dịch được hoàn tất, sẽ mất vài phút để CCIP chuyển dữ liệu đến Kairos Testnet và gọi hàm ccipReceive trên hợp đồng Receiver. Để xác minh giao dịch chuỗi chéo của bạn, hãy mở CCIP explorer và tìm kiếm bằng cách sử dụng mã băm giao dịch.

Bước tiếp theo là kiểm tra hợp đồng nhận hàng trên chuỗi đích. Để thực hiện điều này, bạn sẽ gọi phương thức getLastReceivedMessageDetails() bằng cách chạy lệnh sau:
cast call `RECEIVER_DEPLOYED_ADDRESS` --rpc-url $KAIROS_RPC_URL "getLastReceivedMessageDetails()"
Thay thế RECEIVER_DEPLOYED_ADDRESS bằng địa chỉ hợp đồng của hợp đồng nhận của bạn.
Bạn nên thấy văn bản đã nhận và ID tin nhắn được trả về dưới dạng dữ liệu hex như sau:
0xb4c00b6de96488f16868a8c12878d491a85c64173078650a8ffad8f67e759f800000000000000000000000000000000000000000000000000000000000000040000000000000000000000000000000000000000000000000000000000000000e674b616961206275696c64657273000000000000000000000000000000000000
Để chuyển đổi dữ liệu hex sang chuỗi, đặc biệt là cho văn bản nhận được, hãy chạy lệnh sau:
cast to-utf8 674b616961206275696c64657273000000000000000000000000000000000000
Bây giờ bạn nên thấy gKaia builders, có nghĩa là hành động chuỗi chéo của chúng ta đã thành công.
Kết luận
Trong hướng dẫn này, bạn đã học cách sử dụng Chainlink CCIP để gửi tin nhắn từ mạng thử nghiệm Kaia Kairos Testnet sang chuỗi Ethereum Sepolia và ngược lại. Để có hướng dẫn chi tiết hơn về Chainlink CCIP và cách thức hoạt động của nó, vui lòng tham khảo Tài liệu Chainlink CCIP.