How to verify Smart Contracts Using Block Explorers
Introduction
Usually, the deployer of a smart contract is the only party with access to the code that was actually deployed, and the public cannot read the source code of a contract until the deployer has verified it. However, this is where contract verification comes in as an important step in the smart-contract development cycle, as it helps improve the transparency (for users), convenience (for developers), and security of deployed contracts.
Tuy nhiên, sau khi hợp đồng thông minh được xác thực, các trình khám phá khối như Kaiascan và OKX Kaia Explorer cũng cho phép công chúng tương tác với các phương thức công khai của hợp đồng bằng giao diện người dùng của trình khám phá khối. This is in addition to the public having direct access to the verified contract source code.
In this guide, we'll take a look at how to use block explorers to verify deployed smart contracts on the Kaia Network.
Prerequisites
- Remix IDE and Kaia Wallet
- Enough test KAIA from faucet
Getting Started
Trong hướng dẫn này, chúng tôi sẽ xem xét cách xác minh cả hợp đồng đơn lẻ và hợp đồng nhiều phần trên trình khám phá khối có trong hệ sinh thái Kaia, cụ thể là:
Without further ado, let's get started!
Deploying a single Contract
To verify a smart contract, you need to deploy the contract first on the target network. Hence, for the sake of this guide, we will be deploying the contract to Kaia Kairos Testnet. Also, in this tutorial, we will be deploying a simple counter contract named Counter.sol on Remix IDE. The code is shown below:
// SPDX-License-Identifier: MITpragma solidity ^0.8.0;contract Counter { uint256 public count; constructor(uint256 _initialCount) { count = _initialCount; } function incrementCounter() public { count++; } function decrementCounter() public { count--; } function resetCounter() public { count = 0; }}
Parameters for single contract verification
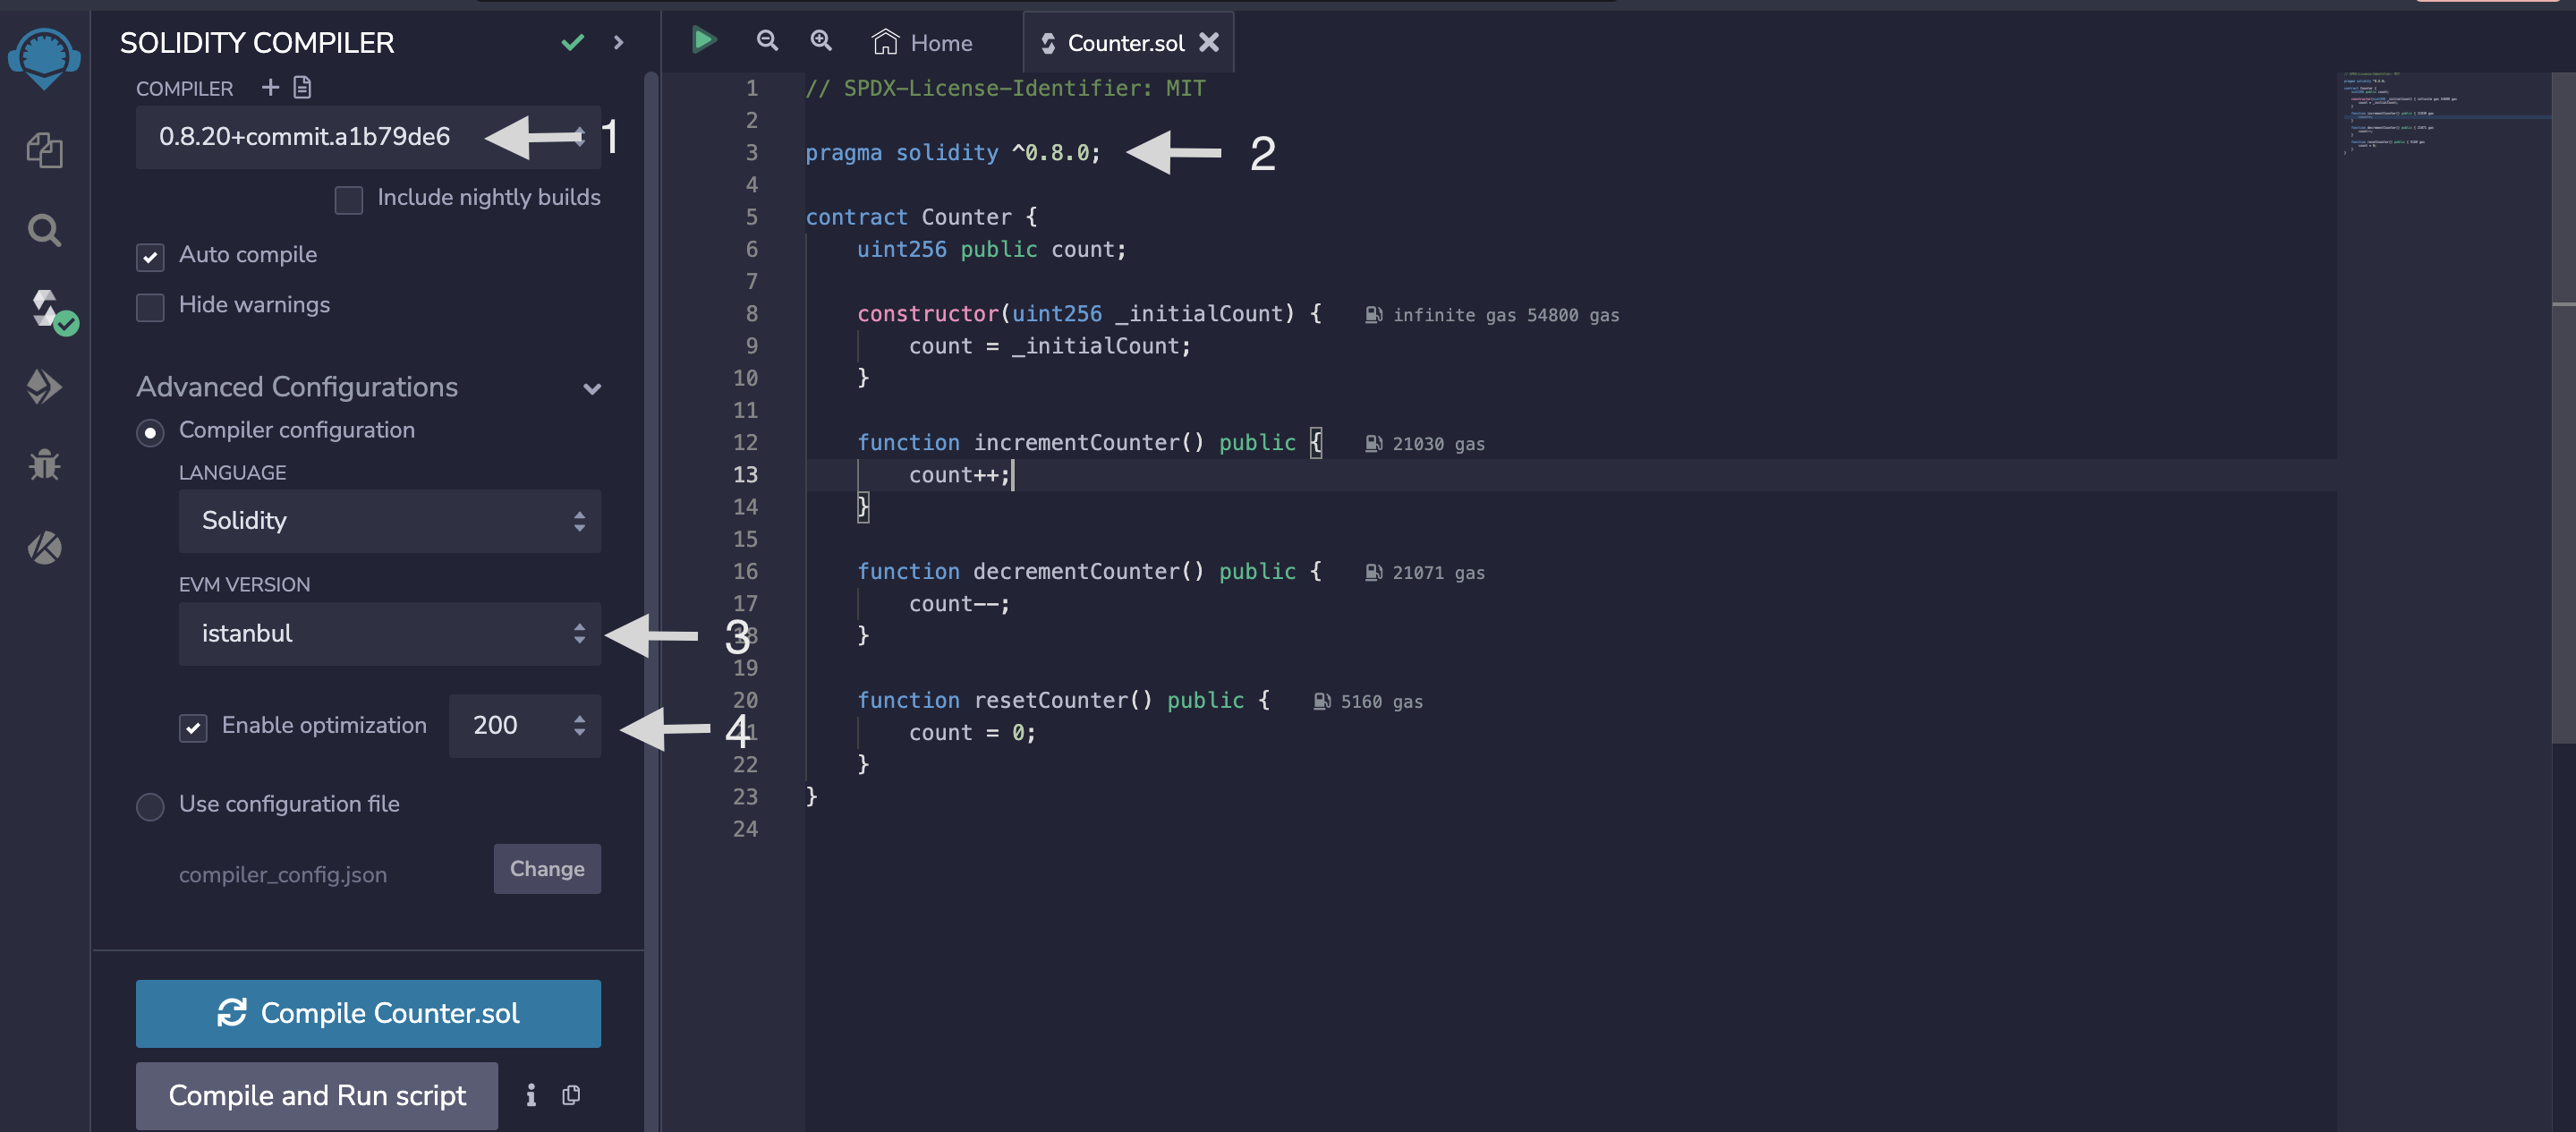
Verifying a contract on the block explorers requires some parameters, and these must be considered while deploying the smart contract. The following are some details related to the contract's compiler and deployment in order to verify a contract successfully:
Remix IDE :
-
On Remix IDE, navigate to the Solidity compiler tab.
- Observe the compiler version used to compile and deploy the contract.
- Observe the Open Source License Type used in the contract. This means the SPDX license identifier used at the beginning of the Solidity source file. In the
Counter.solfile we used// SPDX-License-Identifier: MIT - Observe the EVM version used for deploying contracts.
- (Optional) If optimization is enabled during compilation, take note of the value of the optimization runs parameter
-
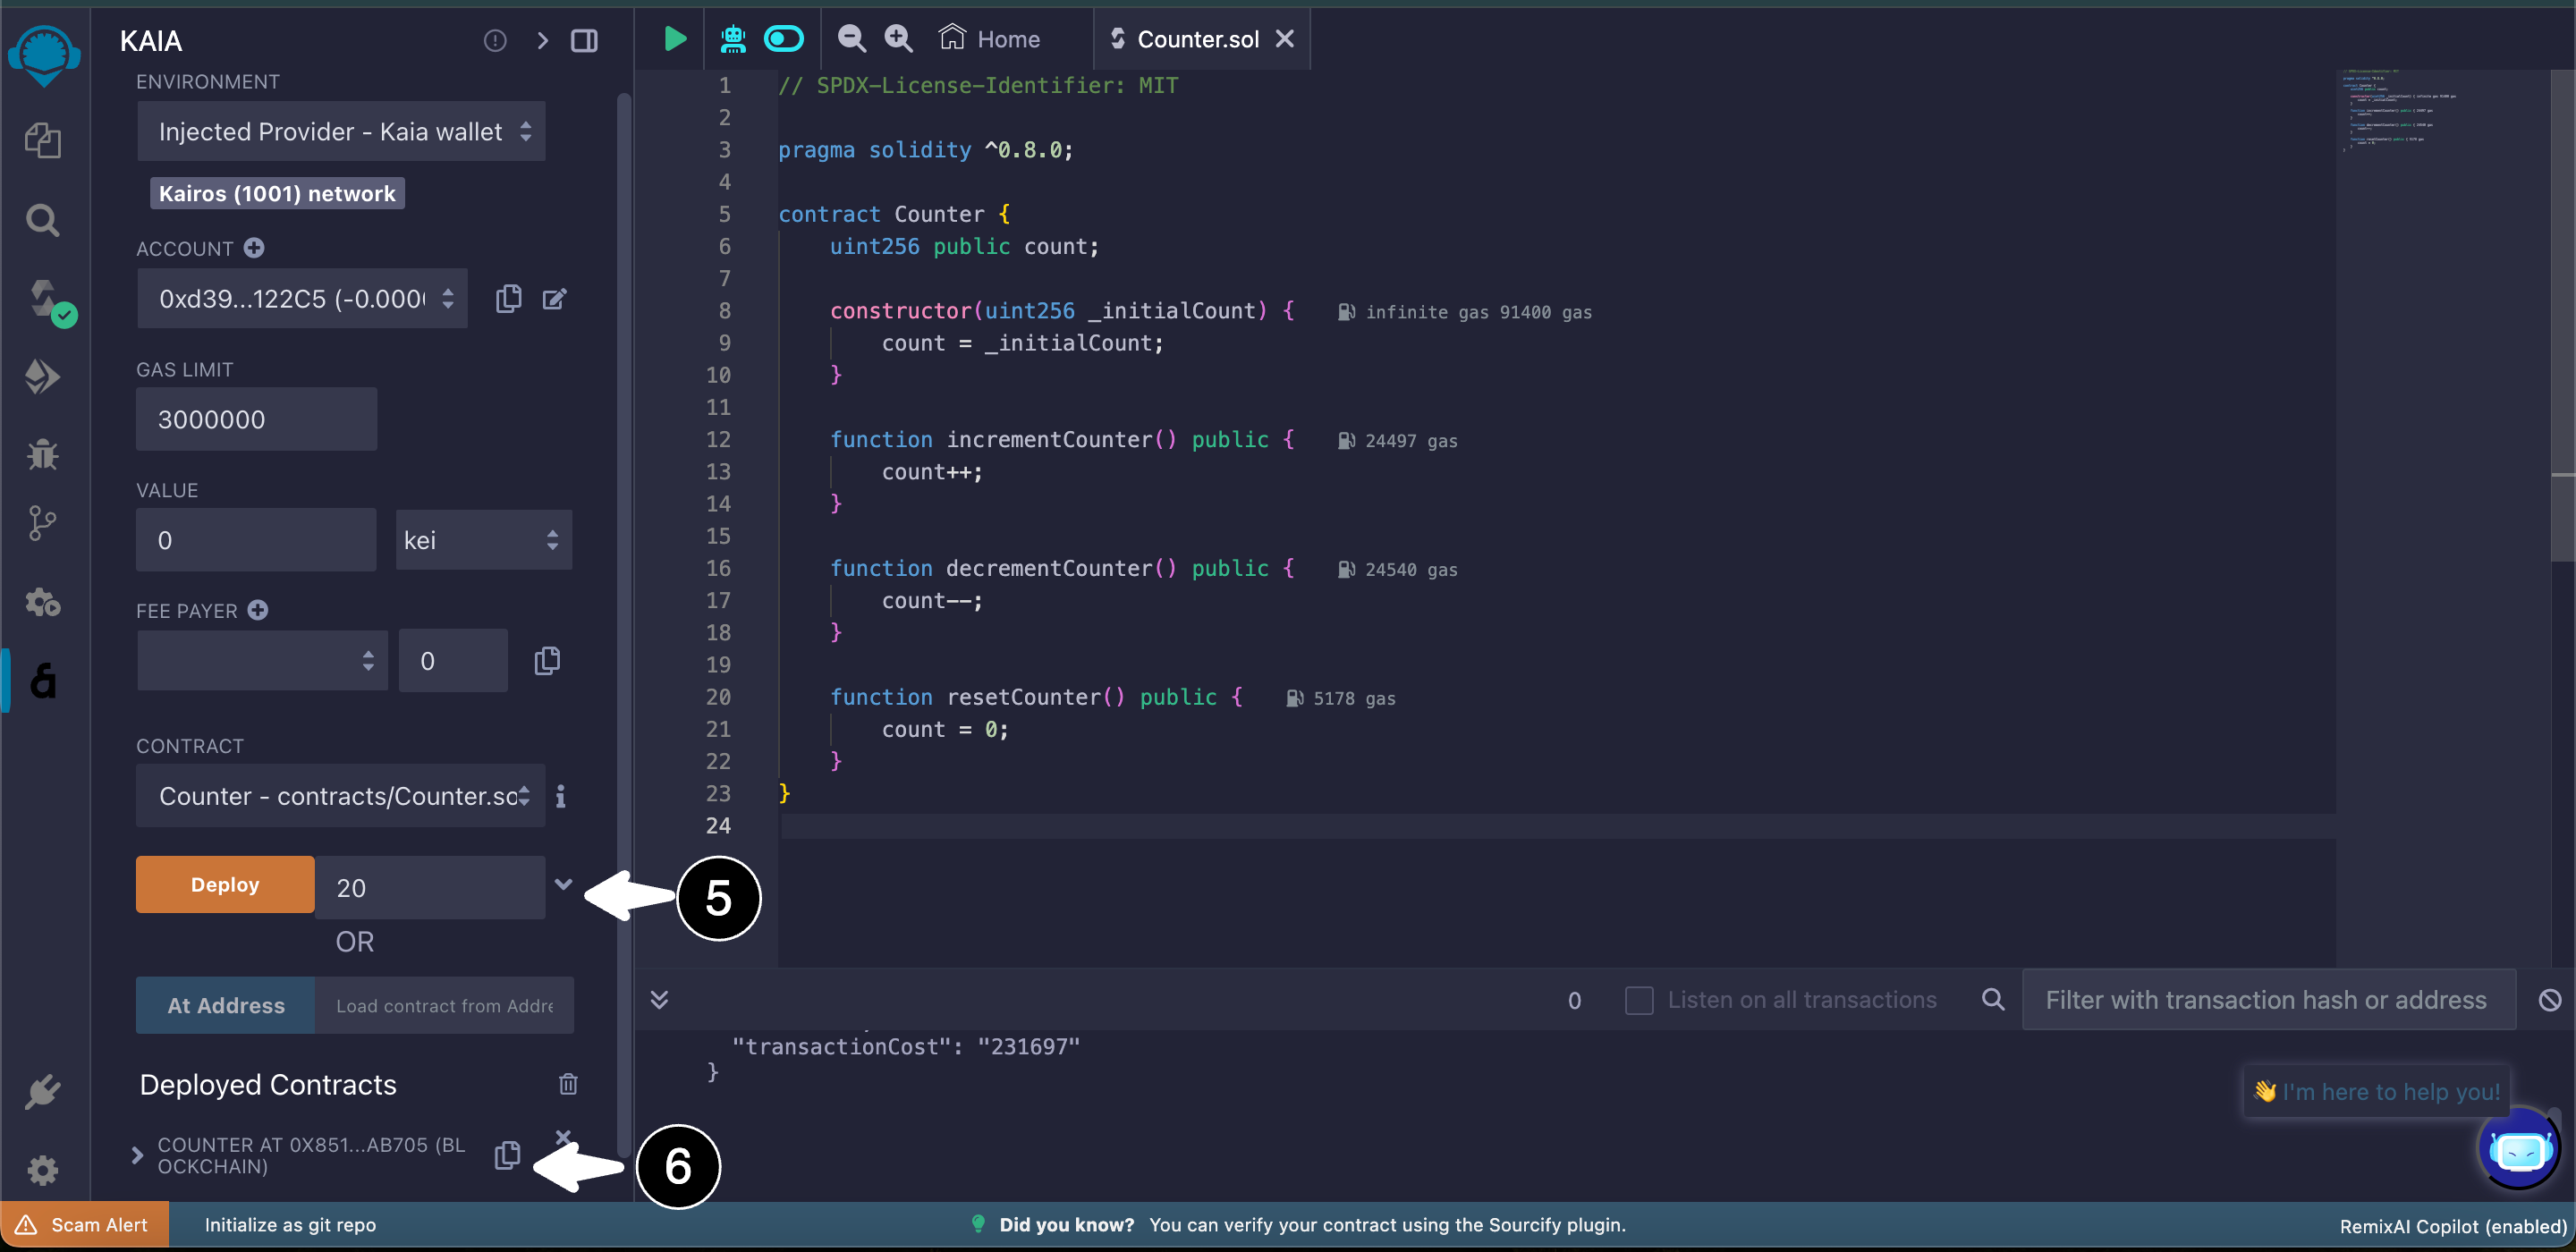
On Remix IDE, navigate to Kaia tab.
- (Optional) If the contract constructor method accepts arguments, take note of the ABI-encoded form of the constructor arguments
- Take note of the contract address of the smart contract on the Deployed Contracts tab after successful deployment.
Deploying a multi-part contract
It is important to note that deploying a multi-part contract involves the same steps as deploying a single contract. For the sake of this guide, we will be deploying a simple KIP7 airdrop contract named airdropToken.sol. The code is shown below:
//SPDX-License-Identifier: MITpragma solidity ^0.8.4;import "@kaiachain/contracts/KIP/token/KIP7/KIP7.sol";import "@kaiachain/contracts/access/Ownable.sol";// the creator of the project mints certian amount of fungible tokens directly to a certain selection of wallets.contract TokenAirdrop is KIP7, Ownable { constructor() KIP7("Token Aidrop Demo", "TAD") { } // Airdrop Token function airdropTokens(address[] calldata wAddresses, uint[] calldata tAmount) public onlyOwner { require(wAddresses.length == tAmount.length, "Must be same lenght"); for (uint256 i = 0; i < wAddresses.length; i++) { _mintSingleTokens(wAddresses[i], tAmount[i]); } } function _mintSingleTokens(address wAddress, uint amount) private { _mint(wAddress, amount); } function supportsInterface(bytes4 interfaceId) public view virtual override returns (bool) { return super.supportsInterface(interfaceId); }}
Parameters for multi-part contract verification
The parameters for verifying a multi-part contract are the same as those for a single contract. However, because they are made up of multiple dependent contracts, we need to pre-process all dependencies of the contract into a single solidity file. This preprocessing is usually referred to as smart contract flattening.
For this reason, we will have to flatten the contract so it can be verified using the new flattened Solidity file on the block explorer.
Remix IDE:
-
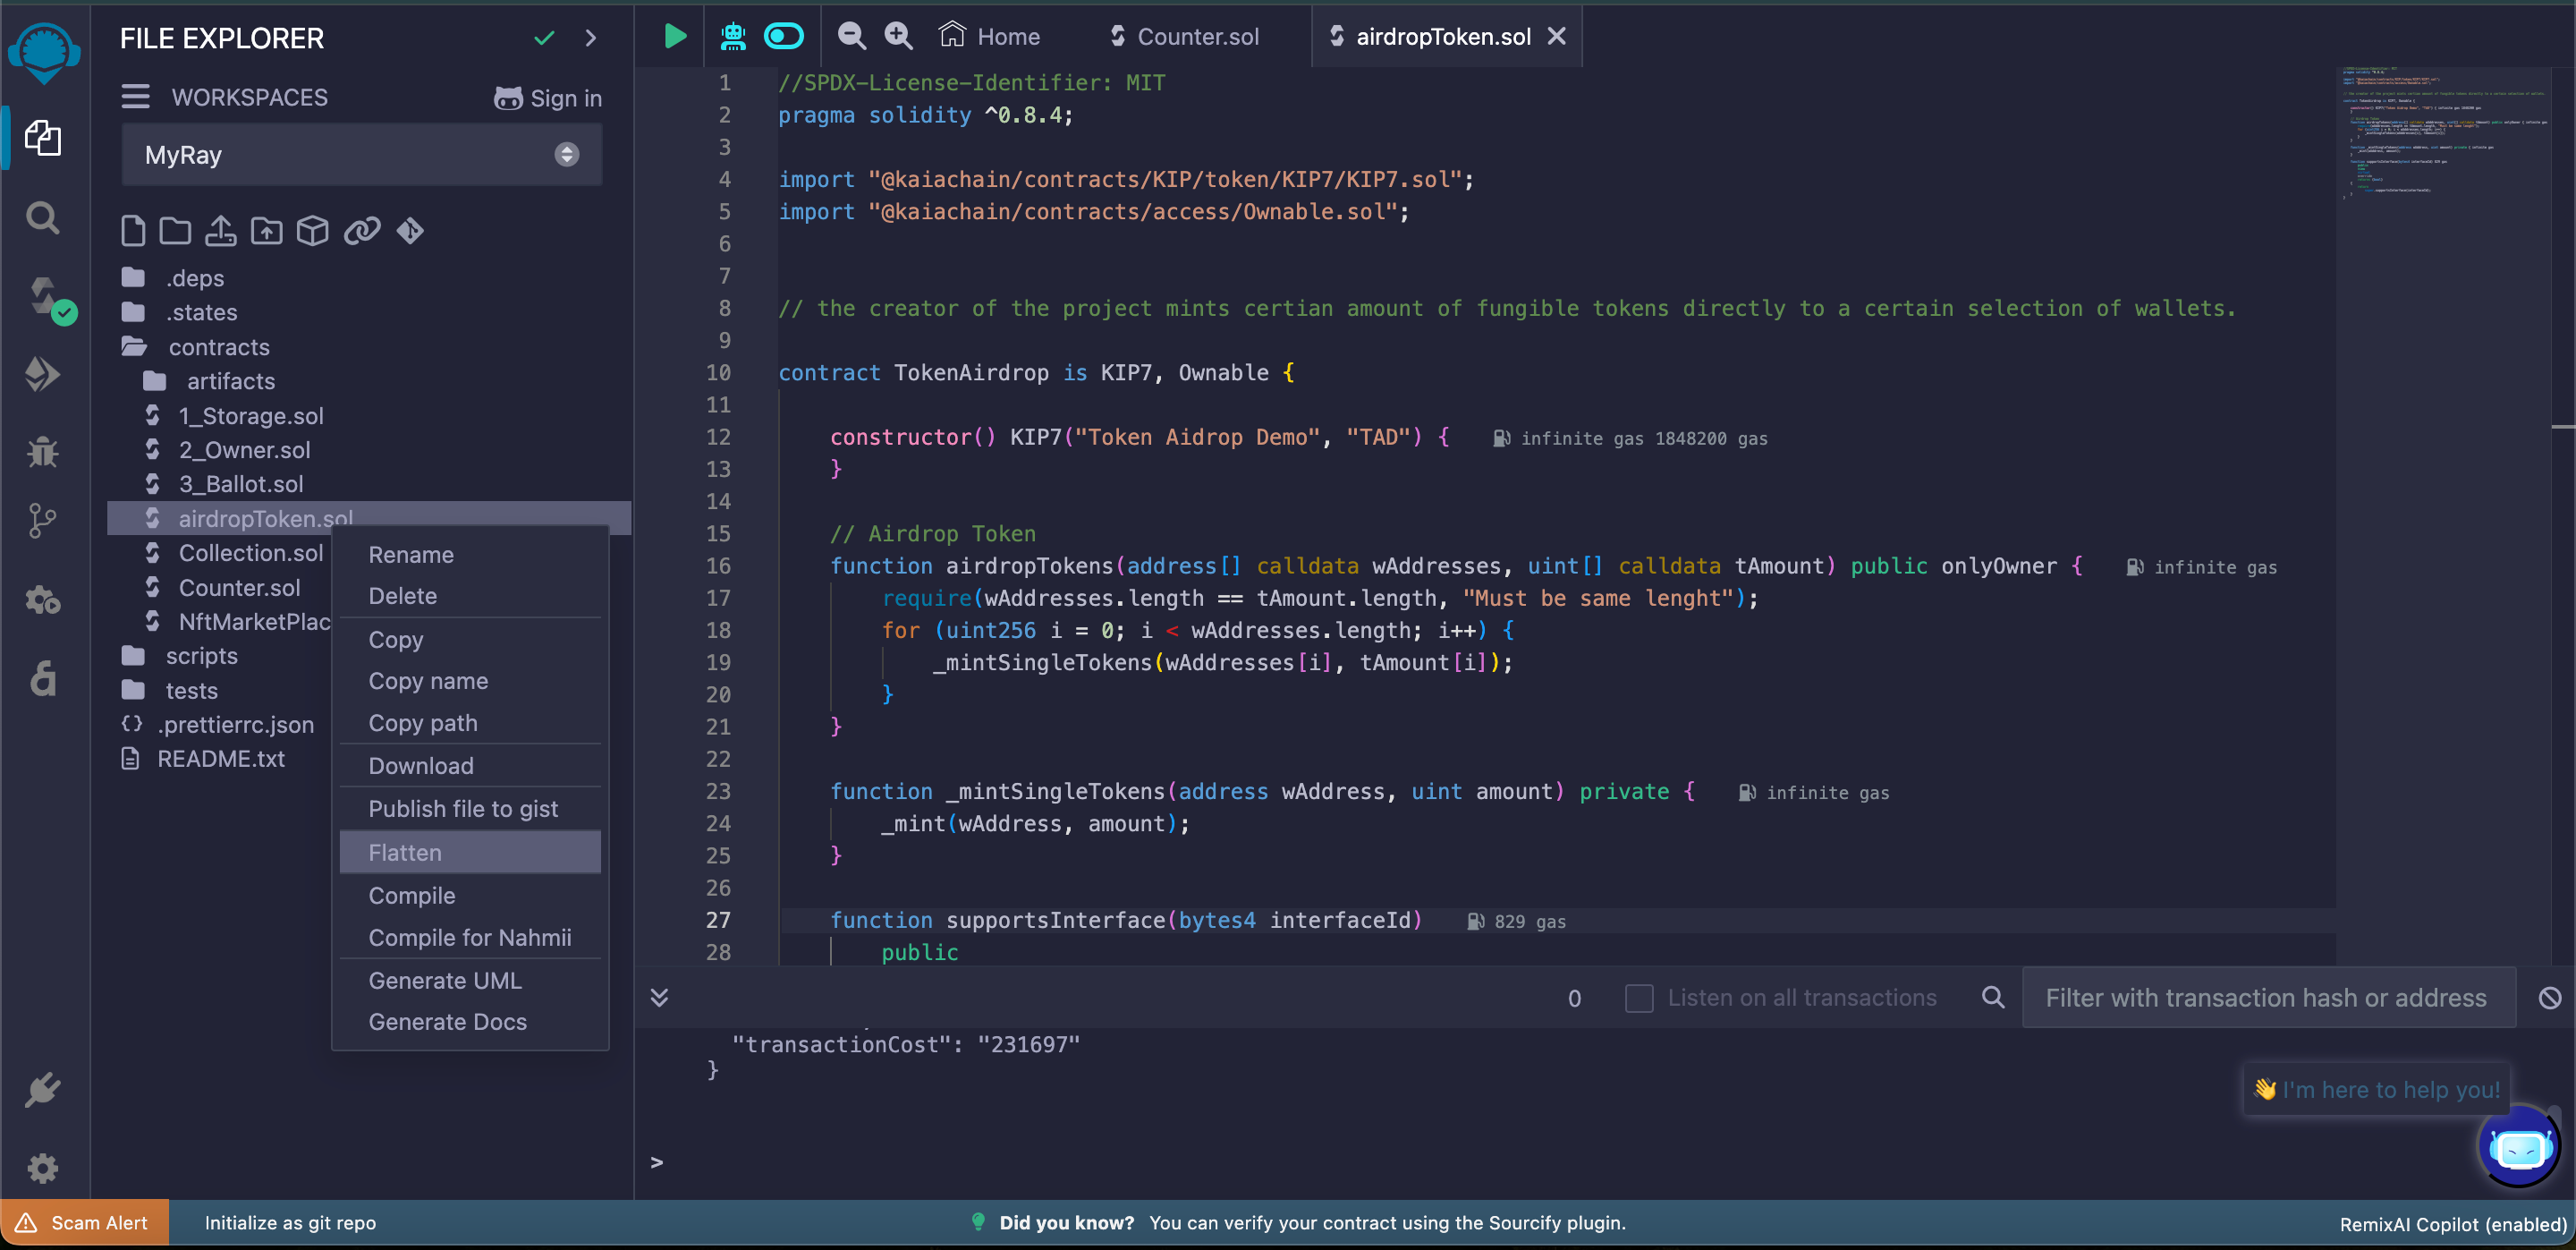
On Remix IDE, navigate to the File explorer tab.
- Select the newly created contract under the contracts folder
- Click or tap with two fingers to see all commands available on the contract.
- Select flatten
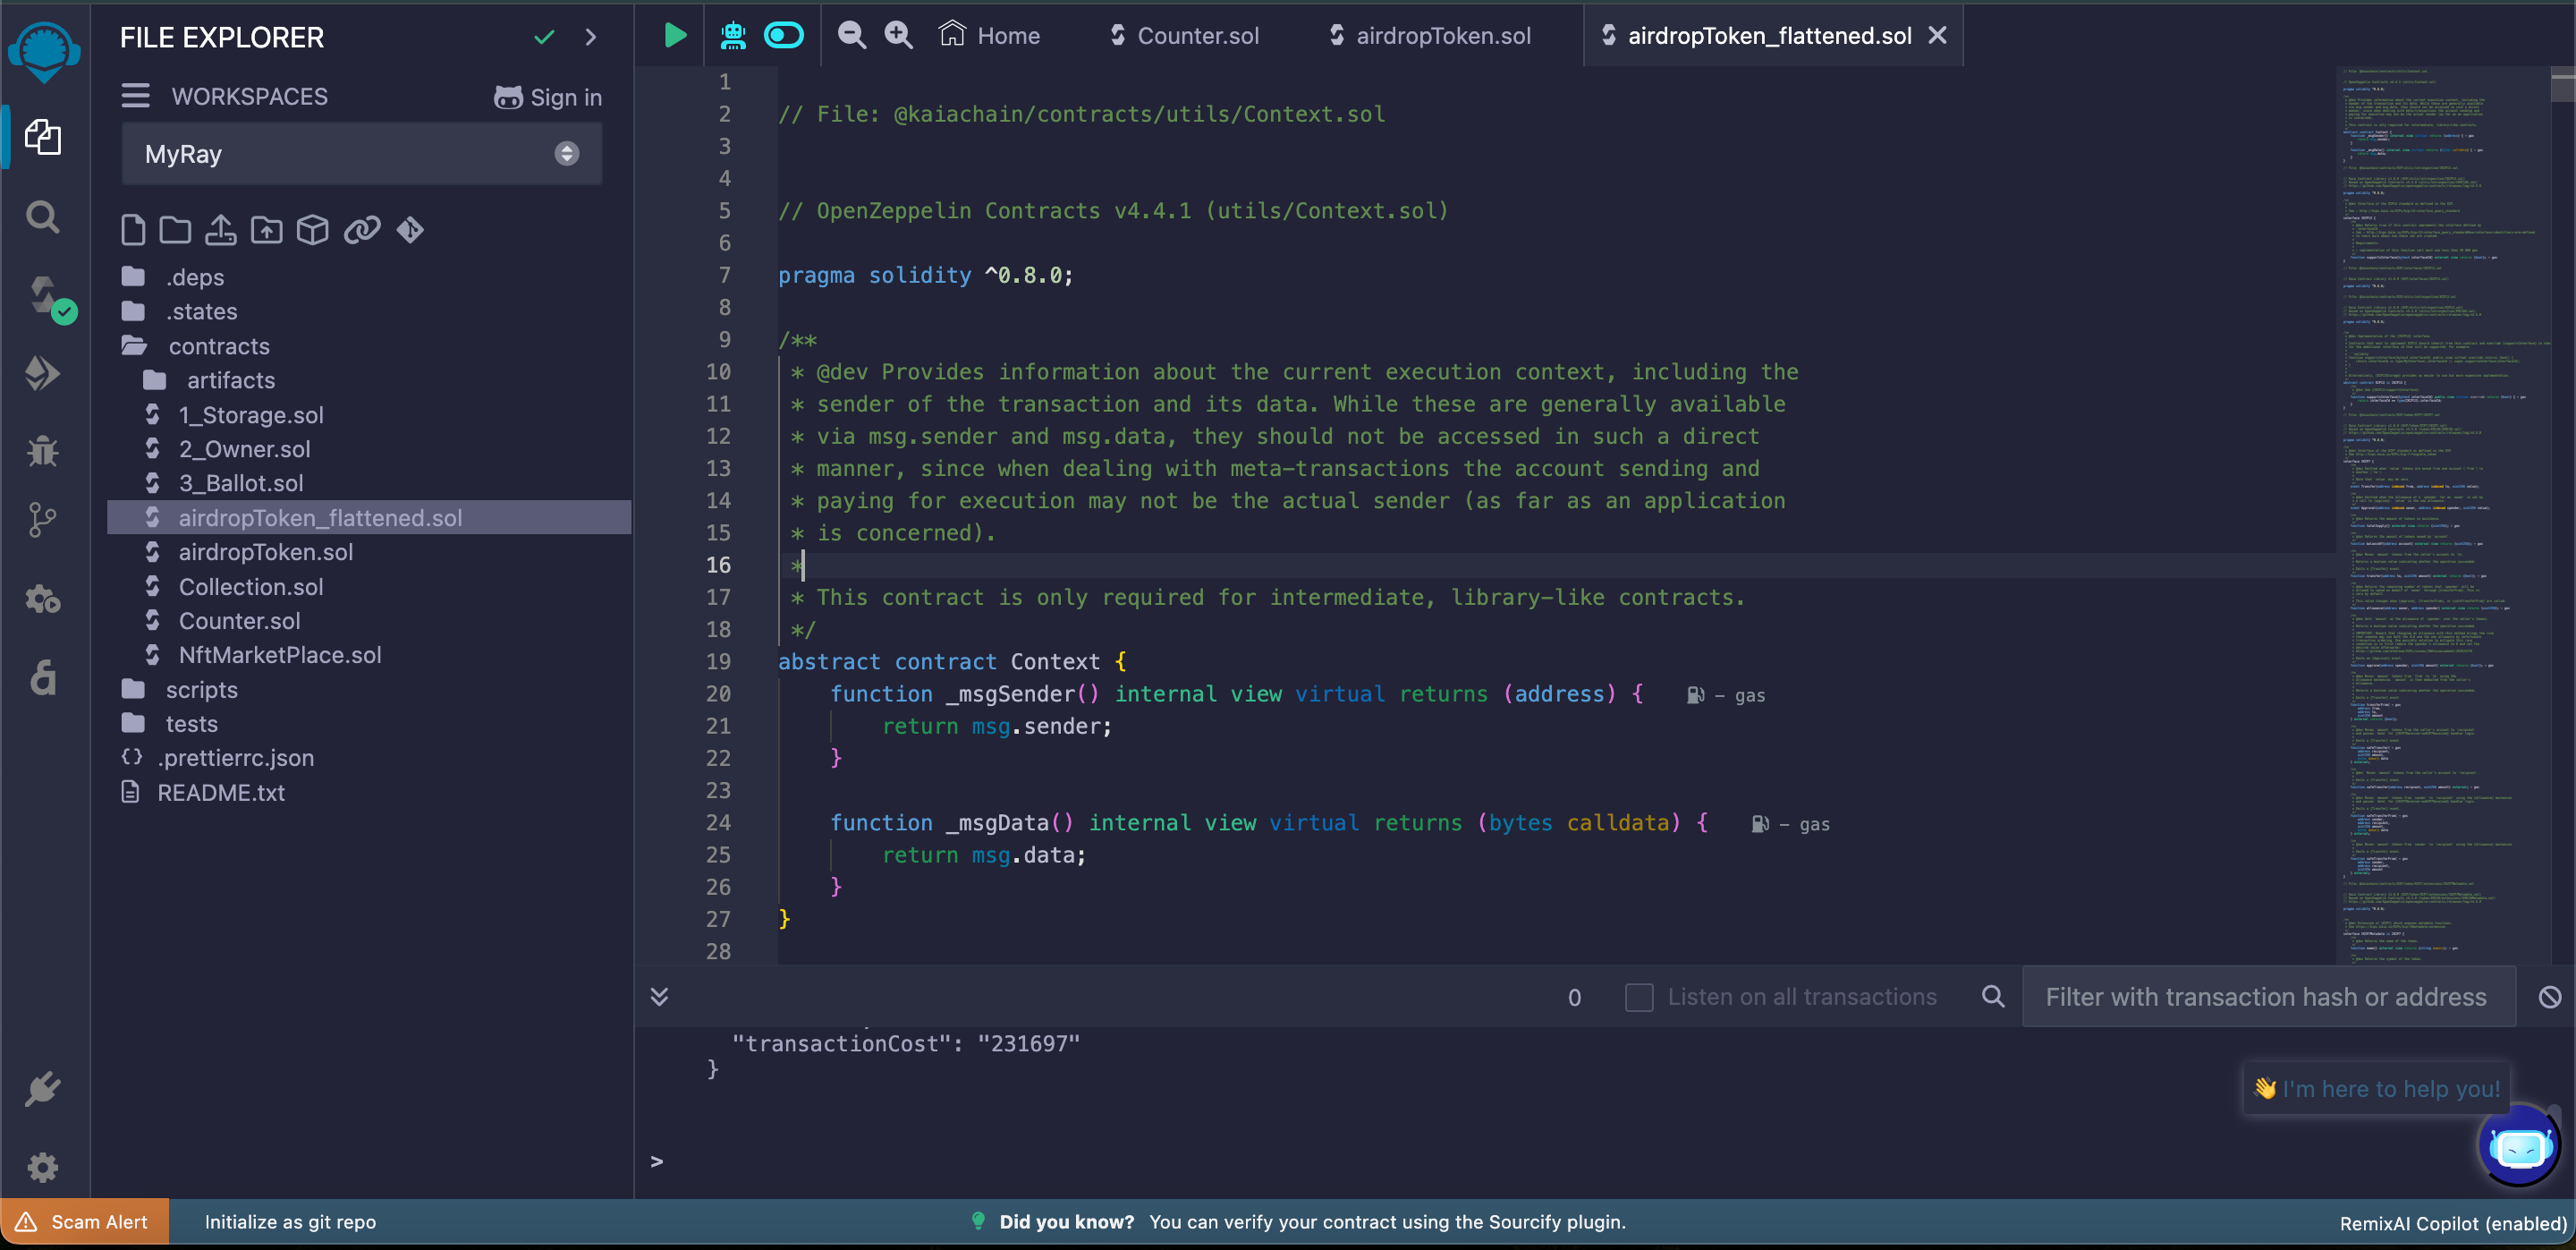
- Once the code is flattened, you will see a new contract named
airdropTokens_flattened.sol.
There are different tools for flattening a multi-part smart contract into a single Solidity file, such as Hardhat Flattener. Kindly refer to the respective smart contract flattening tool's documentation for more detailed instructions on its usage.
Verifying the Contract
Having obtained all of our verification parameters, we will go over the steps for verifying a single smart contract (Counter.sol) and a multi-part smart contract (airdropTokens.sol) on the block explorer in this section.
Kaiascan
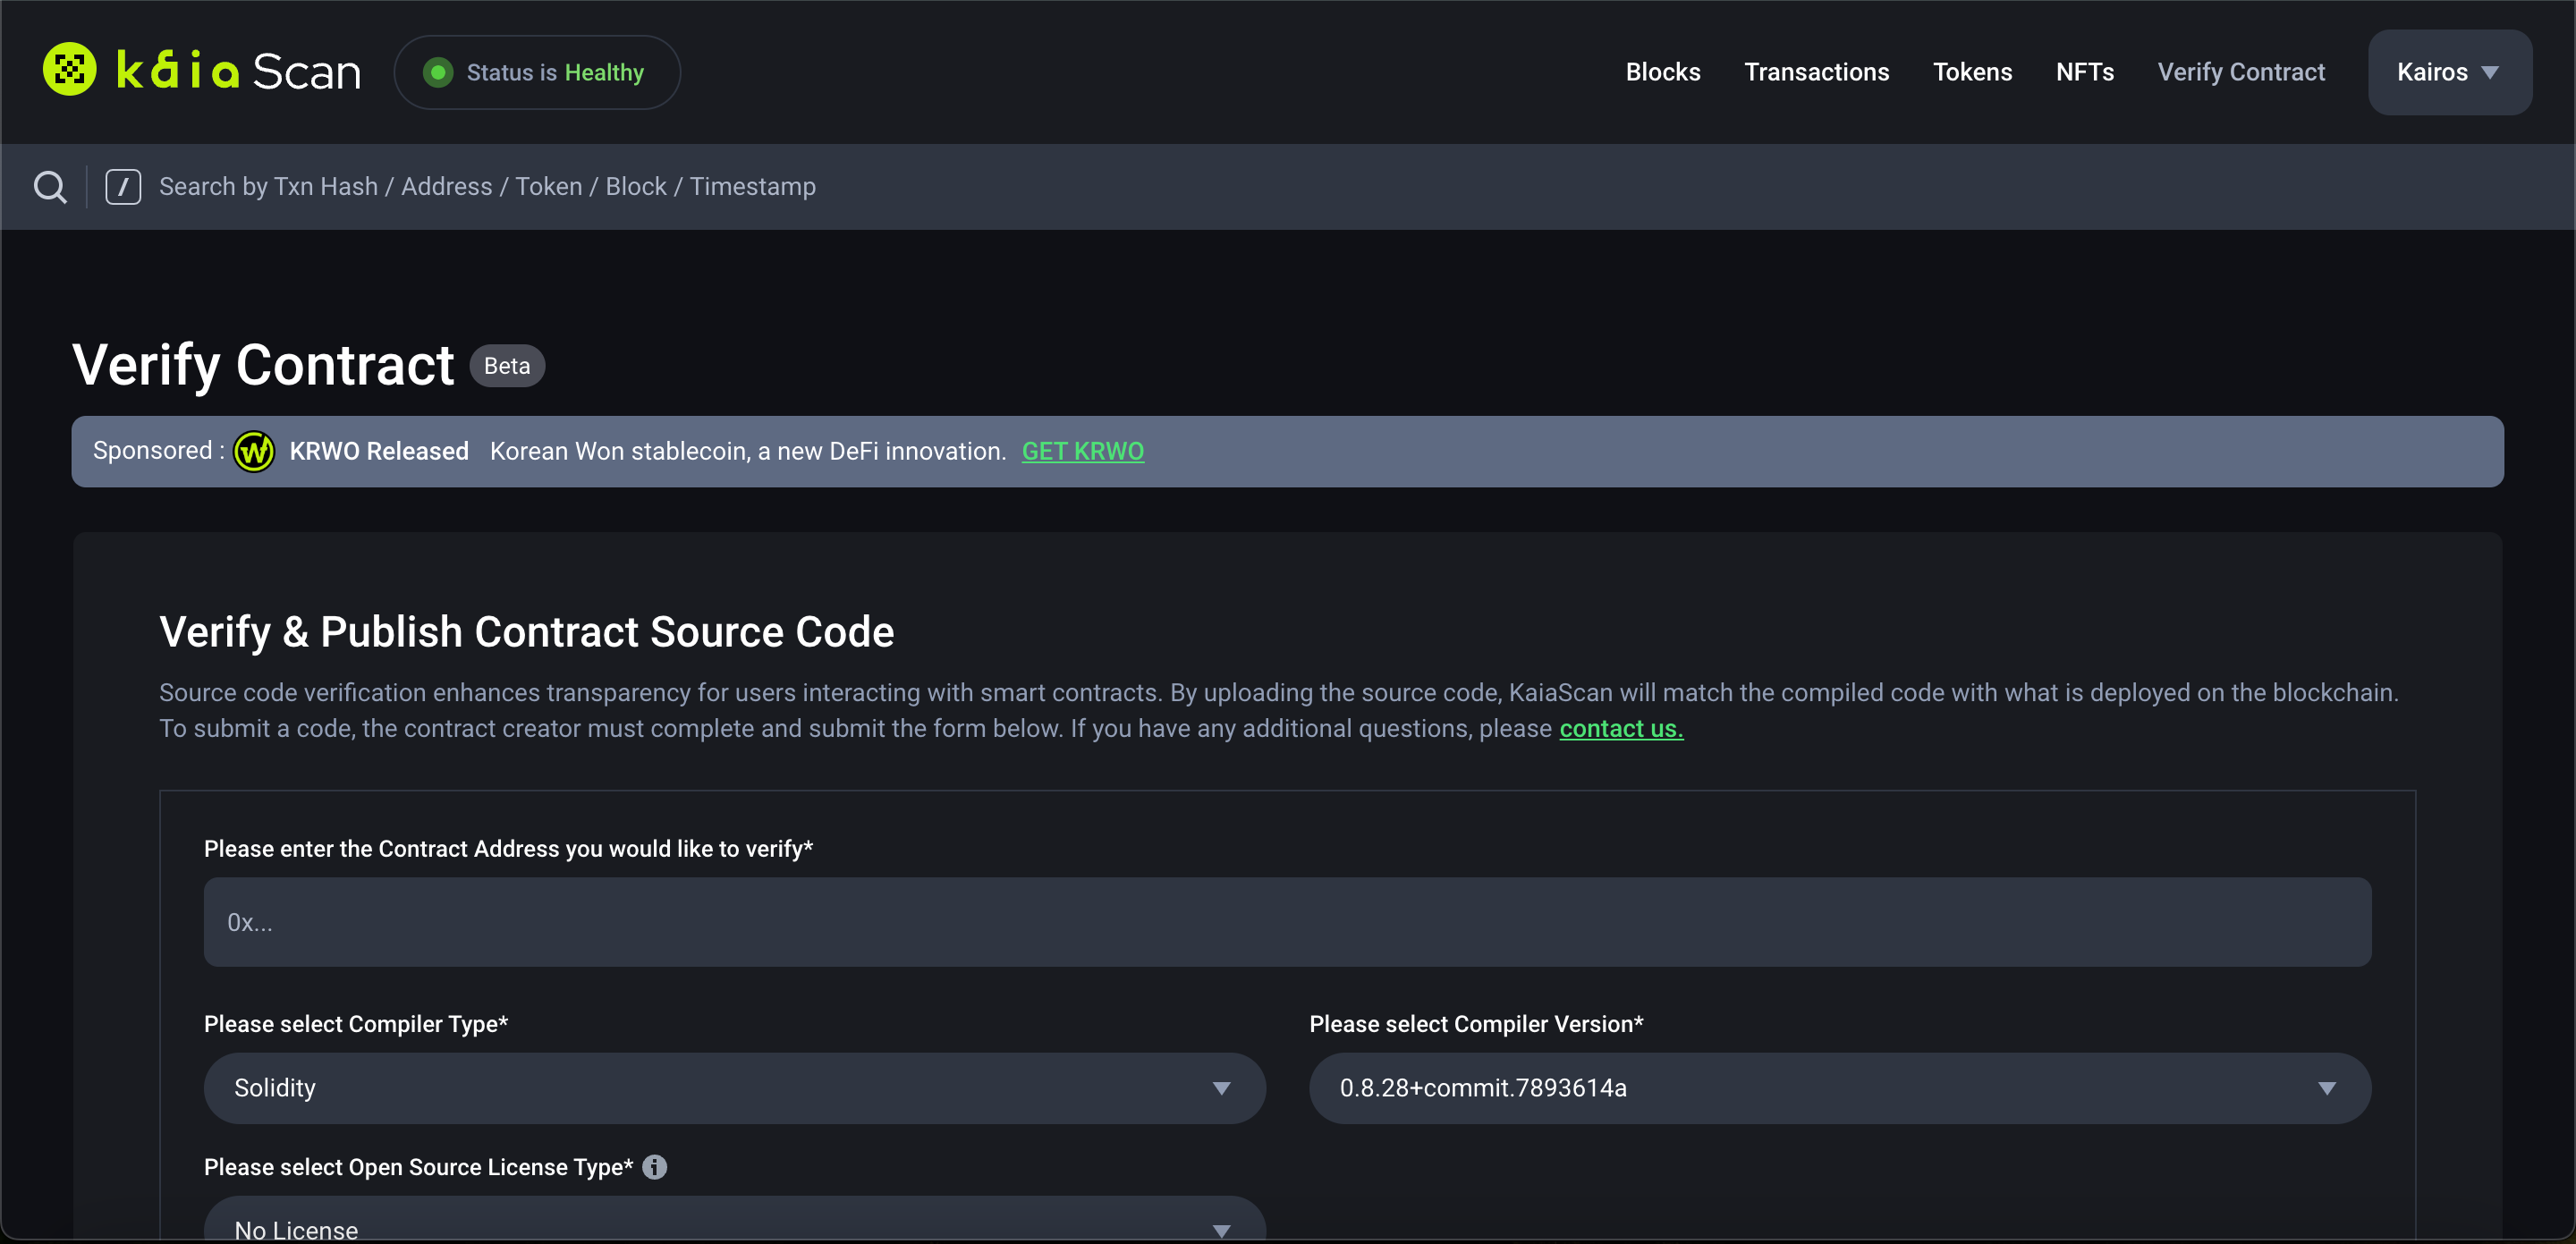
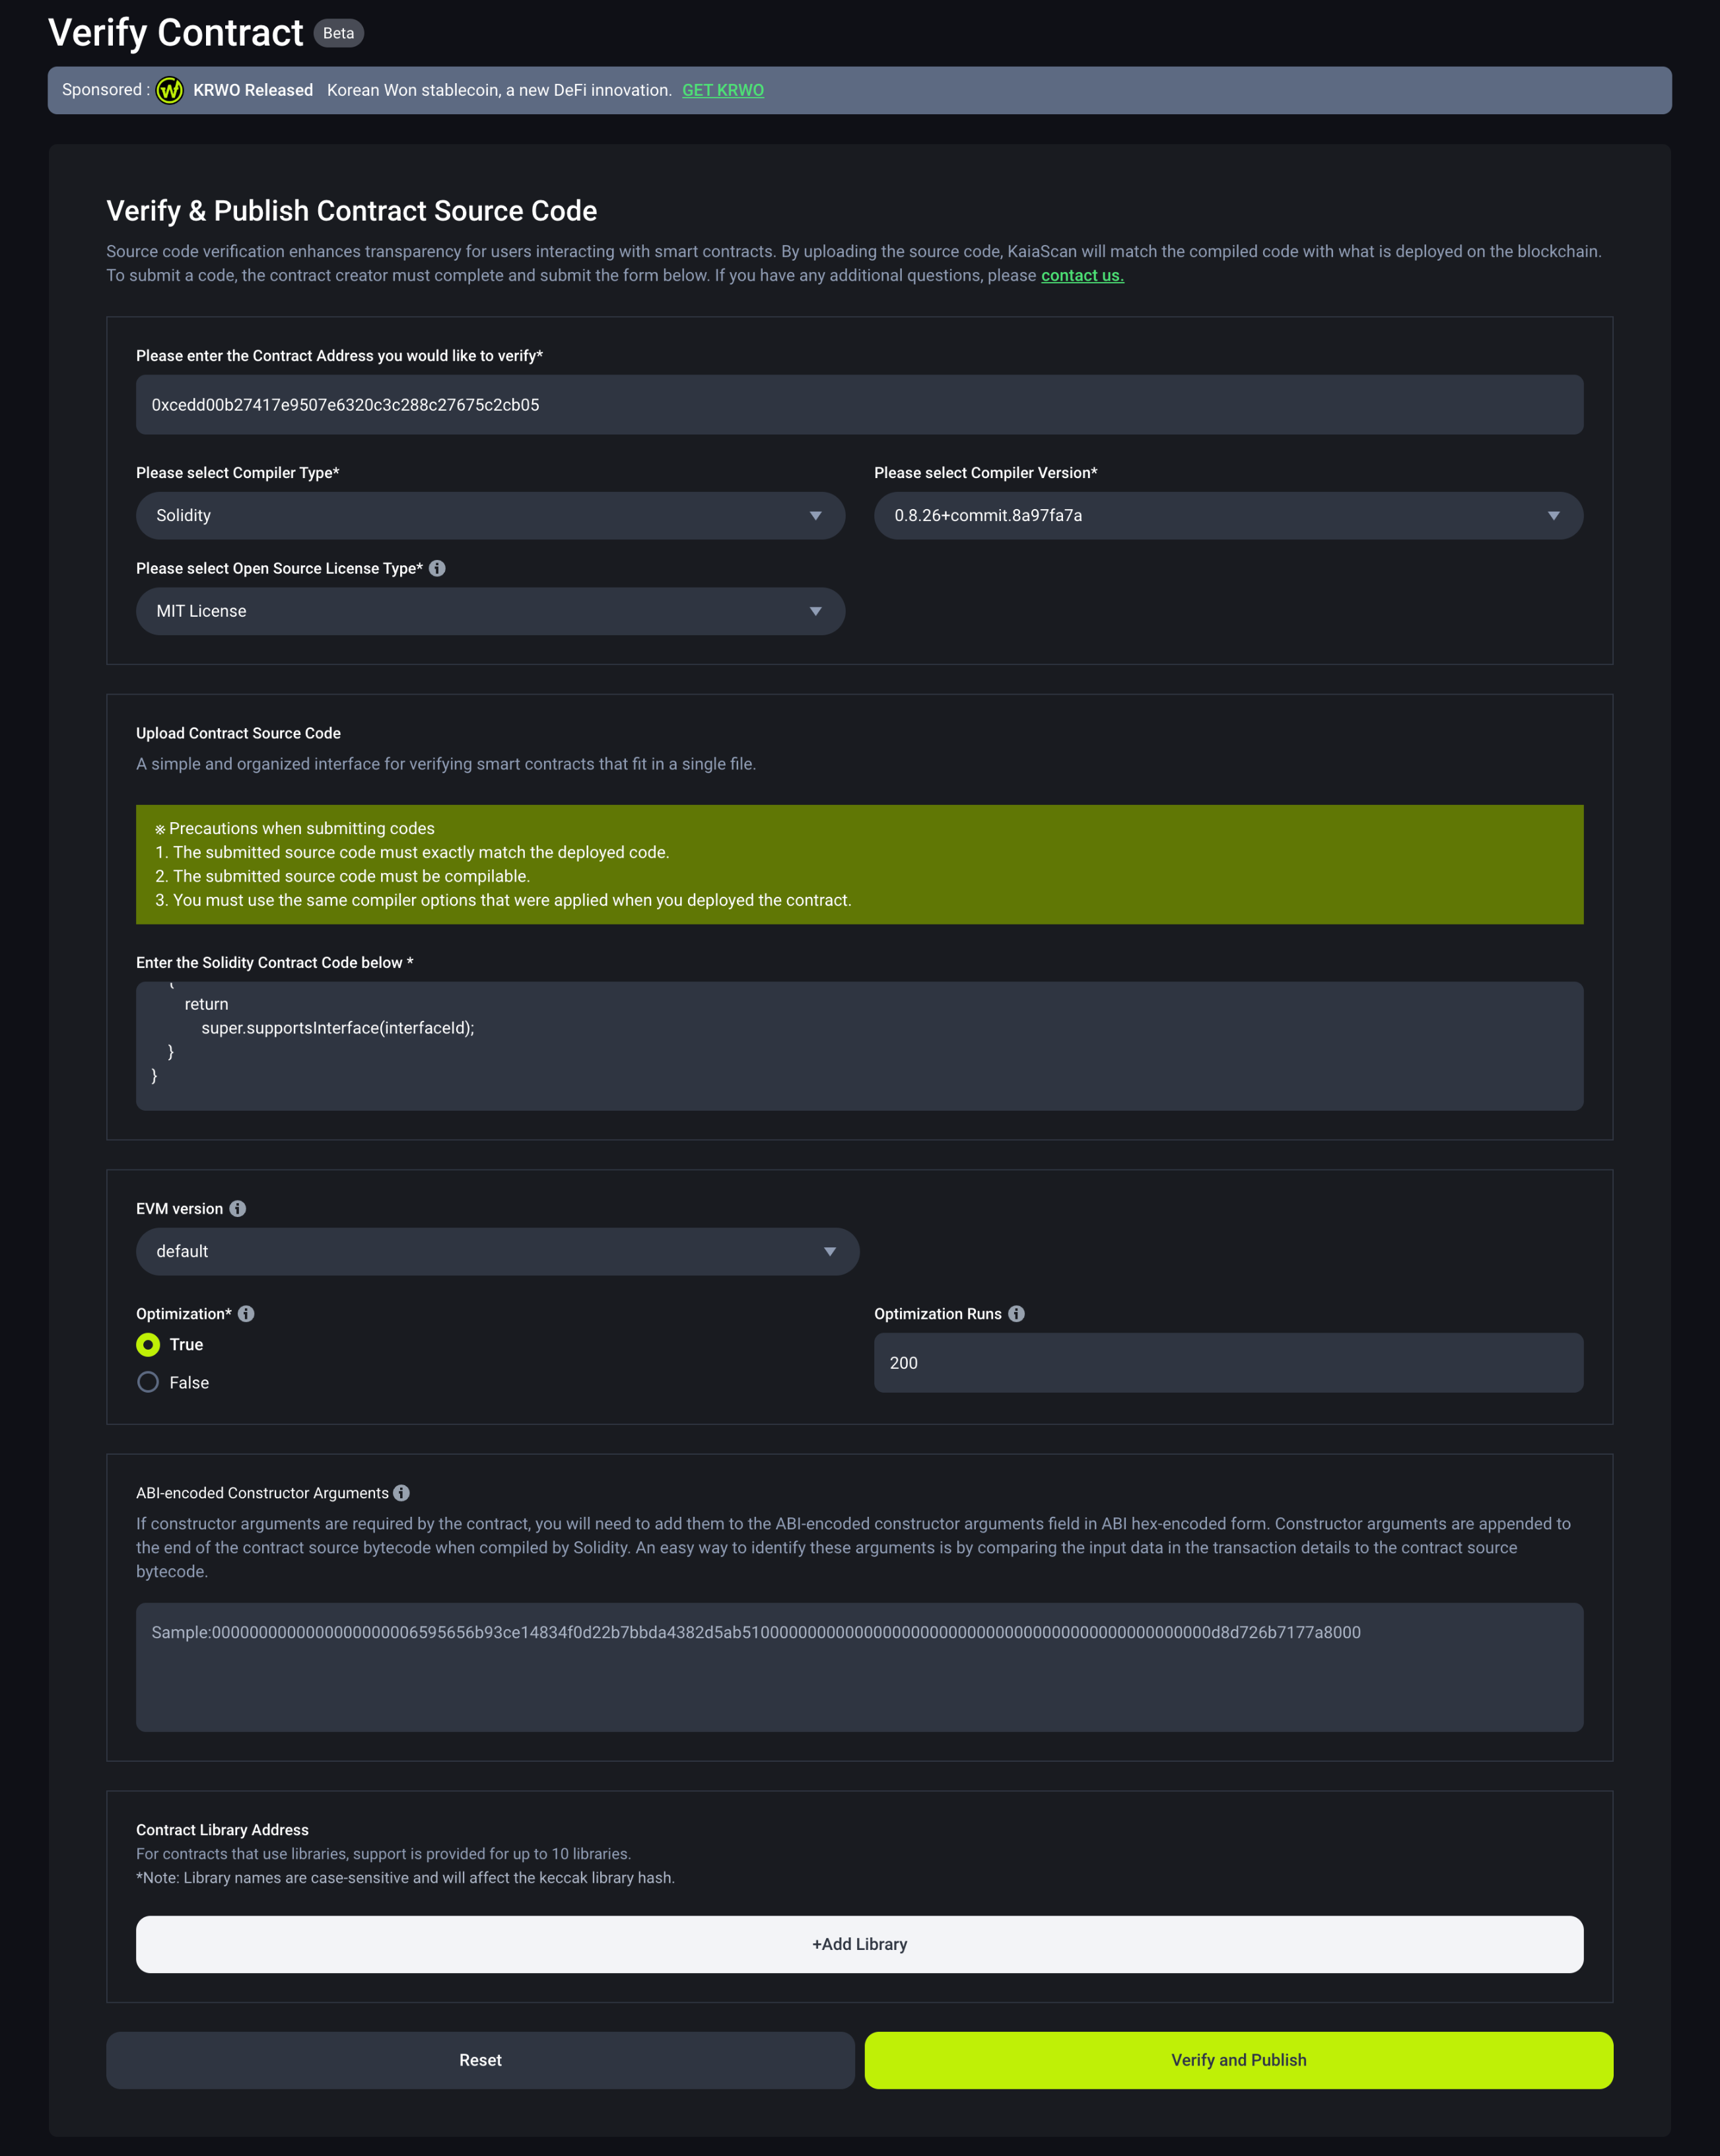
To verify a single contract and multi-part contracts on Kaiascan, navigate to the contract submission request page.
Verification of contracts on Kaiascan is currently in beta.
Xác minh hợp đồng đơn lẻ
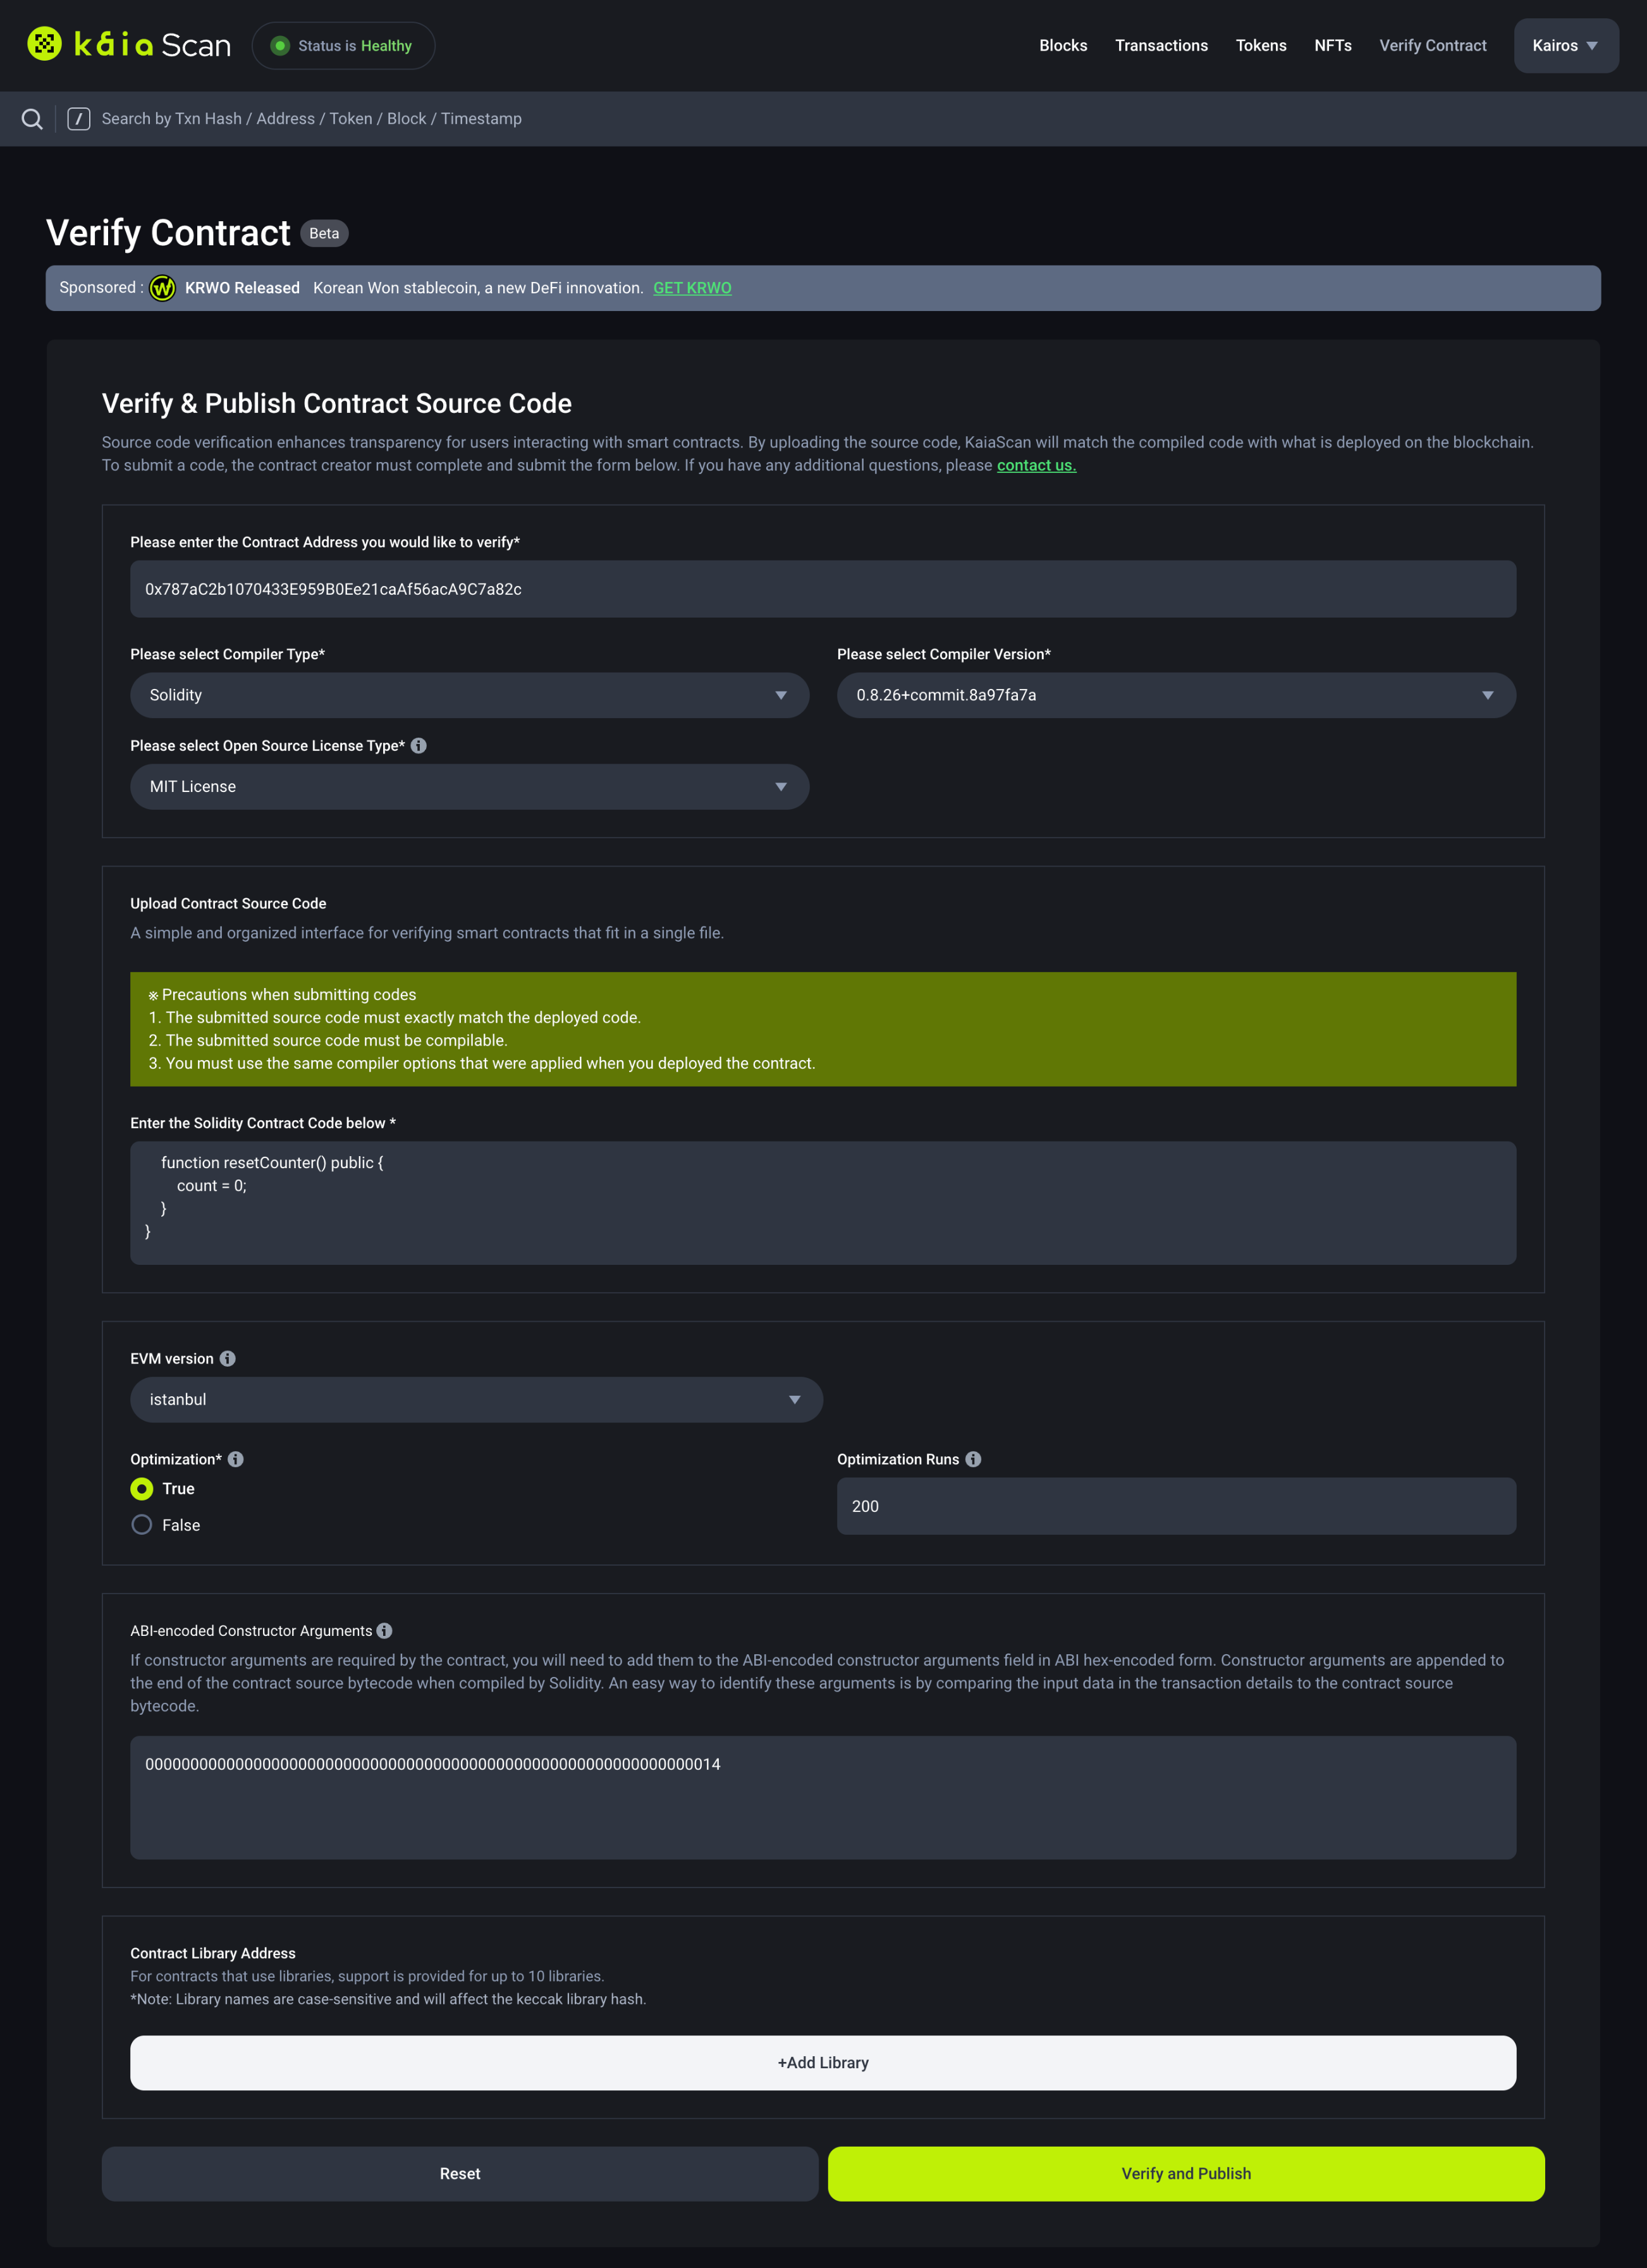
- Fill in the contract address for the deployed contract (Counter.sol)
- Select the compiler version used for the
Counter.solexample - Select the Open Source License Type used for the
Counter.solexample. ForCounter.solexample, select the option, MIT License (MIT). If there was none used, select No License (None) - Make sure to download
Counter.solfrom Remix IDE and upload it in the Source Code (Solidity File) field - Select the EVM version for the contract. For
Counter.solexample, select the option Istanbul. - Select True for Optimization if it was enabled during compilation, and fill in the number of runs under Optimization Runs to be 200.
- (optional) To get the ABI-encoded constructor arguments for this field, navigate to abi.hashex.org to get the encoded data following the image below:
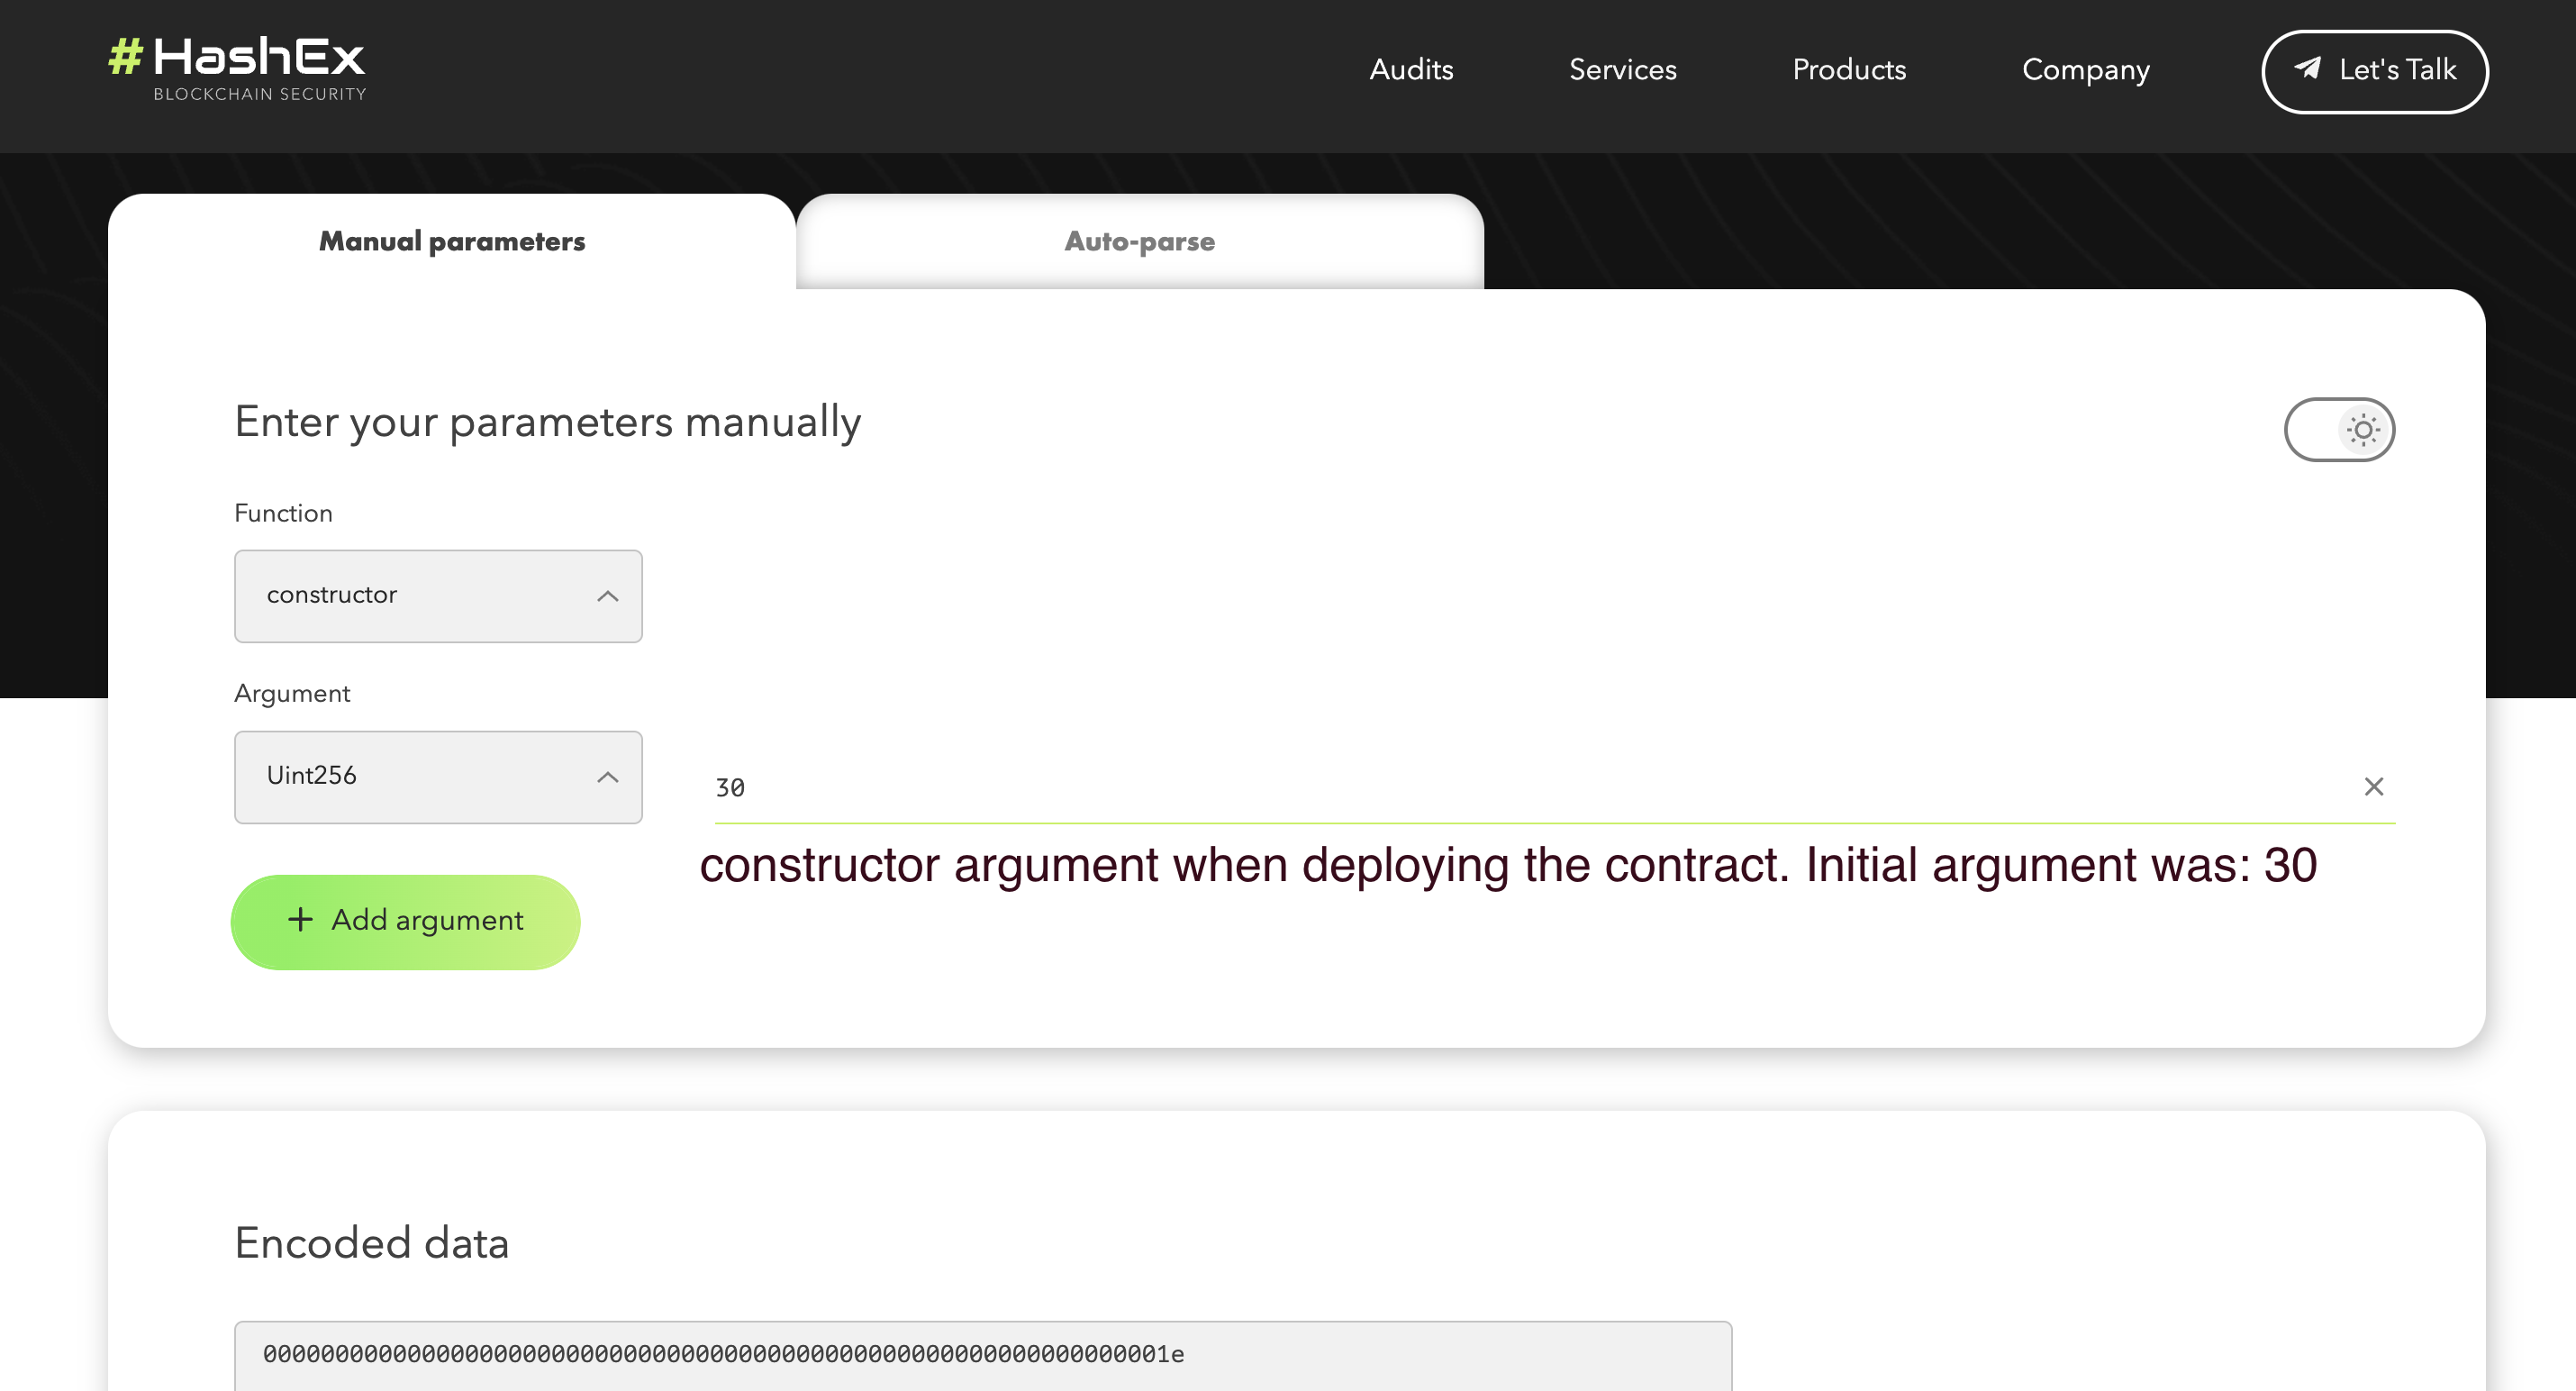
- Click on the Verify and Publish button to begin verification.
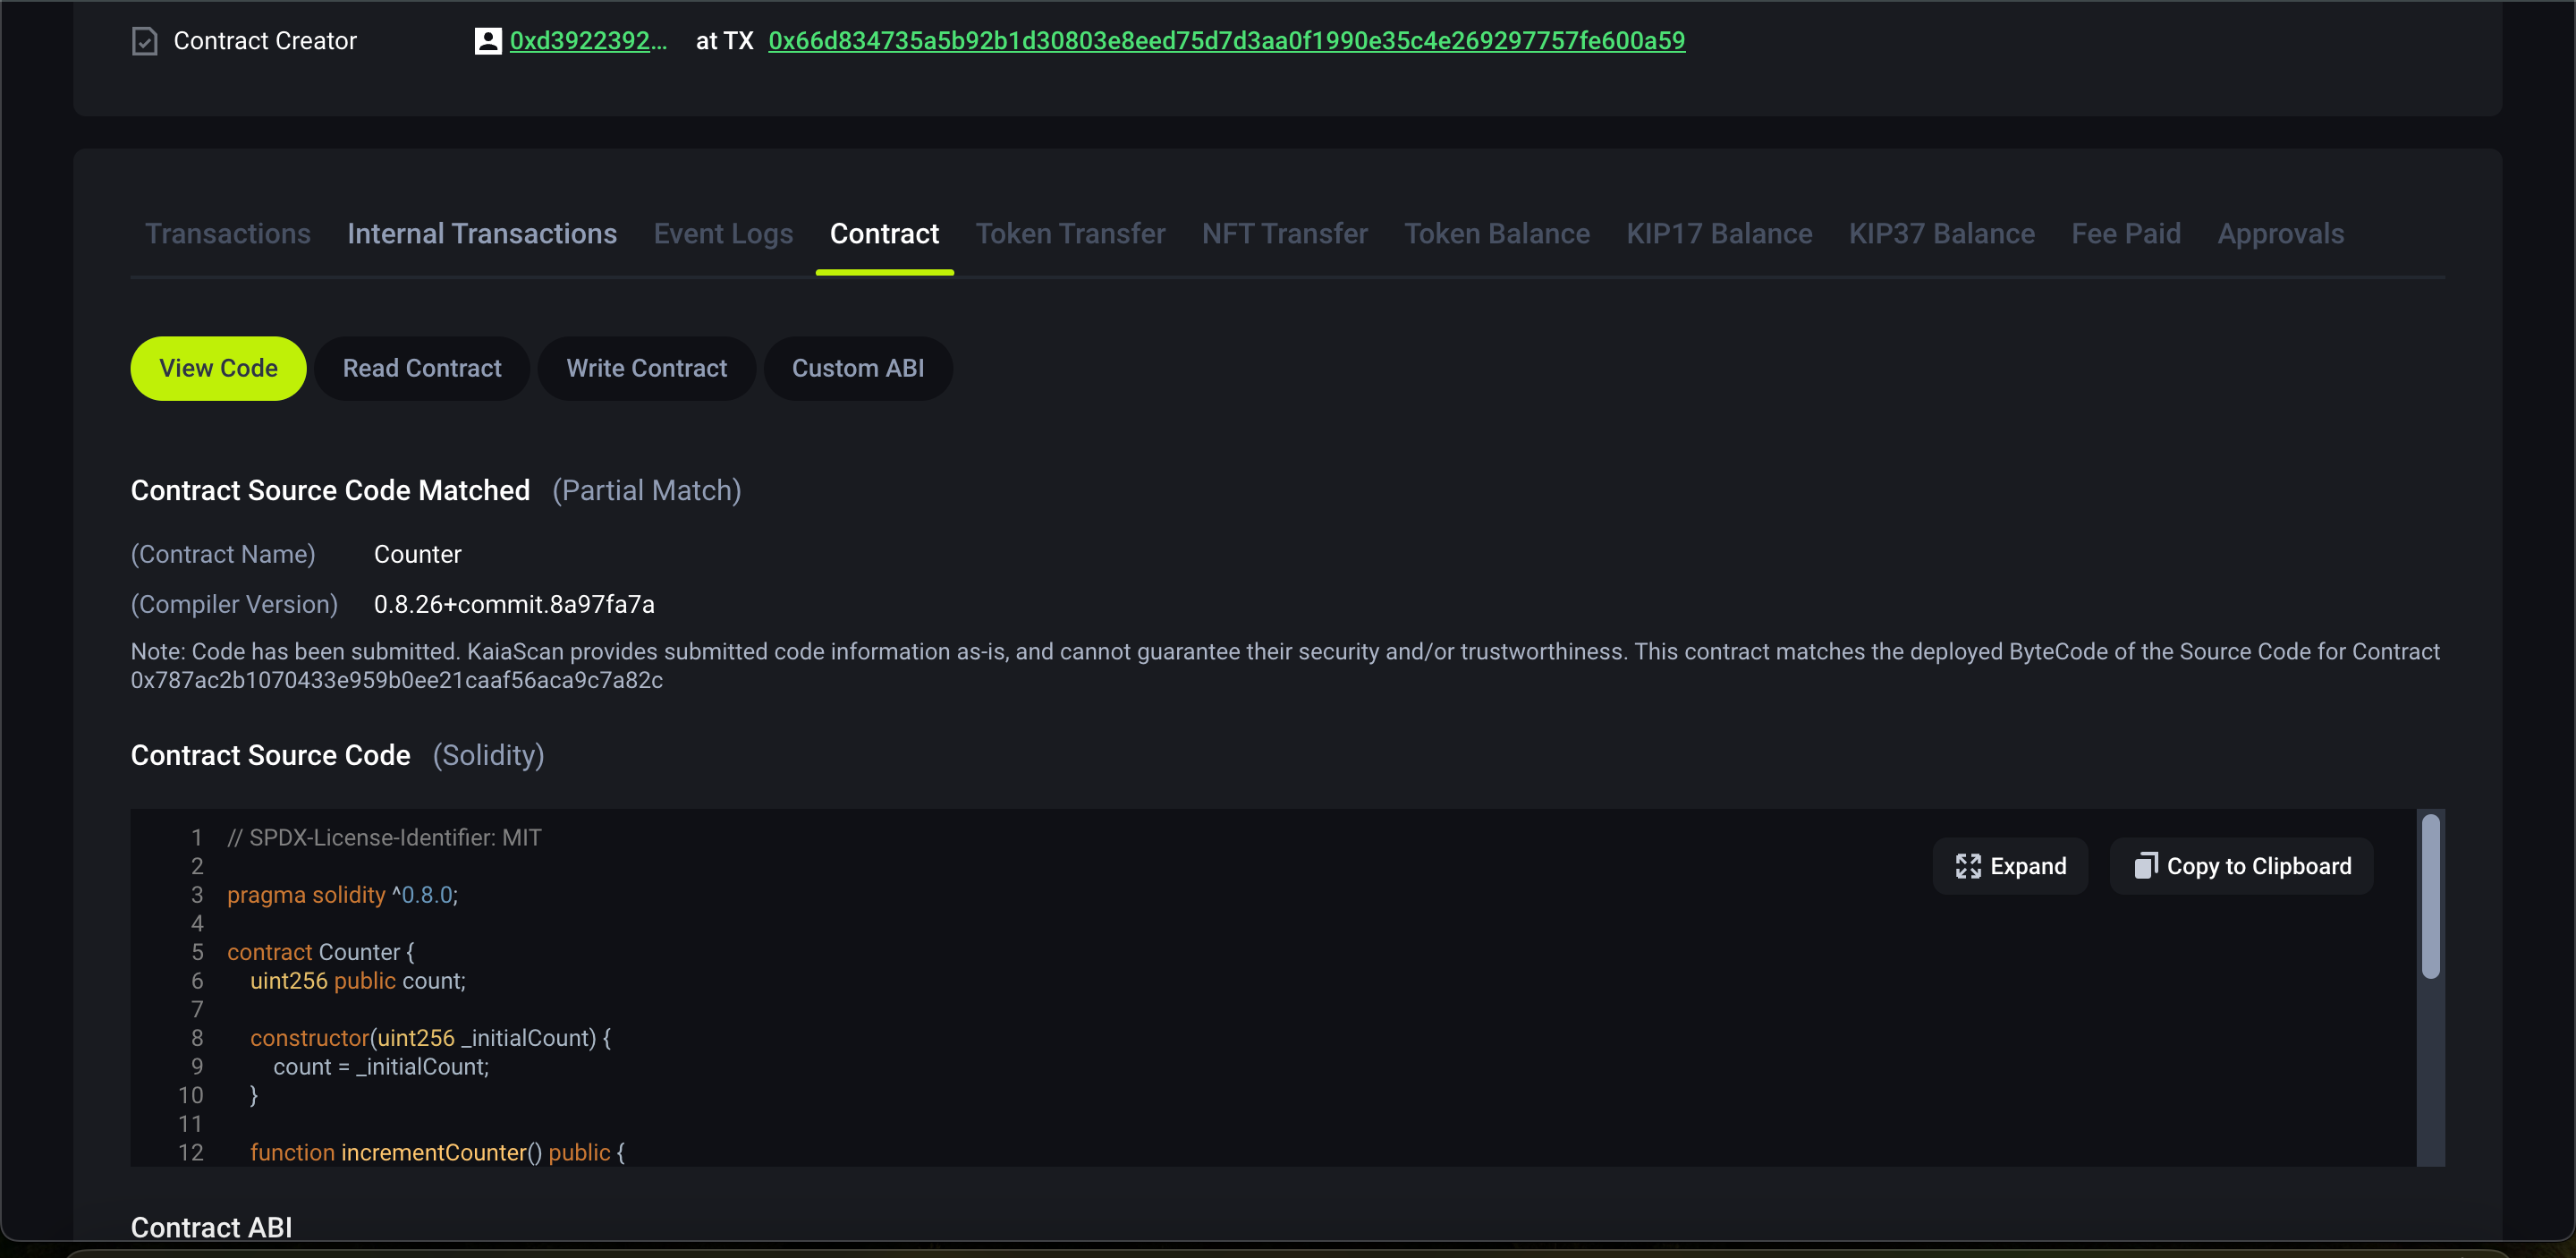
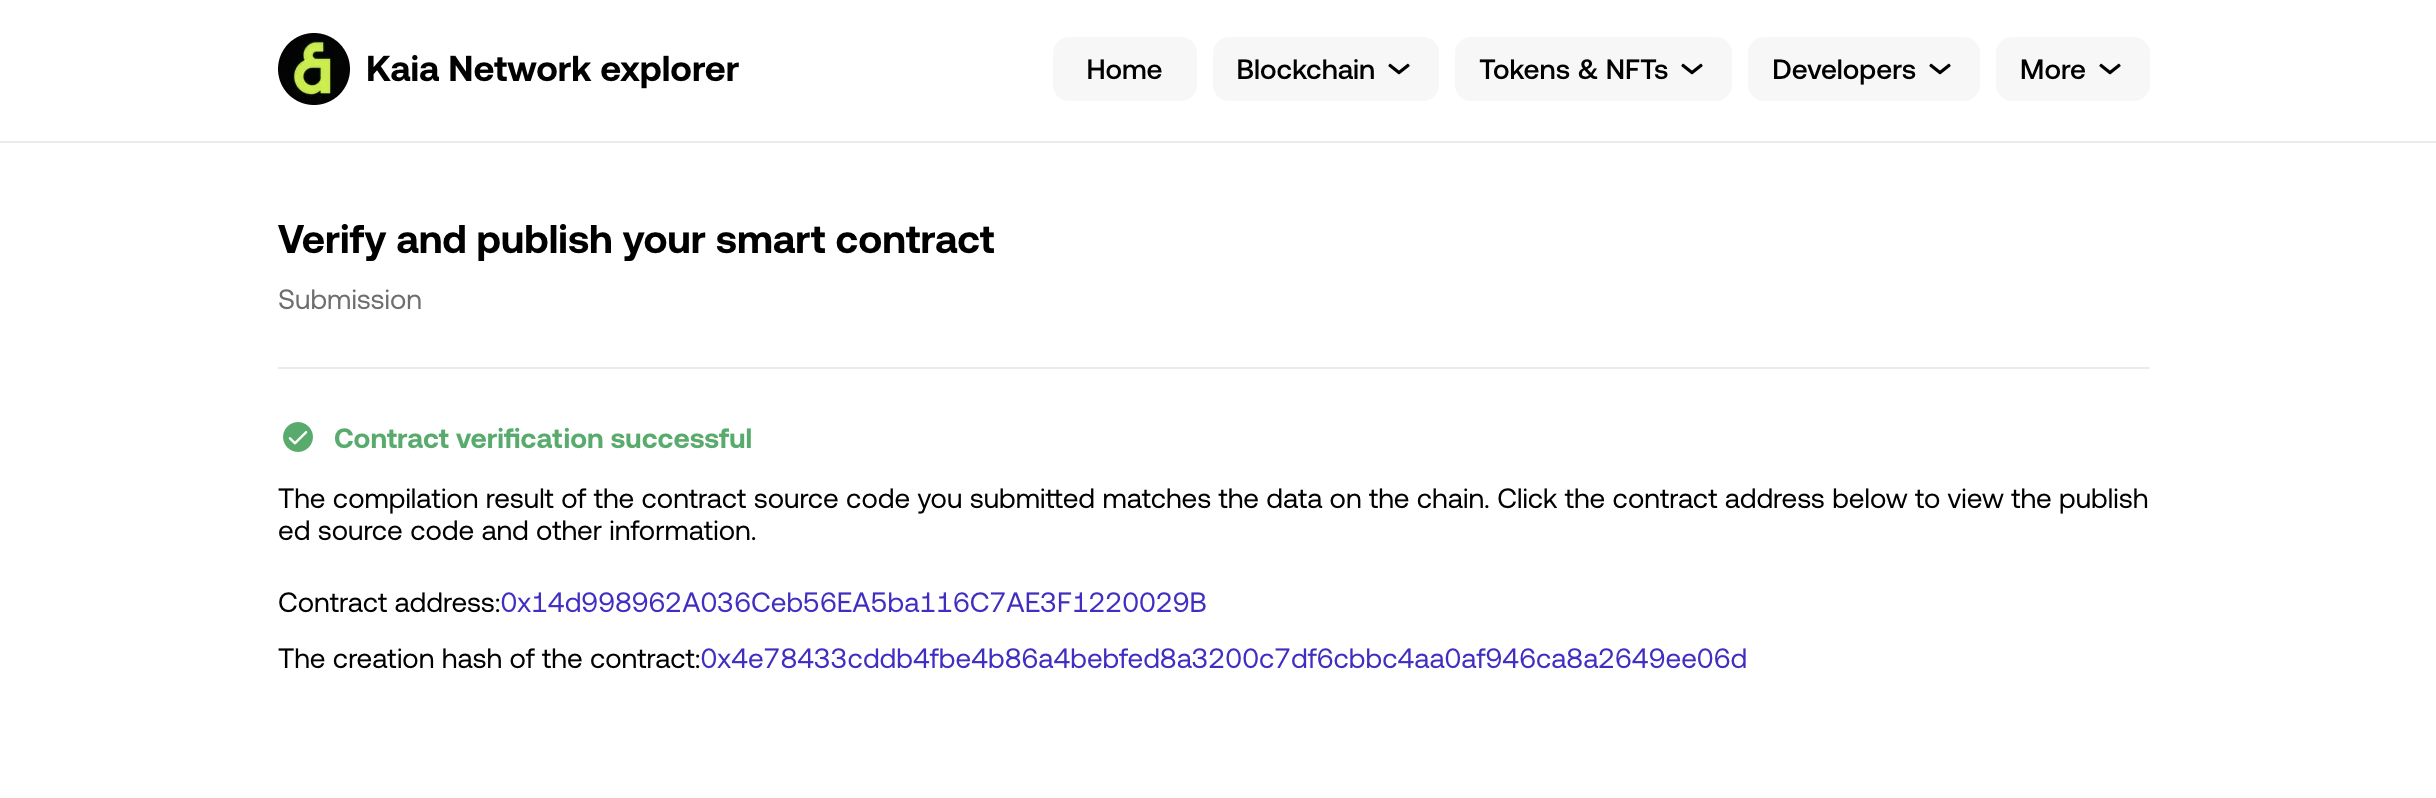
- Once verification is done, you will get a Submission Successful message. Now you can paste the contract address in the explorer search bar to view the Contract Source Code, Contract ABI, Creation Code and ABI-encoded Value.
Xác minh hợp đồng nhiều phần
Verifying a multi-part contract on Kaiascan follows the same step as verifying a single contract. Tuy nhiên, điều quan trọng cần lưu ý là chúng tôi sẽ sao chép và dán tệp airdropToken_flattened.sol vào trường Nhập Mã hợp đồng Solidity bên dưới vì Kaiascan hiện không hỗ trợ tải tệp lên để xác minh.
After filling in the verification parameters, click on the Verify and Publish button to begin verification. Once verification is done, the verification page will refresh. Now you can paste the contract address in the explorer search bar to view the Contract Source Code, Contract ABI, and Creation Code.

Liên kết OK
Để xác minh hợp đồng đơn lẻ và hợp đồng nhiều phần trên OKLink, hãy điều hướng đến trang sơ bộ xác minh hợp đồng.
Hiện tại, hỗ trợ OKLink chỉ giới hạn ở Kaia Mainnet, do đó, xác minh hợp đồng chỉ khả dụng cho các triển khai Mainnet.
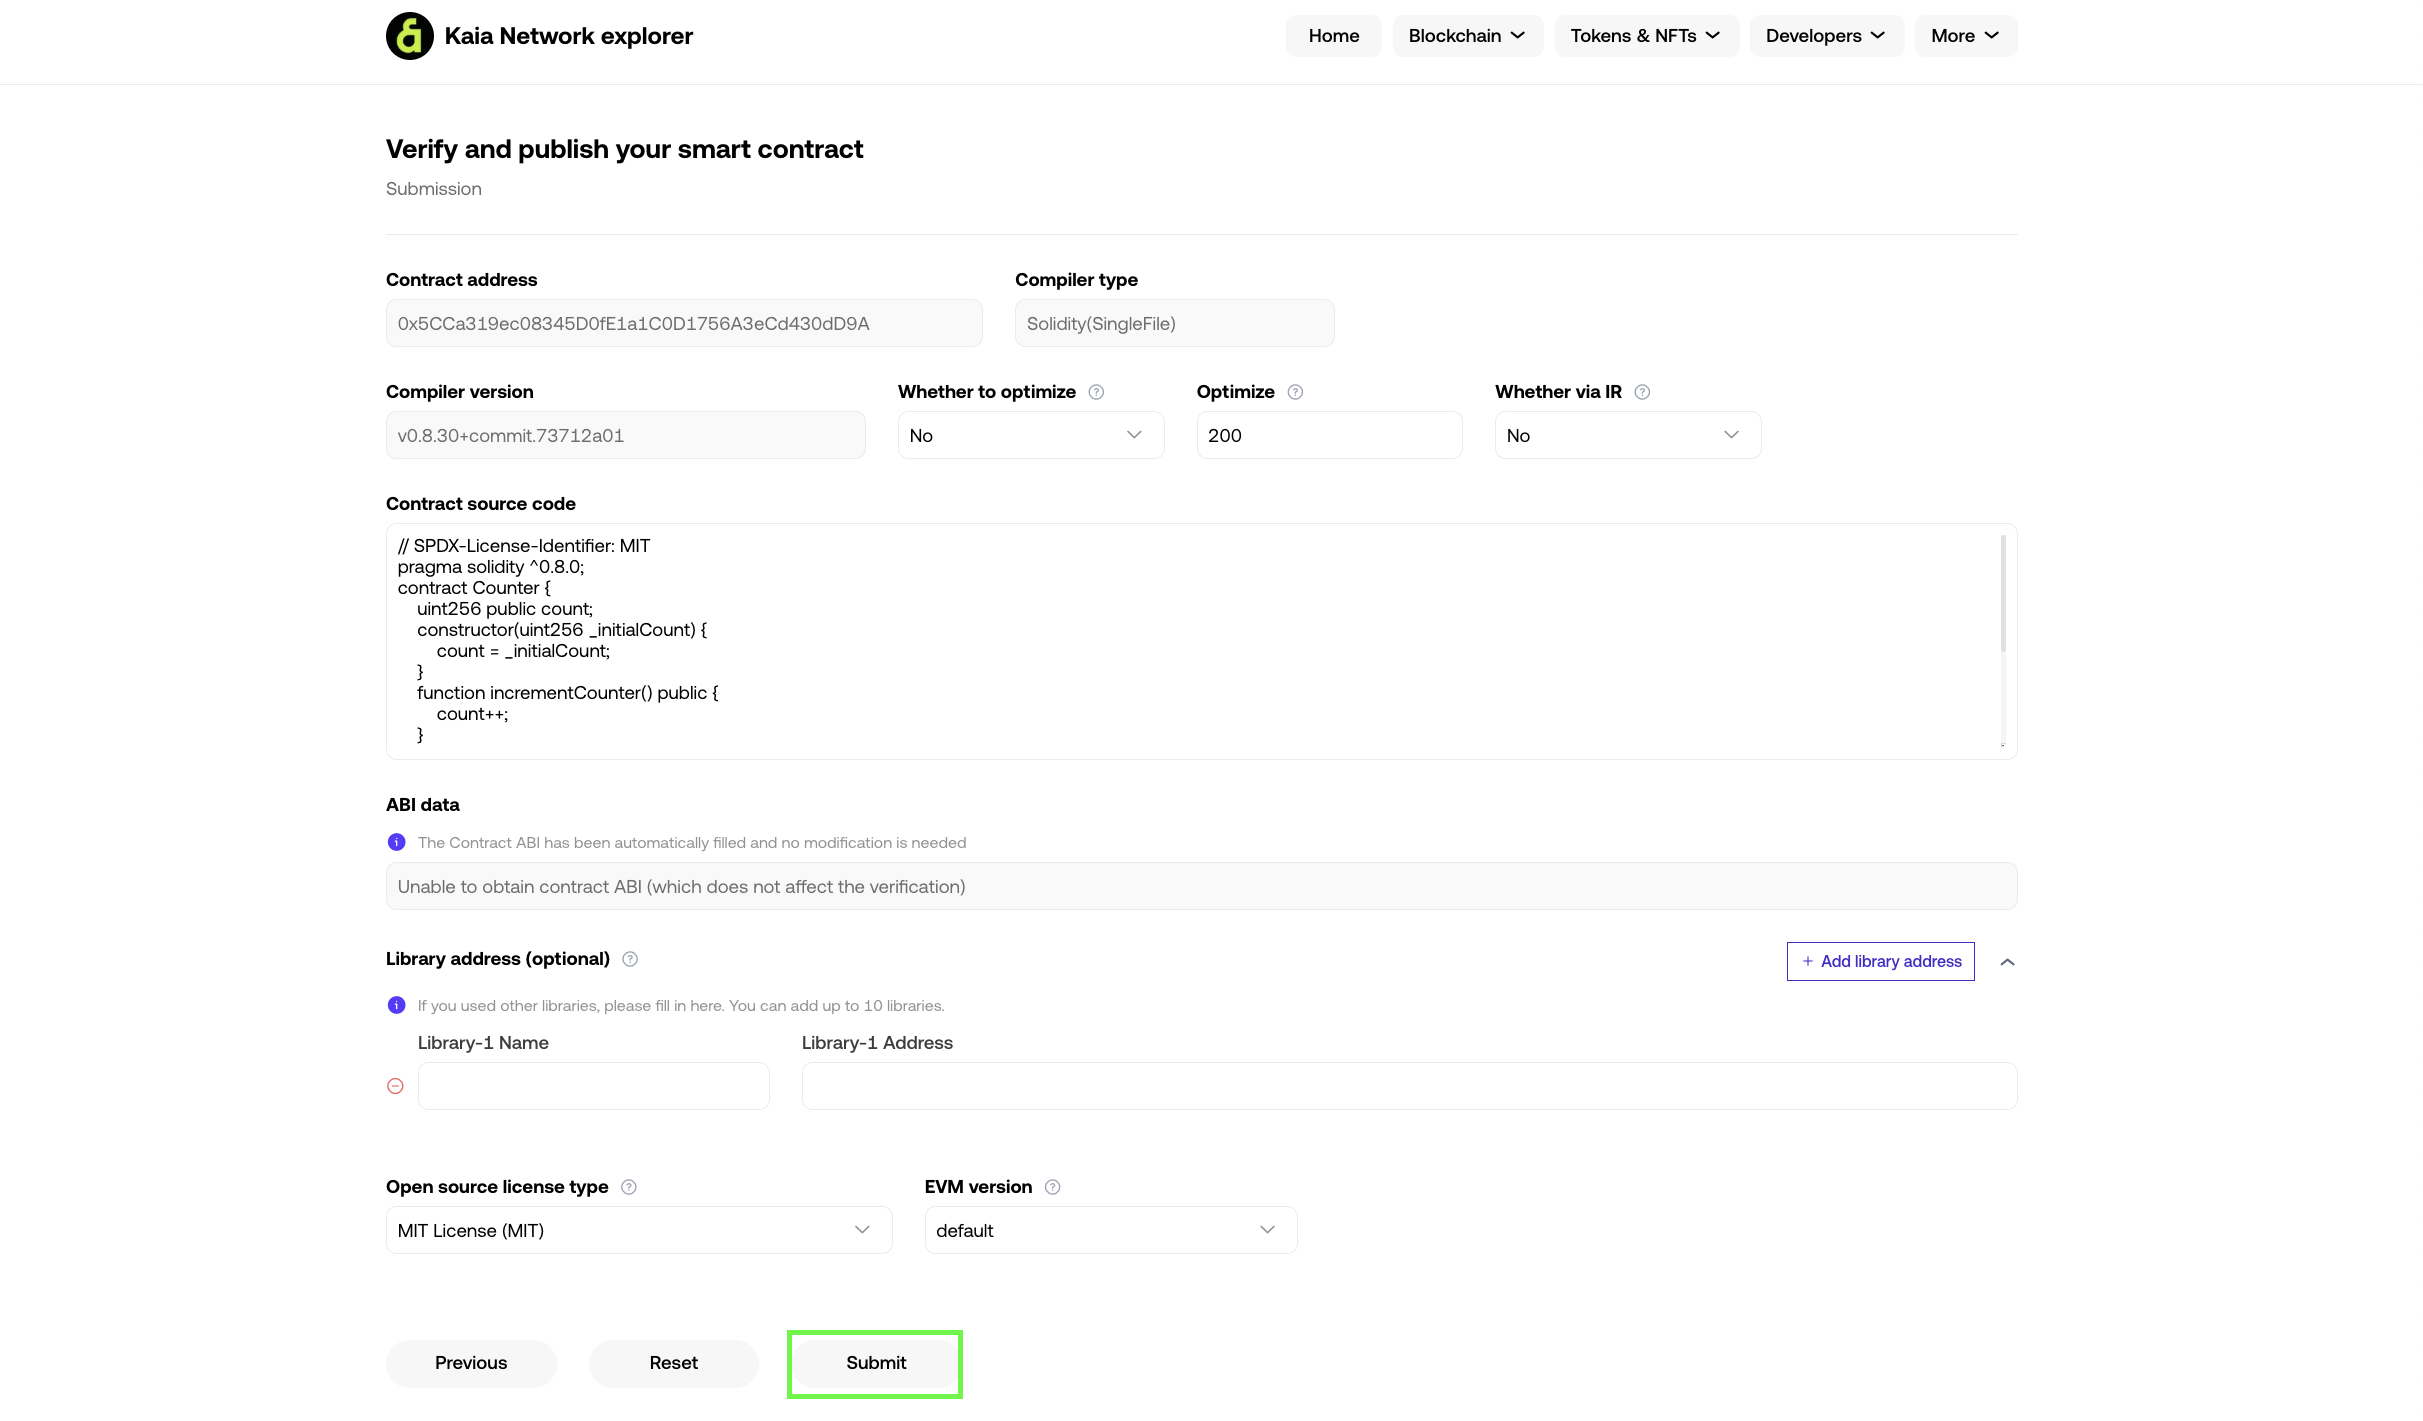
Xác minh hợp đồng đơn lẻ
- Điền địa chỉ hợp đồng cho hợp đồng đã triển khai (Counter.sol)
- Chọn loại trình biên dịch. Đối với hướng dẫn này, hãy chọn Solidity(SingleFile)
- Chọn phiên bản trình biên dịch được sử dụng cho ví dụ Counter.sol: v0.8.30+commit.73712a01 rồi nhấp vào Tiếp theo
- Đảm bảo tải Counter.sol từ Remix IDE lên trong trường Mã nguồn hợp đồng
- Chọn True cho Tối ưu hóa nếu tùy chọn này được bật trong quá trình biên dịch và điền số lần chạy trong mục Tối ưu hóa là 200.
- Chọn Loại giấy phép nguồn mở được sử dụng cho ví dụ Counter.sol. Đối với ví dụ về Counter.sol, hãy chọn tùy chọn Giấy phép MIT (MIT). Nếu không có giấy phép nào được sử dụng, hãy chọn Không có giấy phép (Không có)
- Chọn phiên bản EVM cho hợp đồng. Đối với ví dụ về Counter.sol, hãy chọn tùy chọn mặc định.
- Nhấp vào nút Gửi để bắt đầu xác minh.
- Sau khi xác minh xong, bạn sẽ nhận được thông báo Xác minh thành công.
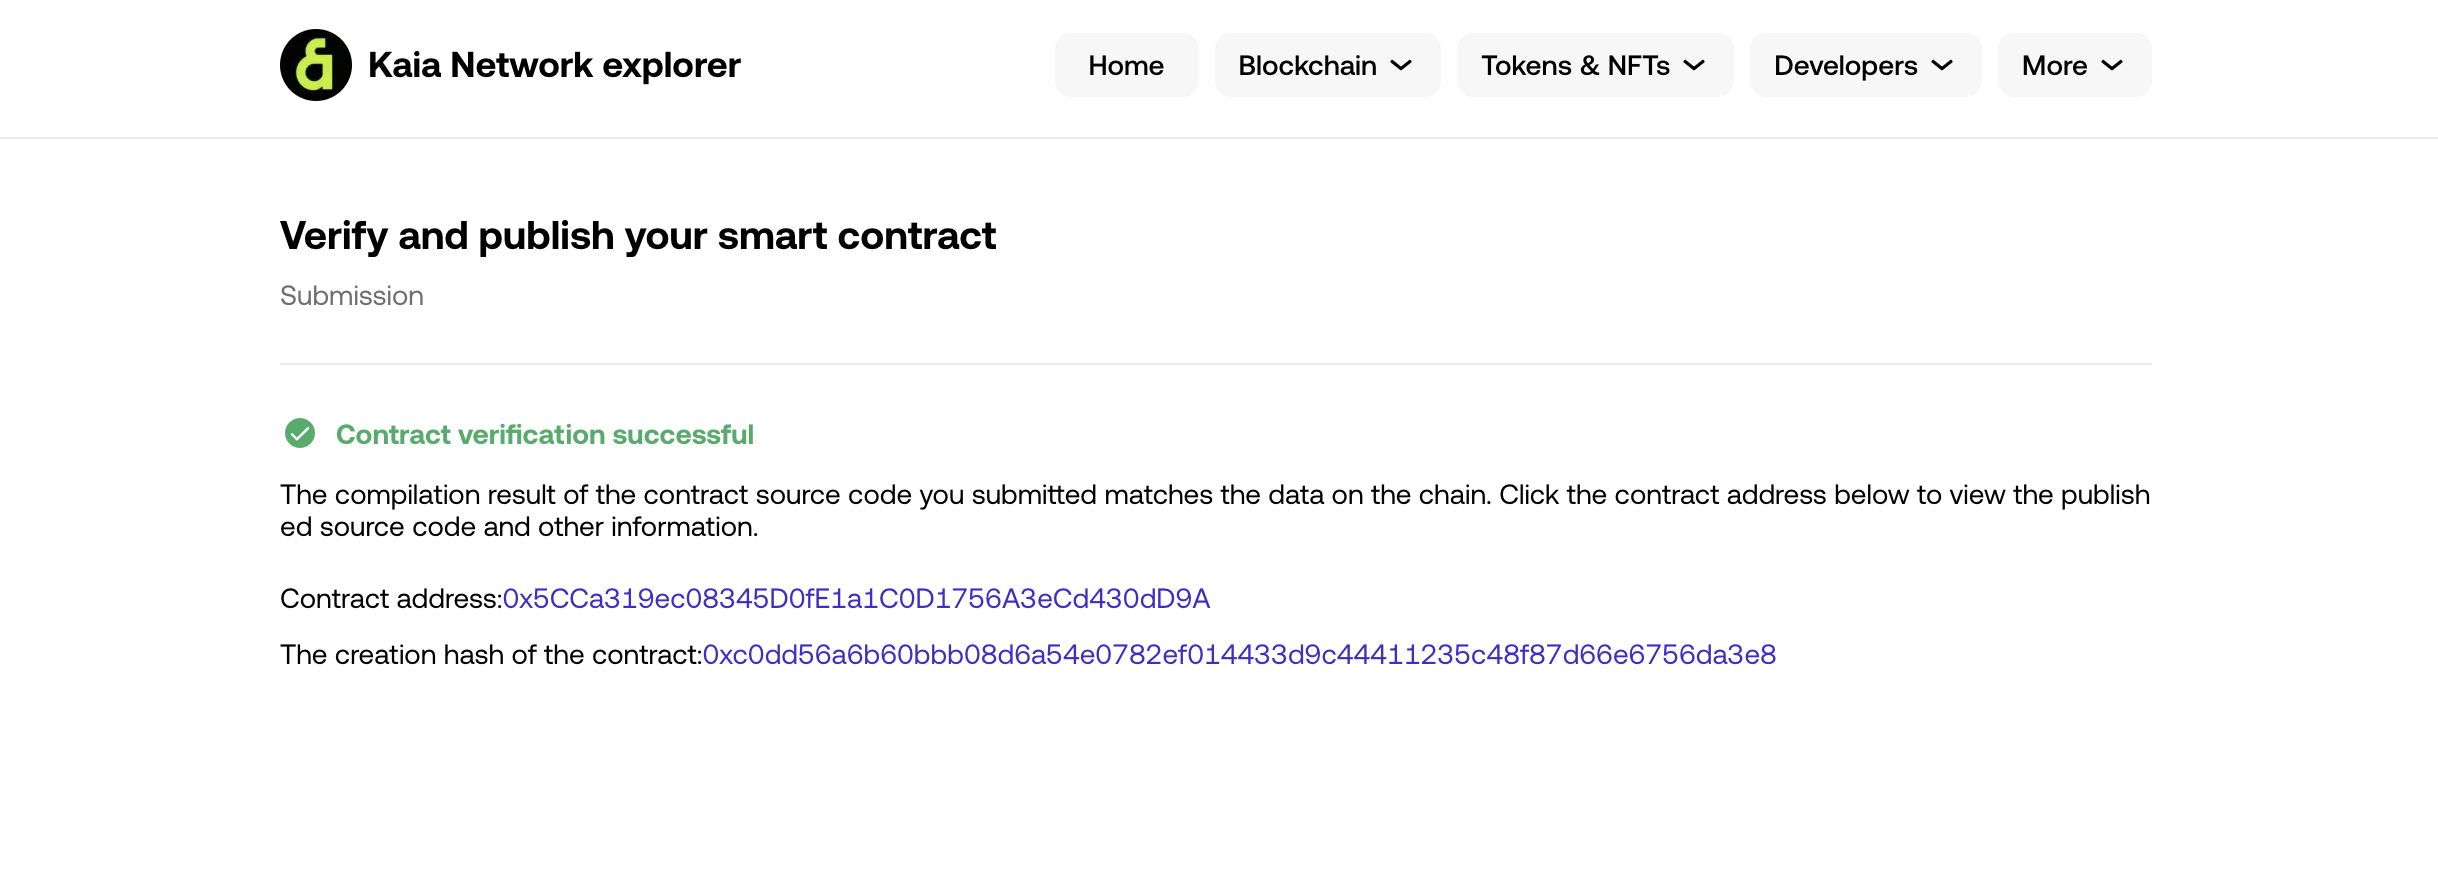
Bây giờ bạn có thể dán địa chỉ hợp đồng vào thanh tìm kiếm của trình khám phá để xem Mã nguồn hợp đồng, ABI hợp đồng và mã byte triển khai hợp đồng.
![]()
Xác minh hợp đồng nhiều phần
Việc xác minh hợp đồng nhiều phần trên OKLink được thực hiện theo các bước tương tự như xác minh hợp đồng đơn lẻ. Tuy nhiên, điều quan trọng cần lưu ý là chúng tôi sẽ sao chép và dán tệp airdropToken_flattened.sol vào trường Mã nguồn hợp đồng vì OKLink hiện không hỗ trợ tải tệp lên để xác minh.
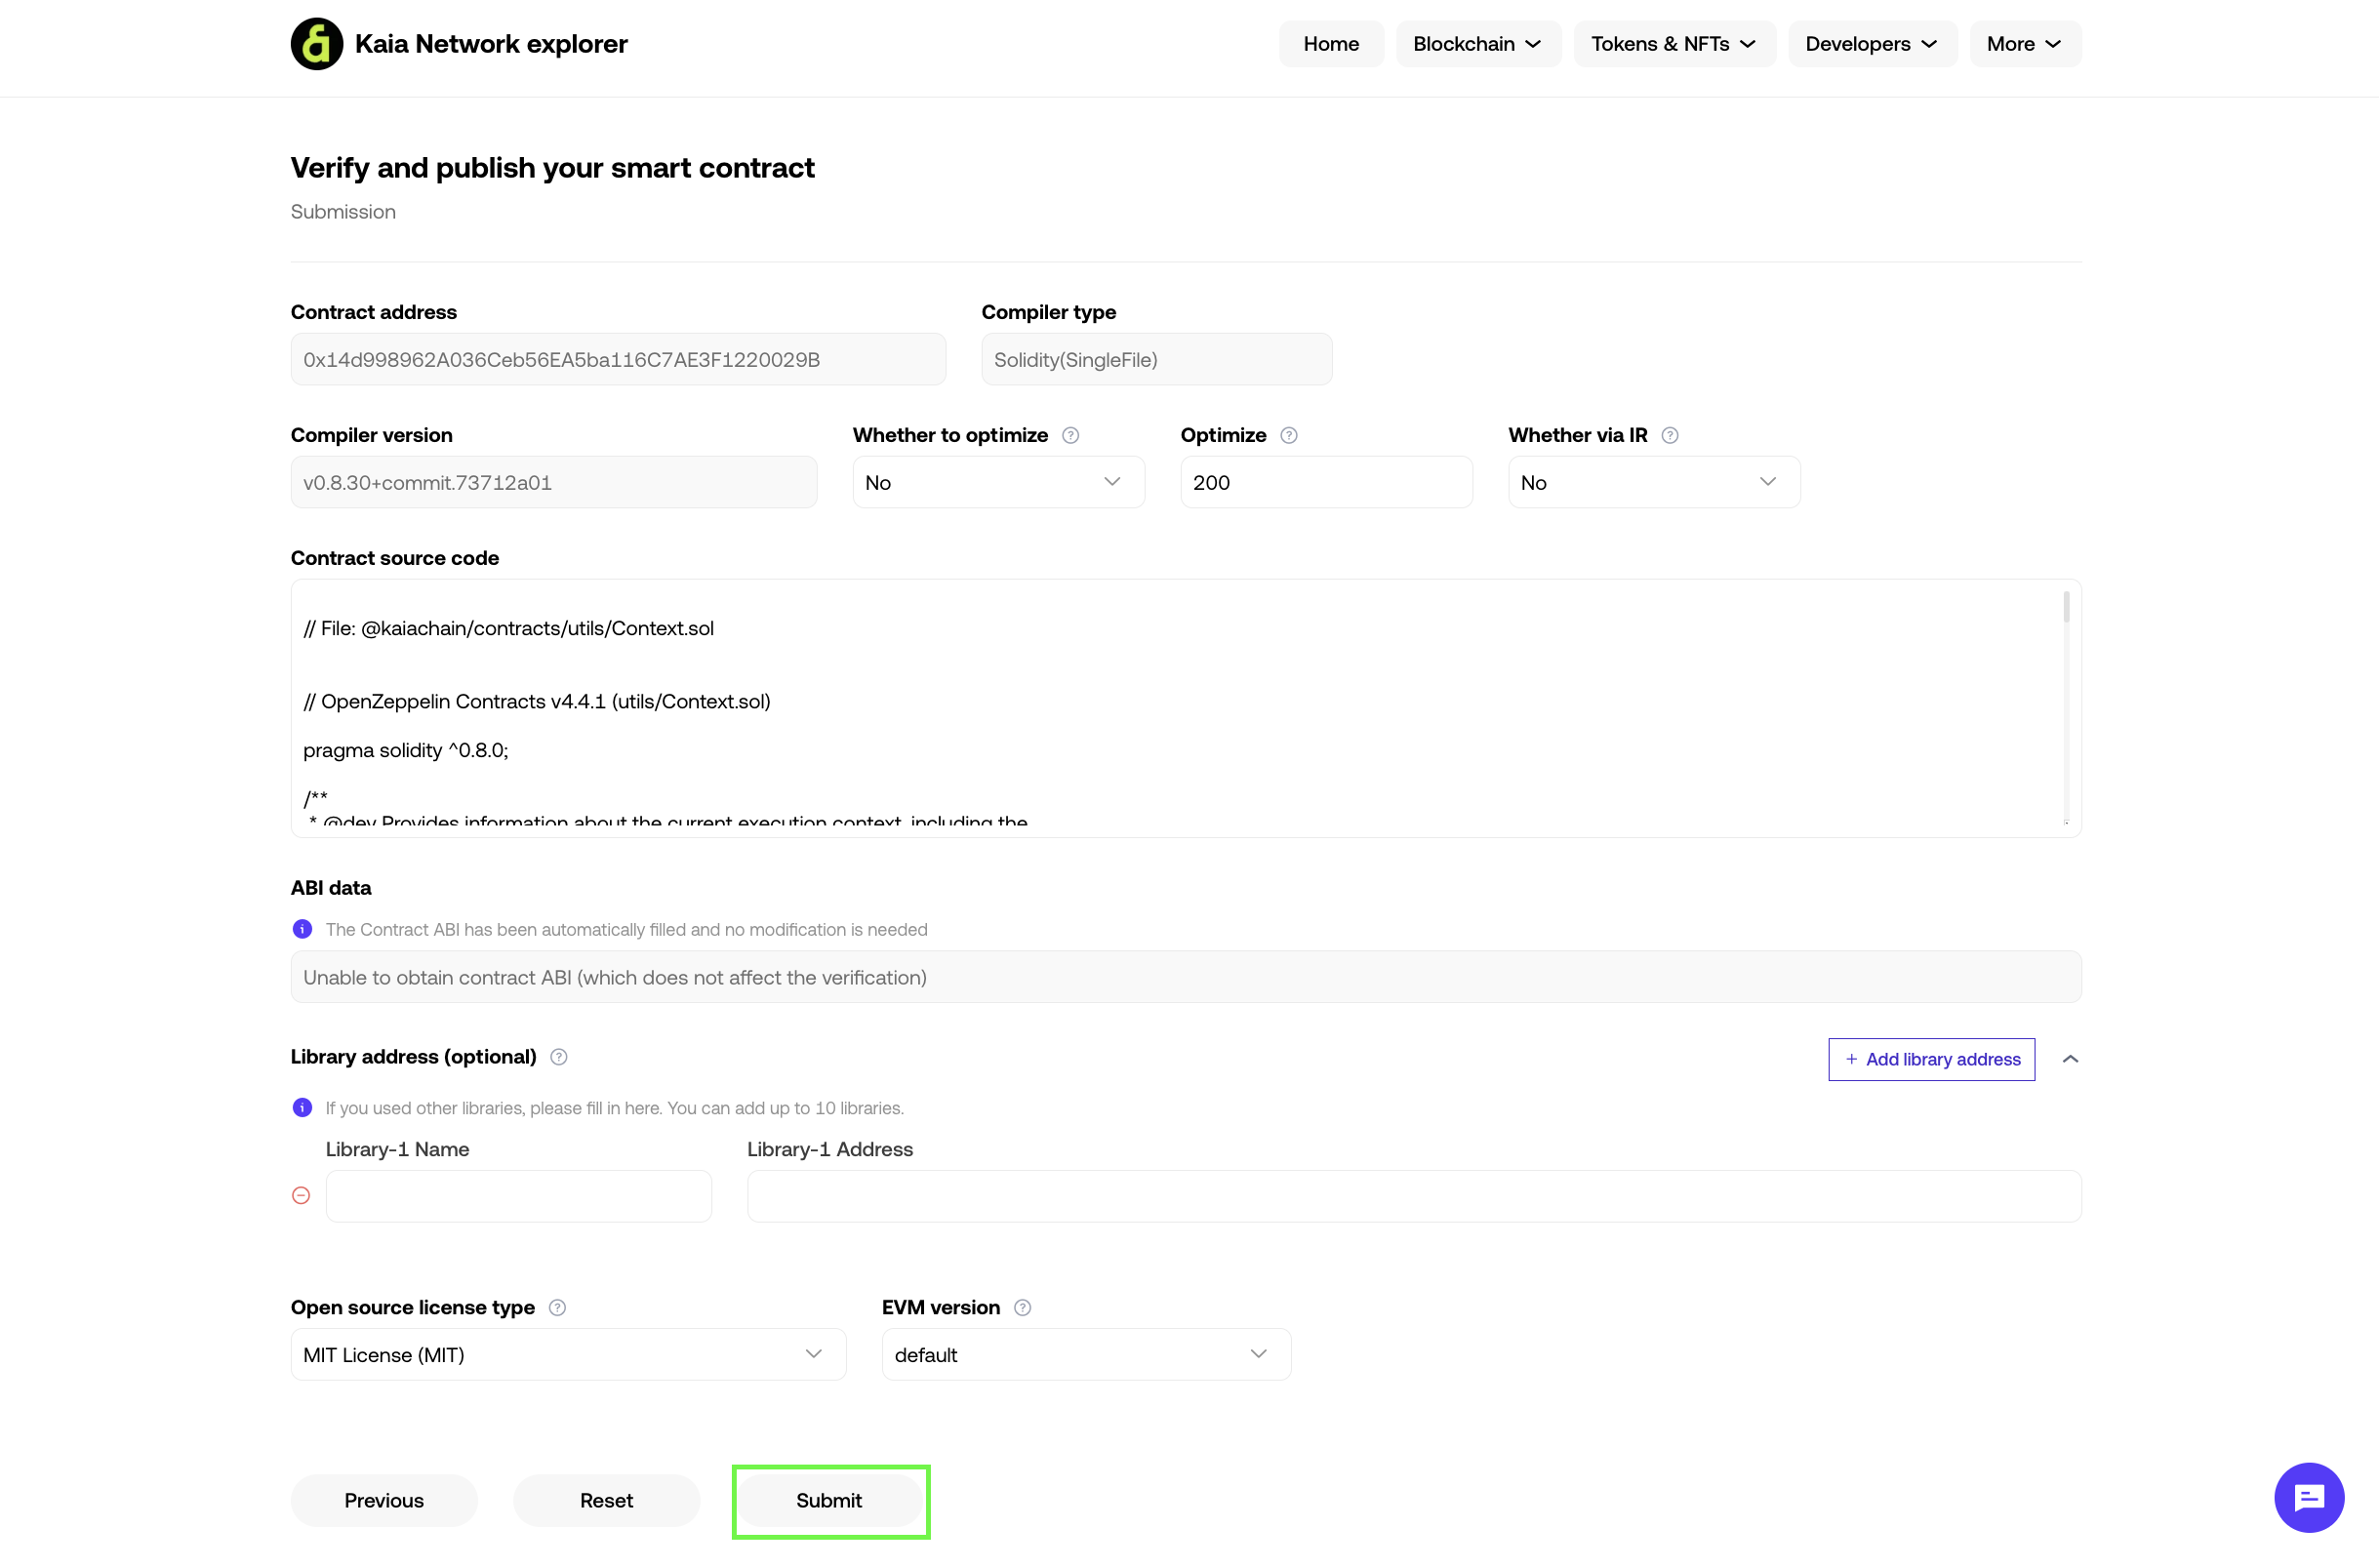
Sau khi điền thông số xác minh, hãy nhấp vào nút Gửi để bắt đầu xác minh. Sau khi xác minh xong, bạn sẽ nhận được thông báo Xác minh thành công.
Bây giờ bạn có thể dán địa chỉ hợp đồng vào thanh tìm kiếm của trình khám phá để xem Mã nguồn hợp đồng, ABI hợp đồng và mã byte triển khai hợp đồng.
![]()
Conclusion
Congratulations on following this guide! Trong hướng dẫn này, bạn sẽ học cách xác minh hợp đồng (cả hợp đồng đơn và hợp đồng nhiều phần) bằng Kaiascan và OKLink để tăng cường tính minh bạch (cho người dùng), sự tiện lợi (cho nhà phát triển) và tính bảo mật của hợp đồng đã triển khai. Visit Kaia Docs for more information and Kaia Forum if you have any questions.