Quản lý ví an toàn trên Kaia Chain: Hướng dẫn chi tiết cho nhà phát triển
Giới thiệu
Cuốn sách nấu ăn này dành cho ai?
Chào mừng đến với Sổ tay Hướng dẫn Sử dụng Ví Điện Tử Kaia Secure. Hướng dẫn này được viết dành cho các nhà phát triển, kỹ sư và các đội ngũ đang phát triển trên nền tảng blockchain Kaia. Dù bạn đang tạo ứng dụng phi tập trung (dApp) đầu tiên, triển khai dịch vụ tự động hóa, hay quản lý quỹ, cuốn cẩm nang này cung cấp các hướng dẫn cơ bản để quản lý khóa mã hóa và ví với tư duy ưu tiên bảo mật.
Cách sử dụng cuốn sách nấu ăn này
Cuốn sách nấu ăn này tuân theo một lộ trình học tập tiến bộ:
- Phần 1 trình bày các nguyên tắc cơ bản về bảo mật mà bạn cần nắm vững.
- Phần 2 cung cấp các hướng dẫn thực hành từ cơ bản đến nâng cao.
Mỗi công thức được xây dựng dựa trên các khái niệm từ các phần trước. Mới làm quen với bảo mật Web3? Bắt đầu với Chương 1. Là nhà phát triển có kinh nghiệm? Nhảy đến các công thức nấu ăn phù hợp với nhu cầu của bạn
Triết lý cốt lõi: An toàn là ưu tiên hàng đầu
Trong Web3, câu nói "không phải chìa khóa của bạn, không phải tiền điện tử của bạn" là một chân lý cơ bản. Đối với các nhà phát triển, điều này áp dụng cho mọi giai đoạn của vòng đời phát triển phần mềm. Một khóa bị xâm phạm duy nhất có thể gây ra những tổn thất nghiêm trọng cho cả người dùng và dự án. Triết lý cốt lõi của hướng dẫn này là An toàn là ưu tiên hàng đầu. Mỗi công thức và hướng dẫn được thiết kế để giúp bạn xây dựng các hệ thống mạnh mẽ và an toàn ngay từ đầu, giảm thiểu bề mặt tấn công và bảo vệ tài sản từ ngày đầu tiên.
Điều kiện tiên quyết
Để tận dụng tối đa cuốn sách nấu ăn này, bạn nên có kiến thức cơ bản về các khái niệm blockchain (ví dụ: khóa công khai/riêng tư, giao dịch, phí gas) và thành thạo trong việc sử dụng giao diện dòng lệnh.
Phần 1: Khái niệm cơ bản và Nguyên tắc bảo mật
Phần này tập trung vào lý do tại sao việc quản lý ví an toàn lại quan trọng. Nó xác lập kiến thức cơ bản cần thiết trước khi bắt đầu viết bất kỳ đoạn mã nào.
Chương 1: Nguyên lý bảo mật khóa riêng
1.1. Hiểu về cặp khóa: Trái tim của tài khoản của bạn
Trên Kaia, giống như các chuỗi tương thích EVM khác, tài khoản của bạn không phải là tên người dùng và mật khẩu. Đây là một cặp khóa mã hóa: một khóa công khai và một khóa riêng tư. Khóa công khai được sử dụng để tạo ra địa chỉ công khai của bạn, tương tự như số tài khoản ngân hàng của bạn — bạn có thể chia sẻ nó một cách an toàn. Khóa riêng tư là thông tin bí mật cho phép thực hiện tất cả các thao tác từ tài khoản của bạn, như ký giao dịch hoặc tin nhắn. Đây là thông tin quan trọng nhất cần được bảo vệ. Bất kỳ ai sở hữu khóa riêng tư của bạn đều có quyền kiểm soát hoàn toàn và không thể đảo ngược đối với tài khoản và tài sản của bạn.
1.2. Tạo khóa an toàn: Các phương pháp tốt nhất cho Kaia
Một khóa an toàn là một khóa được tạo ngẫu nhiên. Sự an toàn của tài khoản của bạn phụ thuộc vào tính toán học không thể đoán được của khóa riêng tư của bạn. Luôn sử dụng các thư viện mã hóa tiêu chuẩn và đã được kiểm tra kỹ lưỡng để tạo khóa, chẳng hạn như những thư viện được tích hợp trong ethers-ext hoặc các công cụ được đề cập trong hướng dẫn này. Không bao giờ cố gắng tạo ra các khóa riêng tư "thông minh" hoặc "dễ đọc cho con người", vì điều này sẽ làm giảm đáng kể tính ngẫu nhiên của chúng và khiến chúng dễ bị đoán ra.
1.3. Lưu trữ khóa an toàn: Từ kho khóa cục bộ đến kho lưu trữ sản xuất
Cách bạn lưu trữ khóa riêng tư của mình quan trọng không kém cách bạn tạo ra nó. Lưu trữ khóa riêng tư trong một tệp văn bản thuần túy tương đương với việc viết mật khẩu ngân hàng của bạn lên một mảnh giấy dán và để nó trên màn hình máy tính.
CẢNH BÁO: Tuyệt đối không lưu trữ khóa riêng tư dưới dạng văn bản thuần túy trong các tệp .env. Mặc dù tiện lợi cho quá trình phát triển, các tệp .env thường bị đẩy lên hệ thống kiểm soát phiên bản một cách vô tình, khiến các khóa bí mật bị lộ ra công khai và dẫn đến việc tiền bị đánh cắp ngay lập tức.
Tiêu chuẩn cho lưu trữ cục bộ an toàn là một tệp kho khóa được mã hóa (thường được gọi là tệp kho JSON). Tệp này chứa khóa riêng tư của bạn, nhưng nó đã được mã hóa bằng một mật khẩu mạnh mà bạn tự chọn. Để sử dụng khóa, bạn phải cung cấp tệp keystore và mật khẩu để giải mã nó trong bộ nhớ. Đối với hệ thống sản xuất, phương pháp tốt nhất là sử dụng các công cụ quản lý khóa bí mật chuyên dụng như AWS KMS hoặc Google Cloud KMS, đảm bảo rằng các khóa bí mật không bao giờ được tiết lộ trực tiếp cho mã ứng dụng.
1.4. Quản lý khóa trong bộ nhớ: Giảm thiểu rủi ro lộ khóa trong quá trình thực thi
Ngay cả khi được tải từ một nguồn an toàn, khóa riêng tư vẫn phải tồn tại trong bộ nhớ của ứng dụng để ký giao dịch. Điều quan trọng là phải giảm thiểu tối đa sự tiếp xúc này. Thiết kế ứng dụng tốt đảm bảo rằng khóa được lưu trữ trong bộ nhớ trong thời gian ngắn nhất có thể và được xóa ngay lập tức sau khi sử dụng. Các thư viện và công thức trong cuốn sách nấu ăn này được thiết kế để tuân theo nguyên tắc này.
Chương 2: Khám phá hệ sinh thái ví Kaia
2.1. Ví Kaia
Kaia Wallet là ví tiền điện tử tích hợp sẵn trong trình duyệt dành cho hệ sinh thái Kaia. Mặc dù có nhiều tính năng tương tự MetaMask, Kaia được tối ưu hóa cho Kaia bằng cách hỗ trợ các loại giao dịch độc đáo, giao dịch ủy quyền phí và hệ thống tài khoản riêng biệt của mạng lưới, đồng thời cung cấp trải nghiệm người dùng mượt mà trên mạng lưới. Đối với các nhà phát triển, việc hiểu rõ các hành vi cụ thể và giao diện lập trình ứng dụng (API) là yếu tố quan trọng để xây dựng các tích hợp dApp mượt mà.
2.2. Lưu trữ lạnh: Tổng quan về ví phần cứng
Lưu trữ lạnh là việc lưu trữ các khóa riêng tư trên một thiết bị không kết nối với internet. Một ví phần cứng là một thiết bị vật lý được thiết kế riêng cho mục đích này. Nó ký các giao dịch bên trong mà không bao giờ tiết lộ khóa riêng tư cho máy tính kết nối. Điều này khiến chúng trở thành tiêu chuẩn vàng trong việc bảo vệ tài sản có giá trị cao. Hướng dẫn này sẽ tập trung vào các ví phần cứng được hỗ trợ chính thức DCENT và SafePal.
2.3. Ví đa chữ ký: Giới thiệu về Kaia Safe
Ví đa chữ ký (hoặc "multi-sig") là một hợp đồng thông minh y�êu cầu nhiều khóa riêng tư để phê duyệt một giao dịch trước khi nó có thể được thực thi. Ví dụ, một giao dịch đa chữ ký 2-of-3 yêu cầu sự chấp thuận của hai trong số ba chủ sở hữu được chỉ định. Đây là tiêu chuẩn để quản lý quỹ đội, kho bạc và quản trị hợp đồng thông minh quan trọng, vì nó ngăn chặn điểm yếu duy nhất có thể gây ra sự cố. Kaia Safe là giải pháp đa chữ ký chính trên mạng Kaia.
Phần 2: Các phương pháp thực tế để quản lý ví
Bây giờ khi bạn đã hiểu các nguyên tắc bảo mật cơ bản từ Phần 1, đã đến lúc áp dụng chúng vào thực tế. Phần này cung cấp hướng dẫn chi tiết từng bước cho các tình huống thực tế, bắt đầu từ việc thiết lập môi trường phát triển cá nhân và tiến tới các giải pháp đạt tiêu chuẩn sản xuất.
Bạn sẽ xây dựng:
- Môi trường phát triển an toàn cho Foundry và Hardhat
- Cấu hình kho bạc đa chữ ký cho hợp tác nhóm
- Tích hợp dApp với các loại ví khác nhau
Chương 3: Cấu hình cho nhà phát triển cá nhân và ứng dụng phi tập trung (dApps)
Chương này cung cấp các hướng dẫn thực hành chi tiết về cách thiết lập và quản lý ví trong quá trình phát triển, với trọng tâm là bảo mật ngay từ dòng code đầu tiên.
3.1. Công thức: Ví phát triển Kaia đầu tiên của bạn
Nếu bạn là người mới sử dụng Kaia hoặc đang thiết lập ví Kaia lần đầu tiên, chúng tôi khuyên bạn nên tham khảo phần Bắt đầu với ví. Nó bao gồm các bước cơ bản như cài đặt ví, tạo và sao lưu tài khoản một cách an toàn, thêm tài khoản bổ sung và nạp tiền vào ví.
3.2. Hướng dẫn: Quản lý tài khoản an toàn trong dự án Foundry
Với Foundry, bạn có thể nhập ví đã mã hóa thông qua giao diện dòng lệnh cast wallet. Mặc dù việc mã hóa các giá trị khác như URL RPC hiện chưa khả dụng, việc kết hợp các khóa mã hóa với biến môi trường vẫn cung cấp một cấu hình an toàn.
Bước 1: Cài đặt và khởi tạo Foundry
Nếu bạn chưa cài đặt Foundry, hãy chạy lệnh sau trong terminal:
curl -L https://foundry.paradigm.xyz | bash
Sau đó, khởi tạo một dự án Foundry bằng cách chạy lệnh sau:
foundryupforge init foundry-encryptedcd foundry-encrypted
Bây giờ bạn nên có một thư mục chứa mẫu mặc định của Foundry.
Bước 2: Nhập ví của bạn
Bạn có thể nhập ví bằng cách sử dụng công cụ dòng lệnh (CLI) của ví Cast. Chỉ cần thay thế your-wallet-name bằng tên ví mà bạn muốn và thực thi lệnh sau:
cast wallet import your-wallet-name --interactive
Sau khi nhập khóa riêng tư, bạn sẽ được yêu cầu đặt mật khẩu để mã hóa. Khóa mã hóa được lưu trữ trong kho khóa cục bộ của bạn tại đường dẫn mặc định ~/.foundry/keystore.
Cờ tương tác được sử dụng để ngăn chặn khóa riêng tư bị lưu trữ trong lịch sử terminal.

Bước 3: Tạo và lấy tệp môi trường
Sau khi mã hóa ví của bạn, bạn cần lưu trữ điểm cuối RPC một cách an toàn. Foundry hiện tại chưa hỗ trợ mã hóa cho các giá trị như URL RPC, do đó việc sử dụng tệp .env là lựa chọn phổ biến và an toàn hơn cho loại giá trị bí mật này.
Tạo một tệp .env trong thư mục gốc của dự án và thêm biến môi trường KAIROS_RPC_URL:
KAIROS_RPC_URL=https://responsive-green-emerald.kaia-kairos.quiknode.pro
Và tải nó trước khi chạy skript của bạn:
source .env
Bước 4: Chạy kịch bản của bạn
Chúng tôi đã hoàn tất việc nhập ví và thêm điểm cuối RPC vào cấu hình của chúng tôi. Bây giờ chúng ta đã sẵn sàng để chạy skript và triển khai hợp đồng.
Mẫu Foundry mặc định bao gồm một skript mẫu để triển khai hợp đồng Counter. Bạn nên chỉnh sửa script này để sử dụng tên ví và điểm cuối RPC của riêng bạn.
Khi bạn chạy skript của mình bằng cách sử dụng một trong hai lệnh forge create hoặc forge script,
- Thiết bị đầu cuối sẽ yêu cầu bạn nhập mật khẩu đã được sử dụng để mã hóa khóa riêng tư của bạn.
- Foundry sẽ chạy skript của bạn và triển khai hợp đồng của bạn sau khi bạn nhập mật khẩu.
Sử dụng Forge để tạo
forge create --rpc-url $KAIROS_RPC_URL src/Counter.sol:Counter --broadcast --account your-wallet-name

Sử dụng kịch bản Forge
forge script script/Counter.s.sol:CounterScript --rpc-url $KAIROS_RPC_URL --account your-wallet-name --broadcast
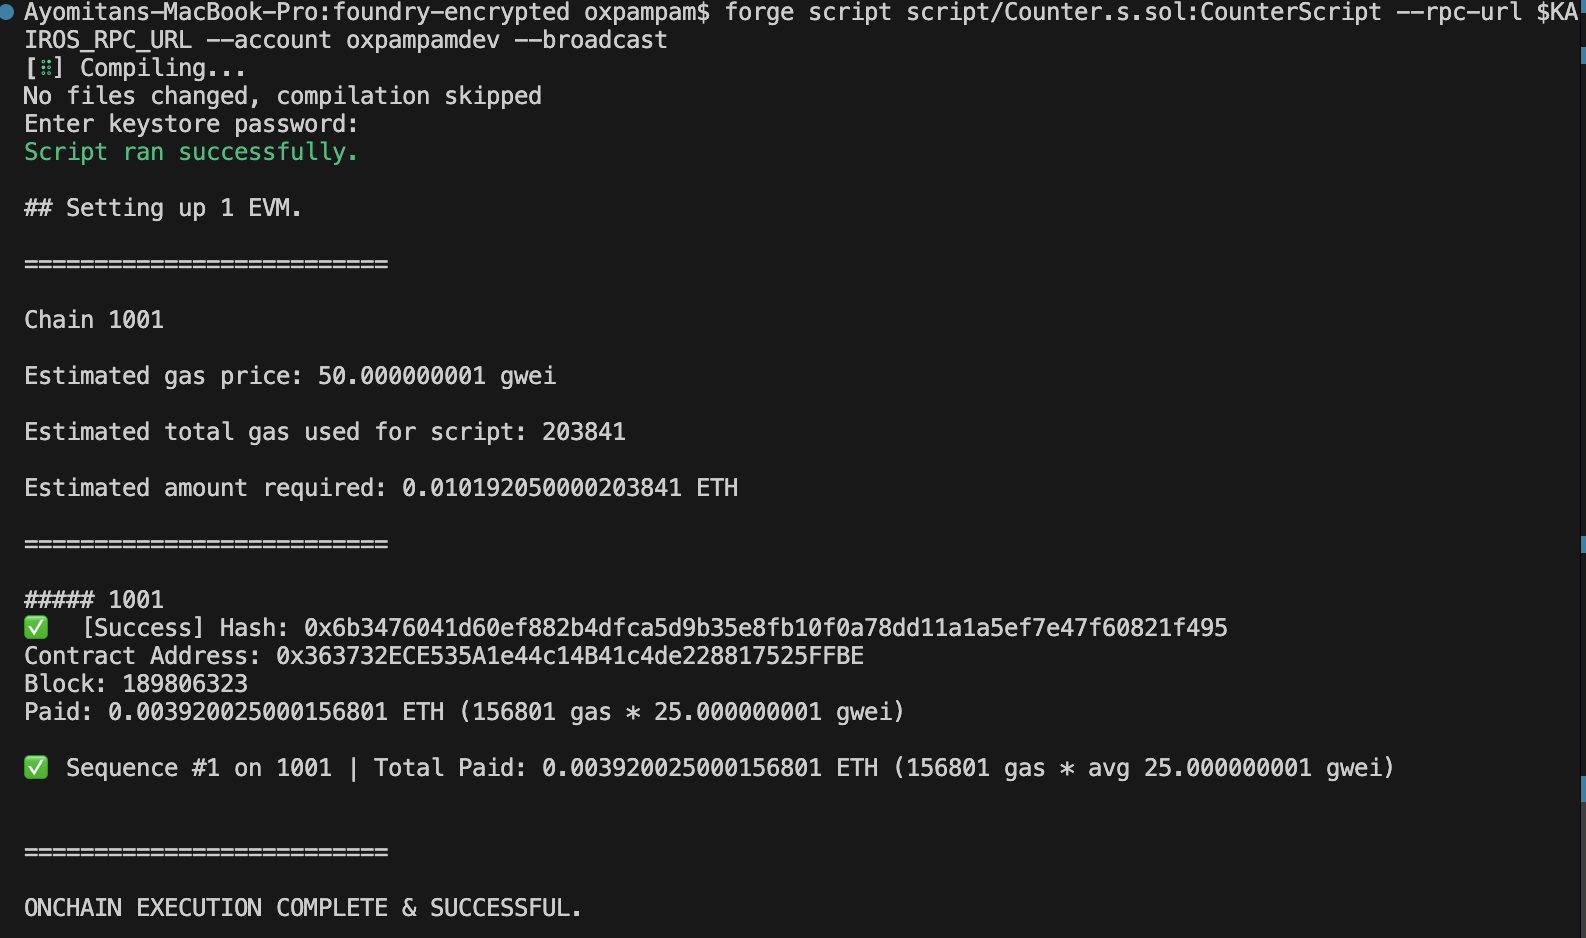
Chúc mừng. Bạn đã cấu hình thành công các bí mật được mã hóa trong Foundry và sử dụng chúng trong các kịch bản triển khai của mình.
3.3. Hướng dẫn: Quản lý tài khoản an toàn trong dự án Hardhat
Hardhat 3 (hiện đang ở giai đoạn beta) giới thiệu tính năng quản lý bí mật được mã hóa thông qua trình quản lý bí mật tích hợp sẵn. Tính năng này cho phép lưu trữ an toàn các thông tin nhạy cảm dạng chuỗi ký tự như khóa riêng tư hoặc URL RPC, cùng với các khóa API không nên được lưu trữ trong hệ thống kiểm soát phiên bản.
Bước 1: Tạo dự án Hardhat mới
Chạy các lệnh sau trong terminal của bạn để tạo một dự án Hardhat mới.
mkdir hardhat-encrypted && cd hardhat-encryptednpm init -ynpx hardhat --init
Chấp nhận câu trả lời mặc định cho các câu hỏi. Sau đó, chạy phiên bản Hardhat để xác minh phiên bản dự án:
npx hardhat --version
Bước 2: Thiết lập các bí mật được mã hóa
Để lưu URL RPC của bạn, hãy chạy lệnh sau:
npx hardhat keystore set KAIROS_RPC_URL

Để lưu trữ khóa riêng tư (PRIVATE KEY) của bạn dưới dạng mã hóa, hãy chạy lệnh sau:
npx hardhat keystore set PRIVATE_KEY

Bước 3: Xác minh các thông tin bí mật đã được mã hóa
Để xác minh rằng các thông tin bí mật của bạn đã được mã hóa, hãy chạy lệnh sau:
npx hardhat keystore list
Bạn nên thấy KAIROS_RPC_URL và PRIVATE_KEY trong danh sách các bí mật được mã hóa.
Để lấy lại giá trị bí mật, hãy chạy lệnh sau. Bạn sẽ được yêu cầu nhập khóa chính để giải mã nó.
npx hardhat keystore get KAIROS_RPC_URL
Sau khi đã thiết lập các thông tin bí mật, hãy cập nhật tệp cấu hình để tham chiếu chúng một cách an toàn trong dự án của bạn.
Bước 4: Tham chiếu các thông tin bí mật trong cấu hình
Mở tệp hardhat.config.ts và cập nhật phần networks để tham chiếu đến các khóa bí mật đã được mã hóa của bạn. Nếu các tên bí mật của bạn khác nhau, hãy điều chỉnh các mục tương ứng.
import { configVariable } from "hardhat/config";module.exports = { networks: { kairos: { url: configVariable("KAIROS_RPC_URL"), accounts: [configVariable("PRIVATE_KEY")], }, },};
Bây giờ bạn có thể sử dụng các thông tin bí mật đã được mã hóa trong các kịch bản triển khai của mình mà không bao giờ tiết lộ chúng dưới dạng văn bản thuần túy.
Bước 5: Sử dụng các khóa bí mật được mã hóa trong các kịch bản triển khai
Sử dụng lệnh sau để triển khai hợp đồng của bạn thông qua mô-đun Counter.ts trong thư mục ignition/modules. Module này triển khai Counter.sol và gọi hàm incBy với giá trị 5.
npx hardhat ignition deploy --network kairos ignition/modules/Counter.ts
Khi chạy lệnh này, Hardhat sẽ hiển thị một hộp thoại yêu cầu bạn nhập mật khẩu mà bạn đã tạo trước đó.
Điều này là cần thiết vì mạng Kairos được cấu hình với một kho khóa (keystore). Bạn chỉ được yêu cầu nhập nếu tác vụ hoặc kịch bản của bạn phụ thuộc vào các thông tin bí mật được mã hóa. Sau khi mật khẩu được nhập, Hardhat sẽ triển khai hợp đồng của bạn và thực thi hàm incBy với giá trị là 5.
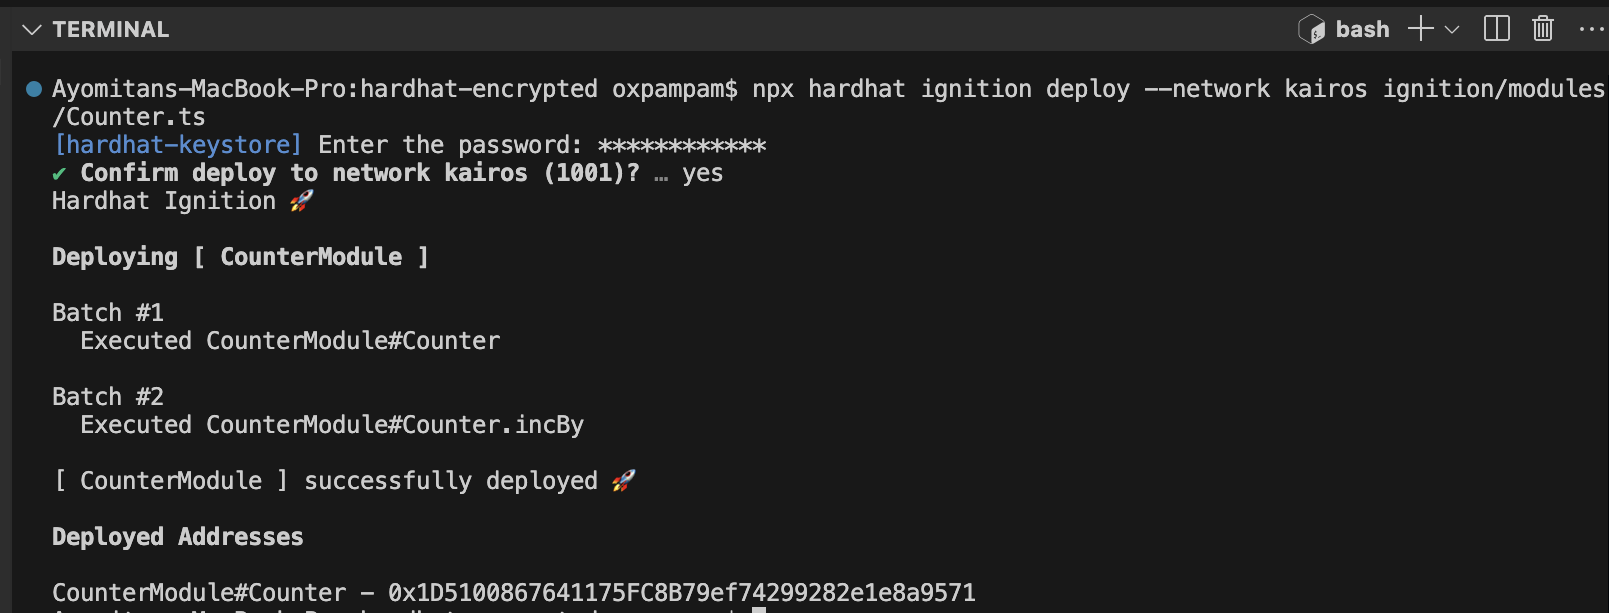
Chúc mừng. Bạn đã cấu hình thành công các bí mật được mã hóa trong Hardhat và sử dụng chúng trong các kịch bản triển khai của mình.
3.4. Hướng dẫn: Kết nối ví phần cứng (SafePal) với ứng dụng phi tập trung (dApp)
Trong phần này, bạn sẽ học cách kết n�ối ví phần cứng SafePal S1 với một ứng dụng phi tập trung (DApp) của bên thứ ba và yêu cầu chữ ký cho một giao dịch.
Bước 1: Cài đặt ví Safepal S1
Trước khi kết nối với bất kỳ ứng dụng phi tập trung (DApp) nào, hãy đảm bảo thiết bị SafePal S1 của bạn đã được cài đặt và cấu hình đúng cách. Nếu bạn chưa thực hiện, hãy làm theo hướng dẫn cài đặt tại đây.
Nếu thiết bị của bạn đã được cấu hình, bạn có thể bỏ qua bước này.
Bước 2: Kết nối thiết bị S1 với ứng dụng SafePal
SafePal S1 là một ví phần cứng hoàn toàn offline, có nghĩa là nó không thể kết nối trực tiếp với internet hoặc giao tiếp với các mạng blockchain. Để tương tác với các ứng dụng phi tập trung (dApps) hoặc ký giao dịch, thiết bị phải được kết nối với ứng dụng SafePal.
Ứng dụng SafePal hoạt động như một trung gian — thu thập dữ liệu blockchain, truyền tải giao dịch và chuyển tiếp tương tác với các ứng dụng phi tập trung (dApp) — đồng thời đảm bảo khóa riêng tư của bạn được lưu trữ an toàn trên thiết bị S1 ngoại tuyến.
Để hoàn tất quá trình ghép đôi, vui lòng làm theo hướng dẫn ghép đôi tại đây pairing guide.
Bước 3: Kết nối với một ứng dụng phi tập trung (dApp).
Trong bước này, bạn sẽ kết nối ví phần cứng SafePal S1 với một ứng dụng phi tập trung (dApp) thông qua WalletConnect.
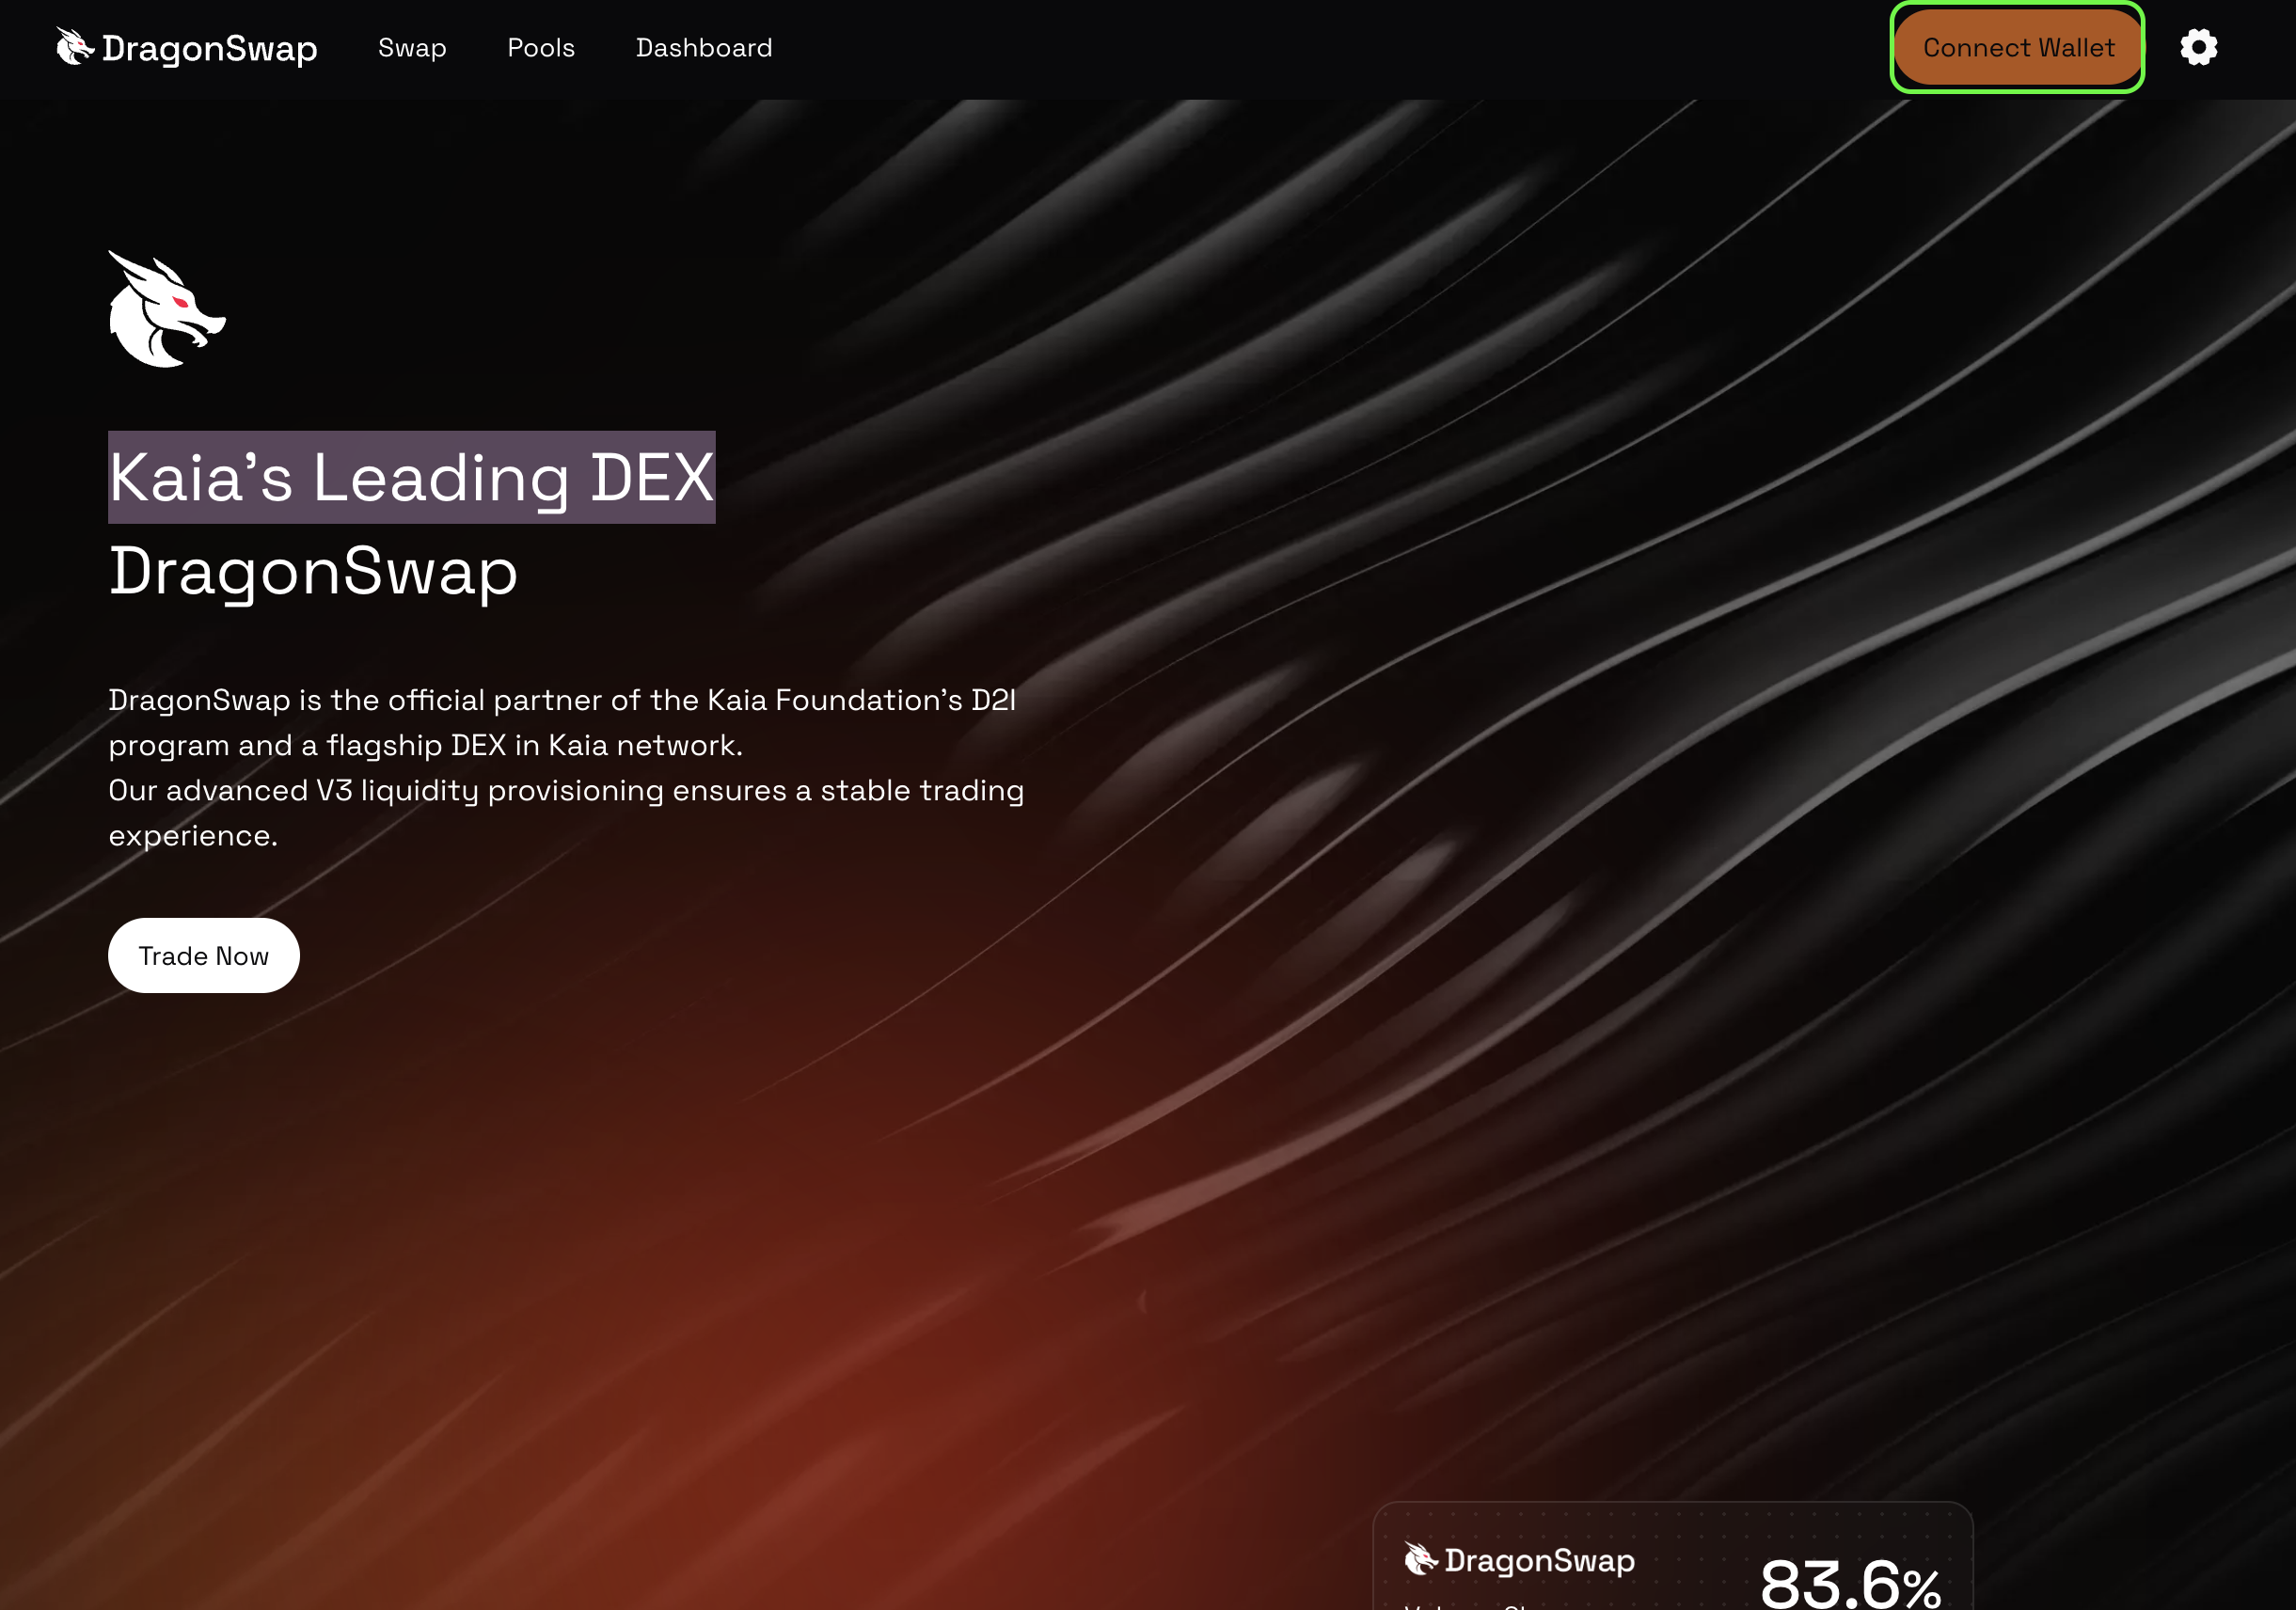
Trong hướng dẫn này, chúng tôi sẽ sử dụng DragonSwap, sàn giao dịch phi tập trung (DEX) hàng đầu của Kaia, làm ví dụ cho ứng dụng phi tập trung (dApp). Kết nối sẽ được thực hiện thông qua trình duyệt của bạn bằng WalletConnect.
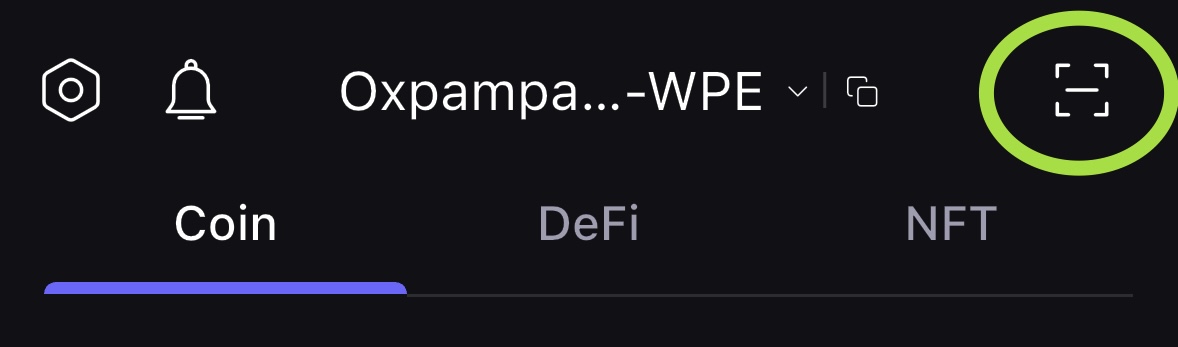
- Khởi chạy ứng dụng DragonSwap bằng cách nhập URL của ứng dụng vào trình duyệt, sau đó nhấp vào nút Kết nối Ví ở góc trên bên phải của trang web.
- Trong số tất cả các tùy chọn kết nối, hãy nhấp vào Wallet Connect. Sẽ có một mã QR hiển thị trên màn hình.
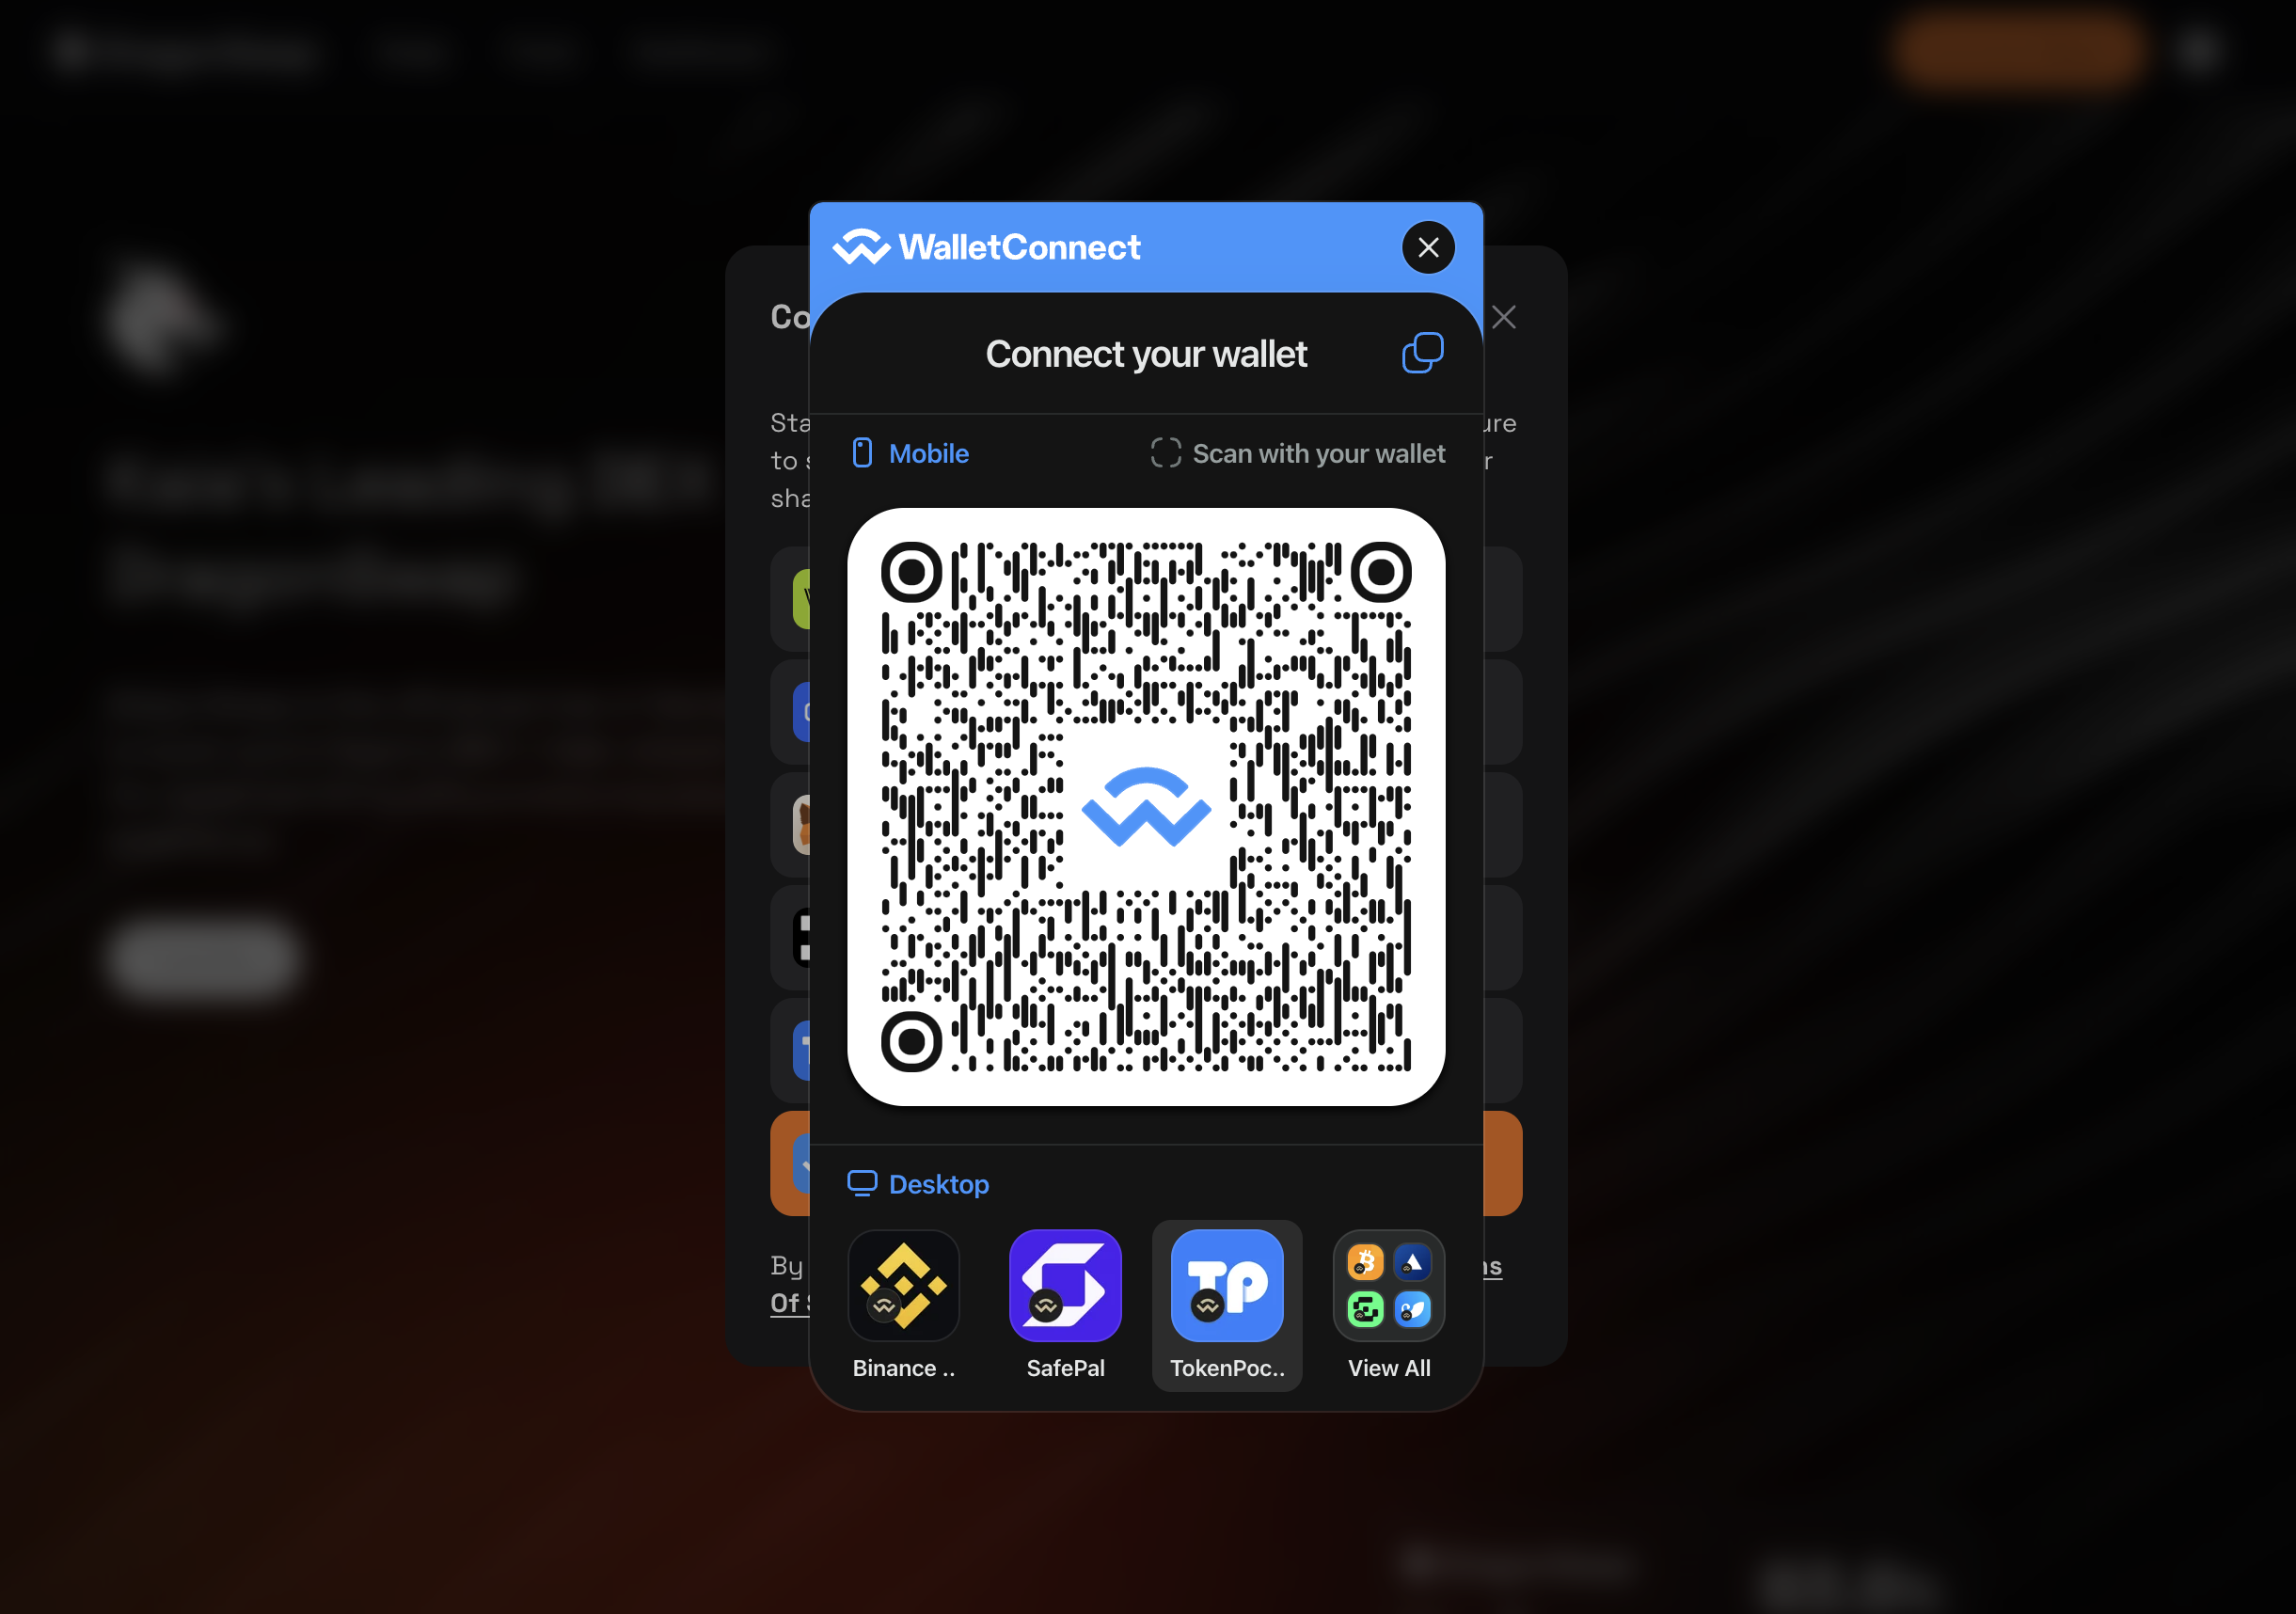
- Quét mã QR bằng ứng dụng SafePal. Bạn có thể bắt đầu quá trình quét bằng cách nhấp vào nút "Quét" ở góc trên bên phải của trang chủ ứng dụng.
- Sau khi quét thành công, xác nhận kết nối với dApp trong ứng dụng và nhấp vào Đồng ý.
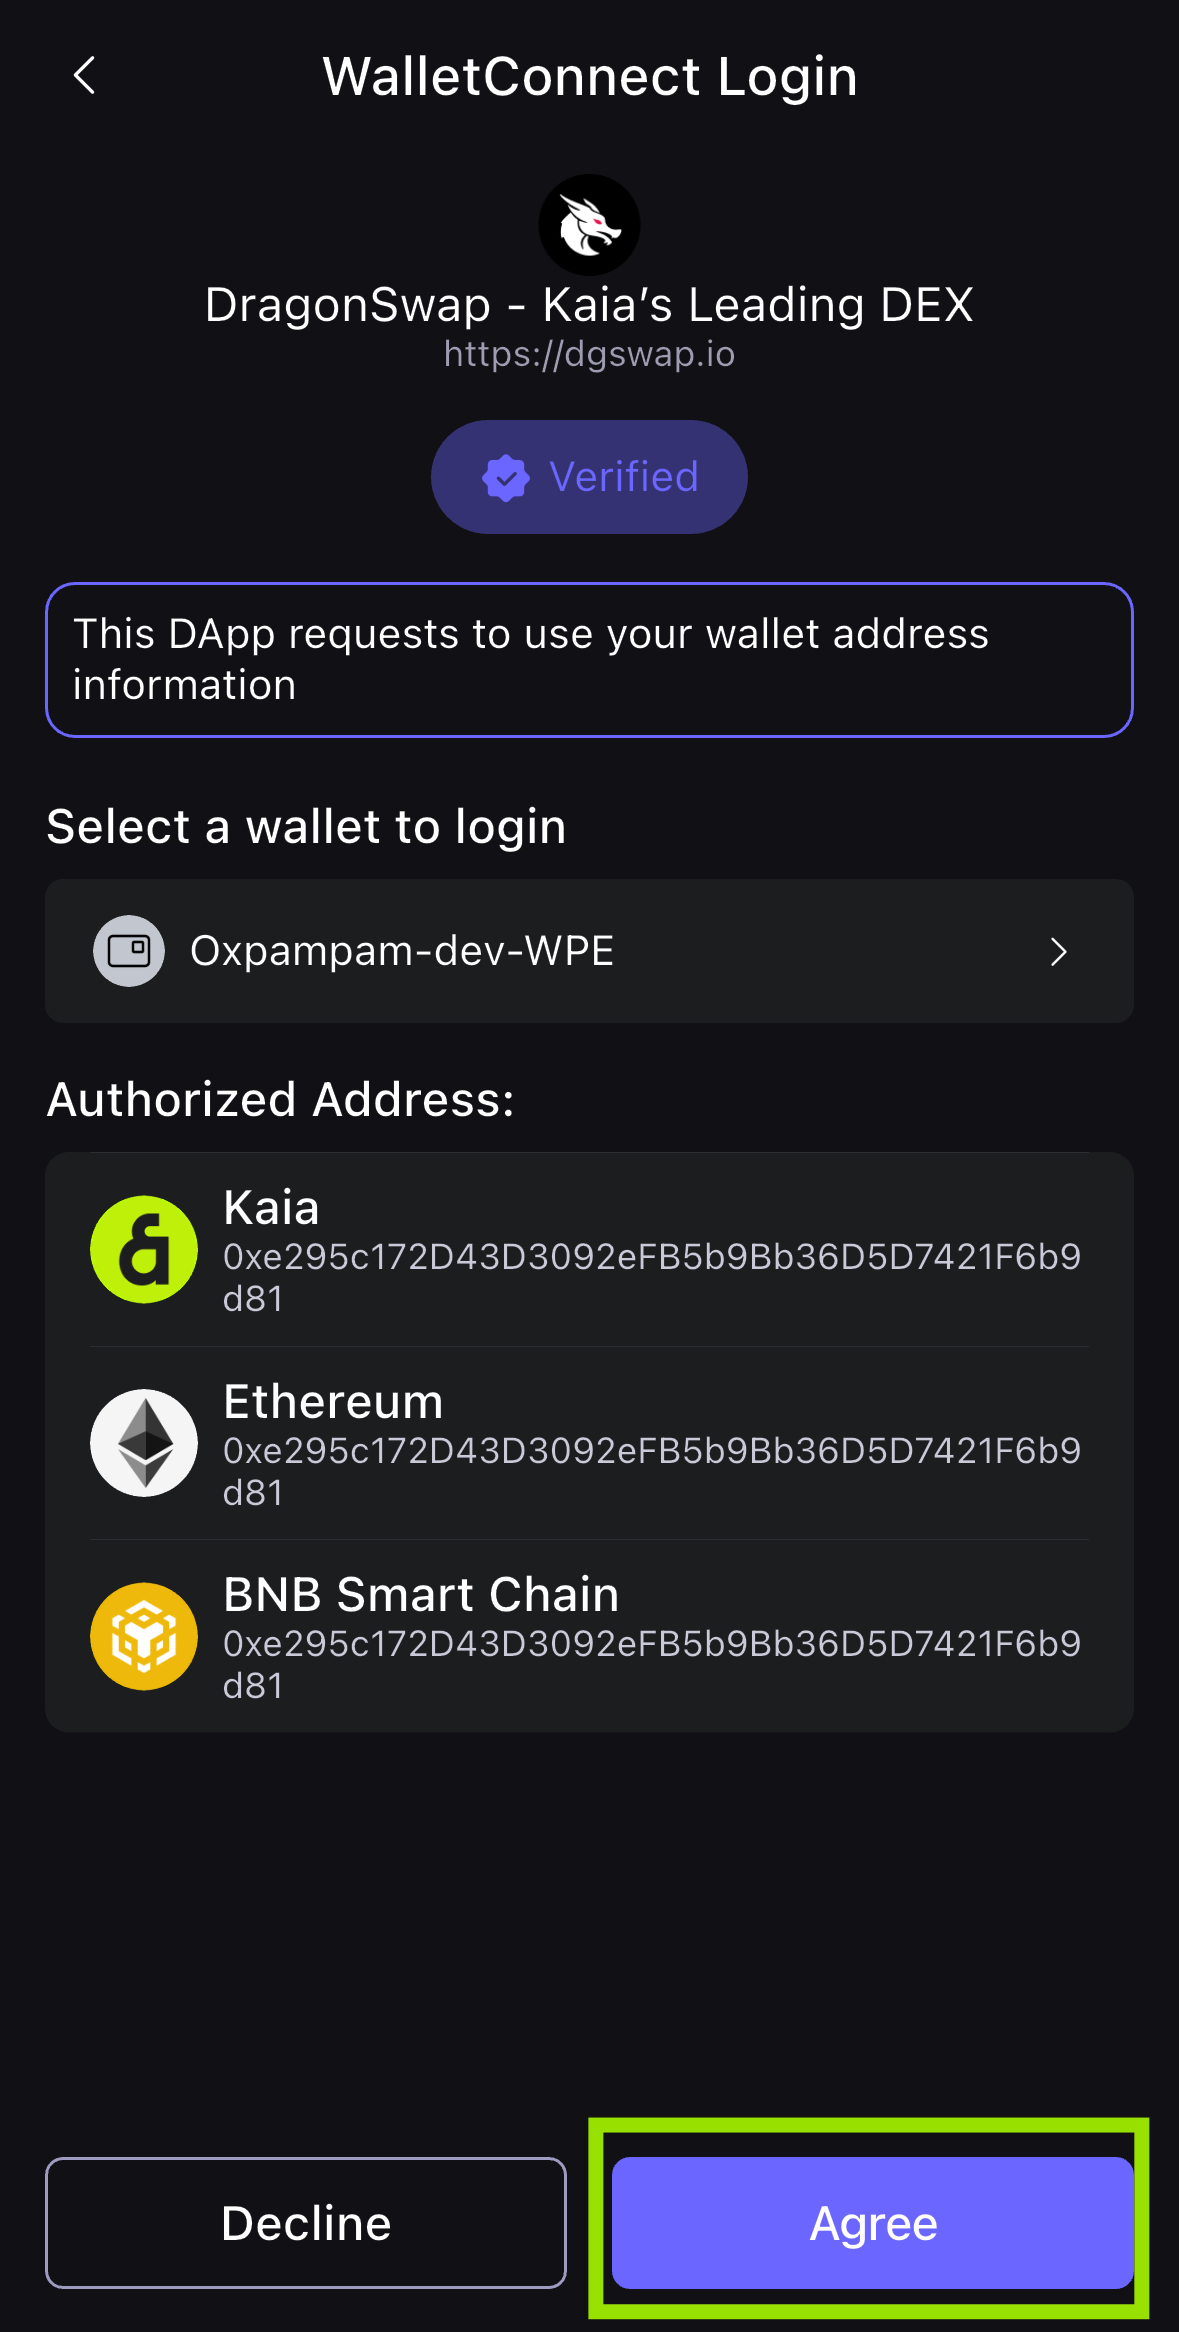
- Bạn đã kết nối thành công ví của mình với ứng dụng DragonSwap dApp trong trình duyệt! Địa chỉ ví của bạn hiện đã hiển thị trong thành phần kết nối DragonSwap.

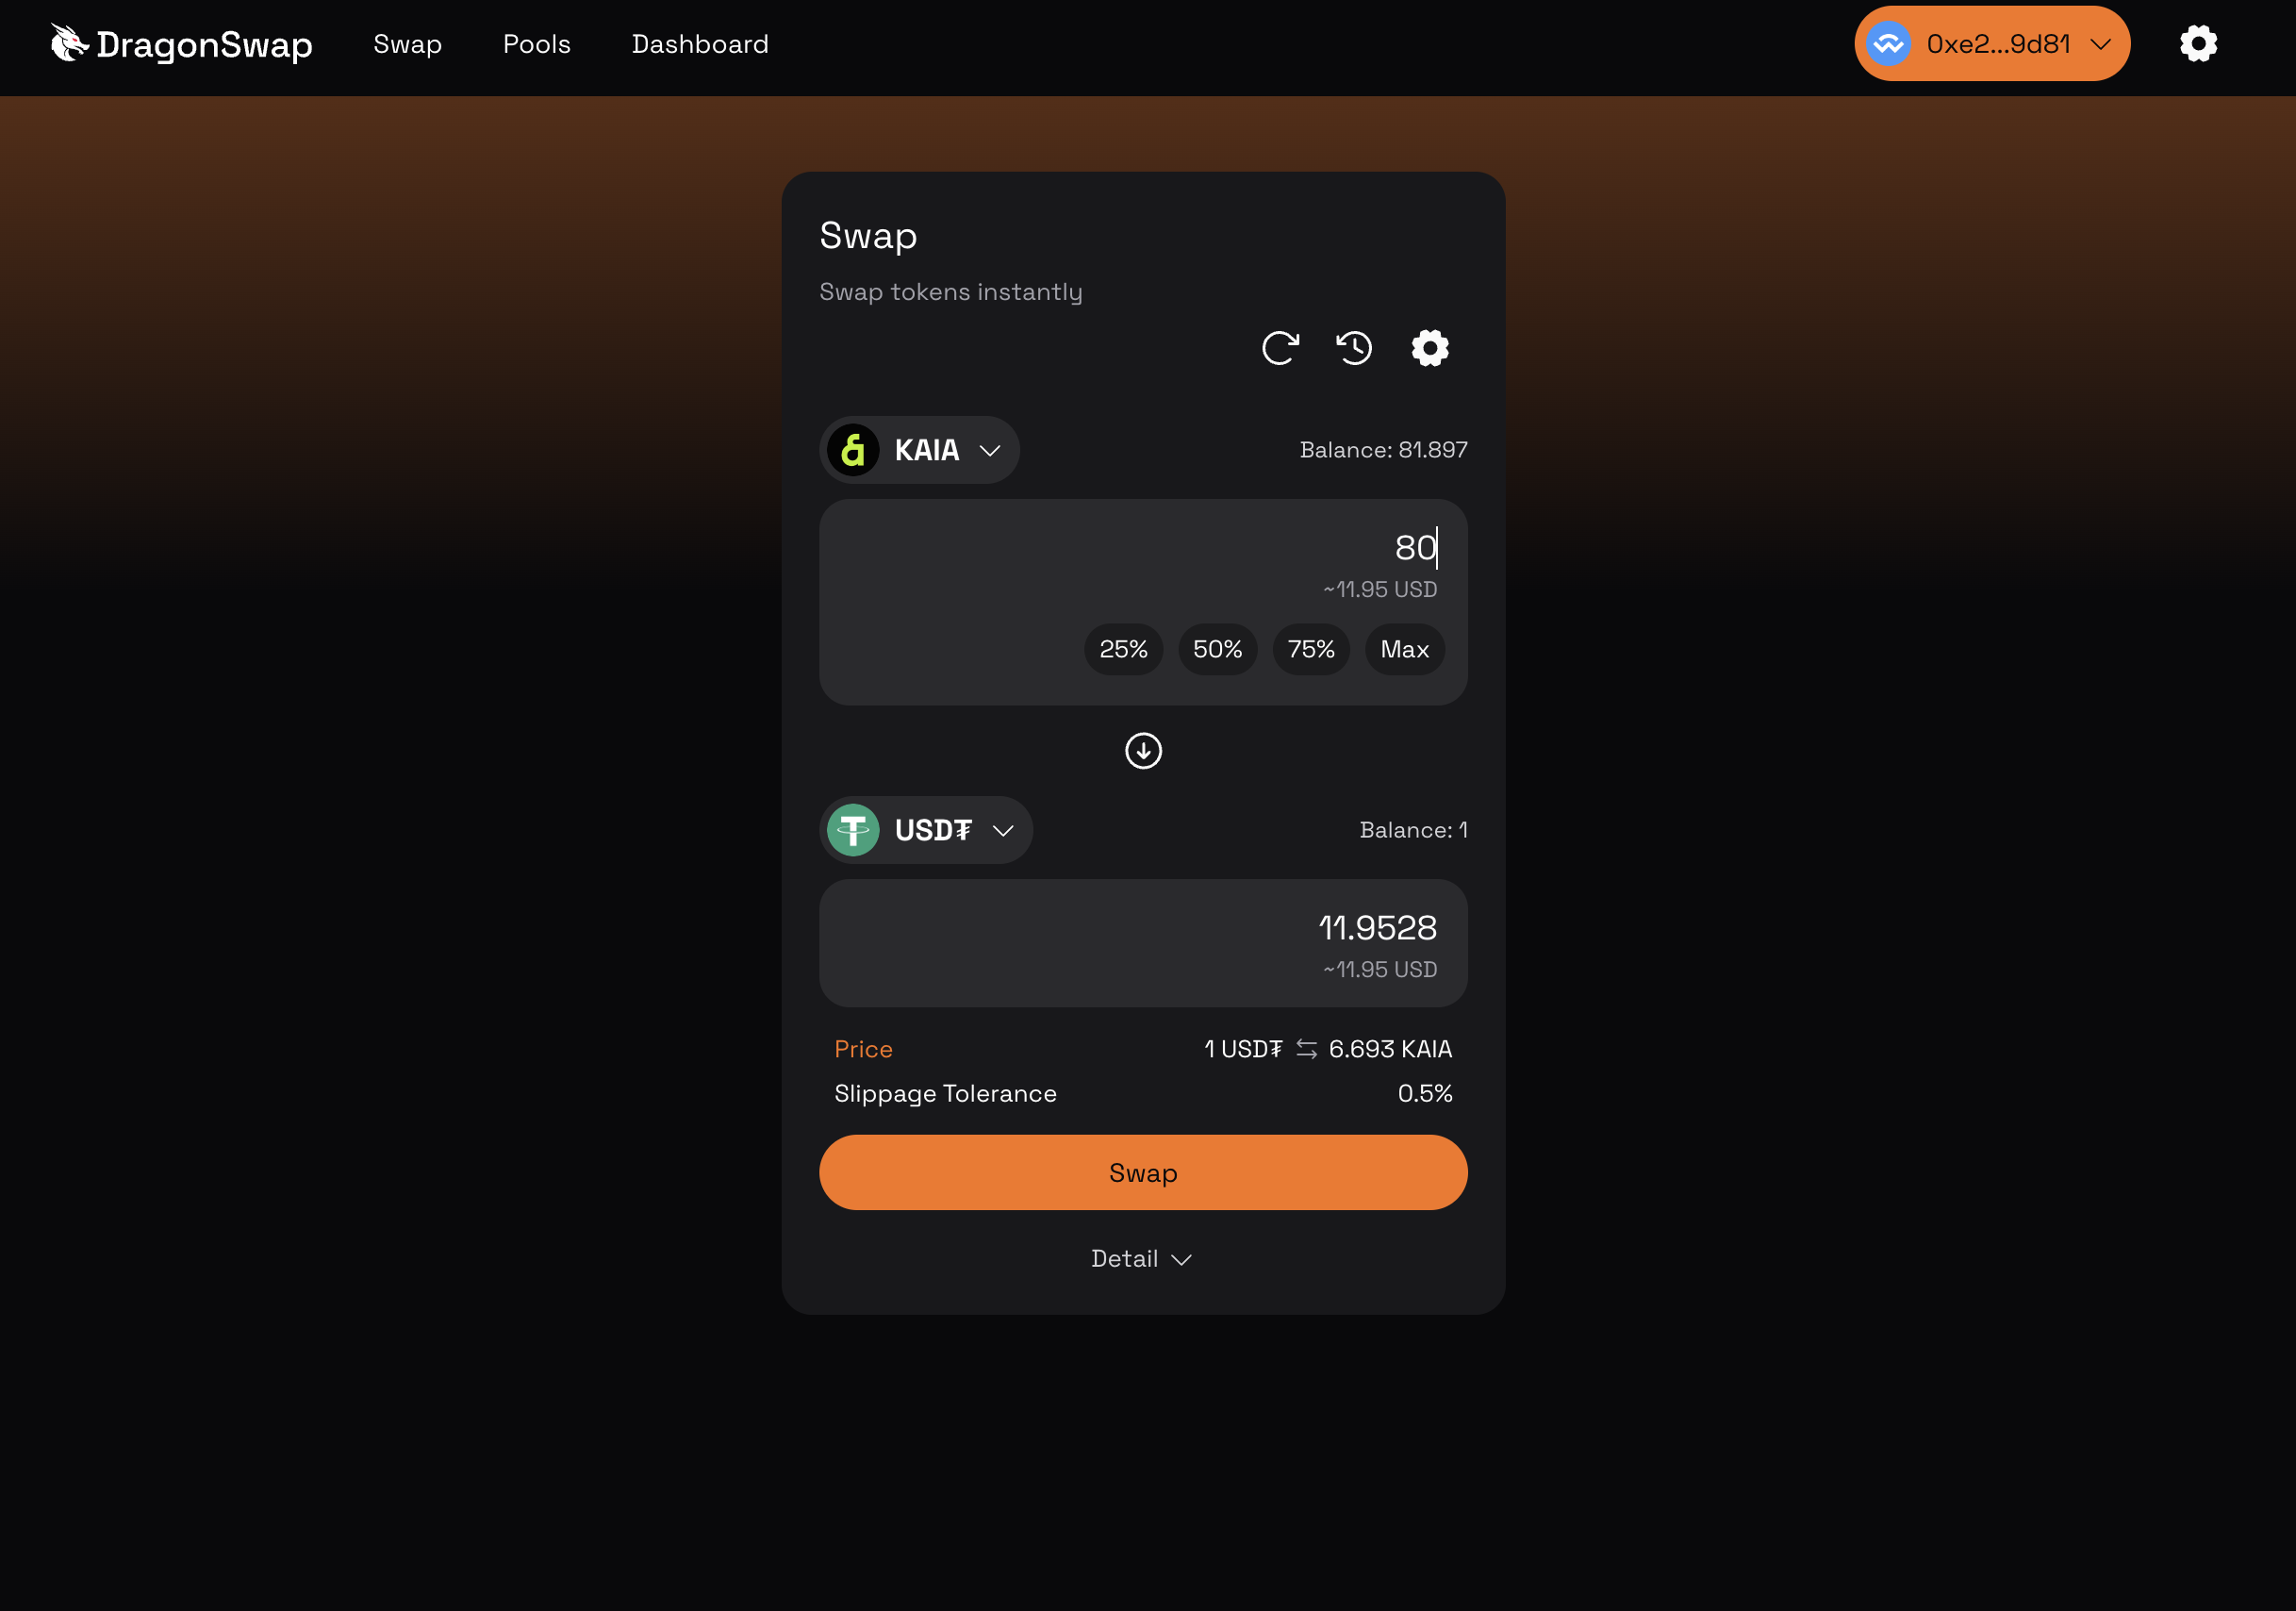
Bước 4: Thực hiện giao dịch
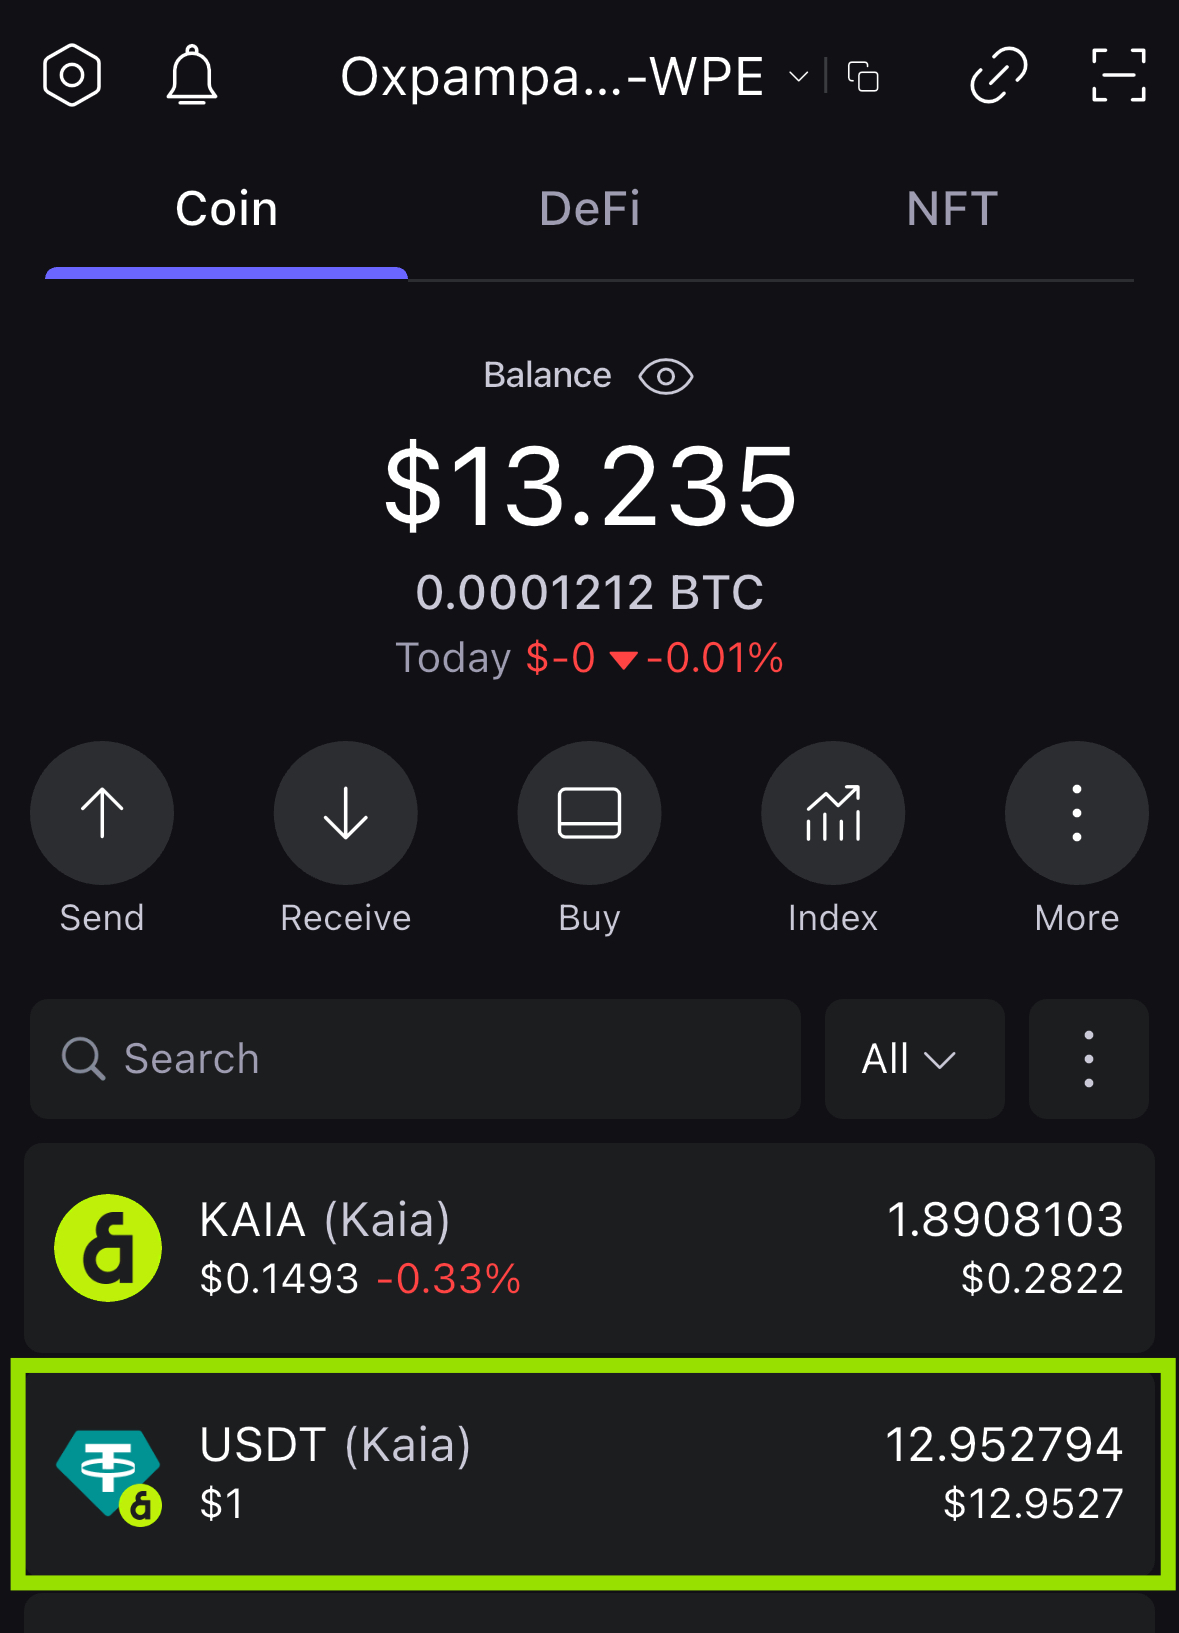
Trong phần này, chúng ta sẽ thực hiện giao dịch bằng cách đổi KAIA lấy USDT. Truy cập trang Swap.
- Nhập đơn đặt hàng hoán đổi của bạn và nhấp vào nút Hoán đổi. Hãy đảm bảo xác nhận việc hoán đổi trước khi tiếp tục giao dịch.
- Mở ứng dụng SafePal và bạn sẽ thấy trang xác nhận giao dịch. Nhấp vào Đồng ý để tiếp tục giao dịch.

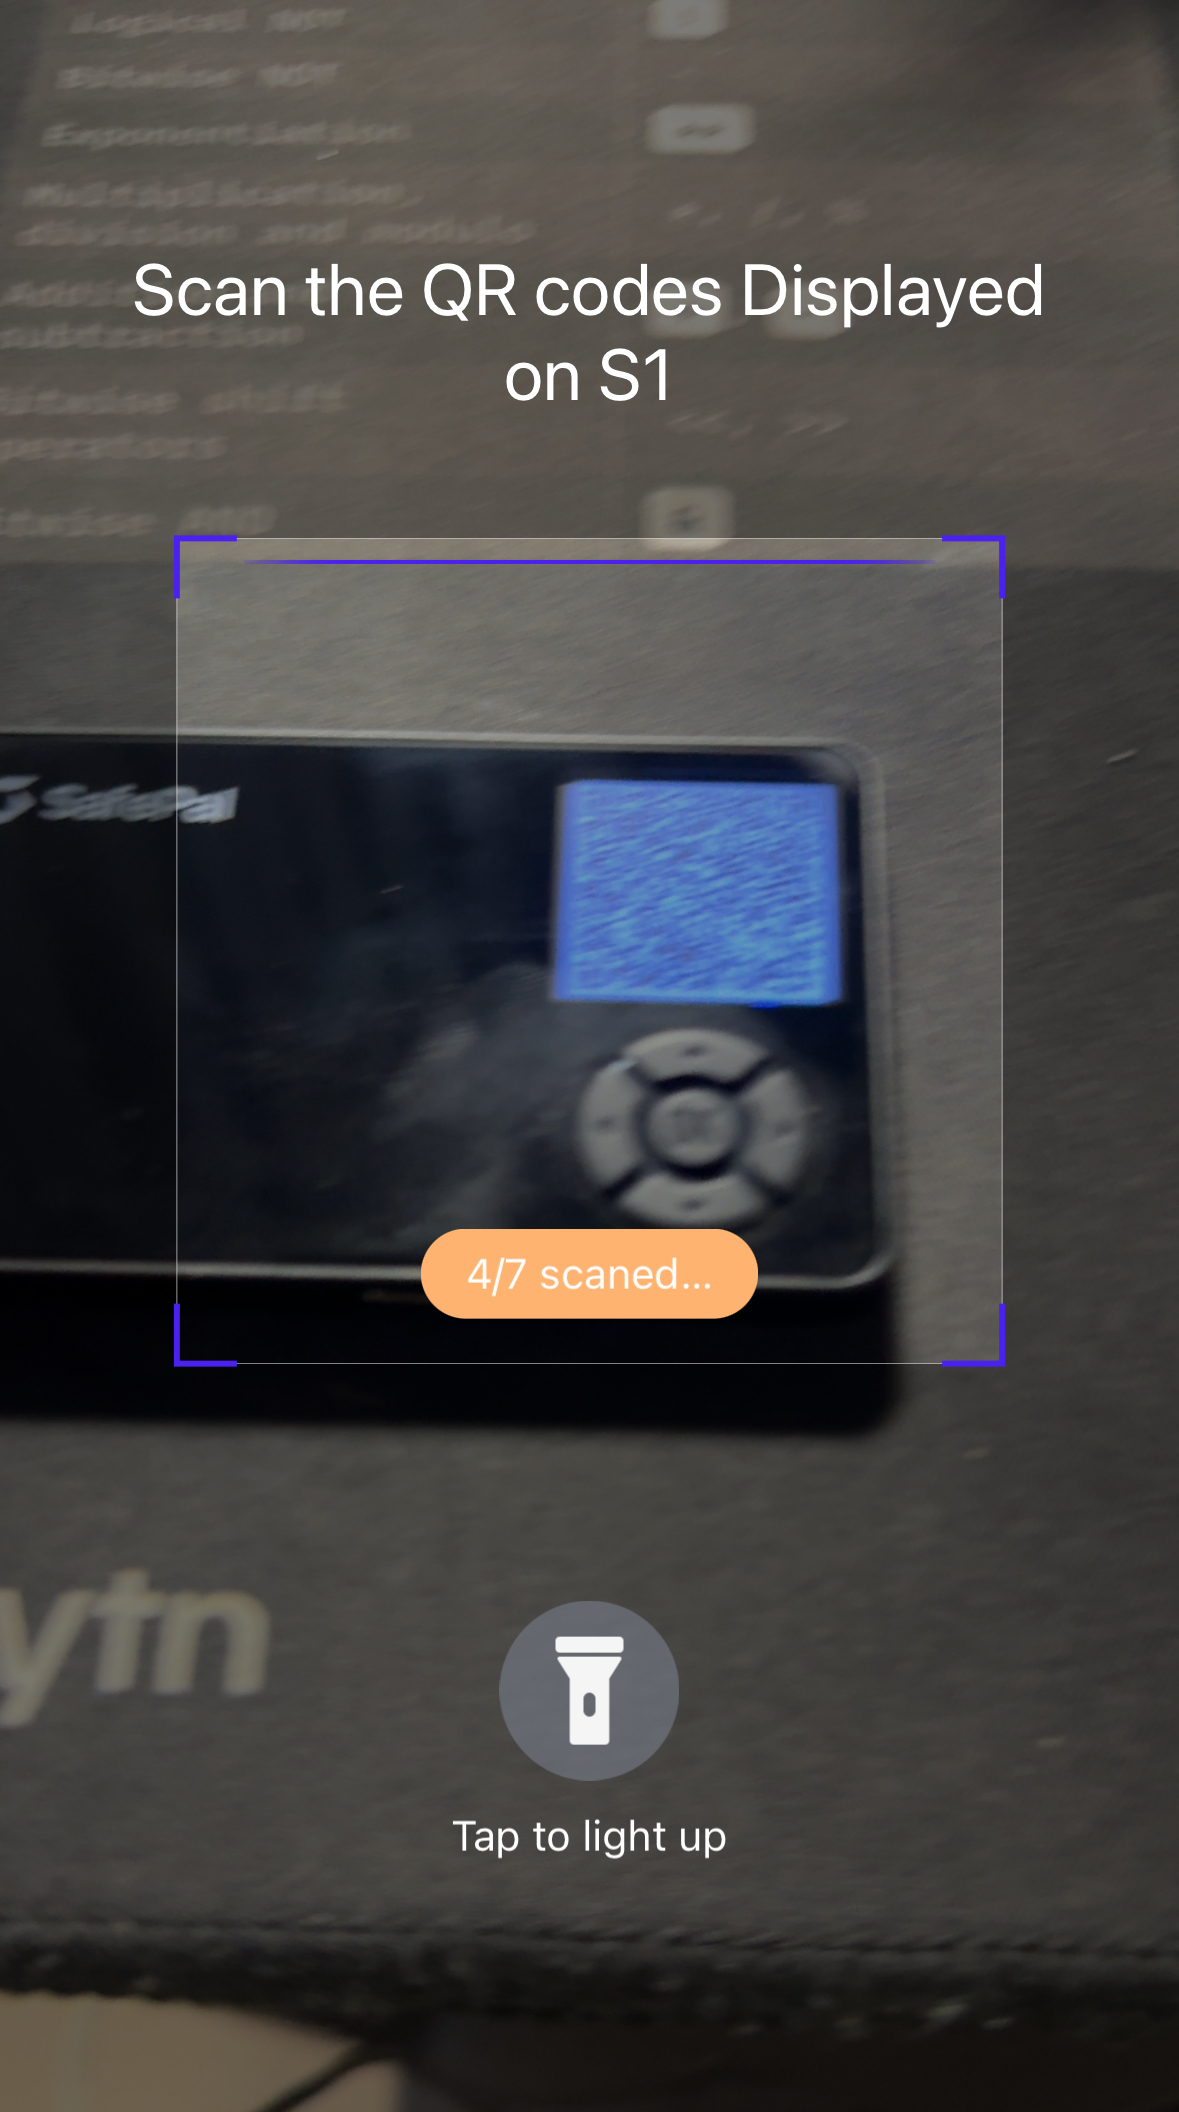
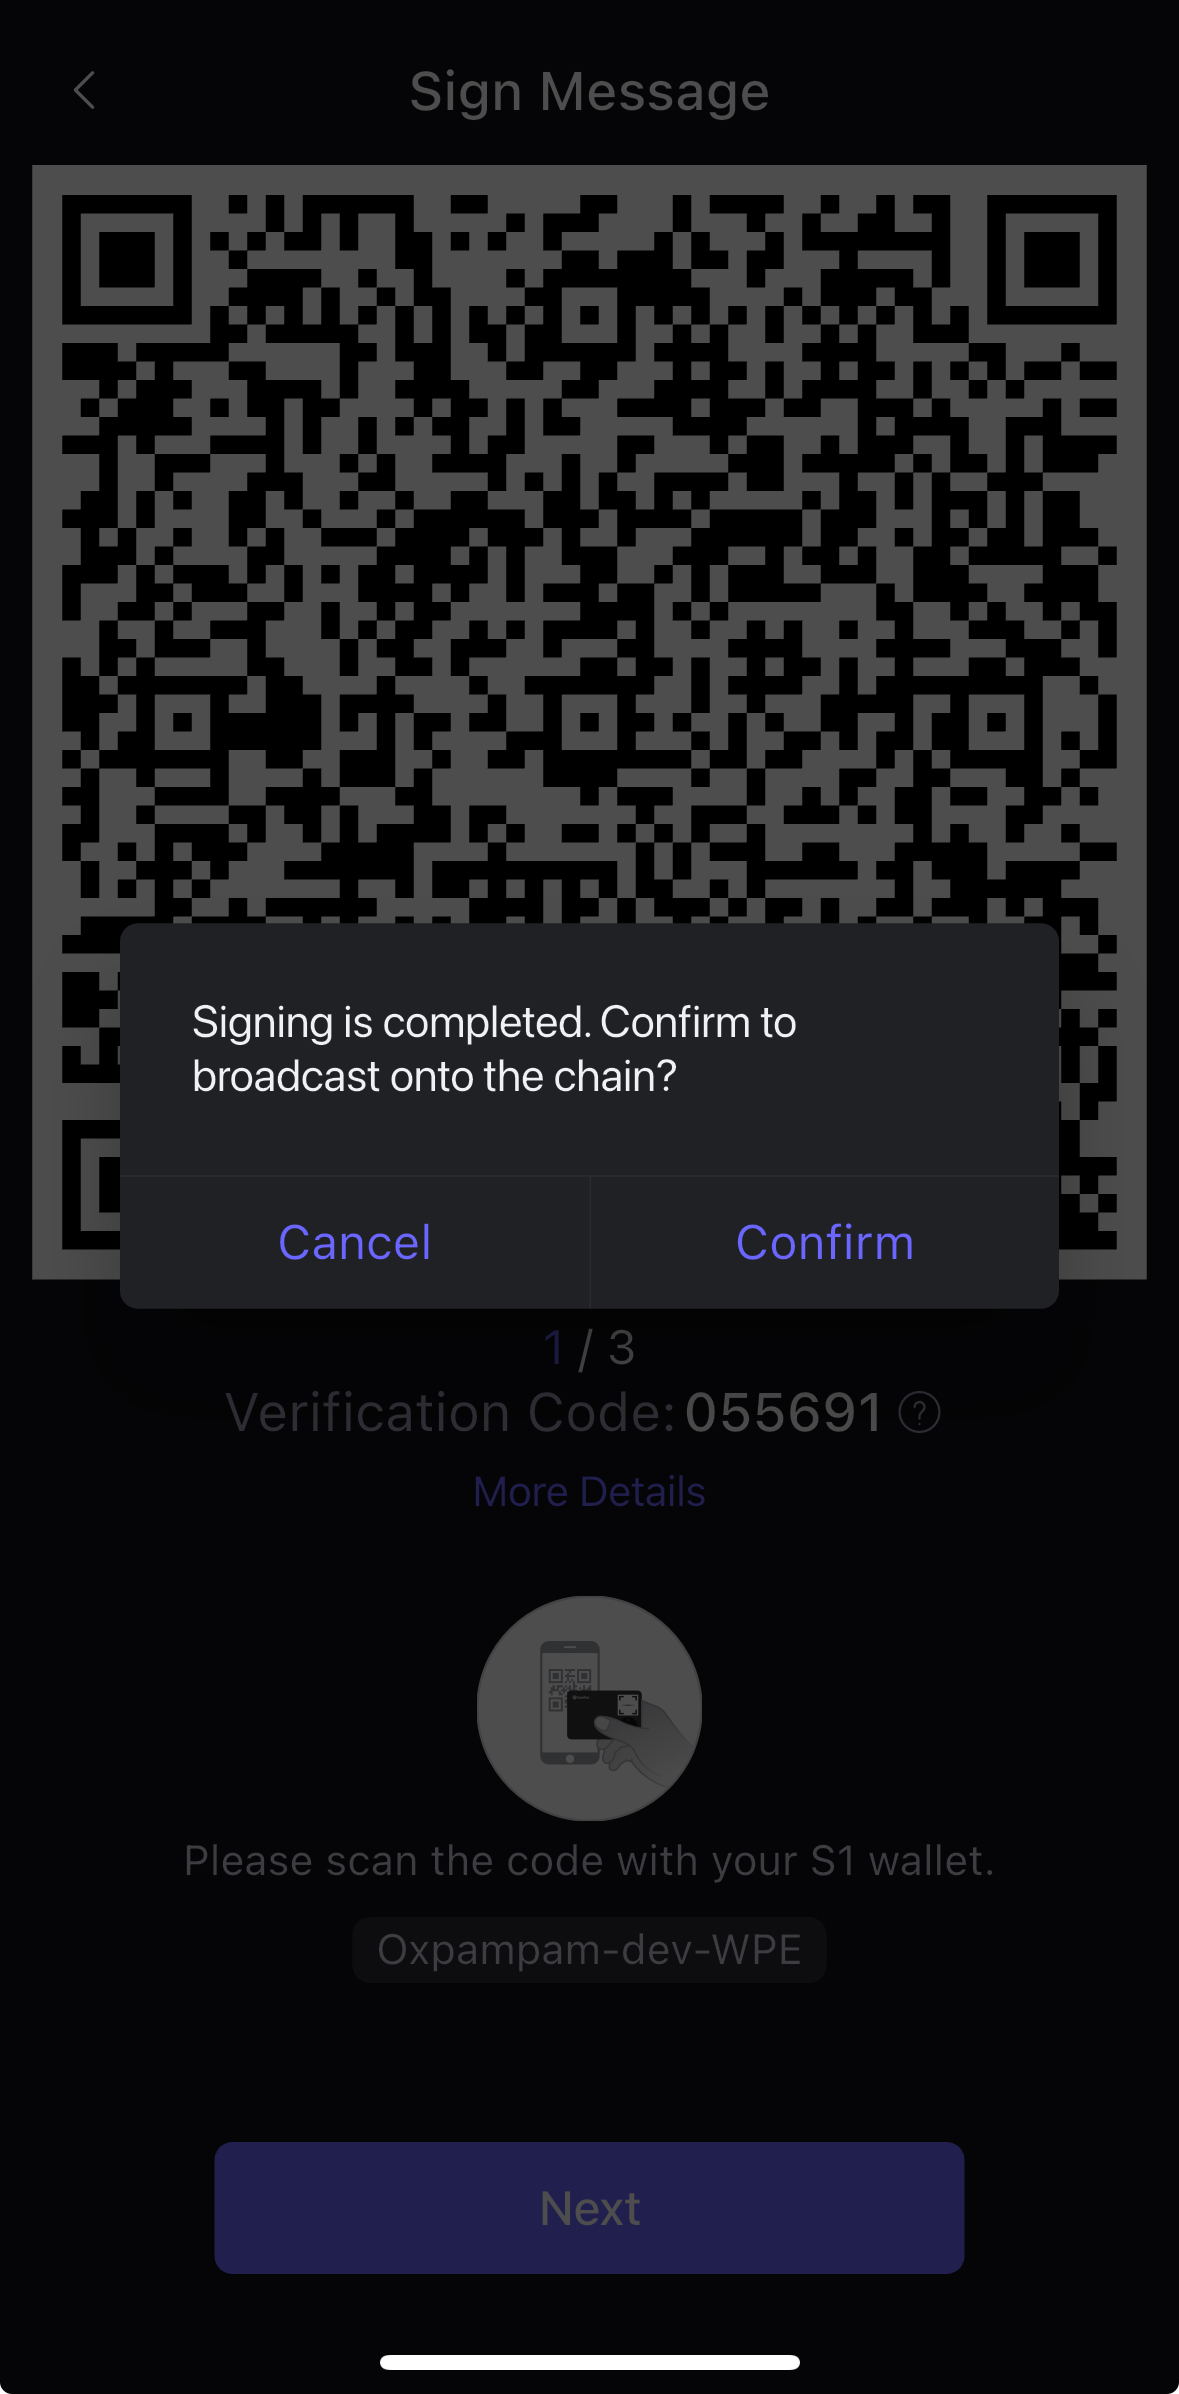
- Mở thiết bị S1 của bạn để quét mã QR và ký giao dịch.

- Nhập mã PIN của thiết bị S1 và sau khi nhập mã, nhấn Tiếp theo trong ứng dụng SafePal.

- Quét mã QR động như hiển thị trên thiết bị S1 từ ứng dụng SafePal. Thực hiện điều này đảm bảo ứng dụng nhận được chữ ký được chứa trong mã QR và sẵn sàng phát sóng giao dịch hoán đổi lên blockchain (Kaia).
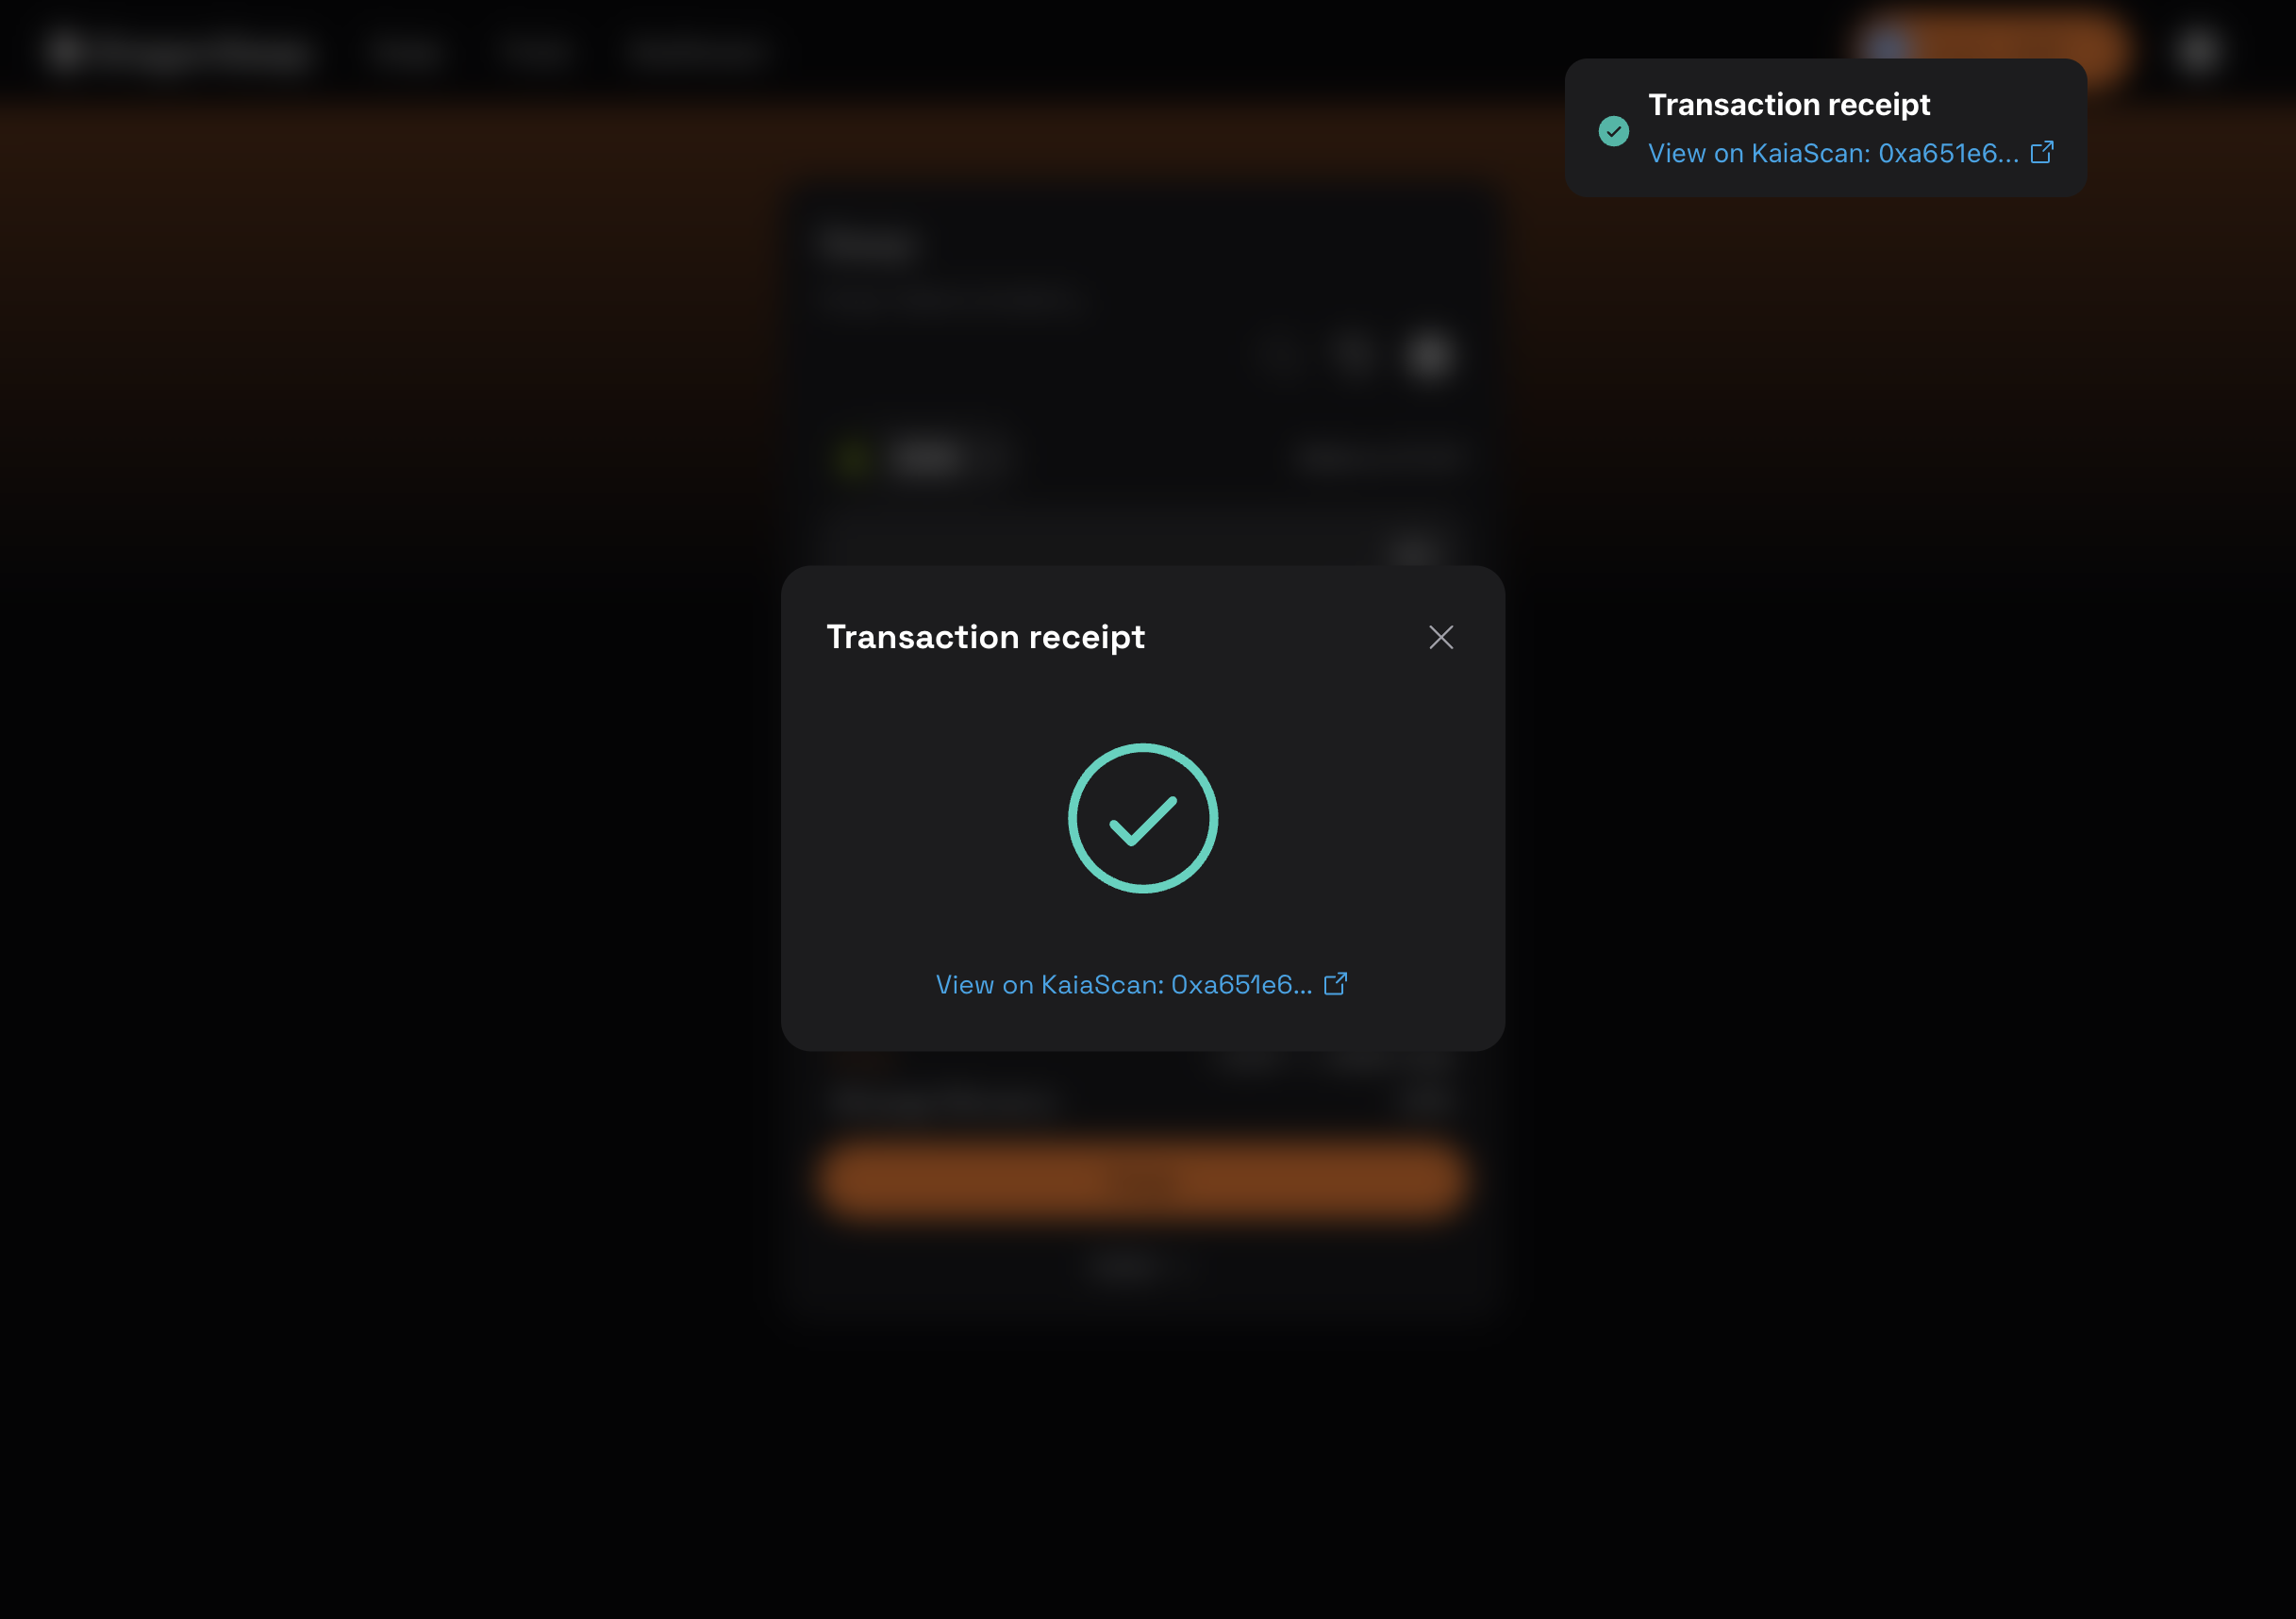
- Sau khi quá trình ký kết hoàn tất, bạn sẽ thấy một cửa sổ popup xuất hiện để phát sóng giao dịch. Nhấp vào Xác nhận sau đó.
- Sau khi giao dịch của bạn được xác nhận, một cửa sổ thông báo Giao dịch thành công sẽ hiển thị như hình bên dưới.
Chúc mừng. Bạn đã thành công trong việc ký kết giao dịch, phát sóng giao dịch lên blockchain thông qua một ứng dụng phi tập trung (dApp) của bên thứ ba bằng ví phần cứng SafePal của bạn thông qua WalletConnect.
Chương 4: Cấu hình nâng cao và chuyên nghiệp cho sản xuất
Chương này trình bày các phương pháp bảo mật tài nguyên và tự động hóa các tác vụ trong môi trường sản xuất, nơi yêu cầu bảo mật là cao nhất.
4.1. Hướng dẫn: Thiết lập Kho bạc đa chữ ký với Kaia Safe
Kaia Safe cho phép nhà phát triển tạo tài khoản có thể được quản lý bởi nhiều chủ sở hữu, từ đó nâng cao đáng kể tính bảo mật.
Bạn không bao giờ nên sử dụng ví thông thường để quản lý số tiền lớn, quyền truy cập vào giao thức hoặc kiểm soát quyền sở hữu. Quá nhiều dự án đã bị ảnh hưởng do các lỗ hổng bảo mật cơ bản của ví điện tử. Dù bạn đang phát triển giao thức DeFi tiếp theo, quản lý quỹ của một DAO, hay bảo vệ tài sản có giá trị, ví đa chữ ký là công cụ không thể thiếu.
Trong hướng dẫn này, bạn sẽ học cách tạo một két sắt trên Kaia bằng Kaia Safe, cấu hình chủ sở hữu và ngưỡng phê duyệt, cũng như thực hiện một giao dịch cơ bản.
Tạo ví an toàn
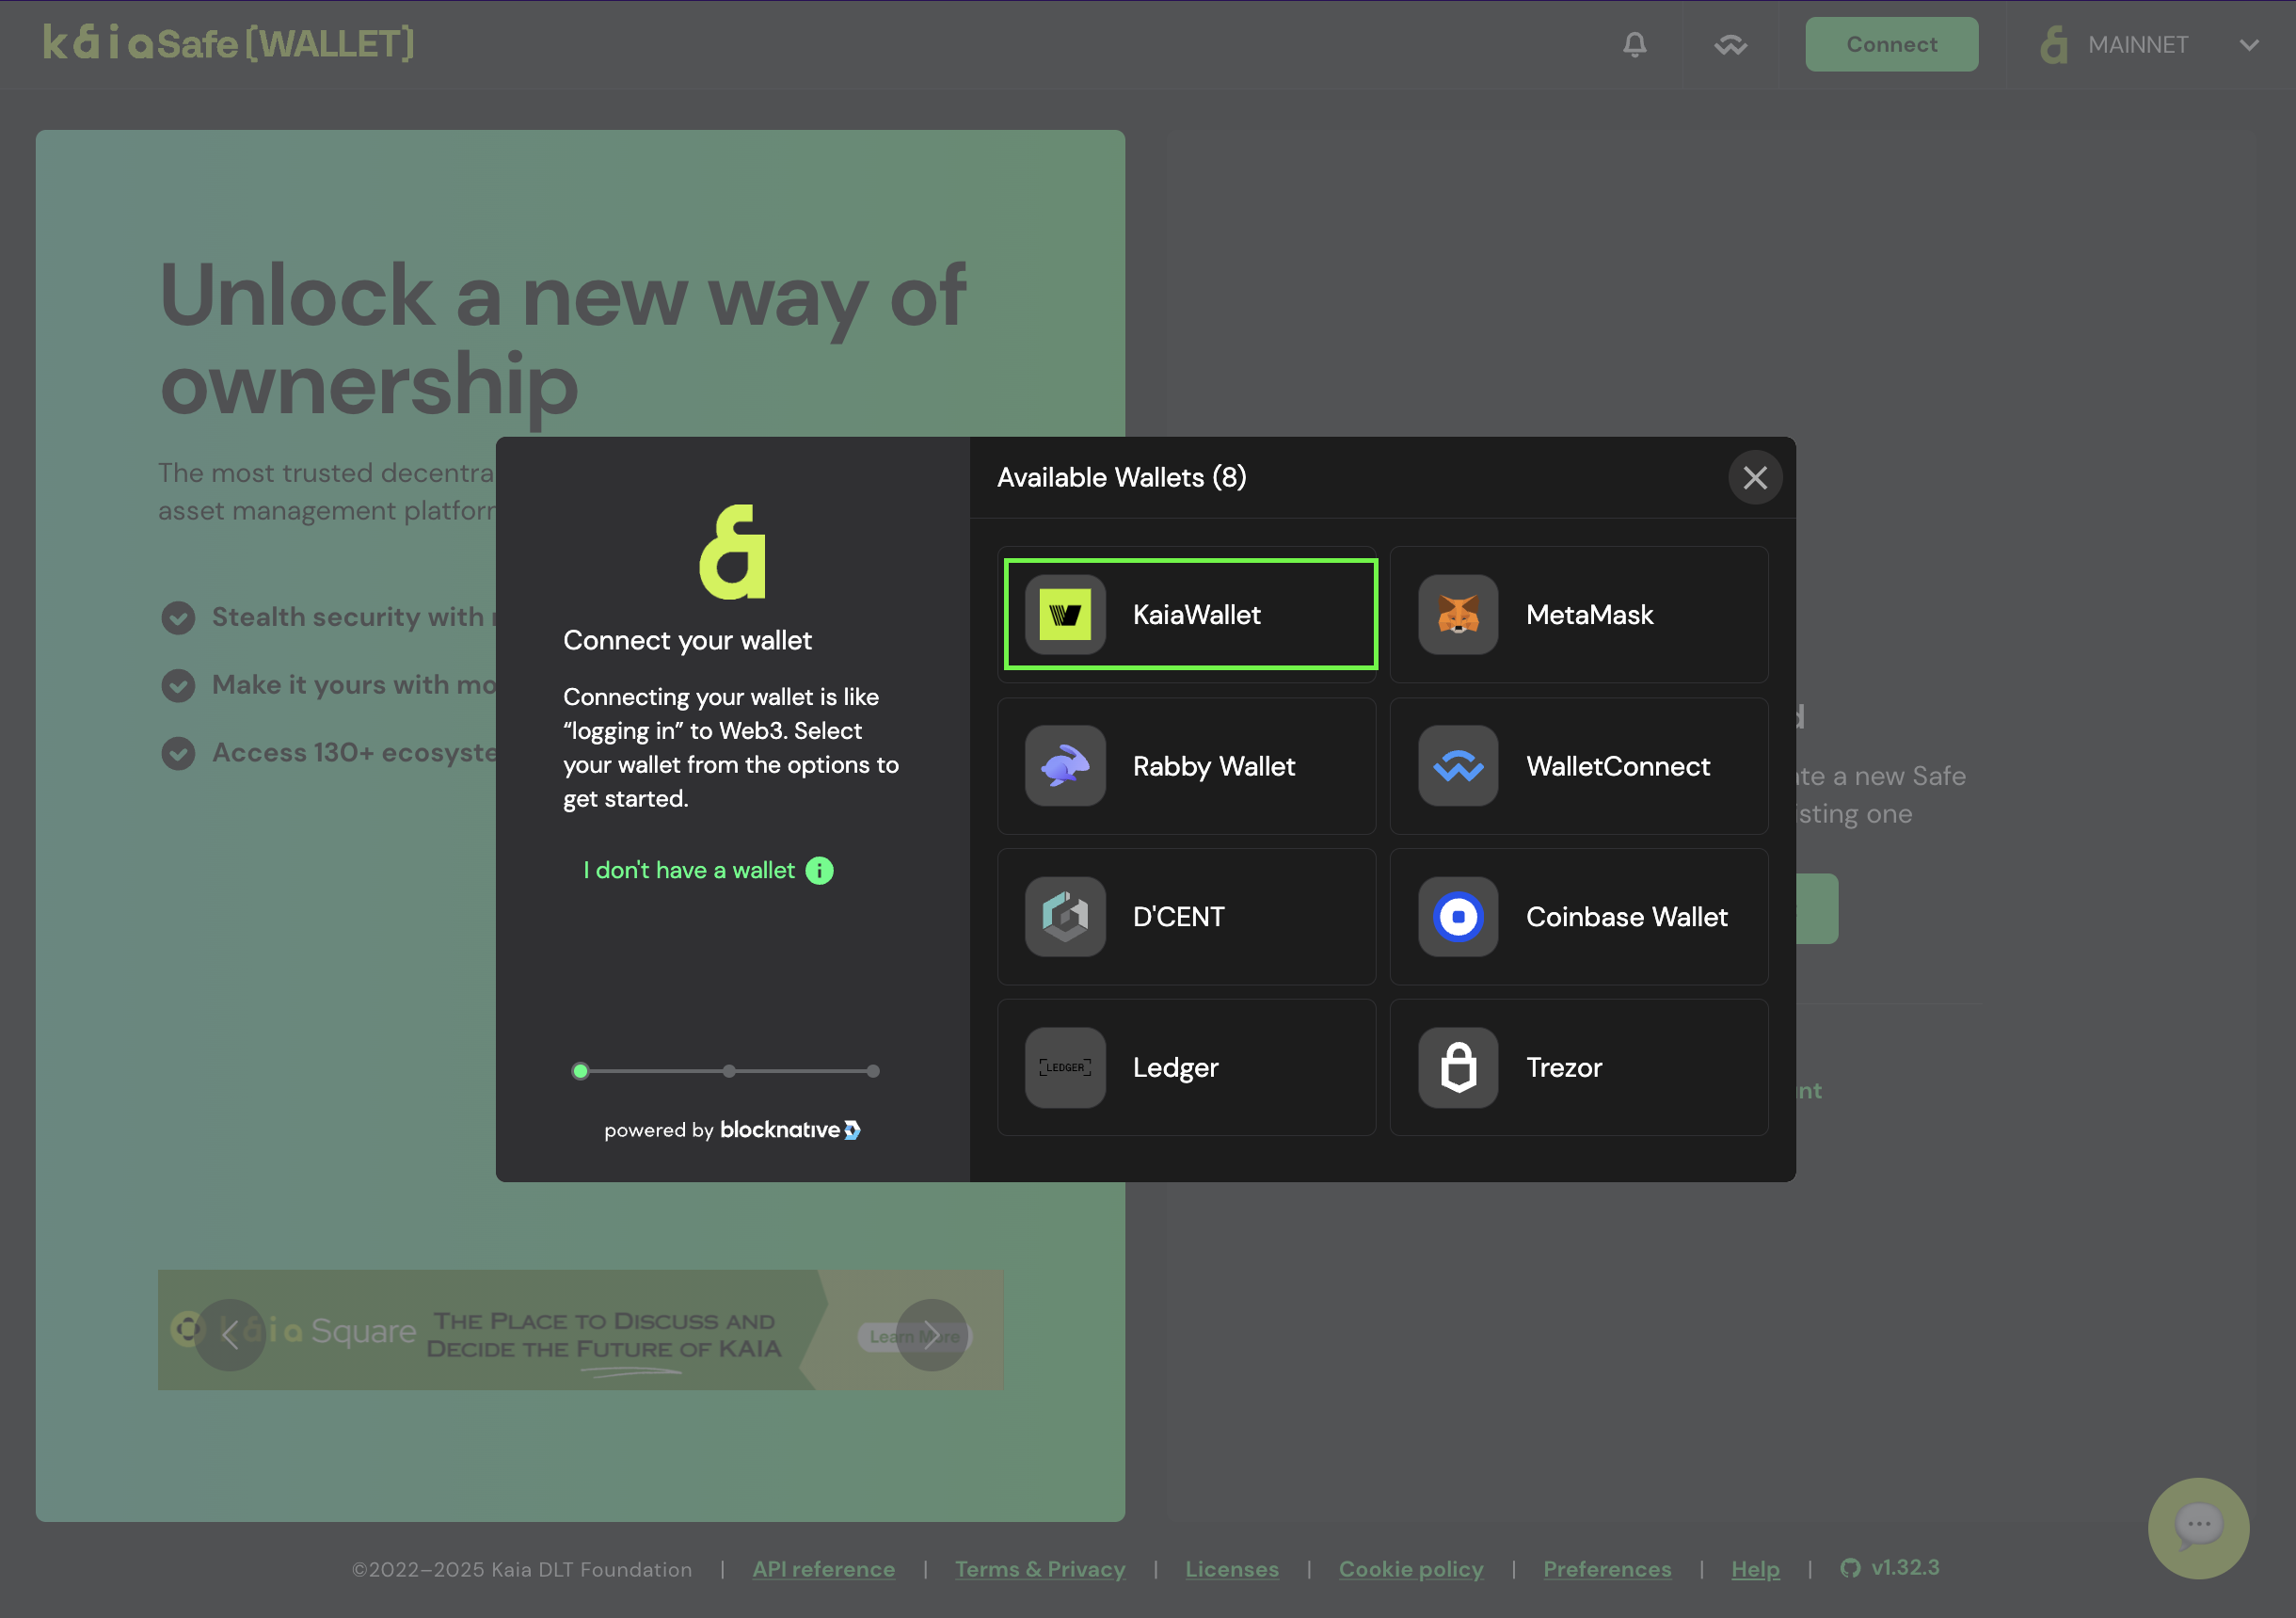
- Truy cập Kaia Safe App.
- Kết nối ví của bạn. Chọn loại ví mà bạn muốn kết nối với trang web Kaia Safe. Trong hướng dẫn này, chúng tôi sẽ sử dụng Kaia Wallet.
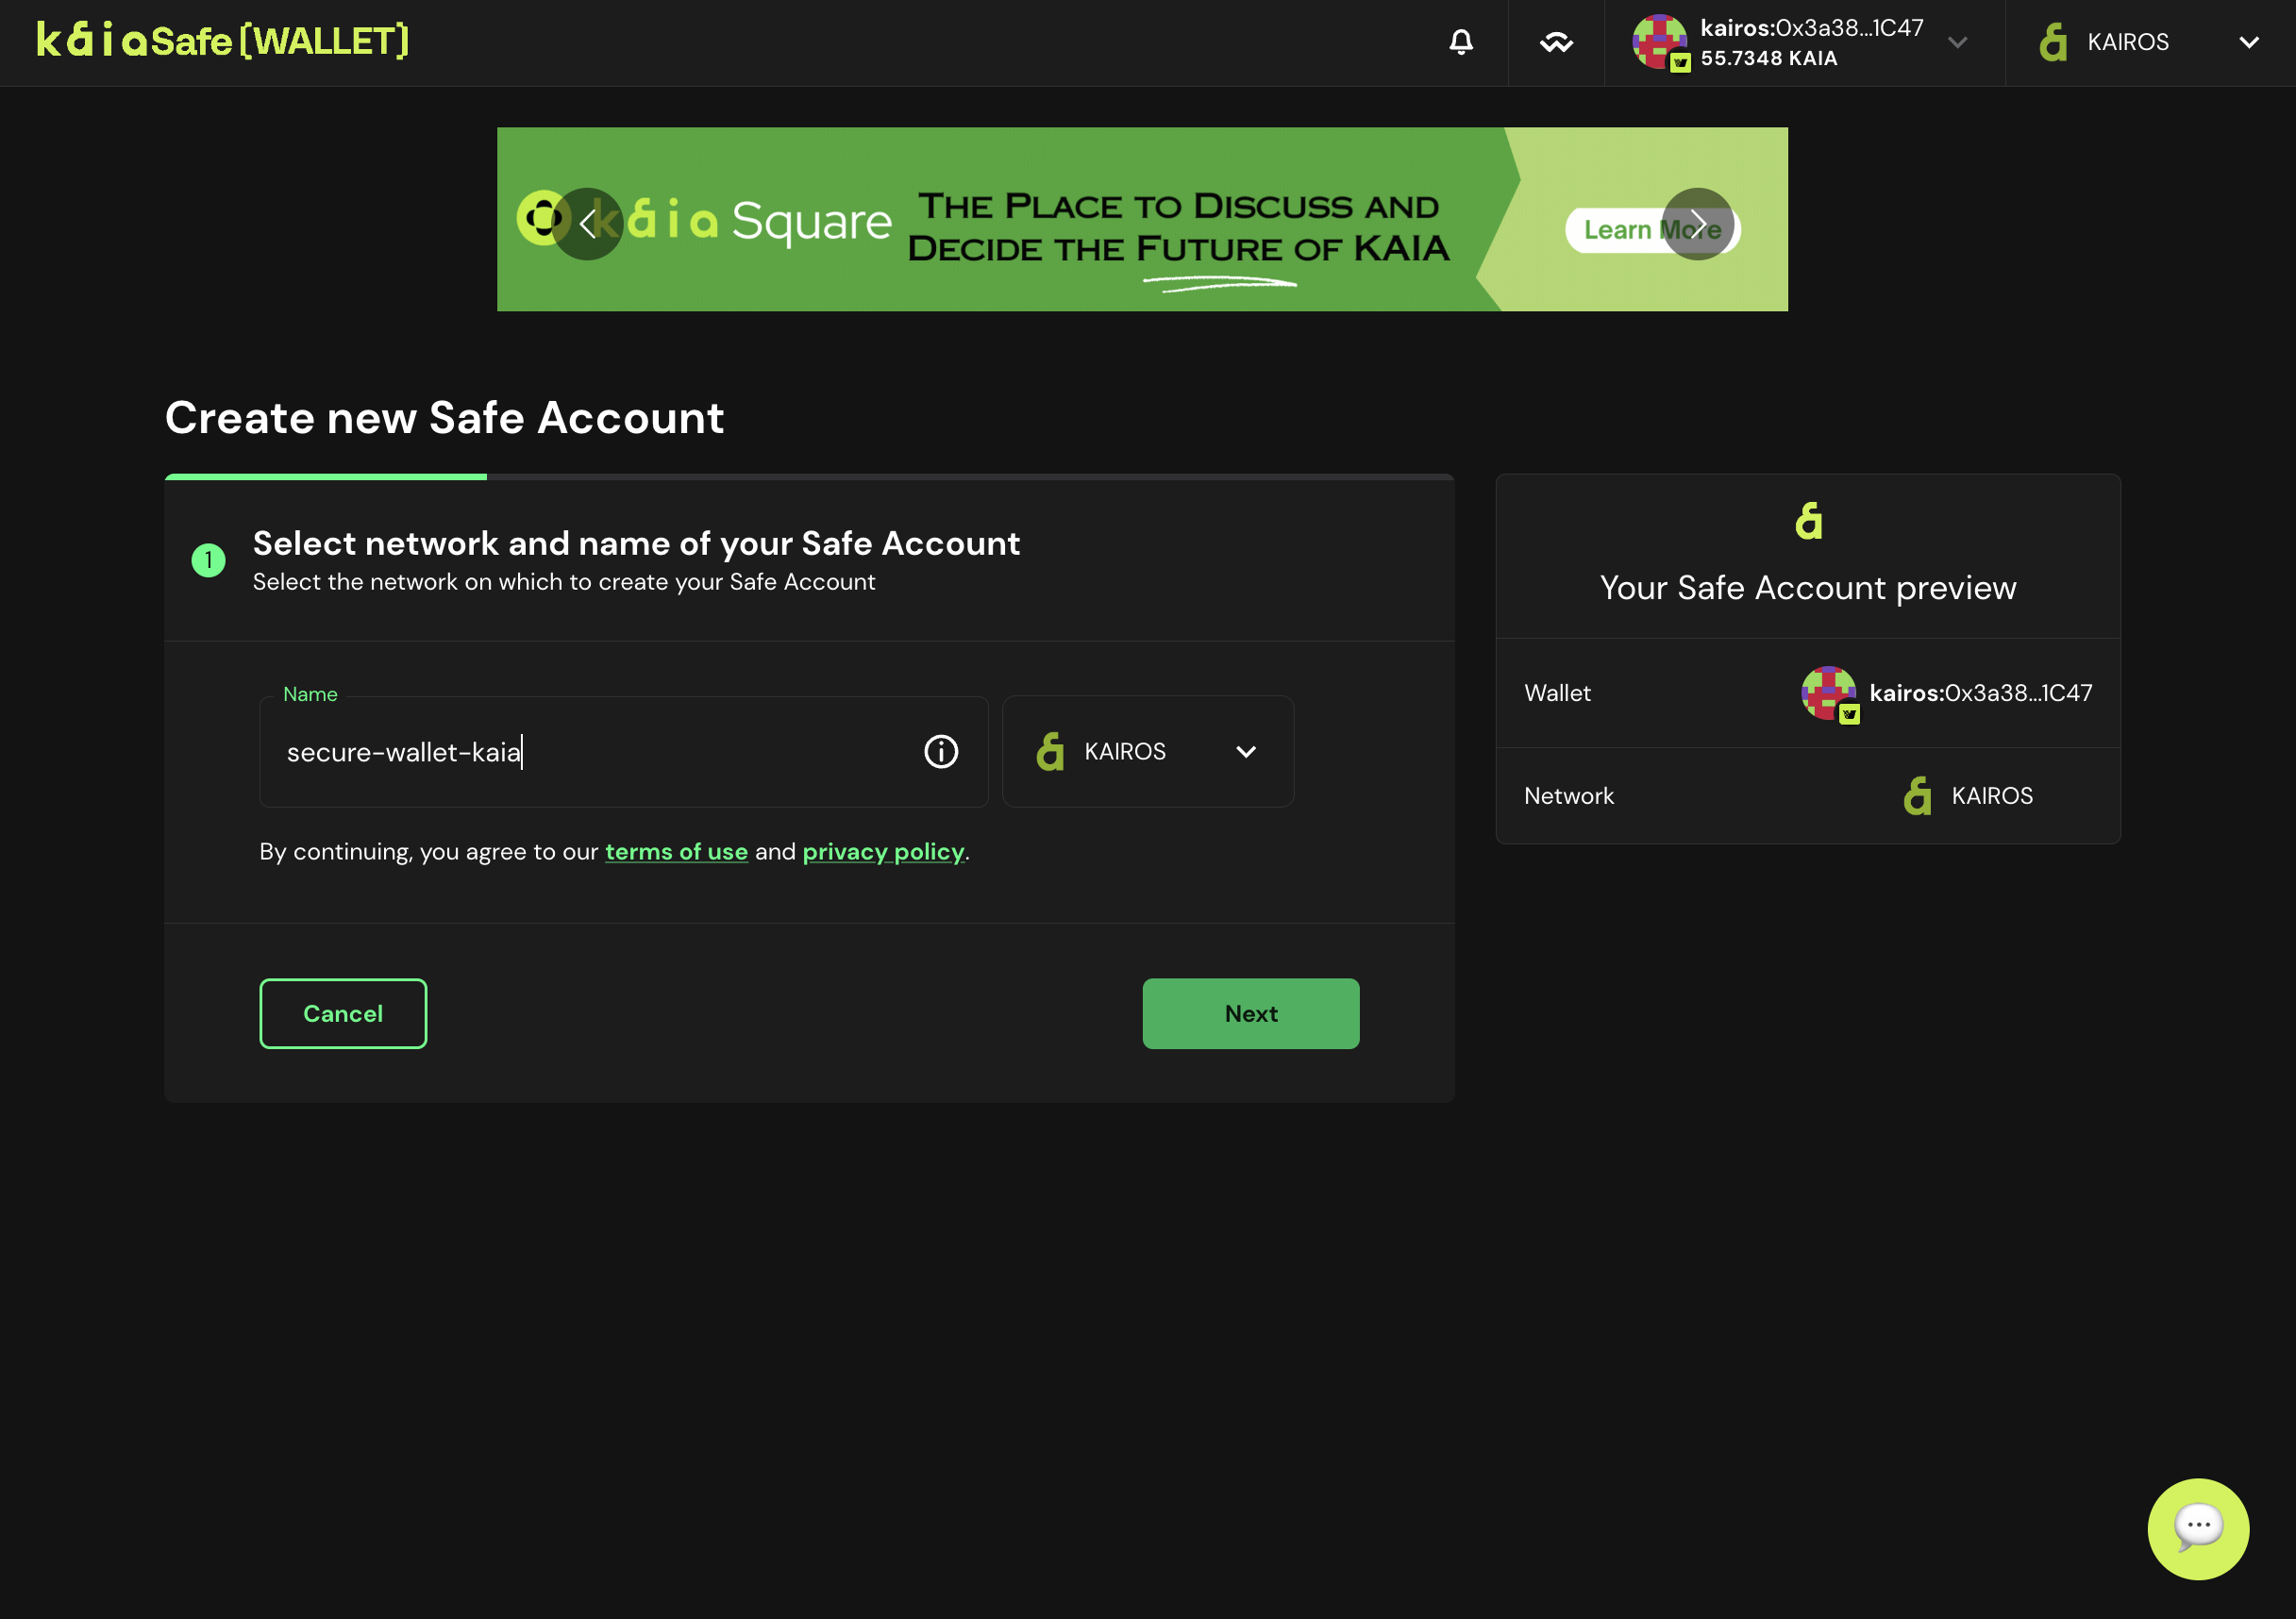
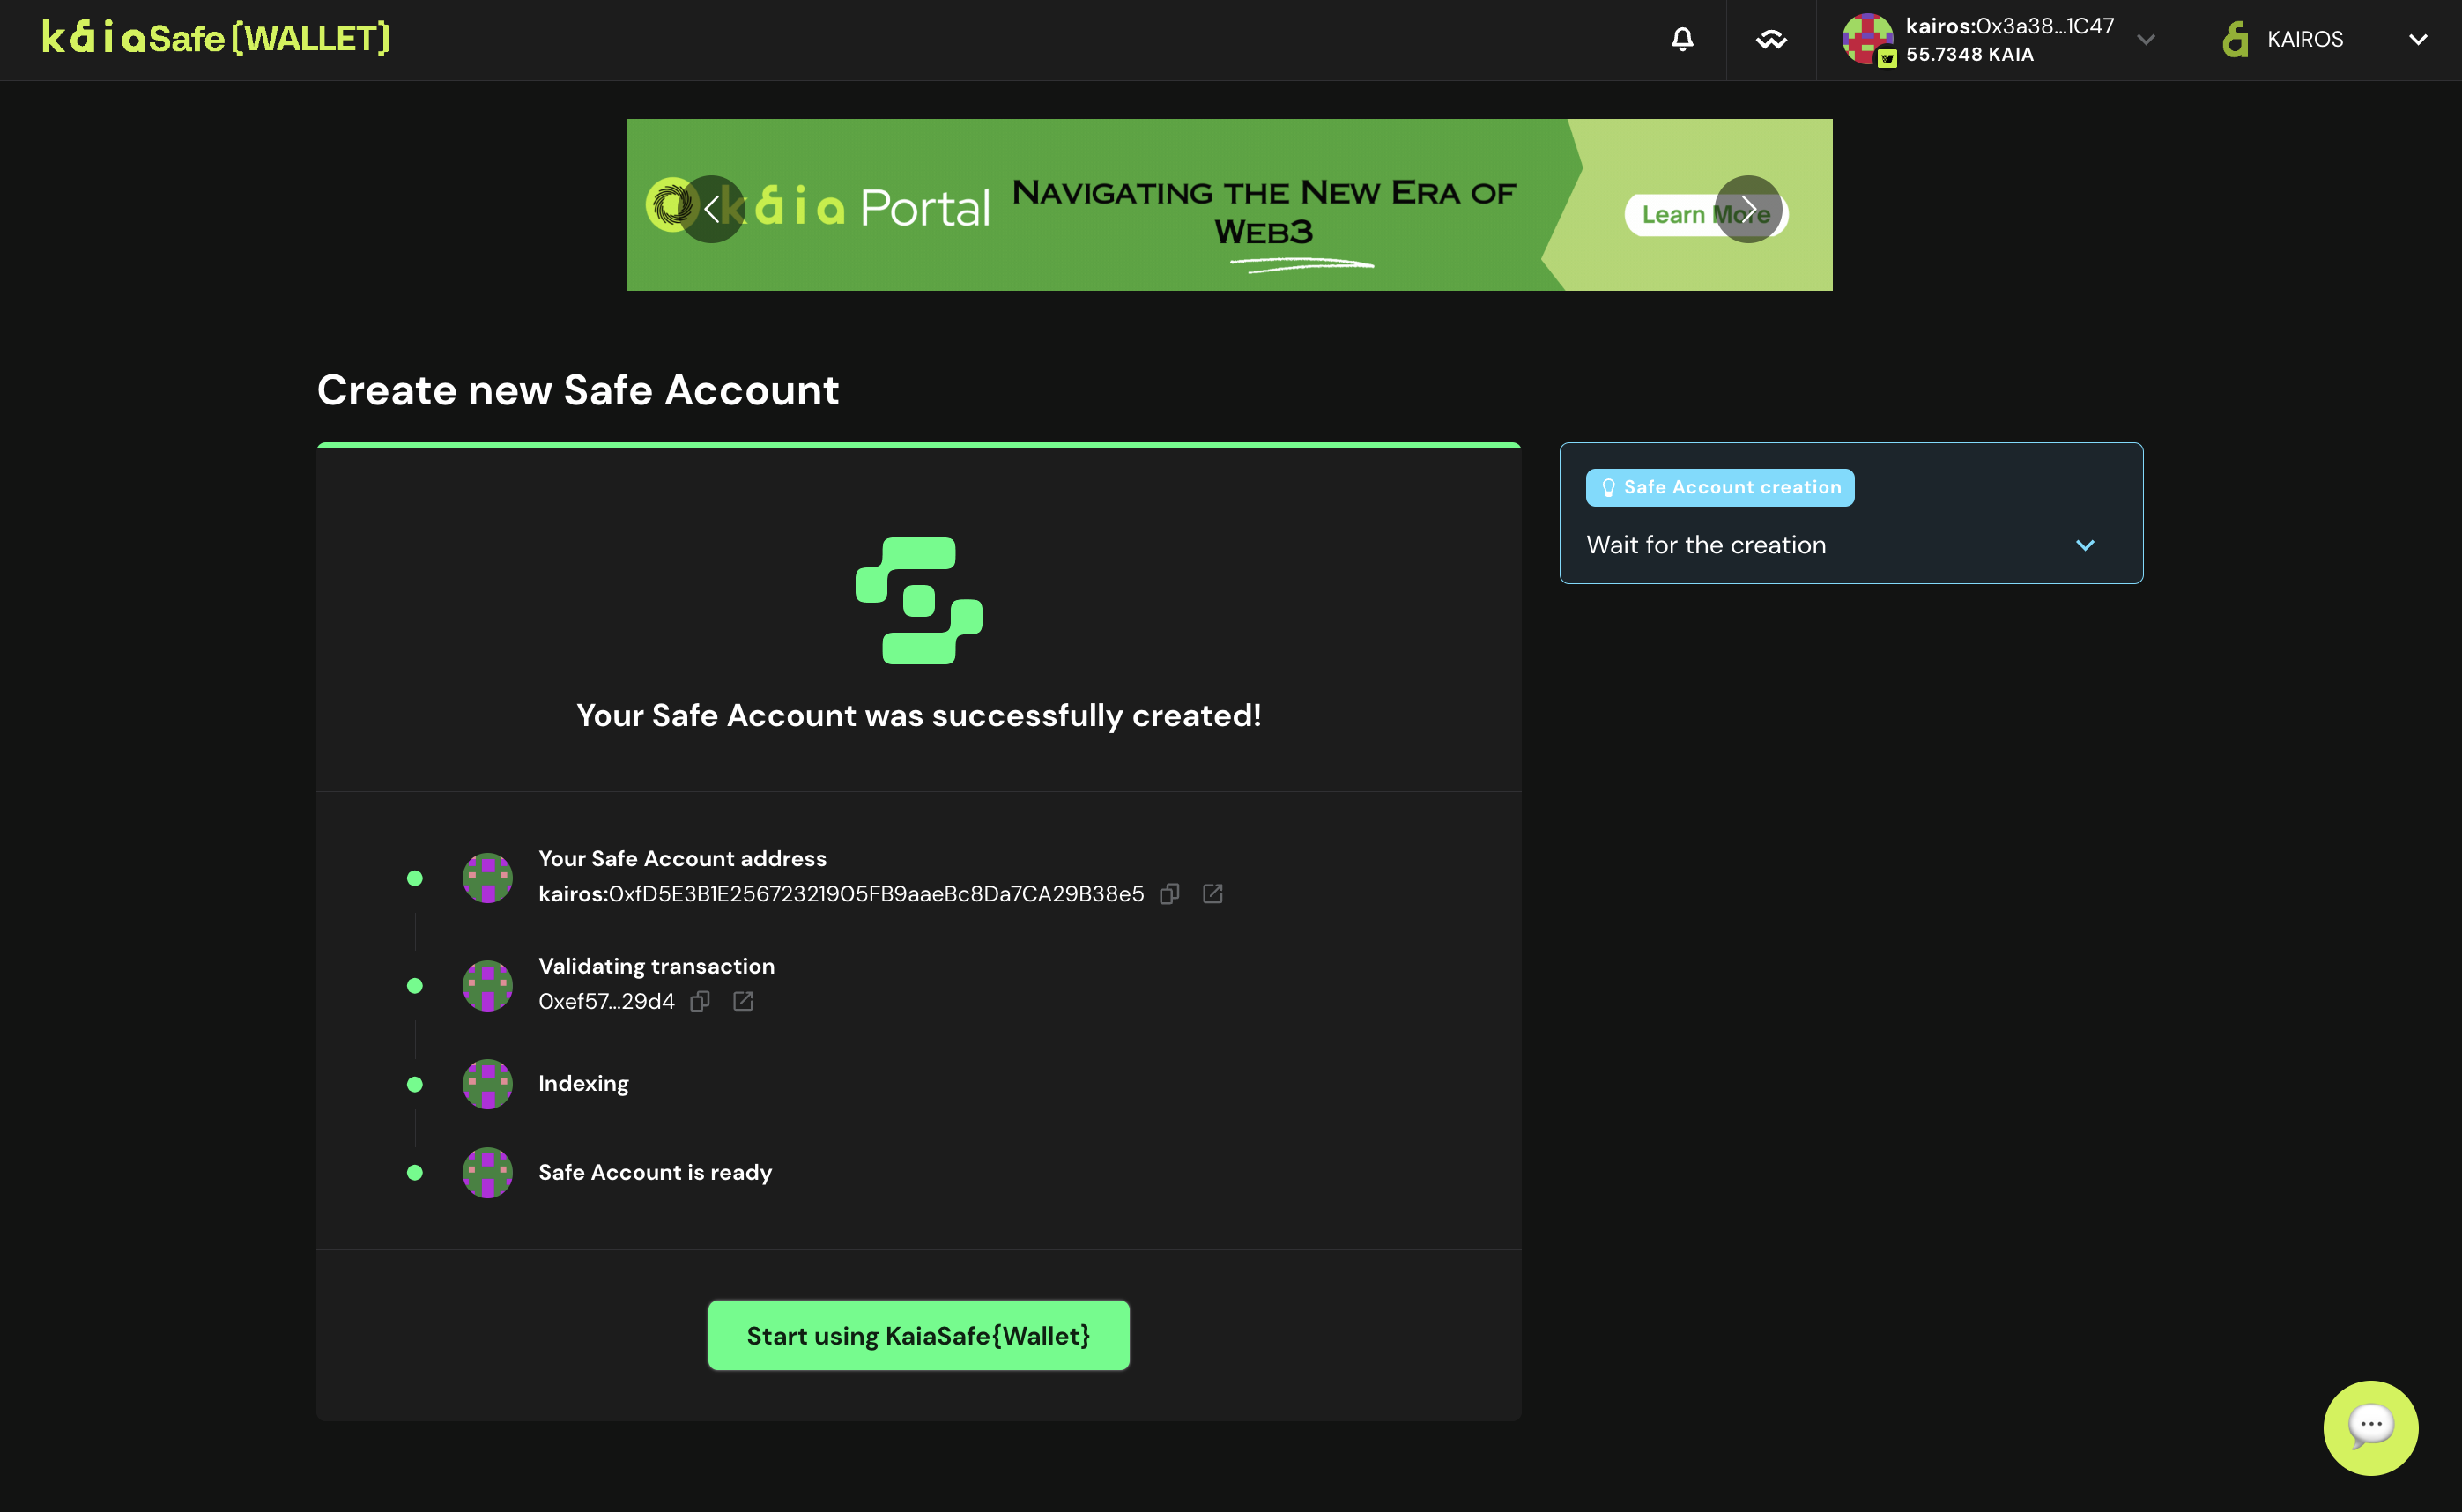
- Đặt tên cho két sắt của bạn. Sau khi kết nối ví của bạn, nhấp vào Tạo tài khoản và đặt tên cho Kaia Safe của bạn.
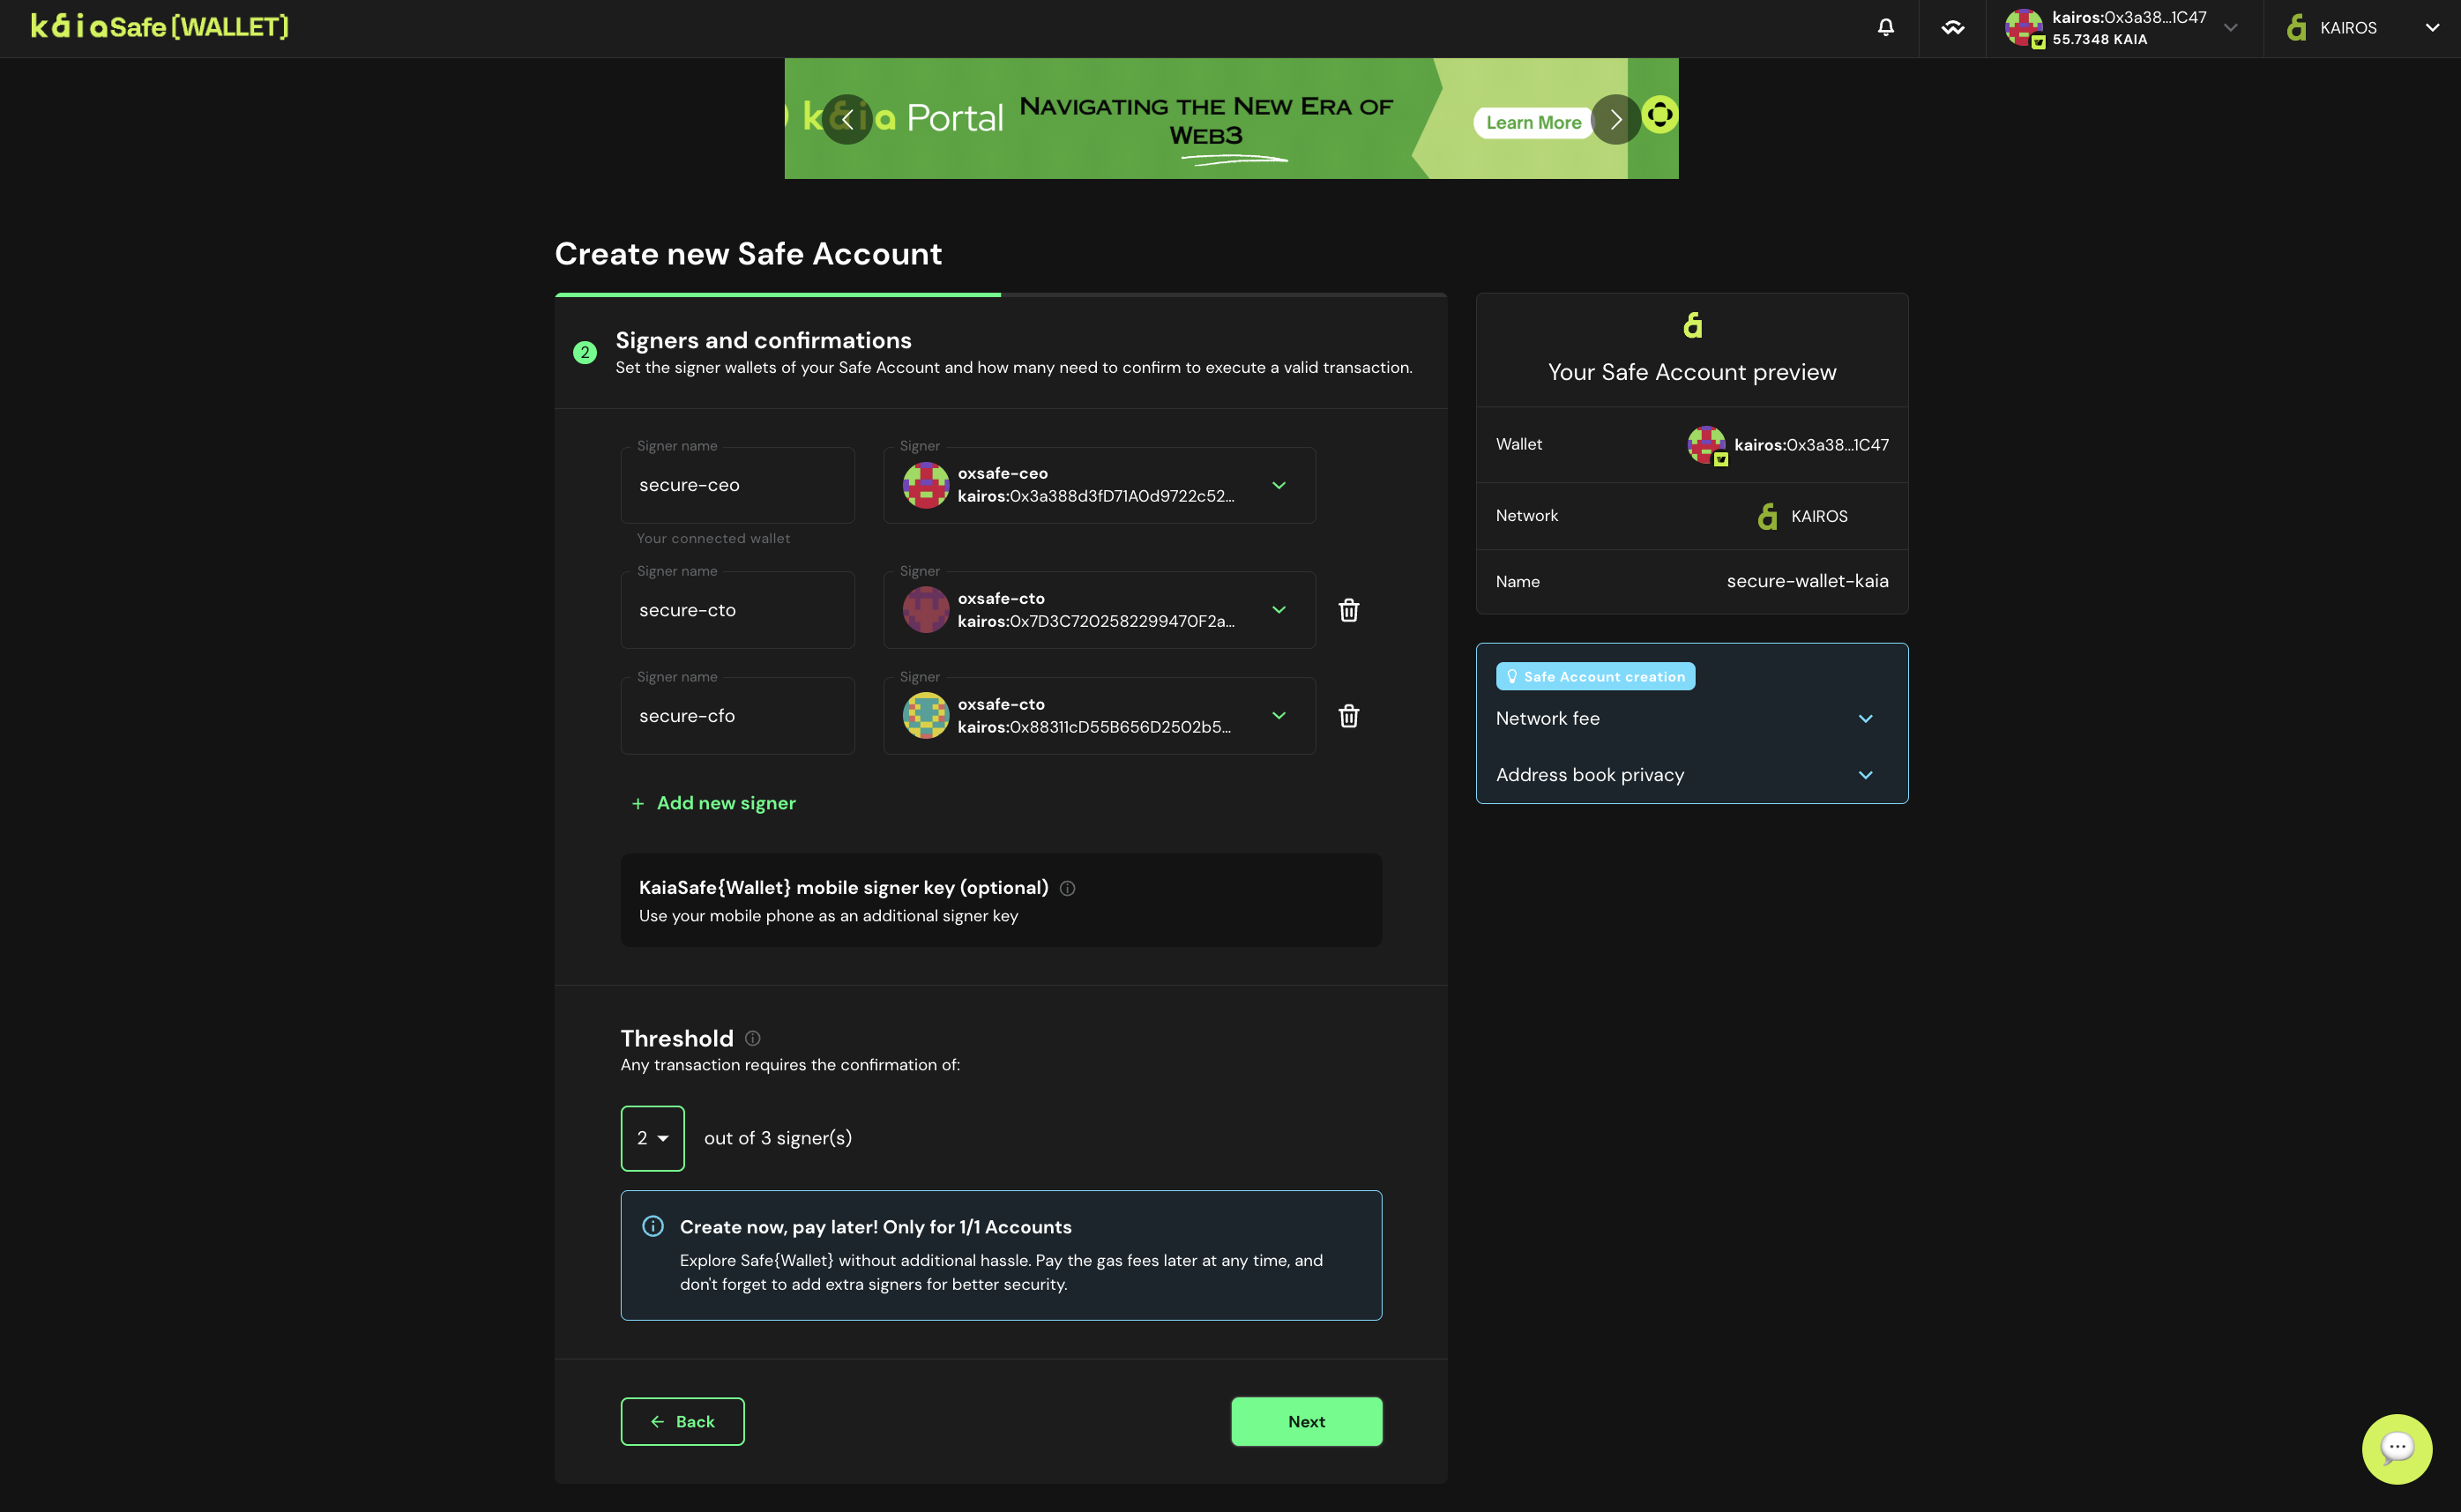
- Cấu hình người ký. Cấu hình số lượng xác nhận của người ký cần thiết để giao dịch trong tài khoản Kaia Safe của bạn được phê duyệt. Thực hành tốt là sử dụng ngưỡng 51% tổng số chủ sở hữu, ví dụ: 2 trong 3, 3 trong 5 v.v., như minh họa bên dưới.
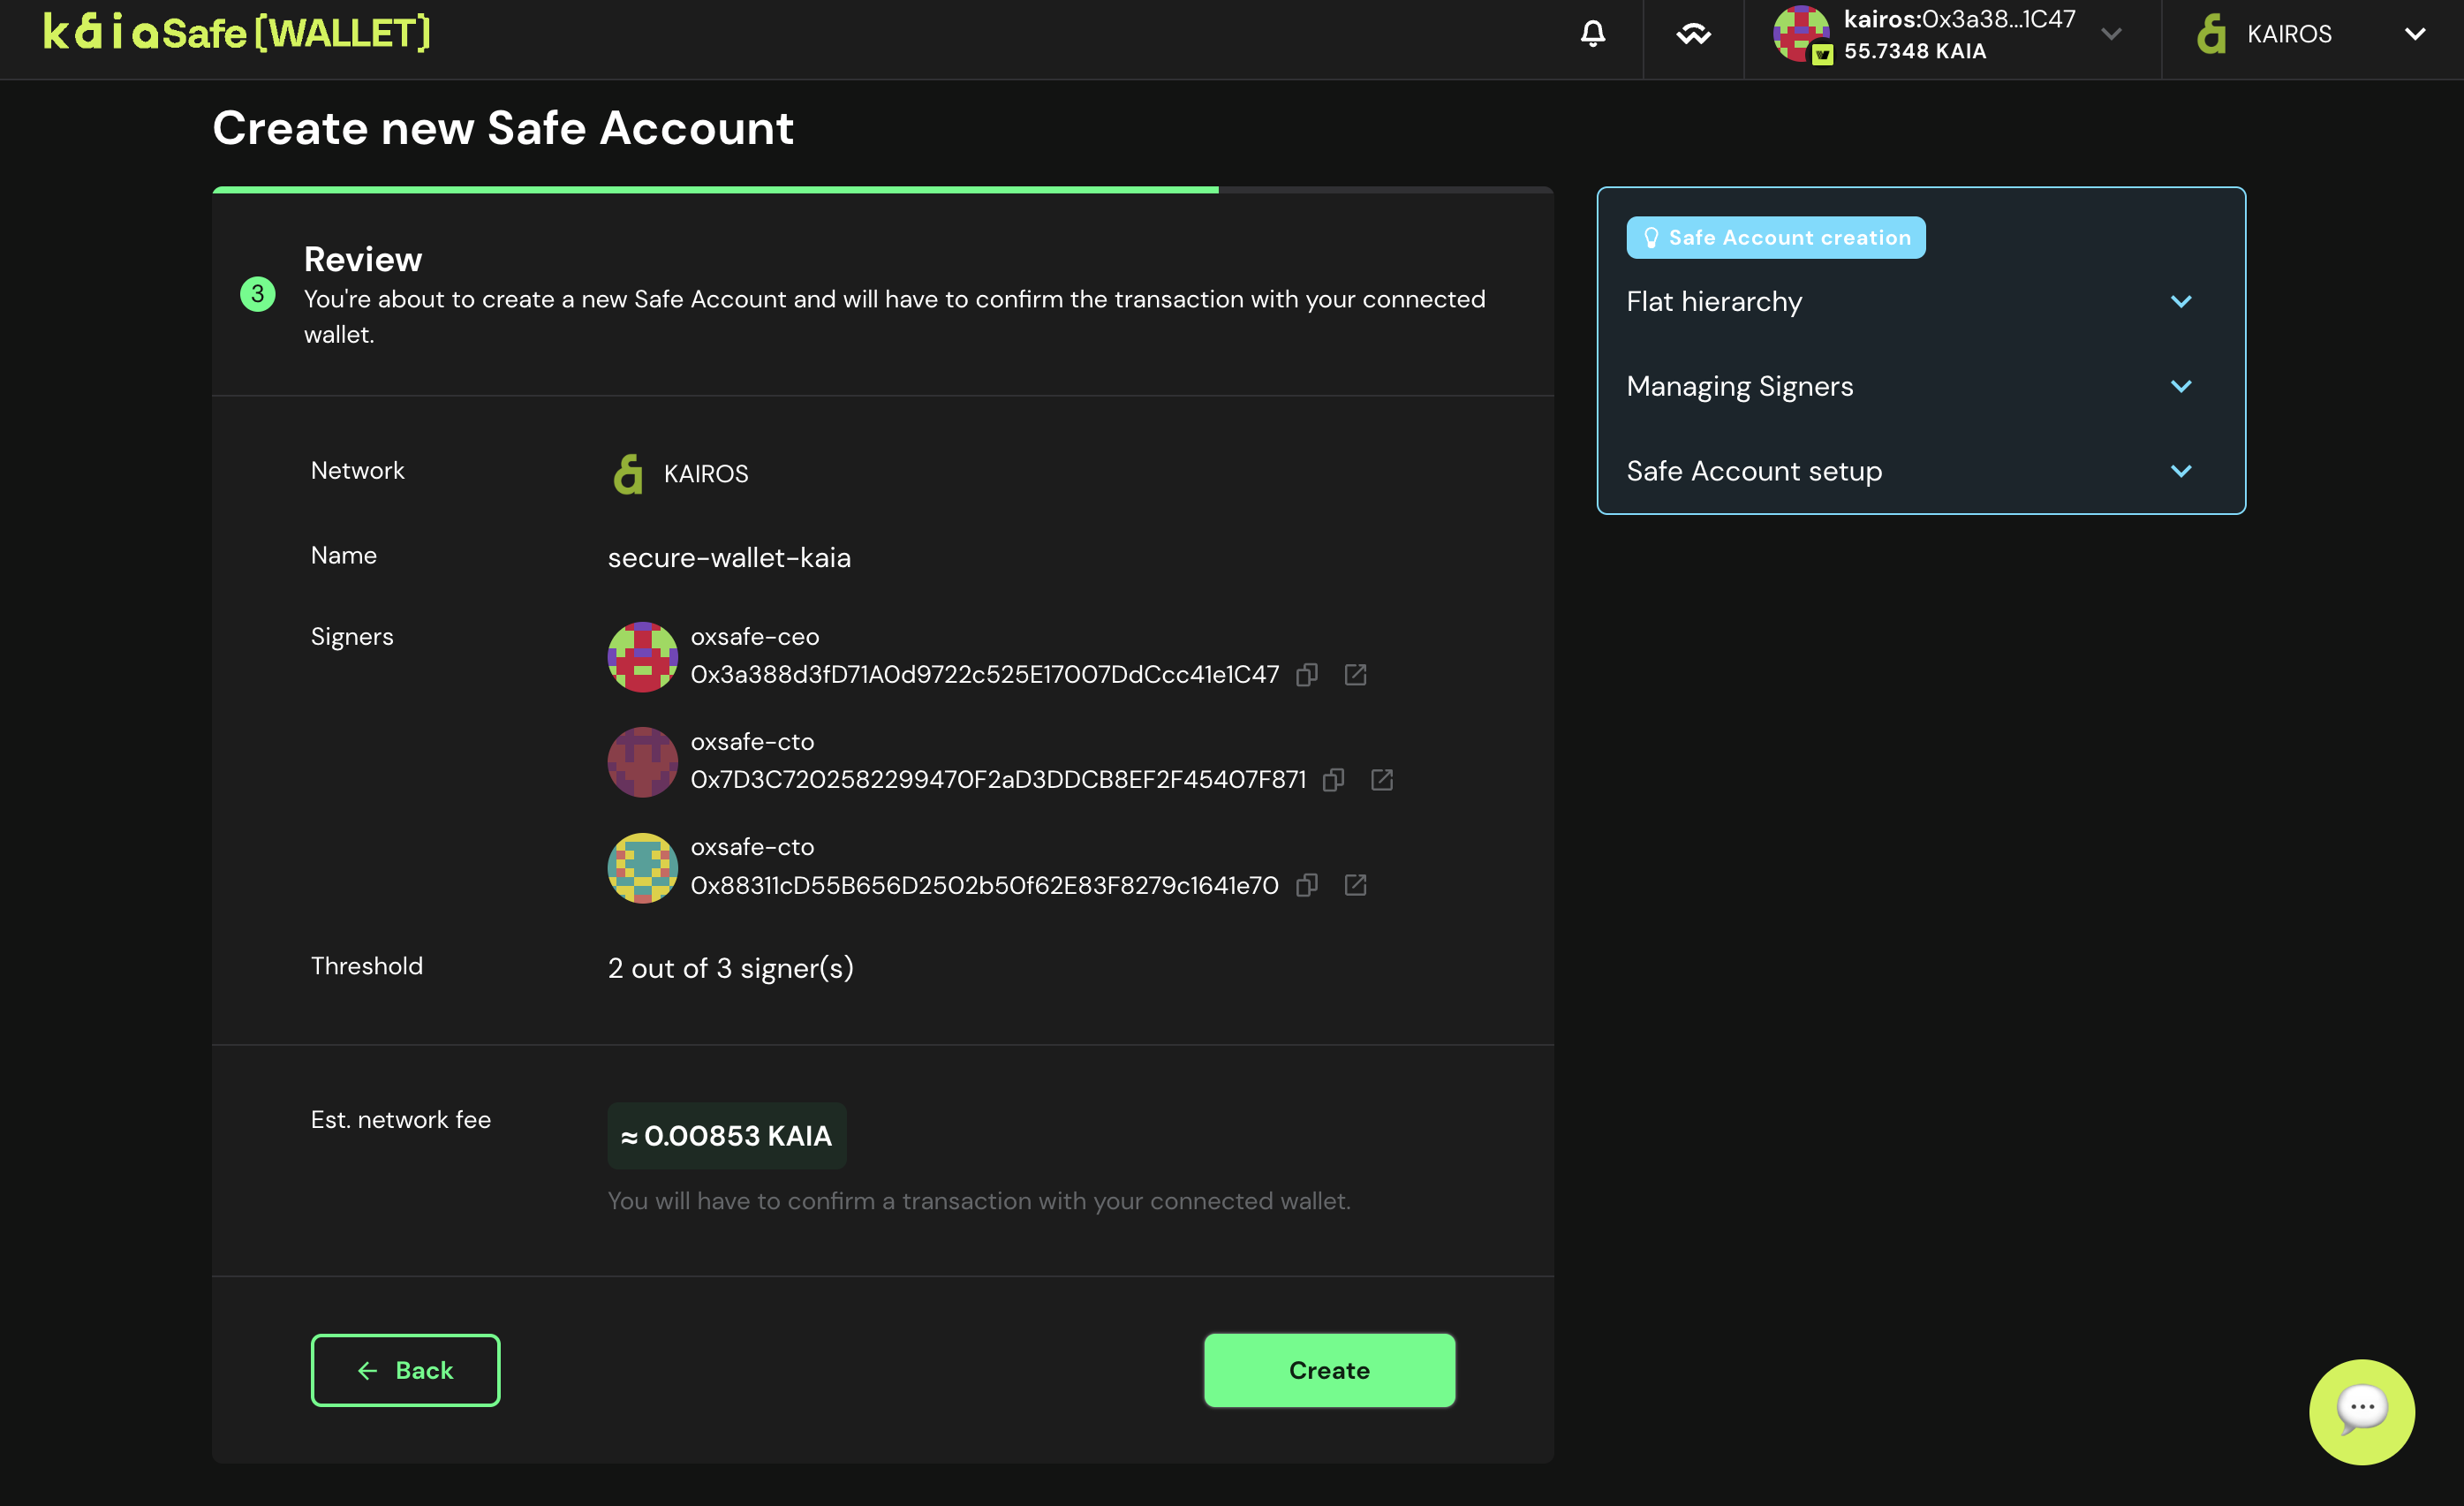
- Kích hoạt tài khoản Kaia Safe của bạn. Khi bạn đã hoàn toàn hài lòng với tất cả các thông số của Kaia Safe, hãy nhấp vào Tạo để gửi yêu cầu tạo tài khoản Kaia Safe của bạn.
- Sử dụng ví của bạn. Nhấp vào nút Bắt đầu sử dụng Ví KaiaSafe.
- Truy cập giao diện người dùng của ví hợp đồng thông minh Kaia Safe như hình minh họa bên dưới.
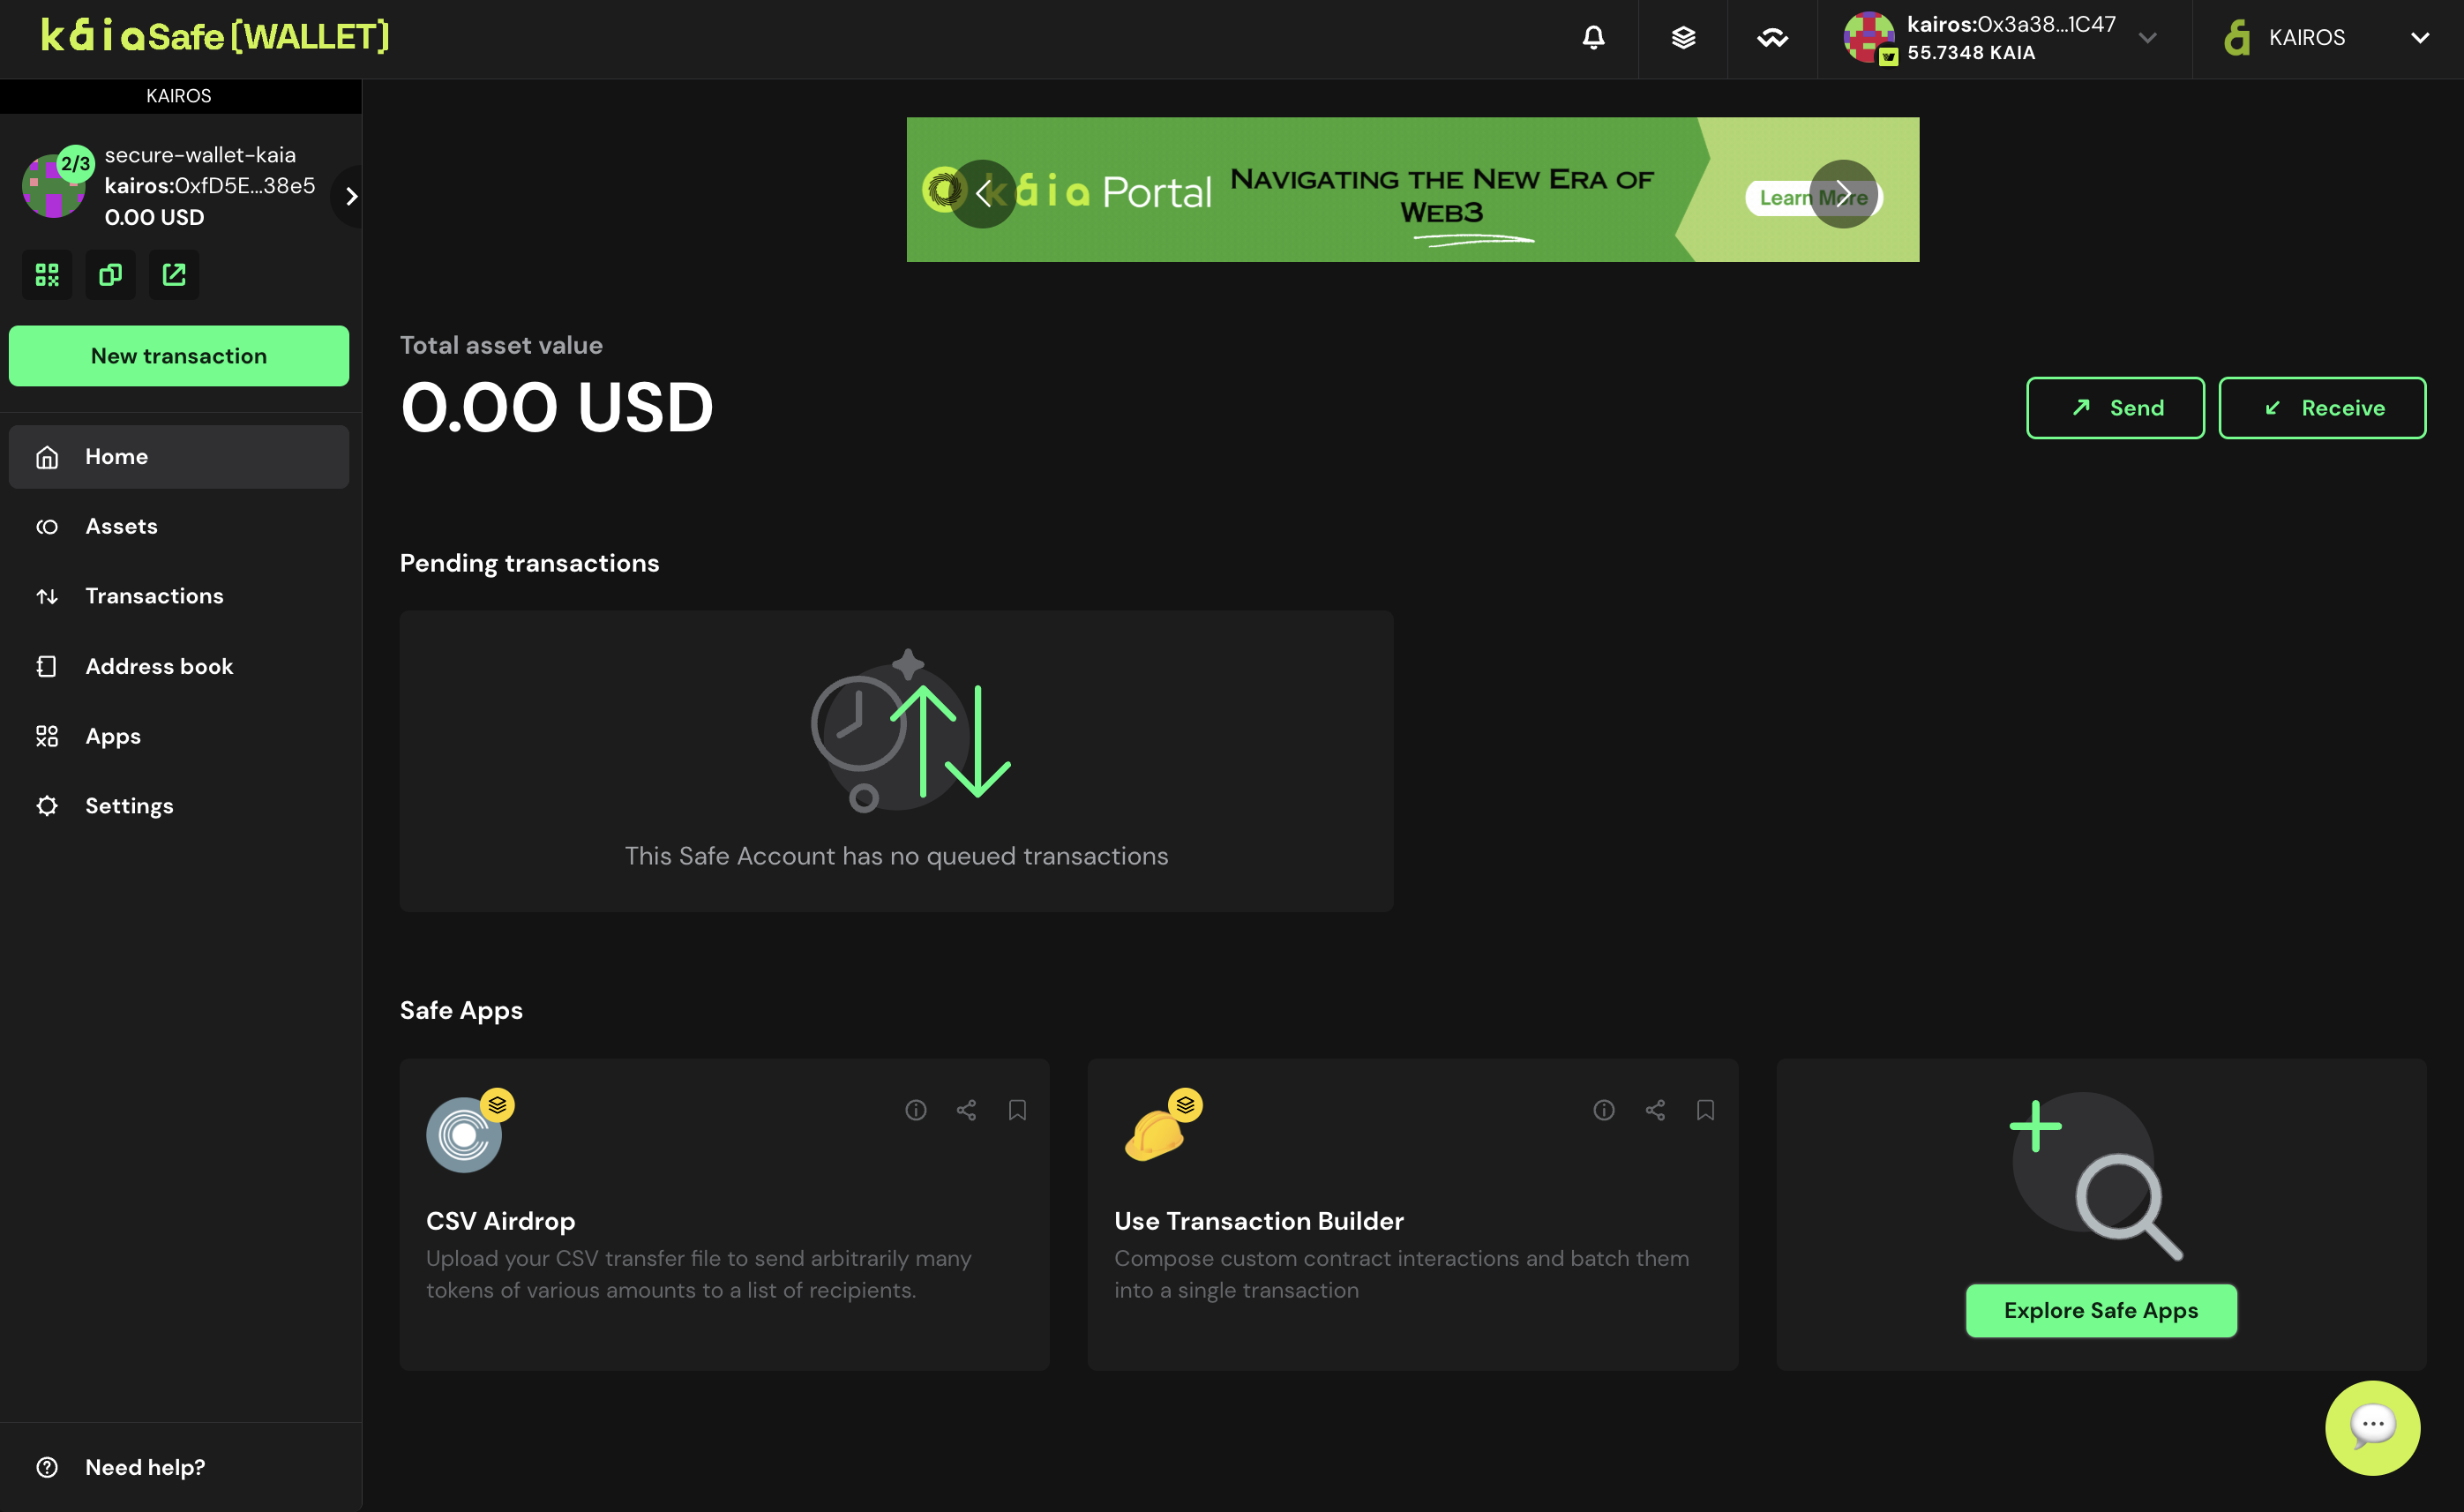
Chúc mừng bạn đã tạo thành công tài khoản Kaia Safe!
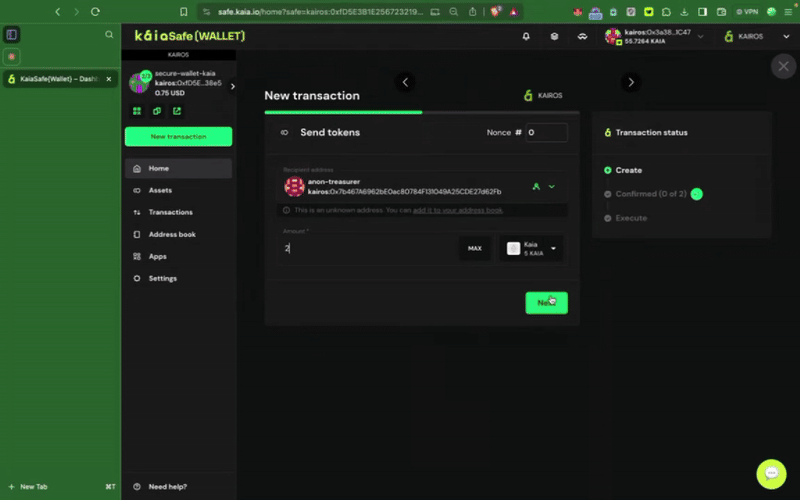
Thực hiện giao dịch cơ bản (Gửi token gốc)
Trong phần này, bạn sẽ học cách thực hiện một giao dịch cơ bản như gửi token gốc KAIA từ tài khoản Kaia Safe của bạn đến địa chỉ người nhận.
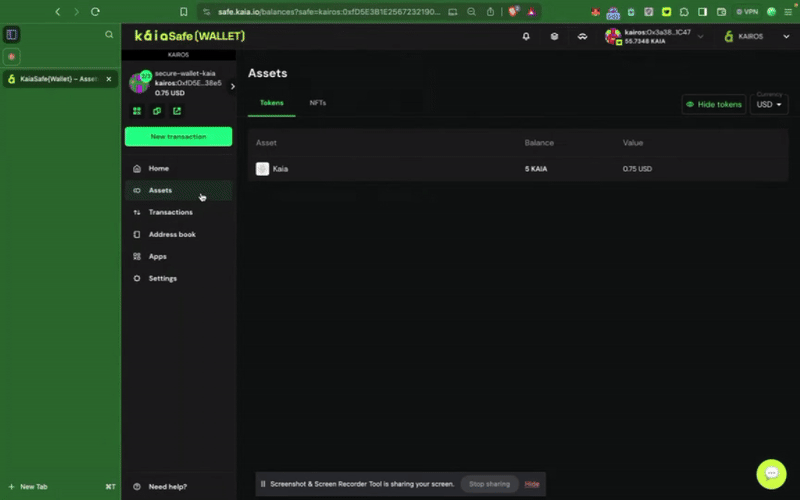
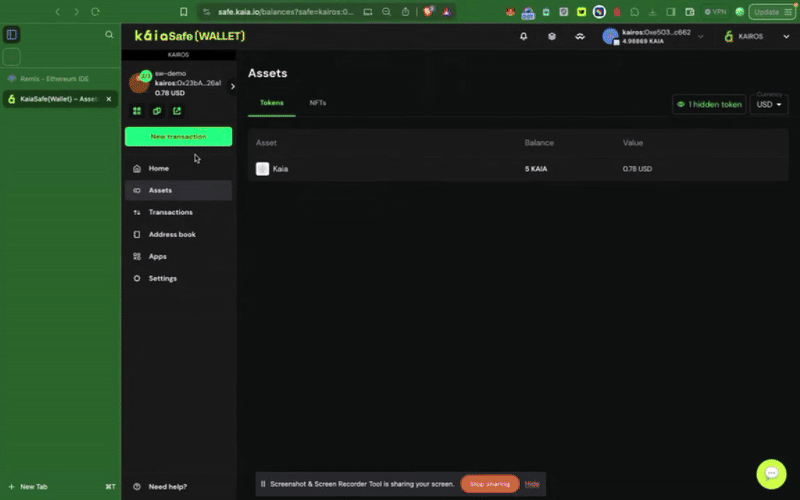
Đảm bảo tài khoản Kaia Safe của bạn có đủ số dư. Bạn có thể tham khảo hướng dẫn này để biết cách nạp tiền vào tài khoản Safe của mình.
Bước 1: Nhấp vào nút Giao dịch mới trong menu bên và chọn Gửi token để bắt đầu chuyển giao tài sản mới.
Bước 2: Chọn tài sản cần chuyển. Nhập địa chỉ người nhận và số lượng KAIA cần chuyển.
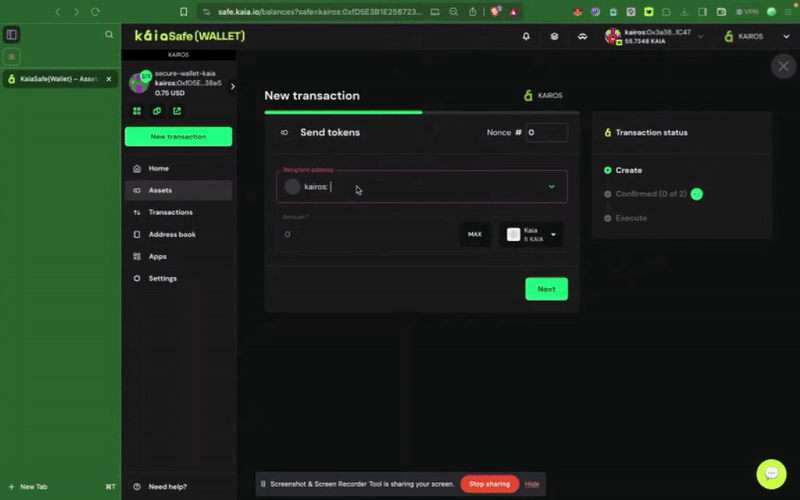
Bước 3: Kiểm tra và gửi giao dịch. Bạn cần ký giao dịch bằng ví ký tên của mình, và giao dịch sẽ được thực hiện sau khi đạt đến ngưỡng xác nhận.
4.2. Công thức: Tích hợp Kaia Safe cho các hành động hợp đồng thông minh quan trọng
Trong hướng dẫn này, bạn sẽ học cách chỉ định tài khoản Kaia Safe làm quản trị viên trong hợp đồng thông minh của mình. Bạn cũng sẽ thấy cách thực hiện các chức năng có quyền truy cập đặc quyền như setTokenPrice() và pause() bằng tài khoản Kaia Safe, đảm bảo rằng chỉ những người ký tên được phê duyệt mới có thể thực hiện các hành động có quyền truy cập đặc quyền.
Điều kiện tiên quyết
Bước 1: Truy cập vào Remix IDE
Bước 2: Biên dịch và triển khai hợp đồng token mẫu
Hợp đồng phải được triển khai trước khi bạn có thể tương tác với nó trong ví đa chữ ký của mình - gọi các hàm có quyền truy cập đặc quyền. Điều đầu tiên chúng ta cần làm là thiết lập tài khoản Kaia Safe vừa tạo làm initialOwner của hợp đồng token khi triển khai.

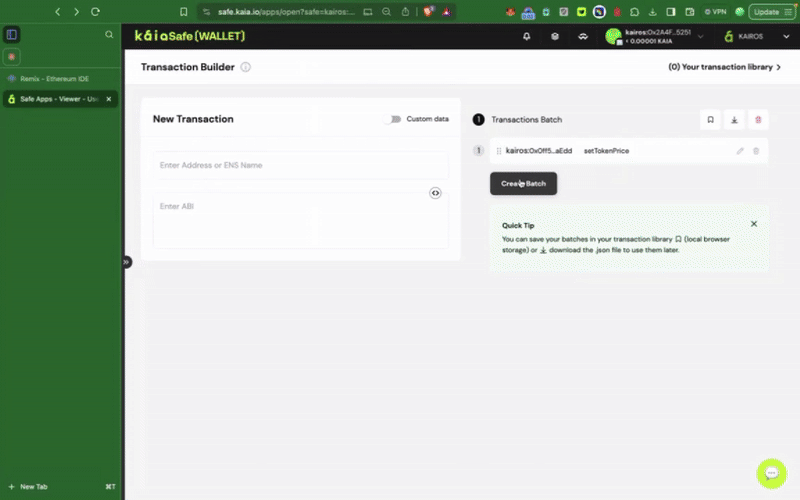
Hợp đồng token mẫu này bao gồm các chức năng đặc quyền như setTokenPrice(), pause(), chỉ có thể được gọi bởi tài khoản Kaia Safe. Bước tiếp theo, chúng ta cần thực hiện các hành động này theo đúng quy trình. Chúng ta có thể thực hiện điều này bằng cách sử dụng Trình tạo giao dịch (Transaction builder) hoặc lập trình trực tiếp thông qua bộ công cụ API Kaia Safe.
Bước 3: Khởi tạo giao dịch mới
Sử dụng Trình tạo giao dịch
Để tương tác với hợp đồng thông minh trong ví an toàn của bạn, hãy nhấp vào Giao dịch mới. Để hoàn thành bước này, bạn cần có địa chỉ hợp đồng đã được triển khai và ABI, như đã được minh họa trong bước trước đó.
Sử dụng bộ công cụ API Kaia Safe
Trong phần này, bạn sẽ sử dụng Kaia Safe API Kit để lập trình đề xuất một giao dịch gọi hàm setTokenPrice, thu thập chữ ký từ chủ sở hữu tài khoản Safe và thực thi giao dịch.
Điều kiện tiên quyết
- Node.js và npm
- Một két sắt có nhiều người ký tên
Cài đặt môi trường
Bước 1: Tạo thư mục dự án.
Sao chép và dán lệnh sau vào terminal để tạo thư mục dự án.
mkdir kaia-safe-api-contract-examplecd kaia-safe-api-contract-example
Bước 2: Khởi tạo dự án npm.
Sao chép và dán lệnh sau vào terminal để tạo tệp package.json.
npm init -y
Bước 3: Cài đặt các thành phần phụ thuộc.
Sử dụng API-Kit đơn giản như việc chạy lệnh cài đặt dưới đây:
npm install --save-dev @safe-global/api-kit@2.4.2 @safe-global/protocol-kit@4.0.2 @safe-global/safe-core-sdk-types@5.0.2
npm install --save-dev ethers dotenv
Bước 4: Nhập các phụ thuộc.
Tạo một tệp có tên app.js. Đây là nơi chứa tất cả các đoạn mã mẫu cho tương tác này.
Sao chép và dán các lệnh nhập sau vào đầu tệp app.js.
import SafeApiKit from "@safe-global/api-kit";import Safe from "@safe-global/protocol-kit";import { OperationType } from "@safe-global/safe-core-sdk-types";import { ethers } from "ethers";import "dotenv/config";
Bước 5: Cấu hình thiết lập
Để minh họa một cách hiệu quả cách API-Kit hoạt động, chúng ta sẽ sử dụng một tài khoản an toàn (Safe account) với hai hoặc nhiều người ký (signers) và ngưỡng (threshold) là hai, do đó cần thu thập nhiều chữ ký khi thực hiện một giao dịch.
Sao chép và dán đoạn mã sau vào phần import trong tệp app.js của bạn:
const RPC_URL = "https://responsive-green-emerald.kaia-kairos.quiknode.pro";const SAFE_ADDRESS = "<REPLACE WITH SAFE PUBLIC ADDRESS HERE>";const CONTRACT_ADDRESS = "<REPLACE WITH CONTRACT ADDRESS>";const OWNER_1_ADDRESS = "<REPLACE WITH OWNER_1 ADDRESS>";const OWNER_1_PRIVATE_KEY = process.env.OWNER_ONE_PK;const OWNER_2_PRIVATE_KEY = process.env.OWNER_TWO_PK; // OWNER 2 need not have any test KAIA
Bước 6: Đề xuất, Xác nhận và Thực hiện giao dịch an toàn
Trong bước này, bạn sẽ đề xuất, ký kết và thực thi một cuộc gọi hàm hợp đồng thông minh sử dụng Safe API-Kit và một tài khoản Safe có nhiều chủ sở hữu. Bạn sẽ gửi một giao dịch từ ví an toàn của mình để gọi phương thức hợp đồng thông minh setTokenPrice() — nhưng cấu trúc tương tự áp dụng cho bất kỳ hàm có quyền truy cập đặc quyền nào như pause().
Sao chép và dán đoạn mã sau vào phần thiết lập ban đầu trong tệp app.js của bạn:
// Create interface from ABIconst contractABI = [ "function pause()", "function setTokenPrice(uint256 newPrice)",];const iface = new ethers.Interface(contractABI);// Encode function calls// const pauseData = iface.encodeFunctionData("pause", []);const setTokenPriceData = iface.encodeFunctionData("setTokenPrice", [15]);const apiKit = new SafeApiKit.default({ chainId: 1001n, txServiceUrl: "https://docs-safe.kaia.io/txs-baobab/api",});const protocolKitOwner1 = await Safe.default.init({ provider: RPC_URL, signer: OWNER_1_PRIVATE_KEY, safeAddress: SAFE_ADDRESS,});// 1. Create transactionconst safeTransactionData = { to: CONTRACT_ADDRESS, value: "0", data: setTokenPriceData, operation: OperationType.Call,};const safeTransaction = await protocolKitOwner1.createTransaction({ transactions: [safeTransactionData],});const safeTxHash = await protocolKitOwner1.getTransactionHash(safeTransaction);const senderSignature = await protocolKitOwner1.signHash(safeTxHash);console.log(safeTxHash);// 2. Propose transaction to the serviceconst proposeTx = await apiKit.proposeTransaction({ safeAddress: SAFE_ADDRESS, safeTransactionData: safeTransaction.data, safeTxHash, senderAddress: OWNER_1_ADDRESS, senderSignature: senderSignature.data})// 3. Confirmation from Owner 2const protocolKitOwner2 = await Safe.default.init({ provider: RPC_URL, signer: OWNER_2_PRIVATE_KEY, safeAddress: SAFE_ADDRESS})const signature2 = await protocolKitOwner2.signHash(safeTxHash)// Confirm the Safe transactionconst signatureResponse = await apiKit.confirmTransaction( safeTxHash, signature2.data)// 4. Execute transactionconst safeTxn = await apiKit.getTransaction(safeTxHash);const executeTxReponse = await protocolKitOwner1.executeTransaction(safeTxn)const receipt = await executeTxReponse.transactionResponse?.wait();console.log('Transaction executed:');console.log(`https://kairos.kaiascan.io/tx/${receipt.hash}`)
Mã đầy đủ:
import SafeApiKit from "@safe-global/api-kit";import Safe from "@safe-global/protocol-kit";import { OperationType } from "@safe-global/safe-core-sdk-types";import { ethers } from "ethers";import "dotenv/config";// https://chainlist.org/?search=kaia&testnets=trueconst RPC_URL = "https://responsive-green-emerald.kaia-kairos.quiknode.pro";const SAFE_ADDRESS = "<REPLACE WITH SAFE PUBLIC ADDRESS HERE>";const CONTRACT_ADDRESS = "<REPLACE WITH CONTRACT ADDRESS>";const OWNER_1_ADDRESS = "<REPLACE WITH OWNER_1 ADDRESS>";const OWNER_1_PRIVATE_KEY = process.env.OWNER_ONE_PK;const OWNER_2_PRIVATE_KEY = process.env.OWNER_TWO_PK; // OWNER 2 need not have any test KAIA// Create interface from ABIconst contractABI = [ "function pause()", "function setTokenPrice(uint256 newPrice)",];const iface = new ethers.Interface(contractABI);// Encode function calls// const pauseData = iface.encodeFunctionData("pause", []);const setTokenPriceData = iface.encodeFunctionData("setTokenPrice", [15]);const apiKit = new SafeApiKit.default({ chainId: 1001n, txServiceUrl: "https://docs-safe.kaia.io/txs-baobab/api",});const protocolKitOwner1 = await Safe.default.init({ provider: RPC_URL, signer: OWNER_1_PRIVATE_KEY, safeAddress: SAFE_ADDRESS,});// 1. Create transactionconst safeTransactionData = { to: CONTRACT_ADDRESS, value: "0", data: setTokenPriceData, operation: OperationType.Call,};const safeTransaction = await protocolKitOwner1.createTransaction({ transactions: [safeTransactionData],});const safeTxHash = await protocolKitOwner1.getTransactionHash(safeTransaction);const senderSignature = await protocolKitOwner1.signHash(safeTxHash);console.log(safeTxHash);// 2. Propose transaction to the serviceconst proposeTx = await apiKit.proposeTransaction({ safeAddress: SAFE_ADDRESS, safeTransactionData: safeTransaction.data, safeTxHash, senderAddress: OWNER_1_ADDRESS, senderSignature: senderSignature.data})// 3. Confirmation from Owner 2const protocolKitOwner2 = await Safe.default.init({ provider: RPC_URL, signer: OWNER_2_PRIVATE_KEY, safeAddress: SAFE_ADDRESS})const signature2 = await protocolKitOwner2.signHash(safeTxHash)// Confirm the Safe transactionconst signatureResponse = await apiKit.confirmTransaction( safeTxHash, signature2.data)// 4. Execute transactionconst safeTxn = await apiKit.getTransaction(safeTxHash);const executeTxReponse = await protocolKitOwner1.executeTransaction(safeTxn)const receipt = await executeTxReponse.transactionResponse?.wait();console.log('Transaction executed:');console.log(`https://kairos.kaiascan.io/tx/${receipt.hash}`)
Mã thực hiện các thao tác sau:
- Tạo giao diện từ hợp đồng ABI bằng ethers.Interface
- Mã hóa lệnh gọi hàm setTokenPrice(uint256)
- Khởi tạo Safe API-Kit và Protocol-Kit cho cả hai chủ sở hữu.
- Tạo giao dịch an toàn
- Đề xuất giao dịch cho dịch vụ An toàn.
- Ký kết giao dịch với chủ sở hữu thứ hai
- Xác nhận giao dịch với tất cả các chữ ký cần thiết.
- Thực hiện giao dịch từ Kho an toàn
Bây giờ chúng ta hãy xem mã nguồn hoạt động như thế nào. Chạy lệnh node app.js trong terminal của bạn, và bạn sẽ thấy kết quả tương tự như sau:
0xfa537bf8282ae36d933c41d867dee1ced93657094efe60c07180a872bb1388fcTransaction executed:https://kairos.kaiascan.io/tx/0xad94e0e8fd2d29602825b3815468dedb14221401438a9fbcfdfbeebaec6e52a7
Bạn nên thấy giá token (tokenPrice) được đặt thành 15 trên Remix IDE.

Chúc mừng! Bạn đã thực hiện thành công một chức năng đặc quyền từ tài khoản Kaia Safe của mình bằng cách sử dụng bộ công cụ API Kaia Safe.
Bước 4: Kiểm tra và gửi giao dịch
Sử dụng Trình tạo giao dịch
Bạn cần ký giao dịch bằng ví ký tên của mình, và giao dịch sẽ được thực hiện sau khi đạt đến ngưỡng xác nhận.
Phụ lục
Phụ lục A: Danh sách thuật ngữ
- Lưu trữ lạnh: Phương pháp lưu trữ khóa riêng tư trên một thiết bị được cách ly hoàn toàn kh�ỏi internet.
- dApp (Ứng dụng phi tập trung): Một ứng dụng chạy trên một mạng lưới phi tập trung như blockchain, thay vì trên một máy chủ trung tâm.
- Kho khóa được mã hóa: Một tệp chứa khóa riêng tư đã được mã hóa bằng mật khẩu.
- Ví phần cứng: Một thiết bị vật lý lưu trữ khóa riêng tư ngoại tuyến và ký giao dịch bên trong.
- Đa chữ ký (Multi-Sig): Loại ví yêu cầu sự phê duyệt từ nhiều khóa riêng tư độc lập để xác thực một giao dịch duy nhất.
- Khóa riêng tư: Một chuỗi ký tự alphanumeric bí mật cho phép chủ sở hữu truy cập vào tiền điện tử của họ và thực hiện các giao dịch. Không bao giờ được chia sẻ.
- Khóa công khai / Địa chỉ: Một khóa mã hóa có thể chia sẻ công khai được sử dụng để nhận tiền. Nó được tạo ra từ khóa riêng tư.
- Cụm từ hạt giống (hoặc cụm từ ghi nhớ): Một danh sách gồm 12-24 từ được sử dụng làm bản sao lưu chính cho tất cả các khóa riêng tư trong ví tiền điện tử.
Phụ lục B: Mẫu cấu hình môi trường
Để giúp độc giả có thể thực hiện thành công các hướng dẫn và sao chép các ví dụ mã trong hướng dẫn này, dưới đây là một mẫu cấu hình môi trường phát triển được sử dụng trong quá trình triển khai. Để tránh các vấn đề tương thích, khuyến nghị bạn nên đồng bộ hóa cài đặt cục bộ của mình với các phiên bản này.
Node.js
$ node --version v22.14.0
Mũ bảo hộ
$ npx hardhat --version 3.0.0-next.20
Xưởng đúc (Lò rèn)
$ forge -V forge 1.2.3-stable (a813a2cee7 2025-06-08T15:42:50.507050000Z)
Điểm cuối mạng
- Nhà cung cấp RPC: https://responsive-green-emerald.kaia-kairos.quiknode.pro
- Mạng lưới mục tiêu: Kairos Testnet (ID chuỗi: 1001)
- Trình khám phá blockchain: Kaiascan