사설 네트워크를 통해 스마트 계약 배포하기
소개
이 가이드에서는 [Kaia Hardhat Utils]를 사용하여 프라이빗 Kaia 네트워크에 Greeter 계약을 배포하는 과정을 안내해 드리겠습니다(https://github.com/ayo-klaytn/hardhat-utils). 이 가이드를 따름으로써, 당신은 방법을 배울 것입니다:
- Hardhat 프로젝트 설정
- Kairos 테스트넷을 시뮬레이팅하는 개인 네트워크 시작합니다.
- 이 프라이빗 네트워크에 스마트 계약을 배포하기 위해 Hardhat 유틸리티를 활용하십시오.
필수조건
이 듀토리얼을 따르기 위해서, 필수조건은 다음과 같습니다.
- 코드 편집기: VS Code 같은 소스 코드 편집기.
- 도커: 도커가 설치되어 있지 않다면, 이 링크를 통해 설치해 주세요.
- Node.js와 npm: Node 버전 18 그리고 이상 버전.
개발 환경 설정하기
이 섹션에서는 프로젝트 부트스트랩에 필요한 Hardhat, Kaia hardhat 유틸리티 및 기타 필수 종속성을 설치합니다.
1단계: 프로젝트 디렉터리 만들기
mkdir $HOME/kaia-greetercd kaia-greeter
2단계: npm 프로젝트 초기화하기
npm init -y
3단계: hardhat, hardhat-유틸리티 그리고 다른 종속성 설치하기
- hardhat과 hardhat-유틸리티를 설치하기 위해 터미널에 아래 코드를 복사 후 붙여넣으세요.
npm i hardhat @klaytn/hardhat-utils
- 다른 종속성을 설치하기 위해 터미널에 아래 코드를 복사 후 붙여넣으세요.
npm install @nomiclabs/hardhat-ethers hardhat-deploy dotenv
hardhat-유틸리티 플러그인은 hardhat-ethers 및 hardhat-deploy 플러그인에 의존합니다. hardhat.config.js 또는 hardhat.config.ts에서 해당 패키지를 요구하거나 임포트해야 합니다.
(권장) hardhat 간편 설치 하지만 npx hardhat을 사용해 작업을 계속 사용할 수 있습니다.
npm install hardhat-shorthand --save
4단계: hardhat 프로젝트 초기화하기
hardhat 프로젝트 초기화를 위해 아래 명령어를 실행하세요:
npx hardhat init
이 가이드에서는 아래와 같이 “빈 hardhat.config.js 생성” 프로젝트를 선택하게 됩니다:
888 888 888 888 888888 888 888 888 8888888888888 8888b. 888d888 .d88888 88888b. 8888b. 888888888 888 "88b 888P" d88" 888 888 "88b "88b 888888 888 .d888888 888 888 888 888 888 .d888888 888888 888 888 888 888 Y88b 888 888 888 888 888 Y88b.888 888 "Y888888 888 "Y88888 888 888 "Y888888 "Y888👷 Welcome to Hardhat v2.22.9 👷�? What do you want to do? … Create a JavaScript project Create a TypeScript project Create a TypeScript project (with Viem)❯ Create an empty hardhat.config.js Quit
Step 5: Create a .env file
Now create your .env file in the project folder. This file helps us load environment variables from an .env file into process.env.
Copy and paste this command in your terminal to create a .env file
touch .env
Configure your .env file to look like this:
PRIVATE_KEY="COPY & PASTE ANY OF THE PRIVATE KEY PROVIDED BY LOCAL PRIVATE NETWORK"
When you launch the private network in the next section, you will be able to access the private key provided by the local network.
Step 6: Setup Hardhat Configs
Modify your hardhat.config.js with the following configurations:
require("@nomiclabs/hardhat-ethers");require("hardhat-deploy");require("@klaytn/hardhat-utils");require('dotenv').config()const accounts = [ process.env.PRIVATE_KEY];/** @type import('hardhat/config').HardhatUserConfig */module.exports = { solidity: "0.8.24", networks: { localhost: { url: process.env.RPC_URL || "http://localhost:8545", accounts: accounts, }, kairos: { url: process.env.RPC_URL || "https://public-en-kairos.node.kaia.io", accounts: accounts, }, kaia: { url: process.env.RPC_URL || "https://public-en.node.kaia.io", accounts: accounts, } }, namedAccounts: { deployer: { default: 0, // here this will by default take the first account as deployer }, },};
Launching the Private Network
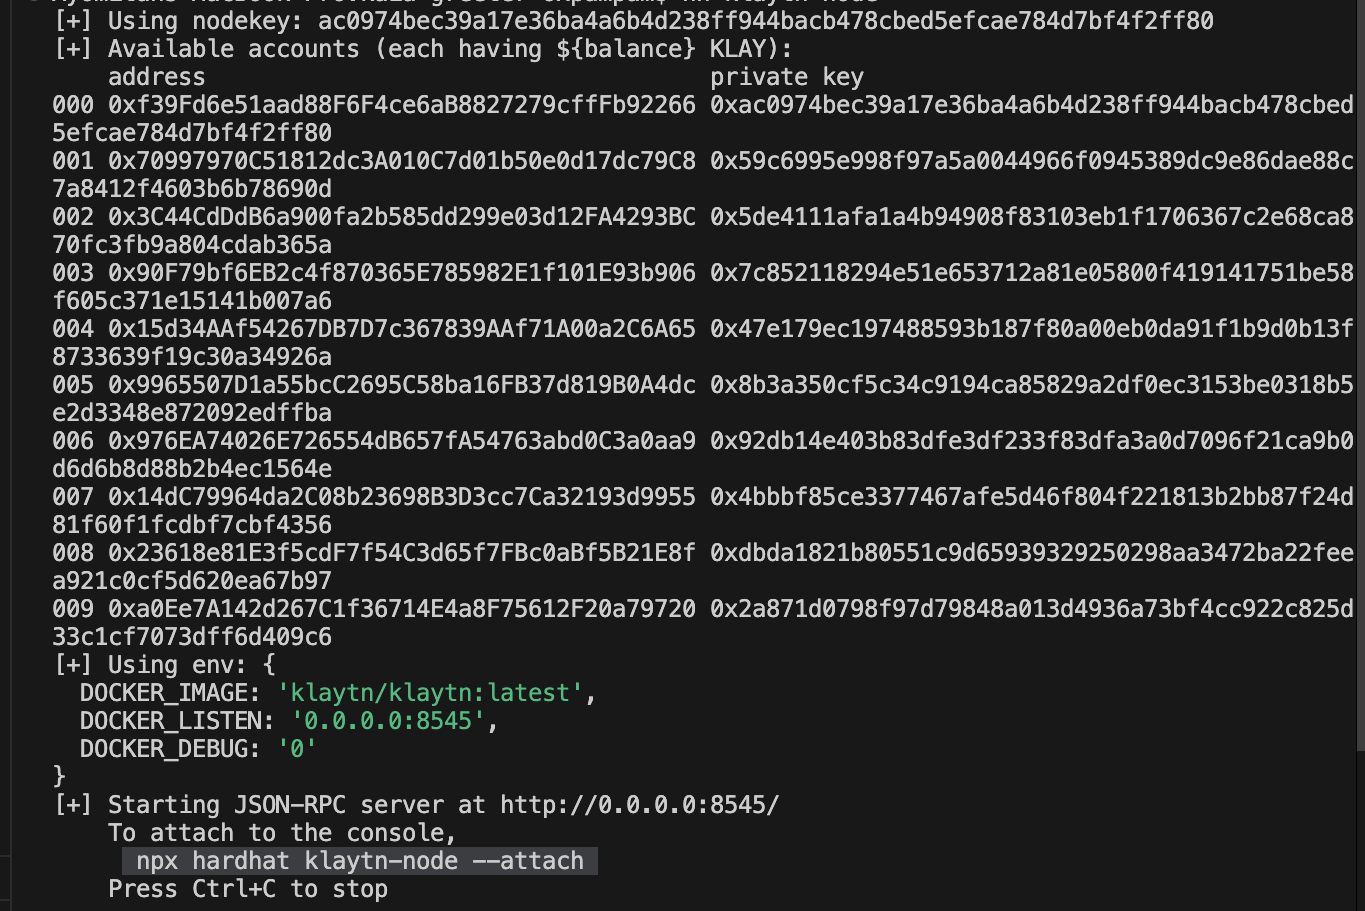
To launch a private network, the hardhat utils plugin provides us a task to easily launch one viz:
hh klaytn-node
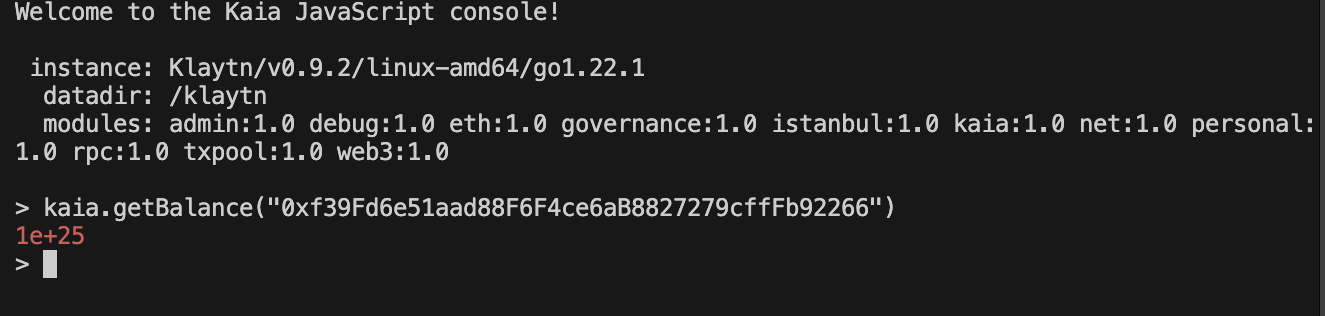
Attaching Console
The private network comes with a JavaScript console. From the console command line, you can initiate part of Kaia API calls to your network. To attach to the JavaScript console, execute the following command:
hh klaytn-node --attach
Type kaia or personal to get the list of available functions.
Checking the Balance in your account
When we launched the private network, it provided us with a list of accounts, private key and pre-funded values for each account.
To see the balance of the account, execute the following command.
kaia.getBalance("0xf39Fd6e51aad88F6F4ce6aB8827279cffFb92266")
Configuring hardhat network environment �
Now that we are running a stand alone local network, which external clients (wallets, dApp) can connect to, we need to configure hardhat to use this network by running this command:
export HARDHAT_NETWORK=localhosthh accounts
hh --network localhost accounts

Creating KaiaGreeter Smart Contract
In this section, you will create a KaiaGreeter smart contract.
Step 1: Create a new folder named contracts folder in the Explorer pane, click the New File button and create a new file named KaiaGreeter.sol
Step 2: Open the file and paste the following code:
// SPDX-License-Identifier: UNLICENSEDpragma solidity ^0.8.0;import "hardhat/console.sol";contract KaiaGreeter { uint256 totalGreetings; constructor() { console.log("Yo yo, Welcome to Kaia"); } function greet() public { totalGreetings += 1; console.log(msg.sender, "says hello kaia!"); } function getTotalGreetings() public view returns (uint256) { console.log("We have %d total waves!", totalGreetings); return totalGreetings; }}
Deploying KaiaGreeter
In this section we will use the hardhat-deploy plugin to deploy our contracts.
Step 1: In the Explorer pane, Create a new folder called deploy and click the New File button to create a new file named deploy.js.
Step 2: Copy and paste the following code inside the file.
module.exports = async ({getNamedAccounts, deployments}) => { const {deploy} = deployments; const {deployer} = await getNamedAccounts(); await deploy('KaiaGreeter', { from: deployer, args: [], log: true, });};module.exports.tags = ['KaiaGreeter'];
Step 3: In the terminal, run the following command which tells Hardhat to deploy your KaiaGreeter contract on the private network.
hh deploy

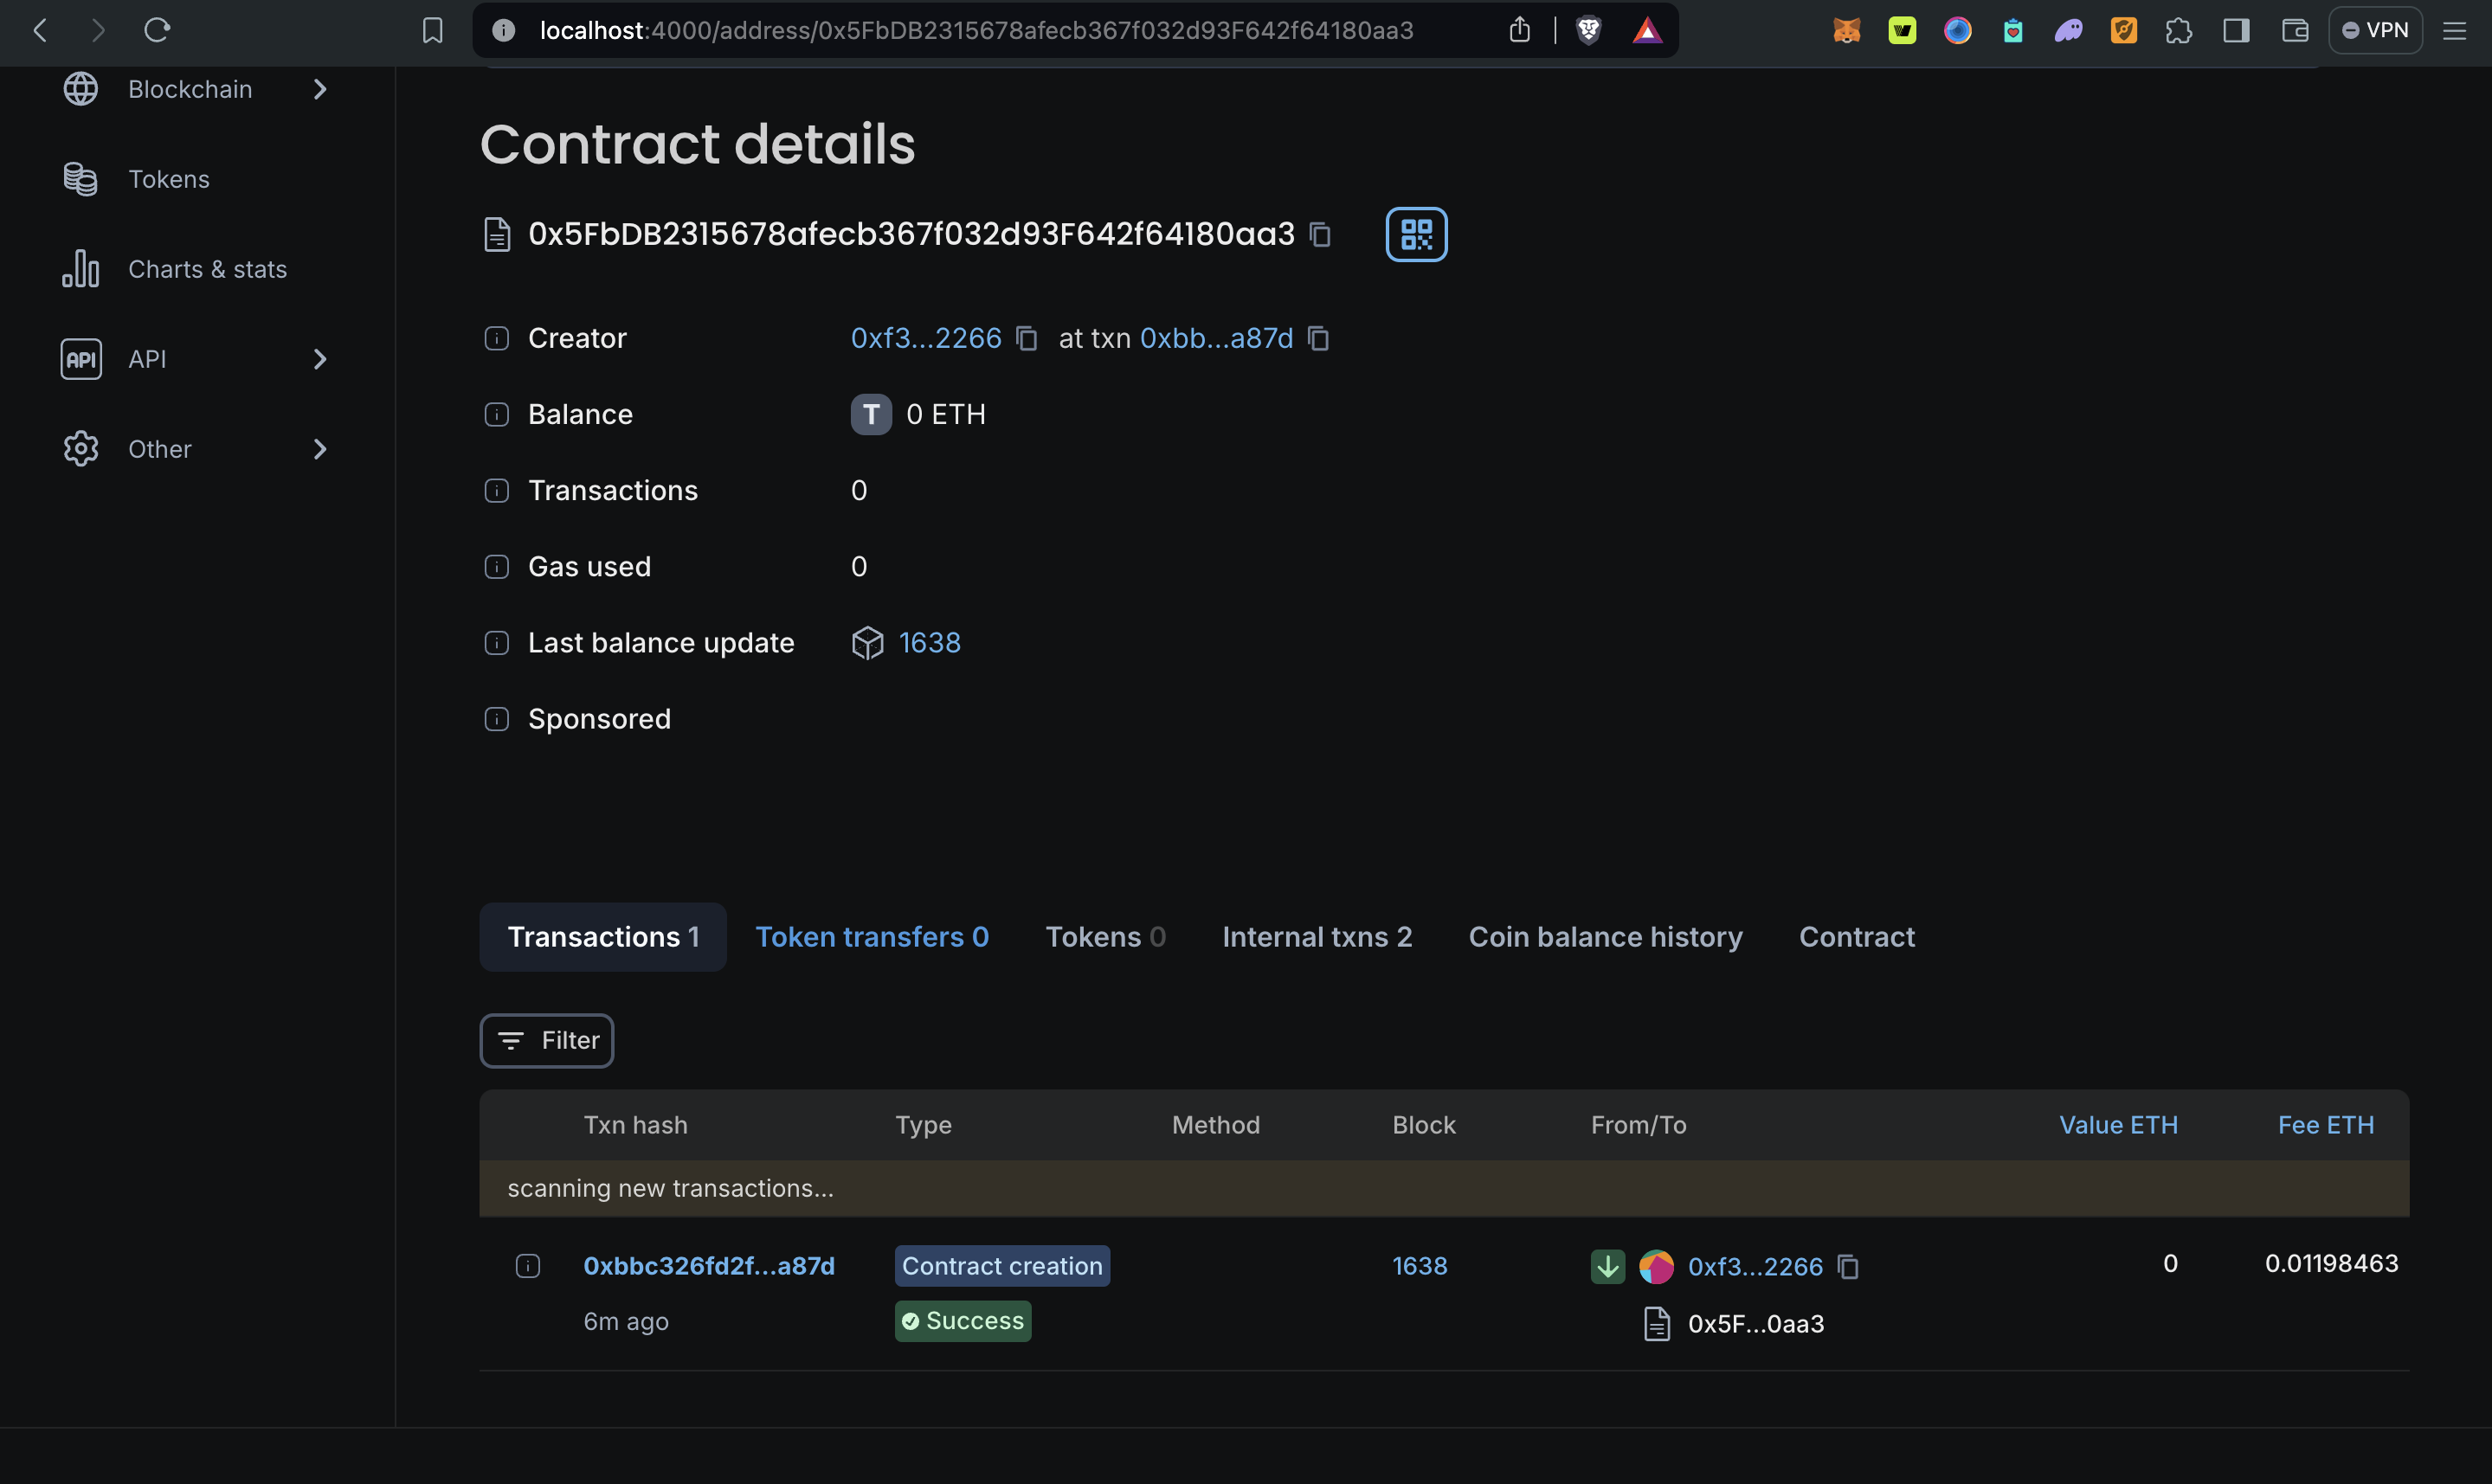
Verifying transaction using Block Explorer
Step 1: To verify our transactions using a local blockscout explorer, run the command below in a new terminal:
hh explorer --network localhost
[+] Using env: { DOCKER_RPC_HTTP_URL: 'http://host.docker.internal:8545/', DOCKER_LISTEN: '0.0.0.0:4000', DOCKER_DISABLE_TRACER: 'false', DOCKER_DEBUG: '0'}[+] Open in the browser: http://localhost:4000 Network blockscout_default Creating Network blockscout_default Created Container blockscout-db-1 Creating Container blockscout-frontend-1 Creating Container blockscout-smart-contract-verifier-1 Creating Container blockscout-redis_db-1 Creating Container blockscout-smart-contract-verifier-1 Created Container blockscout-db-1 Created Container blockscout-frontend-1 Created Container blockscout-redis_db-1 Created Container blockscout-backend-1 Creating Container blockscout-backend-1 Created Container blockscout-frontend-1 Starting Container blockscout-redis_db-1 Starting Container blockscout-smart-contract-verifier-1 Starting Container blockscout-db-1 Starting Container blockscout-db-1 Started Container blockscout-redis_db-1 Started Container blockscout-smart-contract-verifier-1 Started Container blockscout-backend-1 Starting Container blockscout-frontend-1 Started Container blockscout-backend-1 Started
Step 2: To access this block explorer, open up http://localhost:4000 in your browser.
Step 3: Copy and paste the deployed contract address in the search field and press Enter. You should see the recently deployed contract.
Interacting with deployed contract
using hardhat utils contract task
- To call a read-only function of the deployed contract, run the command below:
hh call KaiaGreeter getTotalGreetings

- To send a function invoking transaction to the deployed contract, run the command below:
hh send KaiaGreeter greet
using Kaia SDK
Step 1: To interact with the deployed contract using Kaia SDK, you need to install Kaia SDK by running this command:
npm install --save @kaiachain/ethers-ext
Step 2: In the Explorer pane, Create a new folder called "utils" and click the New File button to create a new file named kaia-sdk.js in the utils folder.
Step 3: Copy and paste the following code inside the file.
const { JsonRpcProvider, Wallet } = require("@kaiachain/ethers-ext");const { ethers } = require("ethers");require('dotenv').config()const provider = new JsonRpcProvider("http://127.0.0.1:8545/")const privKey = process.env.PRIVATE_KEY;const signer = new ethers.Wallet(privKey, provider);const contractAddress = "0x5FbDB2315678afecb367f032d93F642f64180aa3" // PASTE DEPLOYED CONTRACT ADDRESS;const KaiaGreeterABI = require("../artifacts/contracts/KaiaGreeter.sol/KaiaGreeter.json").abi;async function getCode(ca) { const tx = await provider.getCode(ca); console.log(tx);}async function greet(ca) { const klaytnGreeter = new ethers.Contract(ca, KaiaGreeterABI, signer); const tx = await klaytnGreeter.greet(); console.log( tx);}async function getTotalGreetings(ca) { const klaytnGreeter = new ethers.Contract(ca, KaiaGreeterABI, provider); const value = await klaytnGreeter.getTotalGreetings(); console.log(value.toString());}// getCode(contractAddress);getTotalGreetings(contractAddress);// greet(contractAddress);
Step 4: To execute any of the functions declared in this file, make sure to uncomment them as we did for the getTotalGreetings() function, then run the following command in your terminal.
node utils/kaia-sdk.js

For a more in-depth guide on hardhat-utils, please refer to hardhat-utils github. Also, you can find the full implementation of the code for this guide on GitHub