Hardhat을 사용하여 첫 스마트 컨트랙트 배포하기

소개
이 섹션에서는 Hardhat을 사용하여 Kaia Kairos 네트워크에 Soul-bound token을 배포하는 방법을 안내합니다.
Hardhat은 여러분을 도와줄 스마트 컨트랙트 개발 환경입니다:
- 스마트 컨트랙트 개발 및 컴파일.
- 스마트 컨트랙트 및 dApp 디버깅, 테스트, 배포.
소울바운드 토큰(SBT)은 양도 불가능한 대체 불가능한 토큰입니다. 즉, 한 번 획득하면 다른 사용자에게 판매하거나 양도할 수 없습니다. SBTs-Scalable Bitcoin Tokens-에 대해 더 알아보고, 작동 방식과 활용 사례를 확인하려면 Vitalik Buterin이 발표한 이 참고 문서를 살펴보실 수 있습니다.
이 가이드가 끝나면 여러분은 다음을 할 수 있을 것입니다:
- Kaia에서 Hardhat 프로젝트를 설정합니다.
- 간단한 소울바운드 토큰을 생성합니다.
- Verifying contracts using Hardhat on Klaytnscope
- This guide allows you to automatically verify your smart contracts' source code on Klaytnscope straight from your CLI using the Hardhat Verify Plugin.
- Hardhat 포크 기능 살펴보기.
사전 요구 사항
이 튜토리얼을 따르기 위한 전제 조건은 다음과 같습니다:
- 코드 편집기: VS Code 같은 소스 코드 편집기.
- MetaMask: 계약을 배포하고, 트랜잭션에 서명하며, 계약과 상호작용하는 데 사용됩니다.
- RPC 엔드포인트: 지원되는 엔드포인트 공급자 중 하나에서 이 정보를 얻을 수 있습니다.
- Faucet에서 KAIA를 테스트하세요: 계정에 충분한 KAIA를 충전하세요.
- NodeJS 및 NPM
개발 환경 설정하기
Hardhat을 사용하려면 개발 환경을 설정하고 Hardhat을 설치해야 합니다. 다음 단계를 통해 이를 수행해 보겠습니다:
1단계: 프로젝트 디렉터리 만들기
mkdir soulbound-tokenscd soulbound-tokens
2단계: npm 프로젝트 초기화
터미널에 다음 명령을 붙여넣어 package.json 파일을 만듭니다.
npm init -y
3단계: Hardhat 및 기타 종속성을 설치합니다:
- 터미널에 아래 코드를 붙여넣어 Hardhat을 설치하세요.
npm install --save-dev hardhat
- 다른 종속성을 설치하려면 아래 코드를 붙여넣으세요.
npm install dotenv @kaiachain/contracts
참고: 이 프로젝트에 필요한
하드햇,카이아체인/컨트랙트,도텐브이등 다른 종속성을 설치합니다.
4단계: Hardhat 프로젝트를 초기화합니다:
이 가이드는 Hardhat v2를 사용합니다. Hardhat v3를 사용하는 경우 이 설정 가이드에서 구성 지침을 참조하세요.
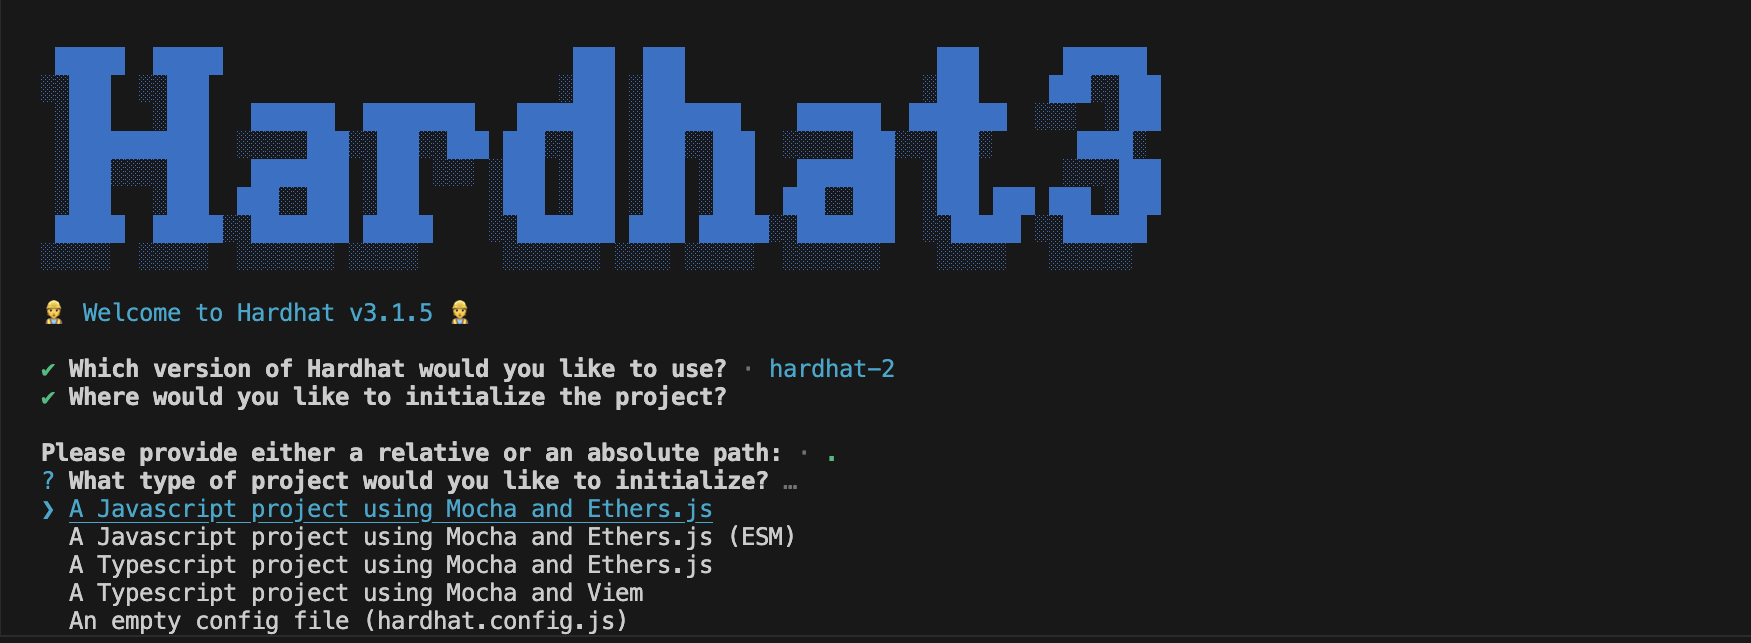
아래 명령을 실행하여 Hardhat 프로젝트를 시작하세요.
npx 하드햇 --init

이 가이드에서는 아래와 같이 모카와 이더를 사용하는 자바스크립트 프로젝트를 선택하겠습니다:

메시지에 대한 기본 답변을 수락합니다.
Hardhat 프로젝트를 초기화한 후에는 현재 디렉터리에 다음이 포함되어야 합니다:
contracts/ - 이 폴더에는 스마트 컨트랙트 코드가 포함되어 있습니다.
ignition/modules/ – 이 폴더는 블록체인 네트워크에서 당신의 스마트 계약을 배포하는 코드를 포함합니다.
test/ - 이 폴더에는 스마트 컨트랙트를 테스트하는 모든 단위 테스트가 포함되어 있습니다.
hardhat.config.js - 이 파일에는 하드햇의 작업과 소울바운드 토큰 배포에 중요한 구성이 포함되어 있습니다.
5단계: .env` 파일 만들기
이제 프로젝트 폴더에 '.env' 파일을 만듭니다. 이 파일은 '.env' 파일에서 process.env로 환경 변수를 로드하는 데 도움이 됩니다.
- 터미널에 이 명령을 붙여넣어 '.env' 파일을 만듭니다.
touch .env
- 파일을 생성한 후 '.env' 파일을 다음과 같이 구성해 보겠습니다:
KAIROS_TESTNET_URL= "귀하의 카이로스 RPC URL" PRIVATE_KEY= "메타마스크 지갑에서 복사한 개인 키"
참고: 하드햇에서 제공하는 구성 변수 기능을 사용하여 코드 저장소에 포함되지 않아야 하는 변수를 구성할 수도 있습니다.
6단계: Hardhat 설정 설정
To verify your contract on klaytn, you need to add the following configuration to your hardhat.config.js:
require("@nomicfoundation/hardhat-toolbox");require('dotenv').config()module.exports = { solidity: "0.8.17", networks: { kairos: { url: process.env.KAIROS_TESTNET_URL || "", gasPrice: 250000000000, accounts: process.env.PRIVATE_KEY !== undefined ? [process.env.PRIVATE_KEY] : [], } }};
이제 개발 환경이 모두 준비되었으니, 이제 소울 바운드 토큰 스마트 컨트랙트를 작성해 보겠습니다.
SBT 스마트 컨트랙트 생성
이 섹션에서는 Kaia Contracts를 사용하게 됩니다: 커뮤니티 검증 코드의 단단한 기반 위에 구축된, 스마트 계약 개발을 위한 안전한 라이브러리입니다. 이는 오픈 제플린 컨트랙트의 포크입니다.
참고: '개발 환경 설정' 섹션의 3단계에서 이미 이 라이브러리를 설치했습니다.
1단계: 탐색기 창에서 contracts 폴더를 선택하고 새 파일 버튼을 클릭한 후 SBT.sol이라는 이름의 새 파일을 만듭니다.
2단계: 파일을 열고 다음 코드를 붙여넣습니다:
// SPDX-License-Identifier: MITpragma solidity ^0.8.7;import "@kaiachain/contracts/KIP/token/KIP17/KIP17.sol";import "@kaiachain/contracts/utils/Counters.sol";import "@kaiachain/contracts/access/Ownable.sol";contract SoulBoundToken is KIP17, Ownable { using Counters for Counters.Counter; Counters.Counter private _tokenIdCounter; constructor() KIP17("SoulBoundToken", "SBT") {} function safeMint(address to) public onlyOwner { uint256 tokenId = _tokenIdCounter.current(); _tokenIdCounter.increment(); _safeMint(to, tokenId); } function _beforeTokenTransfer(address from, address to, uint256) pure override internal { require(from == address(0) || to == address(0), "This a Soulbound token. It cannot be transferred."); } function _burn(uint256 tokenId) internal override(KIP17) { super._burn(tokenId); }}
코드 연습
이것이 여러분의 스마트 컨트랙트입니다. 1줄은 Hardhat이 Solidity 버전 0.8.7 이상을 사용한다는 것을 보여줍니다. 그 외에는 KIP17.sol 및 기타 지원 컨트랙트를 가져옵니다. 6~12줄에서는 KIP17을 계승하는 스마트 컨트랙트가 생성되었습니다. 또한 생성자에서 토큰 이름과 심볼이 전달되었습니다.
위 코드에서 볼 수 있듯이 토큰 이름과 심볼은 각각 SoulBoundToken과 SBT로 설정되어 있습니다. 토큰 이름과 심볼은 원하는 대로 변경할 수 있습니다.
이 컨트랙트에서 가장 중요한 것은 토큰 양도를 금지하여 발행된 토큰을 소울본드로 만든다는 것입니다.
SBT 스마트 컨트랙트 테스트
이 섹션에서는 일부 컨트랙트 기능을 테스트할 것입니다.
1단계: 탐색기 창에서 테스트 폴더를 선택하고 새 파일 버튼을 클릭하여 sbtTest.js라는 이름의 새 파일을 만듭니다.
2단계: 아래 코드를 sbtTest.js 파일에 복사합니다.
// This is an example test file. Hardhat will run every *.js file in `test/`,// so feel free to add new ones.// Hardhat tests are normally written with Mocha and Chai.// We import Chai to use its asserting functions here.const { expect } = require("chai");// We use `loadFixture` to share common setups (or fixtures) between tests.// Using this simplifies your tests and makes them run faster, by taking// advantage of Hardhat Network's snapshot functionality.const { loadFixture } = require("@nomicfoundation/hardhat-network-helpers");// `describe` is a Mocha function that allows you to organize your tests.// Having your tests organized makes debugging them easier. All Mocha// functions are available in the global scope.//// `describe` receives the name of a section of your test suite, and a// callback. The callback must define the tests of that section. This callback// can't be an async function.describe("Token contract", function () { // We define a fixture to reuse the same setup in every test. We use // loadFixture to run this setup once, snapshot that state, and reset Hardhat // Network to that snapshot in every test. async function deployTokenFixture() { // Get the ContractFactory and Signers here. const [owner, addr1, addr2] = await ethers.getSigners(); // To deploy our contract, we just have to call ethers.deployContract() and call the // waitForDeployment() method, which happens onces its transaction has been // mined. const sbtContract = await ethers.deployContract("SoulBoundToken"); await sbtContract.waitForDeployment(); // Fixtures can return anything you consider useful for your tests return { sbtContract, owner, addr1, addr2 }; } // You can nest describe calls to create subsections. describe("Deployment", function () { // `it` is another Mocha function. This is the one you use to define each // of your tests. It receives the test name, and a callback function. // // If the callback function is async, Mocha will `await` it. it("Should mint SBT to owner", async function () { const { sbtContract, owner } = await loadFixture(deployTokenFixture); const safemint = await sbtContract.safeMint(owner.address); expect(await sbtContract.ownerOf(0)).to.equal(owner.address); }); }); describe("Transactions", function () { it("Should prohibit token transfer using transferFrom", async function () { const { sbtContract, owner, addr1 } = await loadFixture( deployTokenFixture ); const safemintTx = await sbtContract.safeMint(owner.address); // prohibit token transfer of token id (0) from owner to addr1 await expect( sbtContract.transferFrom(owner.address, addr1.address, 0) ).to.be.reverted; }); it("Should prohibit token transfer using safeTransferFrom", async function () { const { sbtContract, owner, addr1 } = await loadFixture( deployTokenFixture ); const safemintTx = await sbtContract.safeMint(owner.address); // prohibit token transfer of token id (0) from owner to addr1 await expect(sbtContract['safeTransferFrom(address,address,uint256)']( owner.address, addr1.address, 0 )).to.be.reverted; }); });})
방금 복사한 코드에서 7번째 줄과 12번째 줄은 Chai 및 loadFixture에서 Hardhat 네트워크 헬퍼의 기대값을 가져온 것을 보여줍니다.
위의 테스트는 다음을 확인합니다:
- 특정 토큰 ID의 소유자가 토큰이 발행된 사람과 동일한가요?
- 계정 간 토큰 전송을 금지하나요?
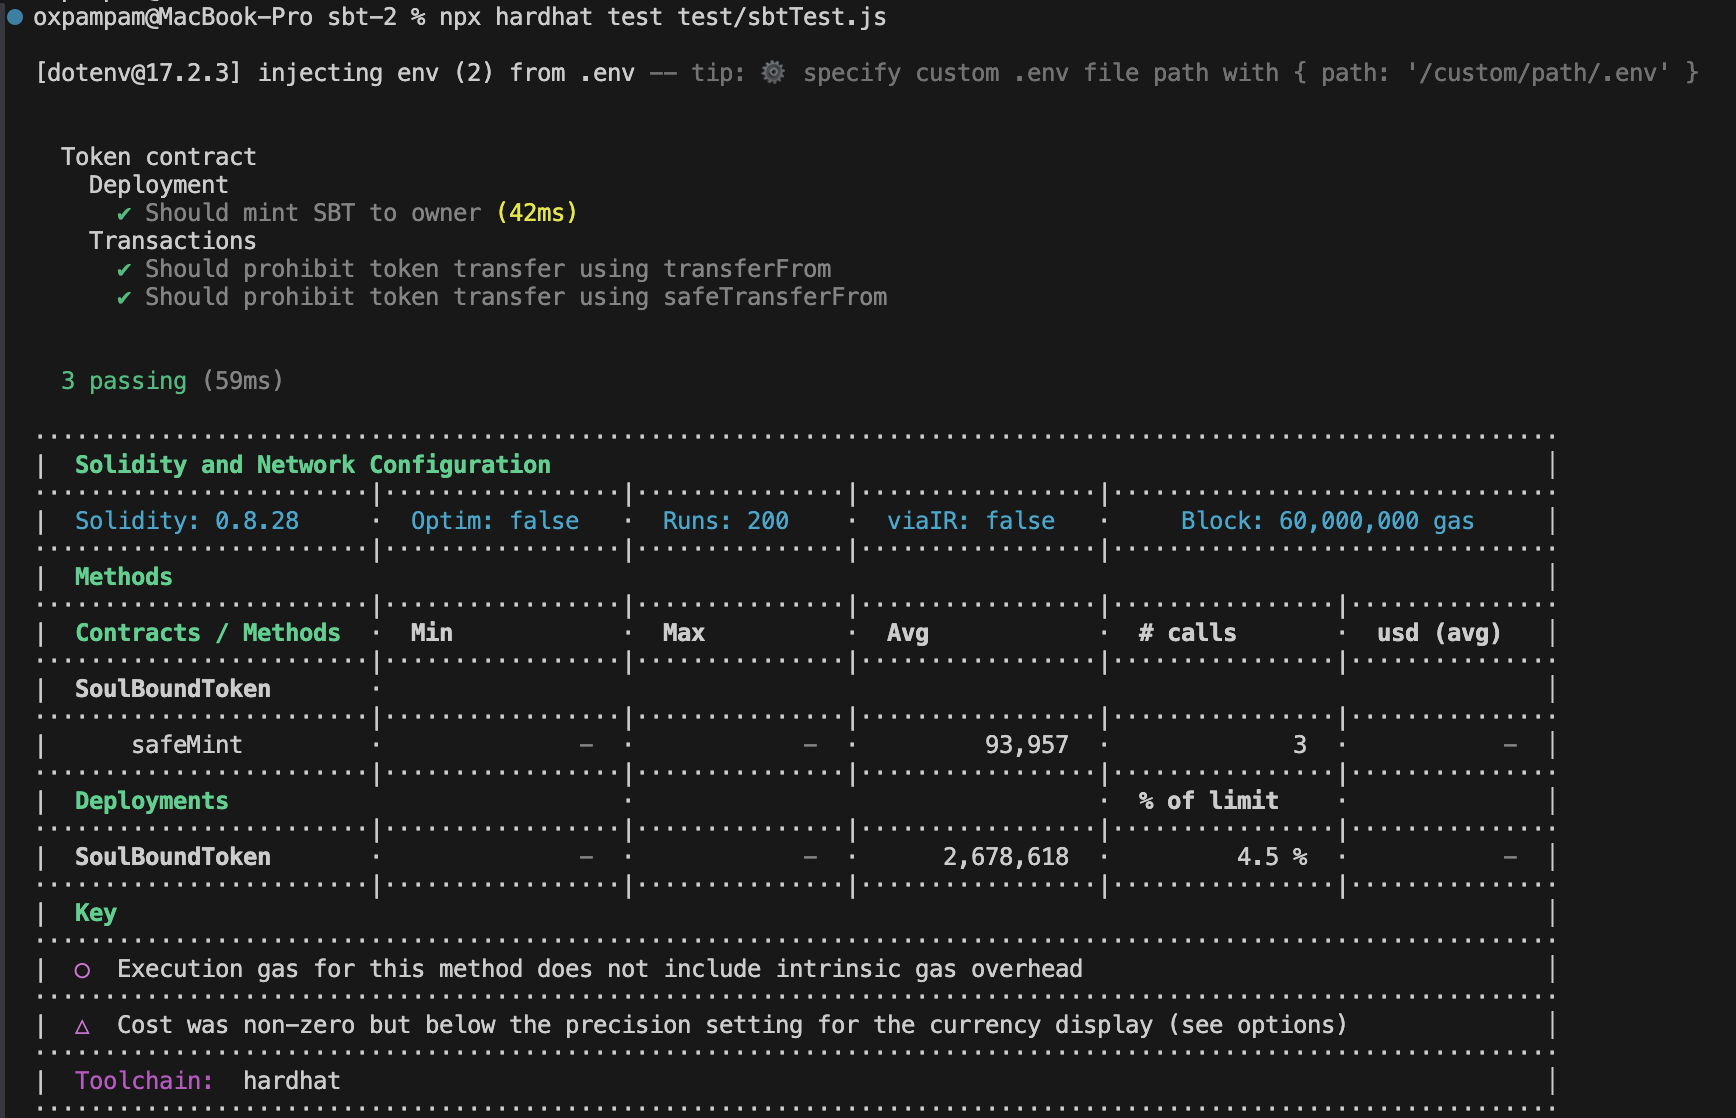
3단계: 테스트를 실행하려면 아래 명령을 실행합니다:
npx hardhat test test/sbtTest.js

테스트에 대한 자세한 안내는 Hardhat 테스트를 참조하세요.
스마트 컨트랙트 배포하기
이그니션 모듈은 블록체인 네트워크에 컨트랙트를 배포하는 데 도움이 되는 자바스크립트/타입스크립트 파일입니다. 이 섹션에서는 스마트 컨트랙트용 모듈을 생성합니다.
1단계: 탐색기 창에서 점화/모듈 폴더를 선택하고 새 파일 버튼을 클릭하여 sbtDeploy.js라는 새 파일을 생성합니다.
2단계: 파일 안에 다음 코드를 복사하여 붙여넣습니다.
// 이 설정은 하드햇 이그니션을 사용하여 스마트 컨트랙트 배포를 관리합니다.https://hardhat.org/ignitionconst { buildModule } = require("@nomicfoundation/hardhat-ignition/modules");module.exports = buildModule("SBTModule", (m) => { const sbt = m.contract("SoulBoundToken", []); return { sbt };});
3단계: 터미널에서 다음 명령을 실행하여 하드햇이 카이아 카이로스 테스트넷에 SBT 토큰을 배포하도록 지시합니다.
npx 하드햇 점화 배포 ./ignition/modules/sbtDeploy.js --네트워크 카이로스

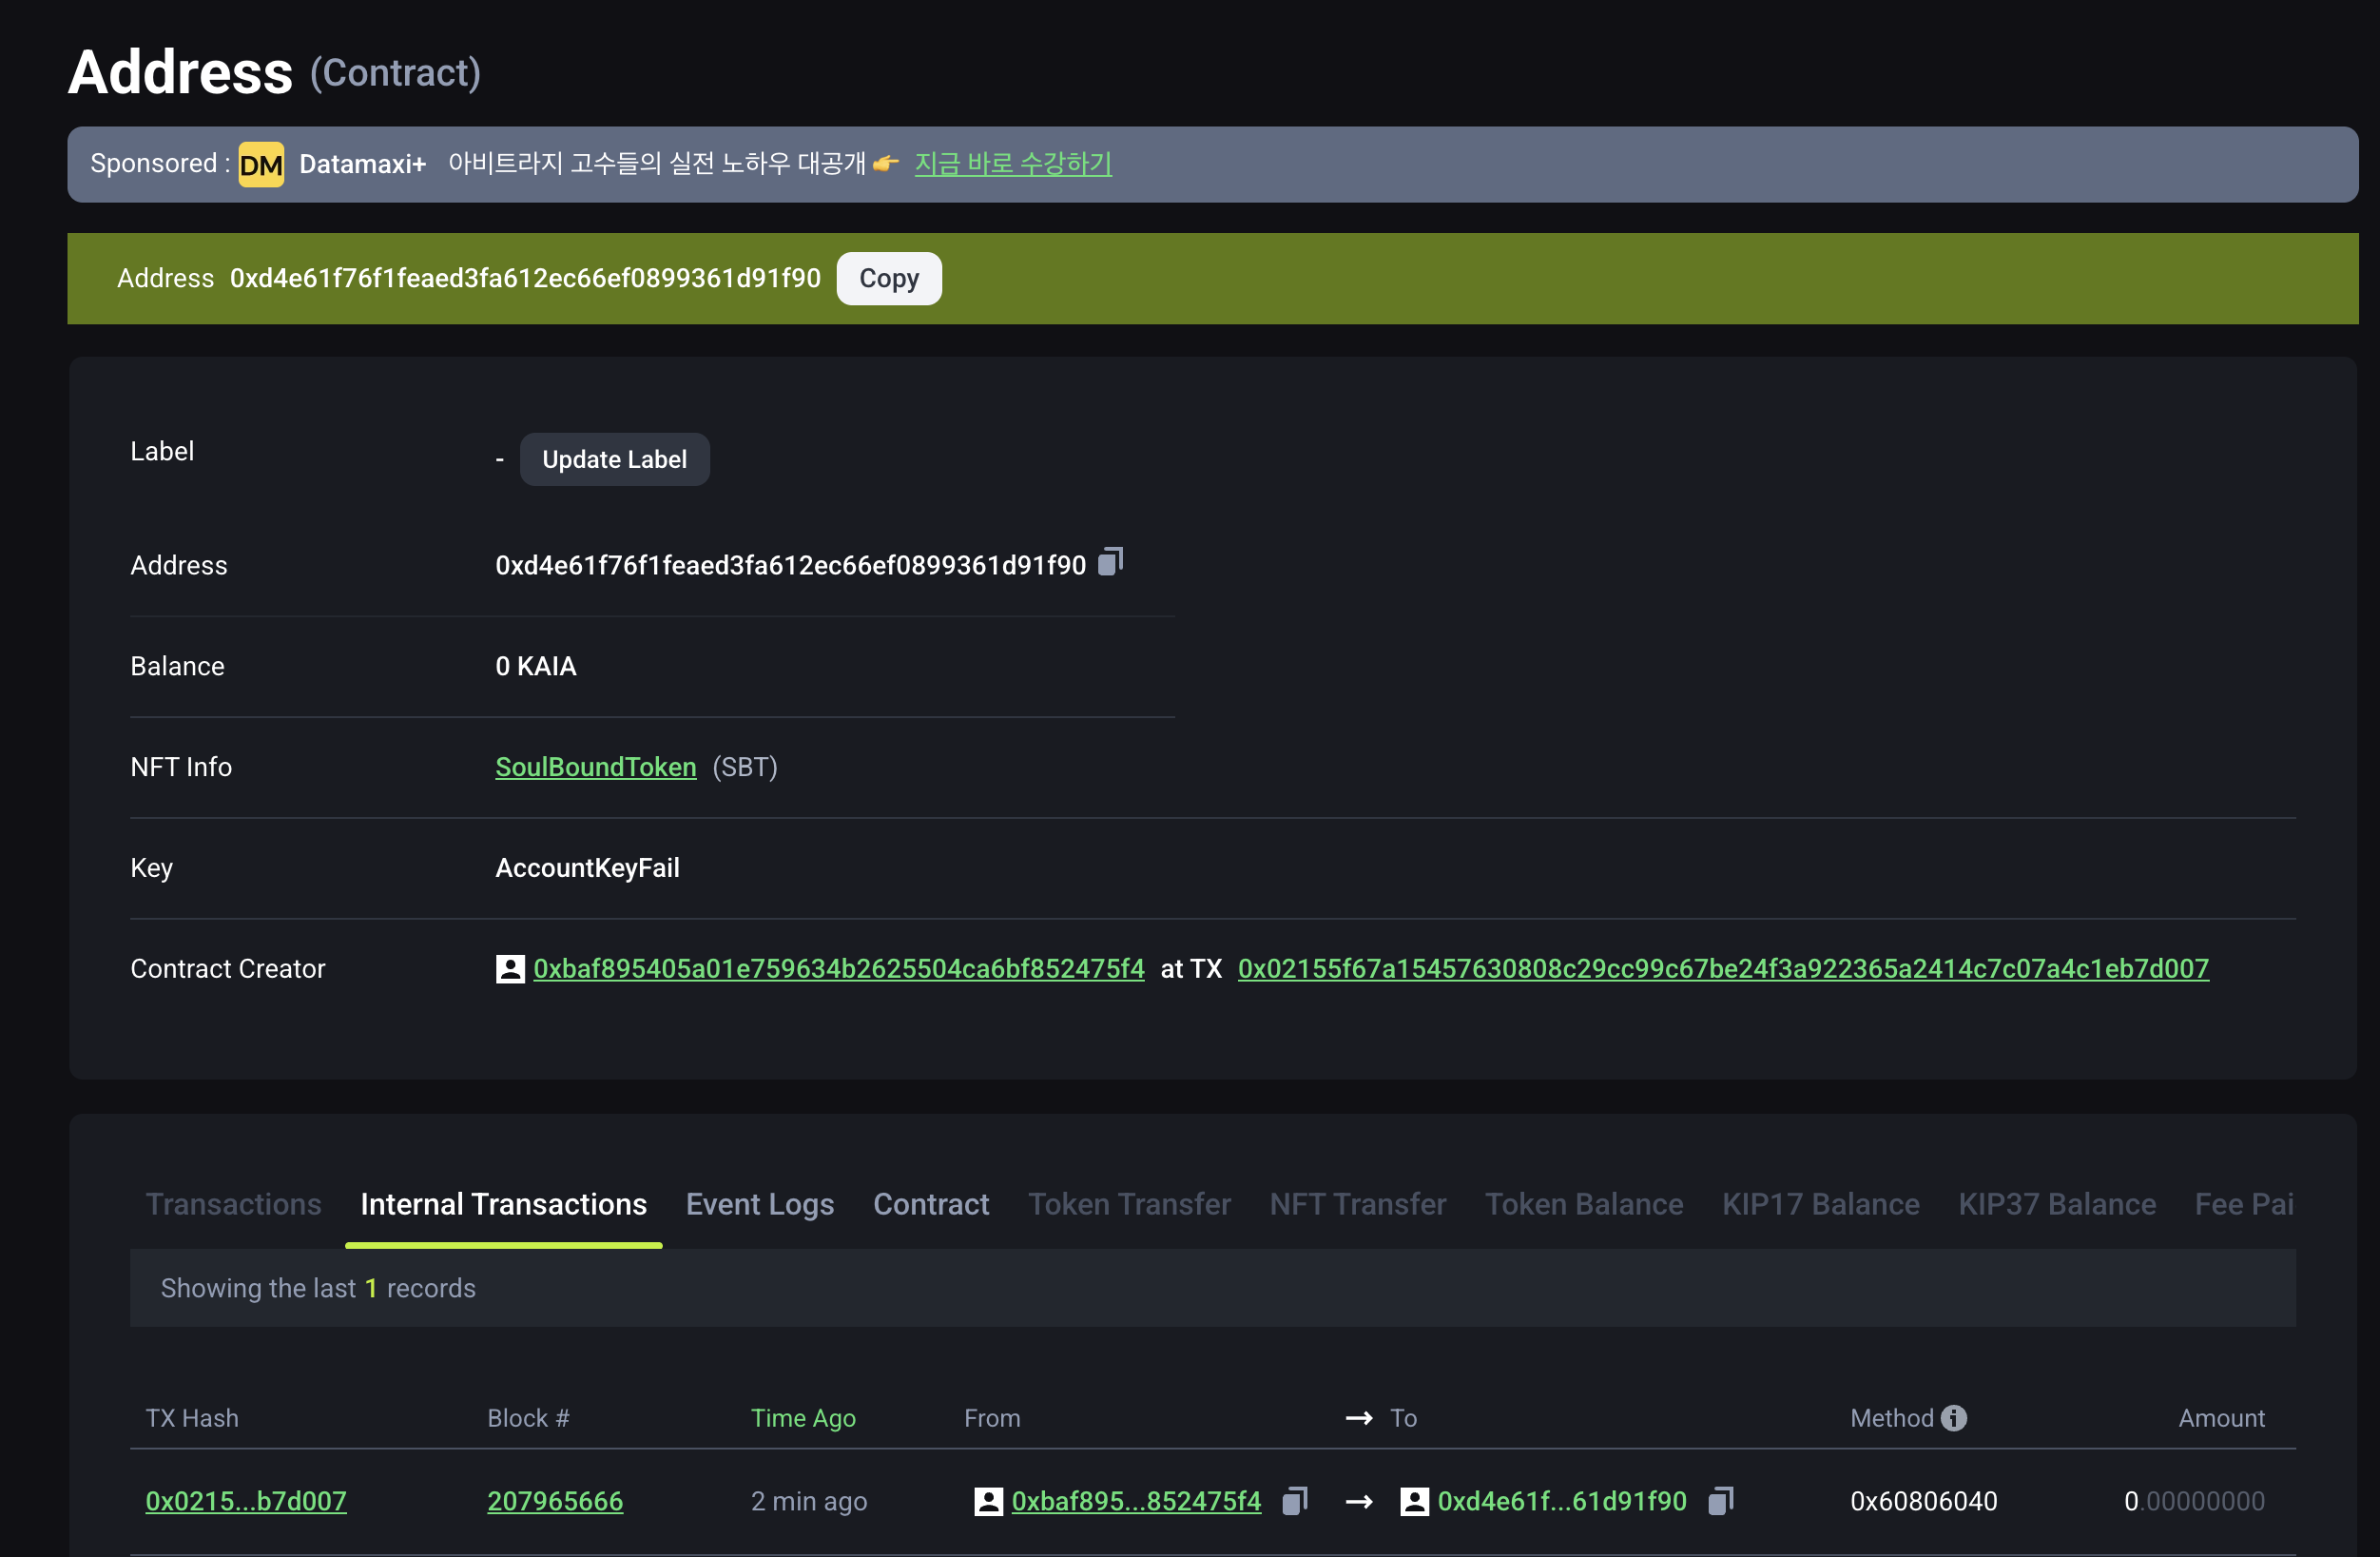
4단계: KaiaScan](https://kairos.kaiascan.io/)을 열어 SBT 토큰이 성공적으로 배포되었는지 확인합니다.
5단계: 검색 필드에 배포된 컨트랙트 주소를 복사하여 붙여넣고 Enter 키를 누릅니다. 최근에 배포된 계약이 표시됩니다.

Using Hardhat
Hardhat은 개발자에게 메인넷(특정 블록)을 로컬 개발 네트워크에서 시뮬레이션할 수 있는 기능을 제공합니다. 이 기능의 주요 이점 중 하나는 개발자가 배포된 컨트랙트와 상호 작용하고 복잡한 케이스에 대한 테스트를 작성할 수 있다는 것입니다.
이 기능이 효과적으로 작동하려면 아카이브 노드에 연결해야 합니다. 이 기능에 대한 자세한 내용은 여기에서 확인할 수 있습니다.
Mainnet
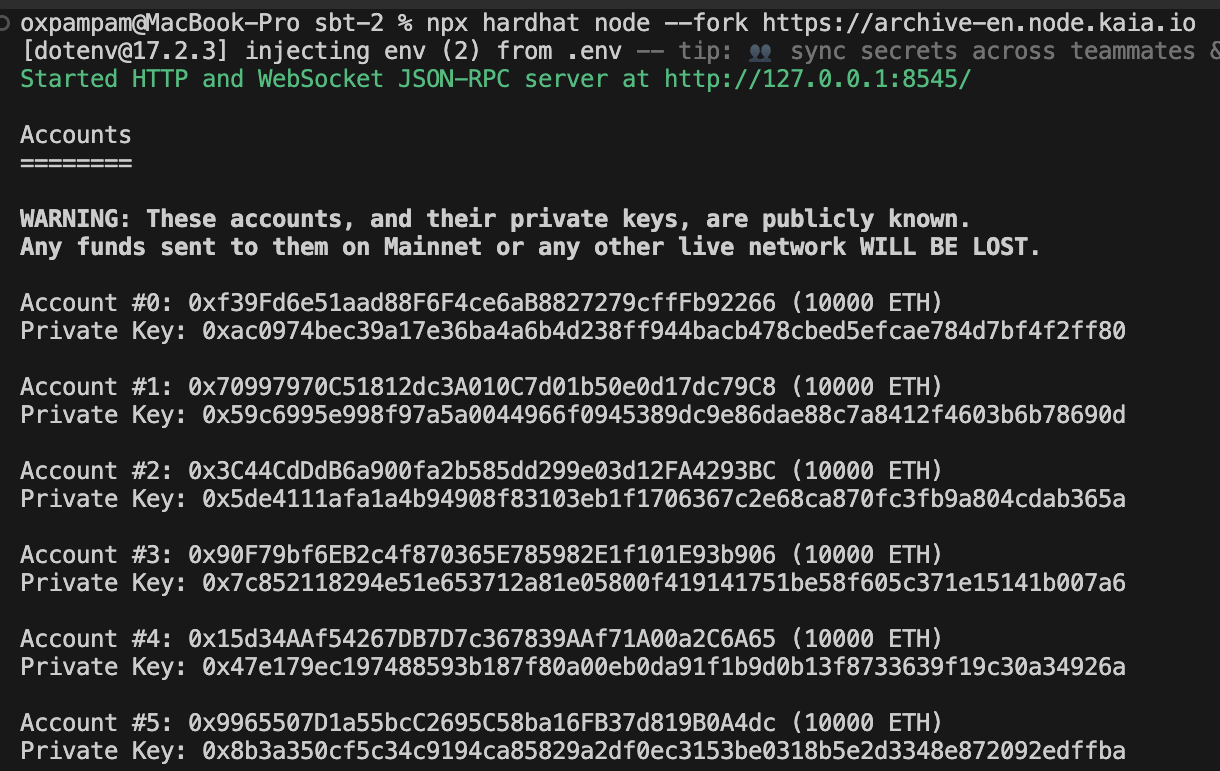
이제 Hardhat 프로젝트를 설정했으니 Hardhat을 사용하여 Kaia 메인넷을 포크해 보겠습니다. 터미널을 열고 다음 명령을 실행합니다.
npx hardhat node --fork <YOUR ARCHIVE NODE URL>npx hardhat node --fork https://archive-en.node.kaia.io
Hardhat 네트워크에서 항상 이 작업을 수행하도록 hardhat.config.js를 구성할 수도 있습니다:
networks: { hardhat: { forking: { url: "<YOUR ARCHIVE NODE URL>", } }}
출력

이 명령을 성공적으로 실행하면 터미널이 위 이미지와 같이 표시됩니다. 10,000개의 테스트 토큰이 사전 충전된 20개의 개발 계정을 갖게 됩니다.
포크된 체인의 RPC 서버는 http://127.0.0.1:8545/에서 수신 대기 중입니다. 최신 블록 ��번호를 쿼리하여 포크된 네트워크를 확인할 수 있습니다. 블록 번호를 얻기 위해 RPC에 대한 cURL을 만들어 보겠습니다. 새 터미널 창을 열고 다음 명령을 사용합니다:
curl --data '{"method":"eth_blockNumber","params":[],"id":1,"jsonrpc":"2.0"}' -H "Content-Type: application/json" -X POST localhost:8545
출력

출력은 위와 같이 16진수입니다. 16진수에서 블록 번호를 얻으려면 이 도구를 사용하여 16진수를 10진수로 변환합니다. 네트워크를 포크한 시점의 최신 블록 번호를 얻어야 합니다. KaiaScan](https://kaiascan.io/)에서 블록 번호를 확인할 수 있습니다.
블록에서 포크하기
Hardhat을 사용하면 특정 블록에서 메인넷을 포크할 수 있습니다. 이 경우 블록 번호 105701850에서 체인을 포크해 보겠습니다.
npx hardhat node --fork <YOUR ARCHIVE NODE URL> --fork-block-number 105701850npx hardhat node --fork https://archive-en.node.kaia.io --fork-block-number 105701850
명시된 블록에서 분기된 체인을 확인하려면 새 터미널 창을 열고 다음 명령을 사용합니다:
curl --data '{"method":"eth_blockNumber","params":[],"id":1,"jsonrpc":"2.0"}' -H "Content-Type: application/json" -X POST localhost:8545

출력은 16진수를 반환하며, 이 도구를 사용하여 변환하면 105701850과 같아야 합니다.
Hardhat에 대한 더 자세한 가이드는 Hardhat 문서를 참조하세요. 또한, 이 가이드의 전체 코드 구현은 GitHub에서 확인할 수 있습니다.