Secure Wallet Management on Kaia Chain: A Developer's Cookbook
Introduction
Who This Cookbook Is For
Welcome to the Kaia Secure Wallet Cookbook. This guide is written for developers, engineers, and teams building on the Kaia blockchain. Whether you are creating your first decentralized application (dApp), deploying automated services, or managing a treasury, this cookbook provides the essential recipes for handling cryptographic keys and wallets with a security-first mindset.
How to Use This Cookbook
This cookbook follows a progressive learning path:
- Part 1 establishes the security fundamentals you need to understand.
- Part 2 provides hands-on recipes from basic to advanced scenarios.
Each recipe builds on concepts from previous sections. New to Web3 security? Start with Chapter 1. Experienced developer? Jump to the recipes that match your use case
Core Philosophy: Security First
In Web3, the phrase not your keys, not your crypto is a fundamental truth. For developers, this extends to every part of the software development lifecycle. A single compromised key can lead to catastrophic losses for users and projects alike. The core philosophy of this guide is Security First. Every recipe and recommendation is designed to help you build robust, secure systems by default, minimizing attack surfaces and protecting assets from day one.
Prerequisites
To get the most out of this cookbook, you should have a basic understanding of blockchain concepts (e.g., public/private keys, transactions, gas fees) and be comfortable working with a command-line interface.
Part 1: Foundational Concepts & Security Principles
This part focuses on the why behind secure wallet management. It establishes the core knowledge needed before writing any code.
Chapter 1: The Principles of Private Key Security
1.1. Understanding Key Pairs: The Heart of Your Account
On Kaia, as with other EVM-compatible chains, your account is not a username and password. It is a cryptographic key pair: a public key and a private key. The public key derives your public address, which is like your bank account number—it's safe to share. The private key is the secret that authorizes all actions from your account, like signing transactions or messages. It is the single most critical piece of information to protect. Anyone who possesses your private key has complete and irreversible control over your account and its assets.
1.2. Secure Key Generation: Best Practices for Kaia
A secure key is a randomly generated one. The security of your account relies on the mathematical impossibility of someone guessing your private key. Always use well-vetted, standard cryptographic libraries to generate keys, such as those embedded within ethers-ext or the tools discussed in this guide. Never attempt to create your own "clever" or "human-readable" private keys, as this dramatically reduces their randomness and makes them vulnerable to being guessed.
1.3. Secure Key Storage: From Local Keystores to Production Vaults
How you store your private key is as important as how you generate it. Storing a private key in a plaintext file is the digital equivalent of writing your bank password on a sticky note and leaving it on your monitor.
WARNING: Never store private keys in plaintext .env files. While convenient for development, .env files are frequently committed to version control by mistake, exposing keys publicly and leading to immediate theft of funds.
The standard for secure local storage is an encrypted keystore file (sometimes called a JSON keystore). This file contains your private key, but it is encrypted with a strong password that you choose. To use the key, you must provide the keystore file and the password to decrypt it in memory. For production systems, the best practice is to use dedicated secret managers like AWS KMS or Google Cloud KMS, which ensure keys are never exposed directly to the application code.
1.4. Handling Keys in Memory: Minimizing Exposure During Runtime
Even when loaded from a secure source, a private key must exist in your application's memory to sign a transaction. It's crucial to minimize this exposure. Good application design ensures that the key is held in memory for the shortest possible duration and is cleared immediately after use. The libraries and recipes in this cookbook are designed to follow this principle.
Chapter 2: Navigating the Kaia Wallet Ecosystem
2.1. Kaia Wallet
Kaia Wallet is the native browser extension wallet for the Kaia ecosystem. While it shares many features with MetaMask, it is optimized for Kaia by supporting unique transaction types, fee-delegated transactions, and the account system specific to the network and offers a seamless user experience on the network. For developers, understanding its specific behaviors and APIs is key to building smooth dApp integrations.
2.2. Cold Storage: An Overview of Hardware Wallets
Cold storage refers to keeping private keys on a device that is not connected to the internet. A hardware wallet is a physical device built for this purpose. It signs transactions internally without ever exposing the private key to the connected computer. This makes them the gold standard for securing high-value assets. This guide will focus on the officially supported DCENT and SafePal hardware wallets.
2.3. Multi-Signature Wallets: An Introduction to Kaia Safe
A multi-signature (or "multi-sig") wallet is a smart contract that requires multiple private keys to approve a transaction before it can be executed. For example, a 2-of-3 multi-sig requires approval from two out of three designated owners. This is the standard for managing team funds, treasuries, and critical smart contract administration, as it prevents a single point of failure. Kaia Safe is the primary multi-sig solution on the Kaia network.
Part 2: Practical Recipes for Wallet Management
Now that you understand the foundational security principles from Part 1, it's time to put them into practice. This section provides step-by-step guides for real-world scenarios, starting with individual development setups and progressing to production-grade solutions.
What You'll Build:
- Secure development environments for Foundry and Hardhat
- Multi-signature treasury setups for team collaboration
- dApp integrations with various wallet types
Chapter 3: Setups for Individual Developers & dApps
This chapter provides hands-on guides for setting up and managing wallets during the development process, emphasizing security from the very first line of code.
3.1. Recipe: Your First Kaia Development Wallet
If you are new to Kaia or setting up your Kaia Wallet for the first time, we recommend referring to the Getting Started with Wallets section. It covers essential steps such as installing a wallet, creating and backing up your account securely, adding additional accounts, and funding your wallet.
3.2. Recipe: Securely Managing Accounts in a Foundry Project
With Foundry, you can import encrypted wallets through the cast wallet CLI. While encrypting other values such as RPC URLs is not currently available, combining encrypted keys with environment variables still provides a secure setup.
Step 1: Install and Initialize Foundry
Run the command below in your terminal if you haven’t installed foundry:
curl -L https://foundry.paradigm.xyz | bash
Then, initialize a Foundry project by running the following command:
foundryupforge init foundry-encryptedcd foundry-encrypted
Now you should have a folder with foundry’s default template.
Step 2: Import Your Wallet
You can import a wallet using the cast wallet CLI. Simply replace your-wallet-name with the desired name of your wallet and execute the following command:
cast wallet import your-wallet-name --interactive
After entering your private key, you will be prompted to set a password for encryption. The encrypted key is saved in your local keystore at the default path ~/.foundry/keystore.
The - - interactive flag is used to prevent the private key from being saved in the terminal history

Step 3: Create and Source an Environment File
After encrypting your wallet, you will need to store your RPC endpoint securely. Foundry does not yet offer encryption for values like RPC URLs, so using a .env file is a common and safer choice for this type of secret value.
Create a .env file in the root directory of your project and add your KAIROS_RPC_URL:
KAIROS_RPC_URL=https://responsive-green-emerald.kaia-kairos.quiknode.pro
And load it before running your script:
source .env
Step 4: Run Your Script
We completed the wallet import and added the RPC endpoint to our configuration. Now we are ready to run the script and deploy the contract.
The default Foundry template includes a sample script that deploys the Counter contract. You should modify this script to use your own wallet name and RPC endpoint.
When you run your script using either of forge create or forge script,
- the terminal will prompt you to enter your password that was used to encrypt your private key.
- foundry will run your script and deploy your contract once you've entered the password.
Using forge create
forge create --rpc-url $KAIROS_RPC_URL src/Counter.sol:Counter --broadcast --account your-wallet-name

Using forge script
forge script script/Counter.s.sol:CounterScript --rpc-url $KAIROS_RPC_URL --account your-wallet-name --broadcast
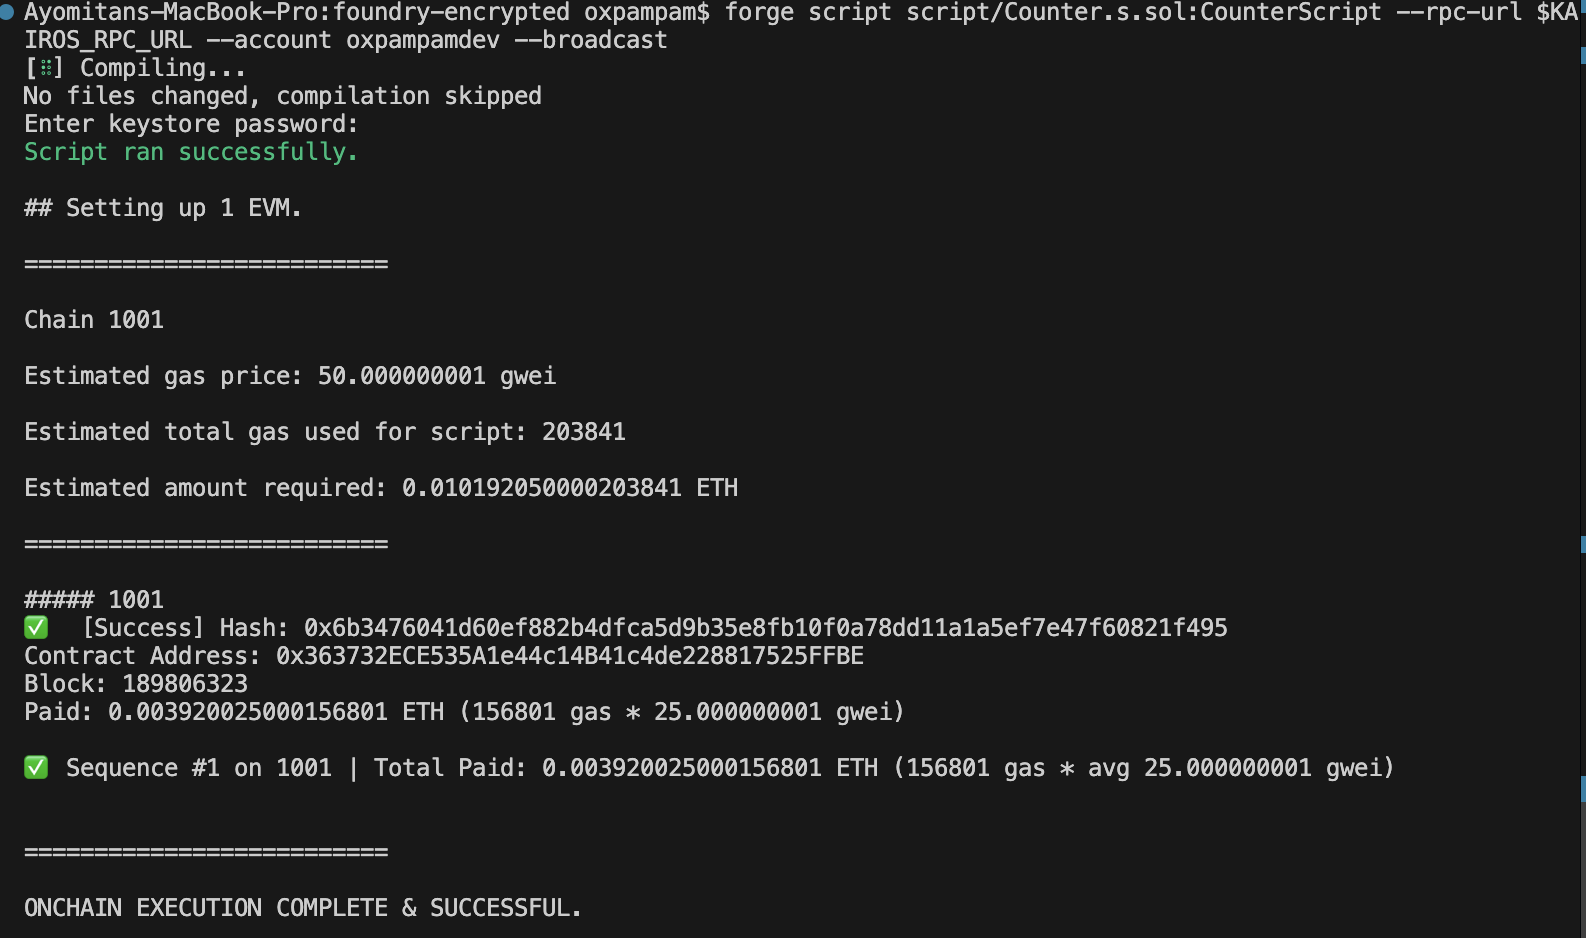
Congratulations. You have successfully configured encrypted secrets in Foundry and used them in your deployment scripts.
3.3. Recipe: Securely Managing Accounts in a Hardhat Project
Hardhat 3 (currently in beta) introduces encrypted secrets via a built-in secrets manager. This feature supports securely storing any sensitive string-based secret like private keys or RPC URLs, with API keys that shouldn’t be committed to version control.
Step 1: Create a New Hardhat Project
Run the following commands in your terminal to create a new Hardhat project.
mkdir hardhat-encrypted && cd hardhat-encryptednpm init -ynpx hardhat --init
Accept default answers to the prompts. Then run the Hardhat version to verify the project version:
npx hardhat --version
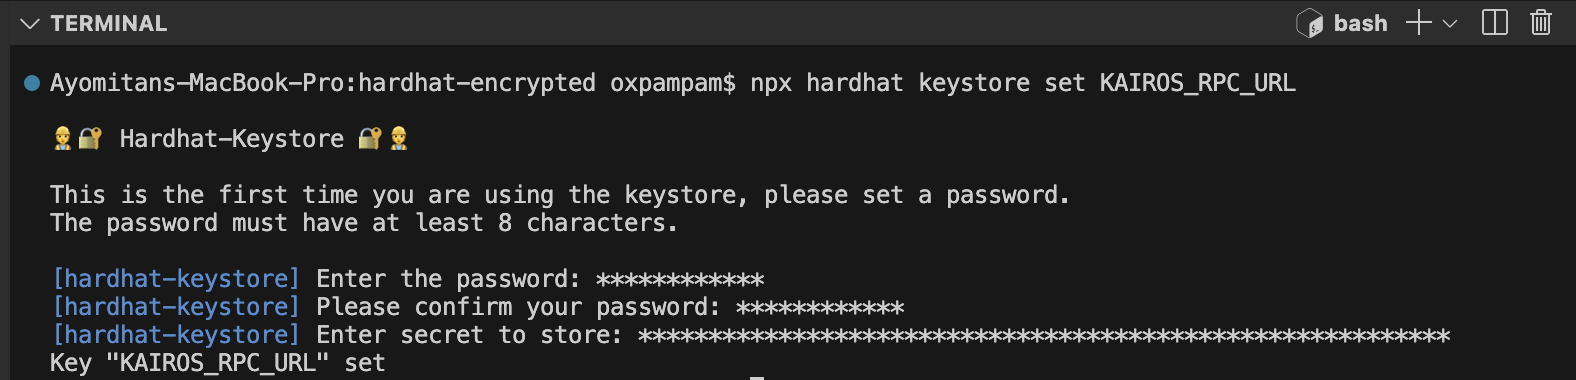
Step 2: Set Encrypted Secrets
To store your RPC URL, run the following command:
npx hardhat keystore set KAIROS_RPC_URL
To store your PRIVATE KEY in an encrypted manner, run the following command:
npx hardhat keystore set PRIVATE_KEY

Step 3: Verify Encrypted Secrets
To verify that your secrets are encrypted, run the following command:
npx hardhat keystore list
You should see your KAIROS_RPC_URL and PRIVATE_KEY in the list of encrypted secrets.
To retrieve the secret value again, run the command below. You will be prompted to enter the master key to decrypt it.
npx hardhat keystore get KAIROS_RPC_URL
Once your secrets are set, update your configuration file to securely reference them in your project.
Step 4: Reference Secrets in Config
Open hardhat.config.ts and update the networks section to reference your encrypted secrets. If your secret names differ, adjust the entries accordingly.
import { configVariable } from "hardhat/config";module.exports = { networks: { kairos: { url: configVariable("KAIROS_RPC_URL"), accounts: [configVariable("PRIVATE_KEY")], }, },};
Now you can use your encrypted secrets in your deployment scripts, without ever exposing them as plaintext.
Step 5: Use Encrypted Secrets in Deployment Scripts
Use the command below to deploy your contract via the Counter.ts module in ignition/modules. This module deploys Counter.sol and calls the incBy function with the value 5.
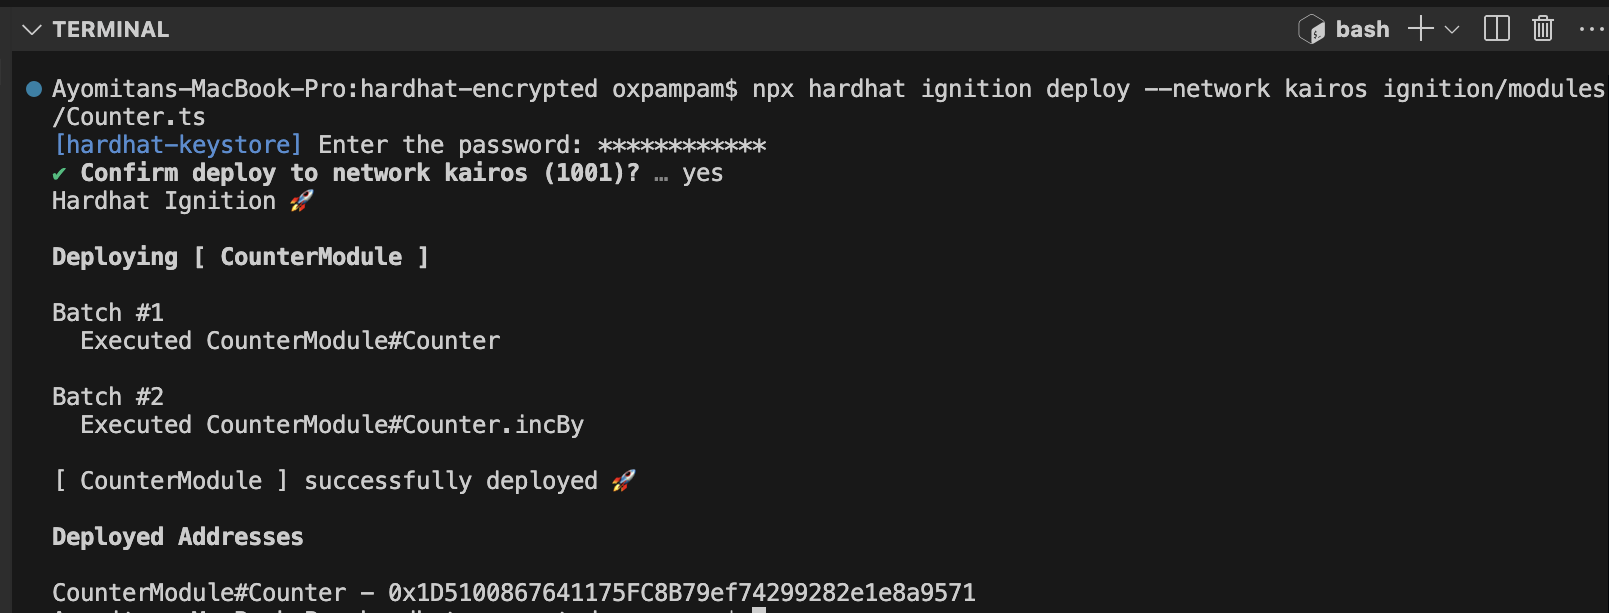
npx hardhat ignition deploy --network kairos ignition/modules/Counter.ts
Running the command will trigger a prompt from Hardhat asking for the password you created earlier.
This is needed because the kairos network is configured with a keystore. You will only be prompted if your task or script relies on encrypted secrets. Once the password is entered, Hardhat proceeds to deploy your contract and execute the incBy function with a value of 5.
Congratulations. You've successfully configured encrypted secrets in Hardhat and used them in your deployment scripts.
3.4. Recipe: Connecting a Hardware Wallet (SafePal) to a dApp
In this section, you will learn how to connect your SafePal S1 hardware wallet to a third party decentralized application (DApp) and request a signature for a transaction.
Step 1: Set up Safepal S1 wallet
Before connecting to any DApp, ensure your SafePal S1 device is properly set up. Follow this setup guide if you have not done so already.
If your device is already configured, you can skip this step.
Step 2: Pair the S1 device with the SafePal App
The SafePal S1 is a fully offline hardware wallet, which means it cannot directly connect to the internet or communicate with blockchain networks. To interact with dApps or sign transactions, the device must be paired with the SafePal App.
The SafePal App acts as an intermediary — fetching blockchain data, broadcasting transactions, and relaying dApp interactions – while ensuring your private key remains safely stored on the offline S1 device.
To complete the pairing process, follow this pairing guide.
Step 3: Connect to a dApp.
In this step, you will connect your SafePal S1 hardware wallet to a decentralized application (dApp) using WalletConnect.
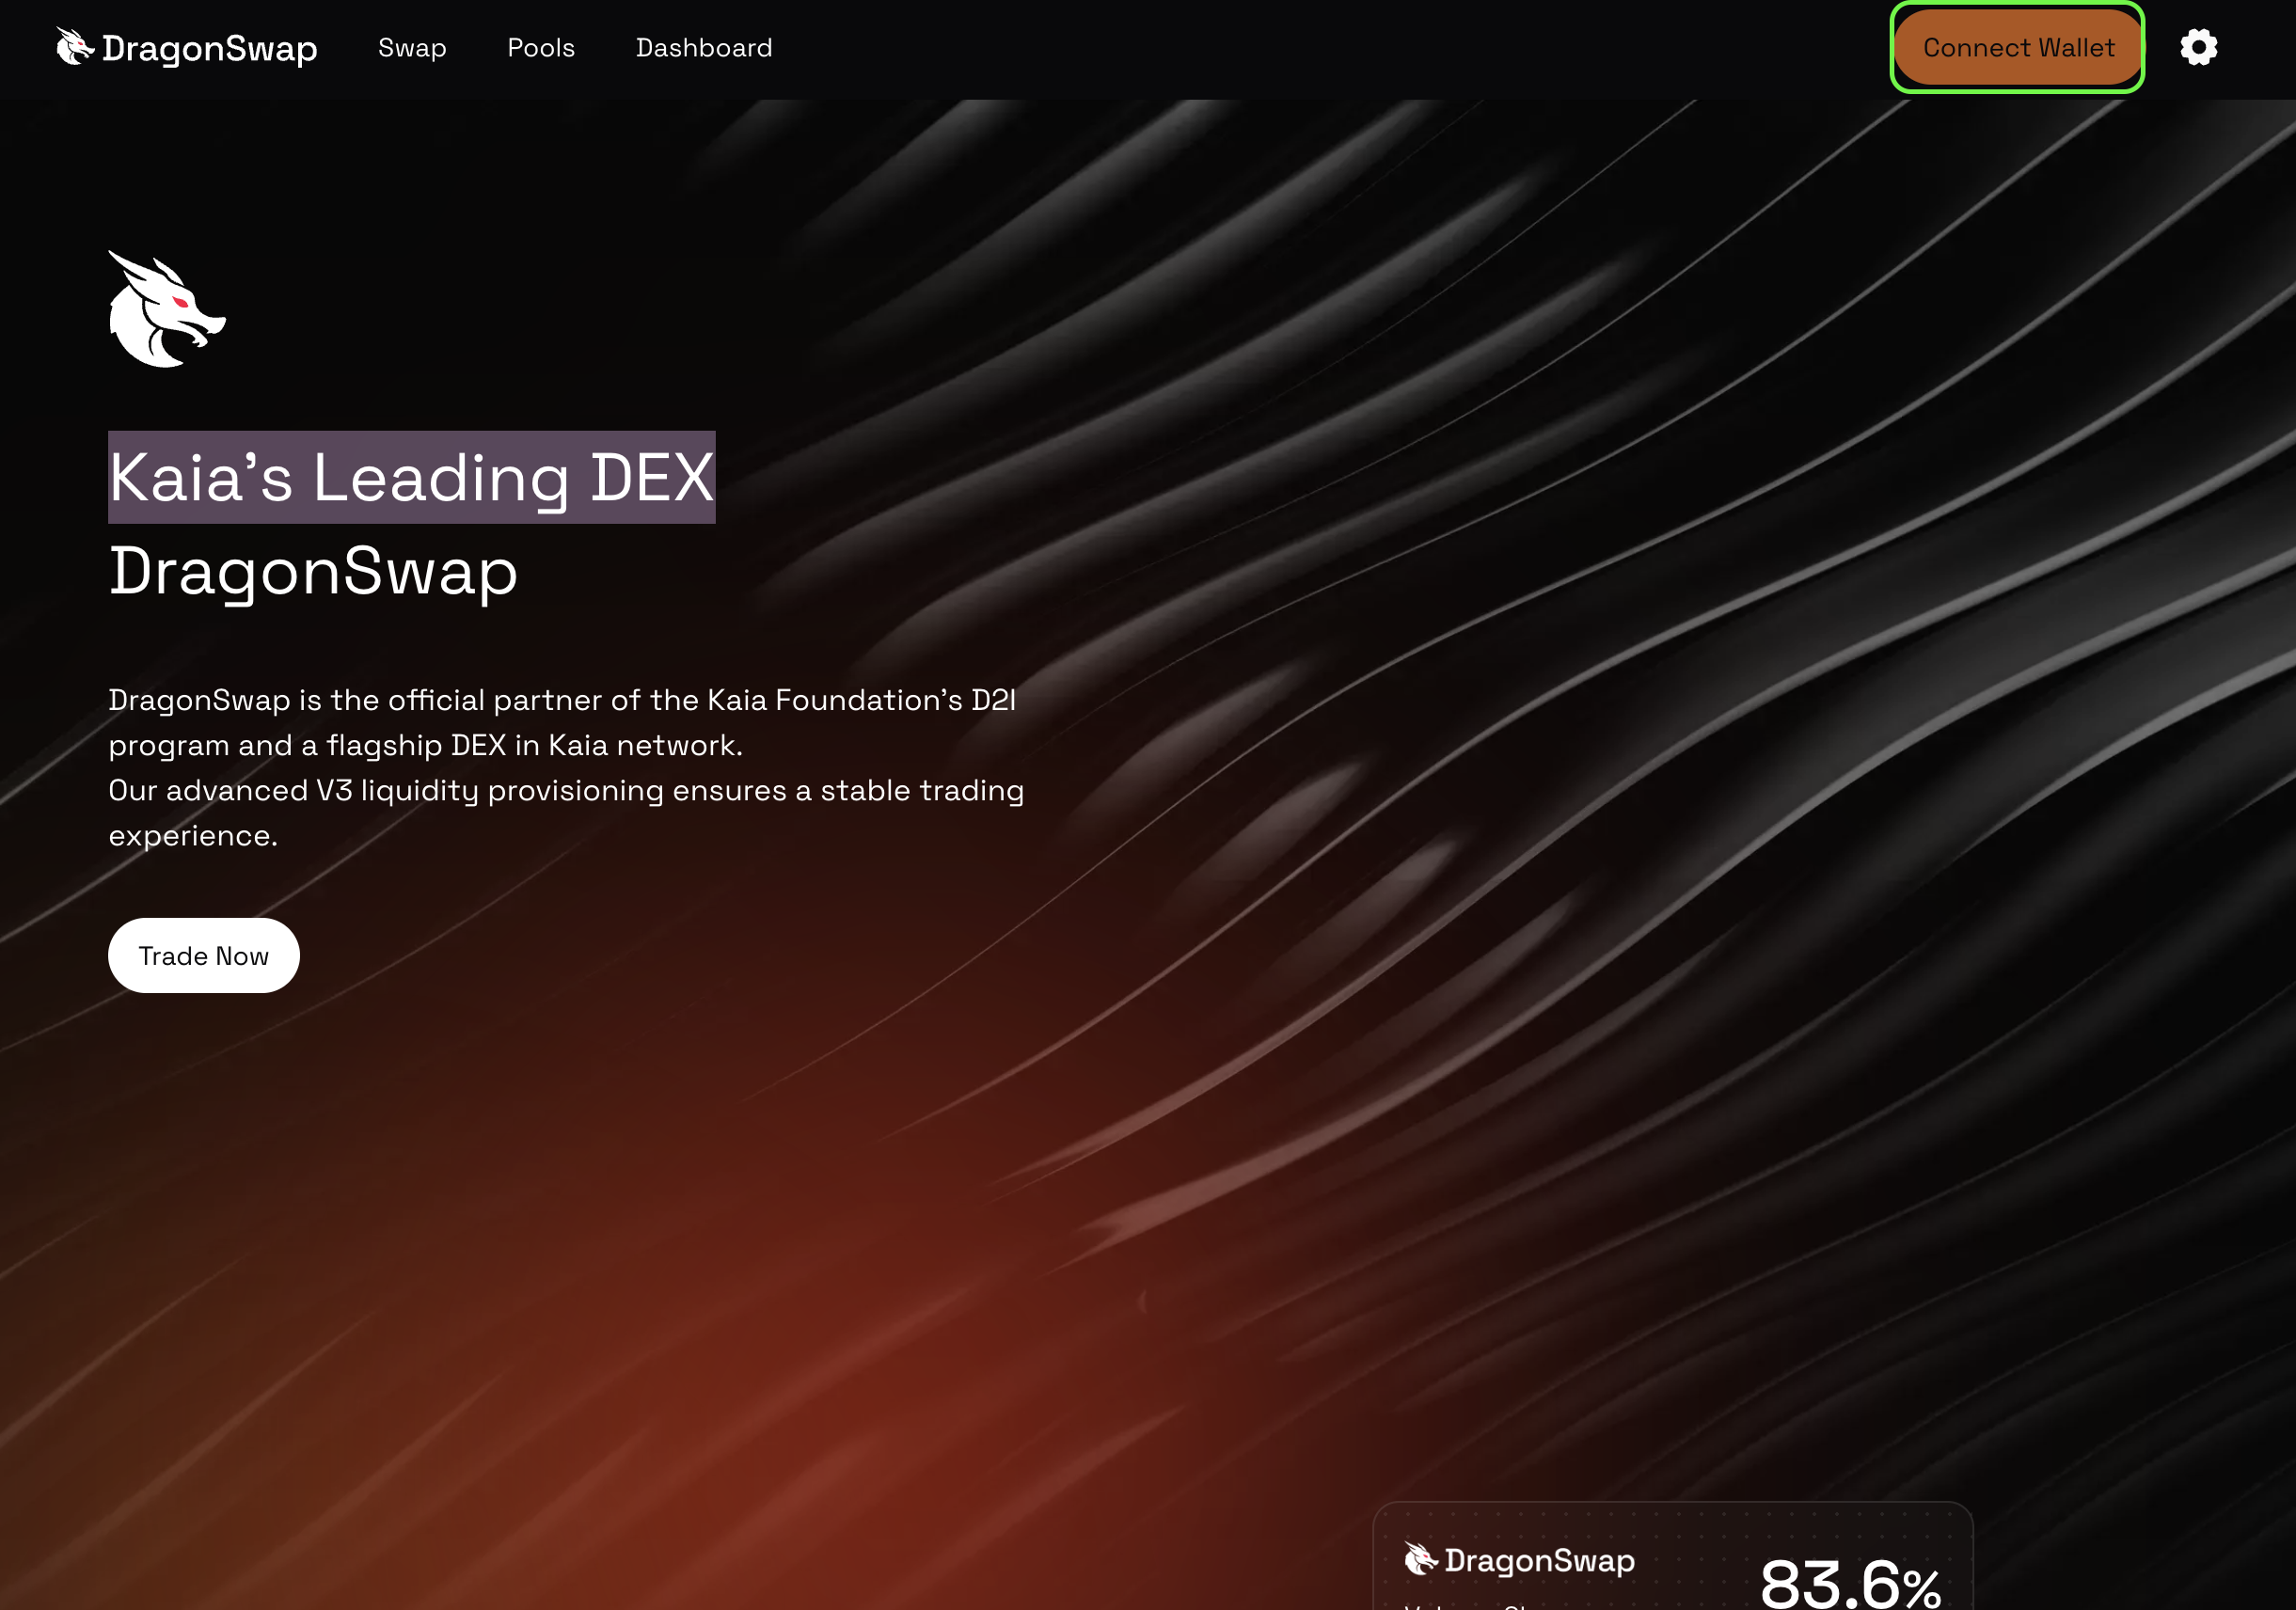
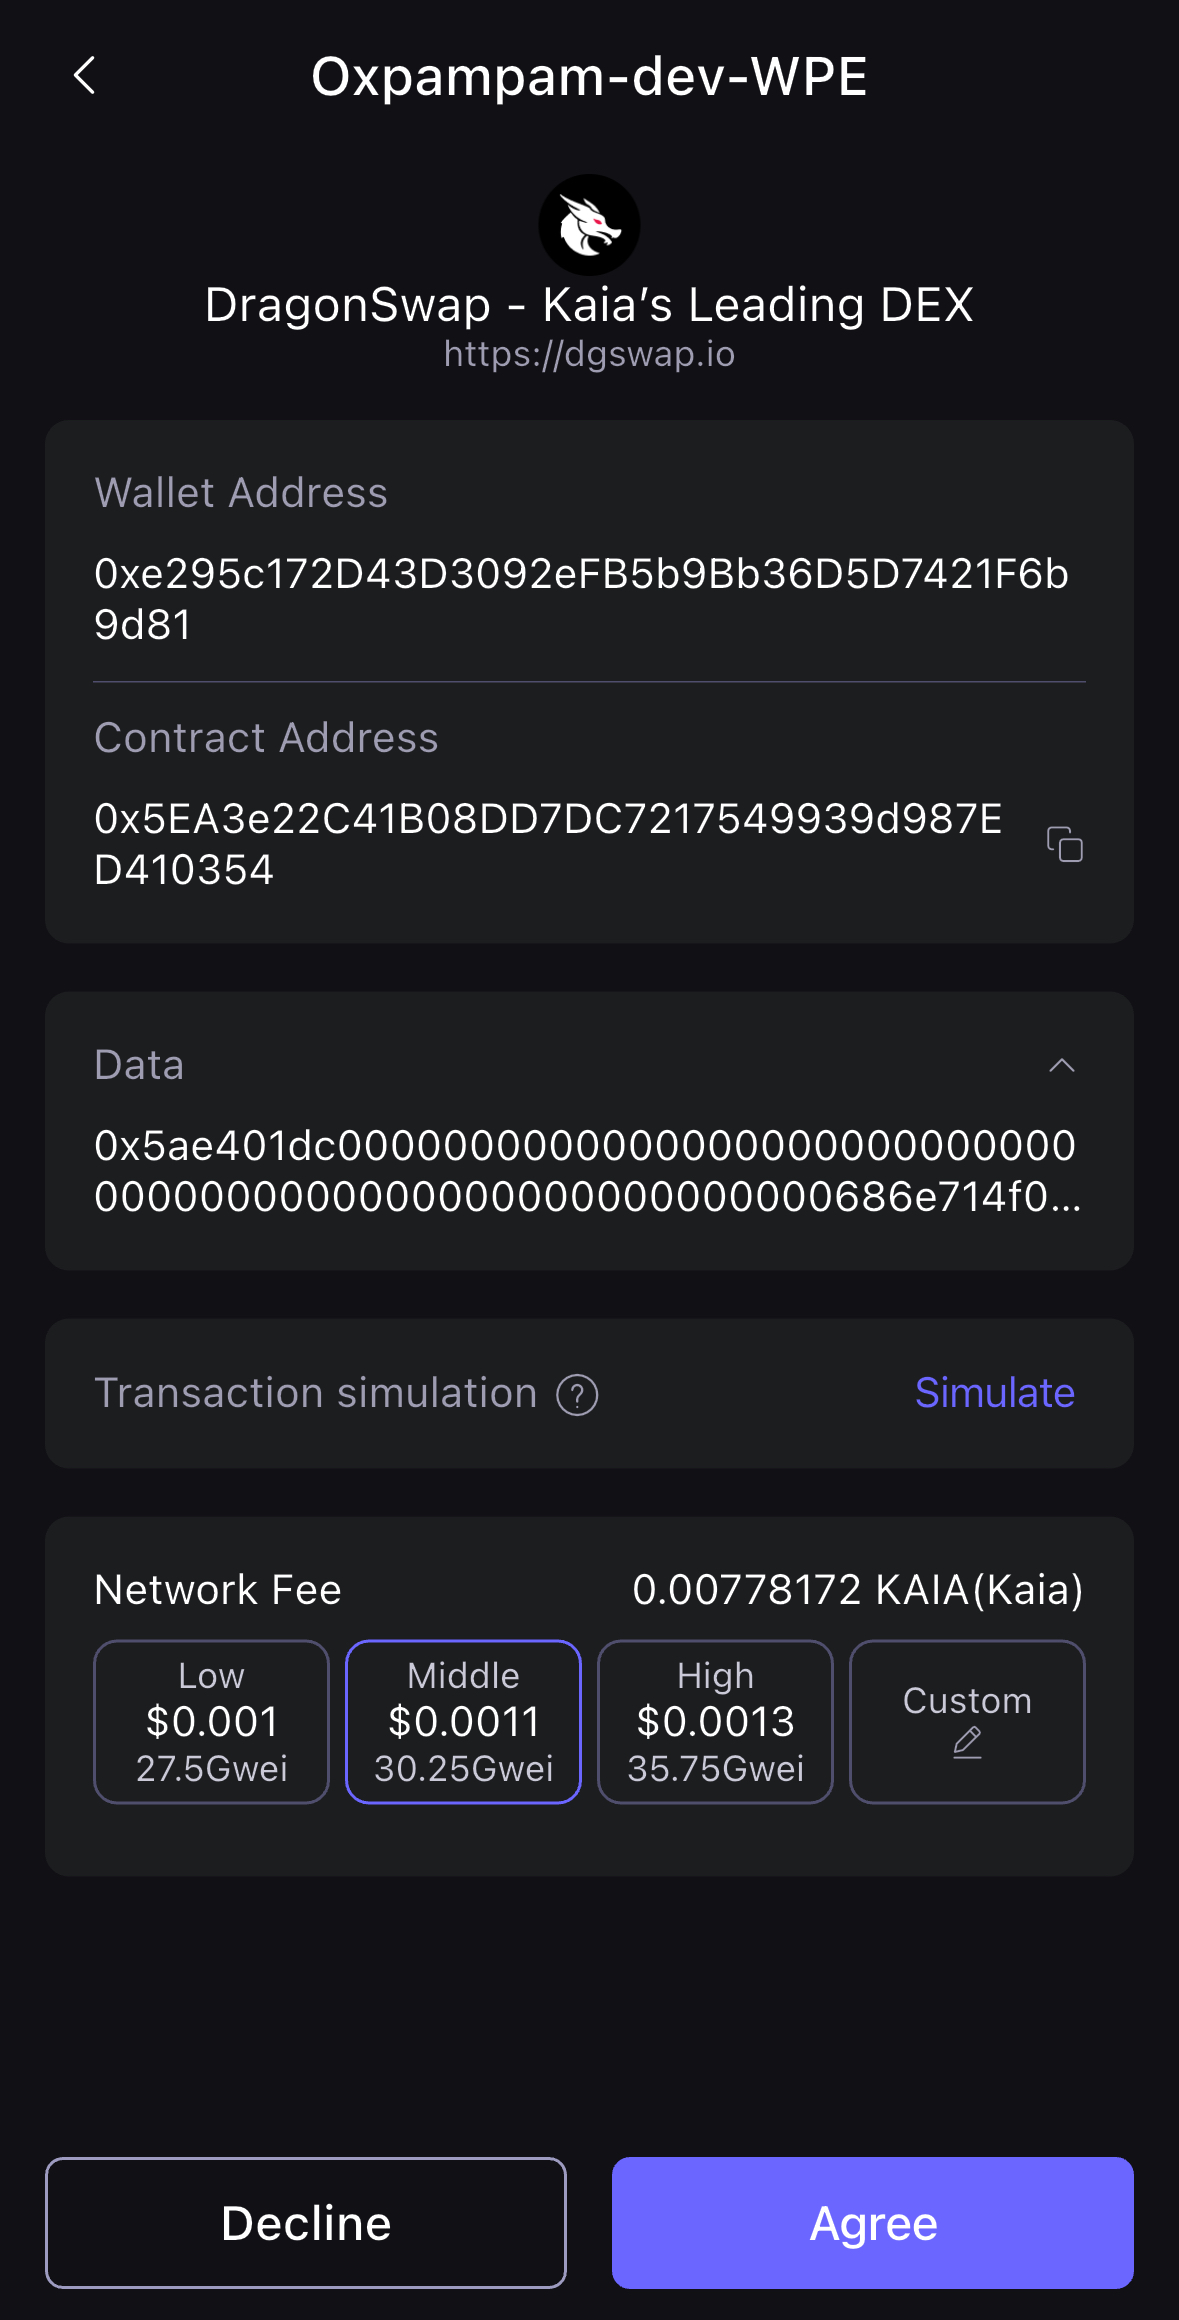
For this guide, we will use DragonSwap, Kaia’s leading decentralized exchange (DEX), as our example dApp. The connection will be made through your browser using WalletConnect.
- Launch the DragonSwap dApp by entering the dApp URL in your browser, then click the Connect Wallet button at the right upper corner of the website.
- Among all the connection options, click Wallet Connect. There will be a QR code shown on the screen.
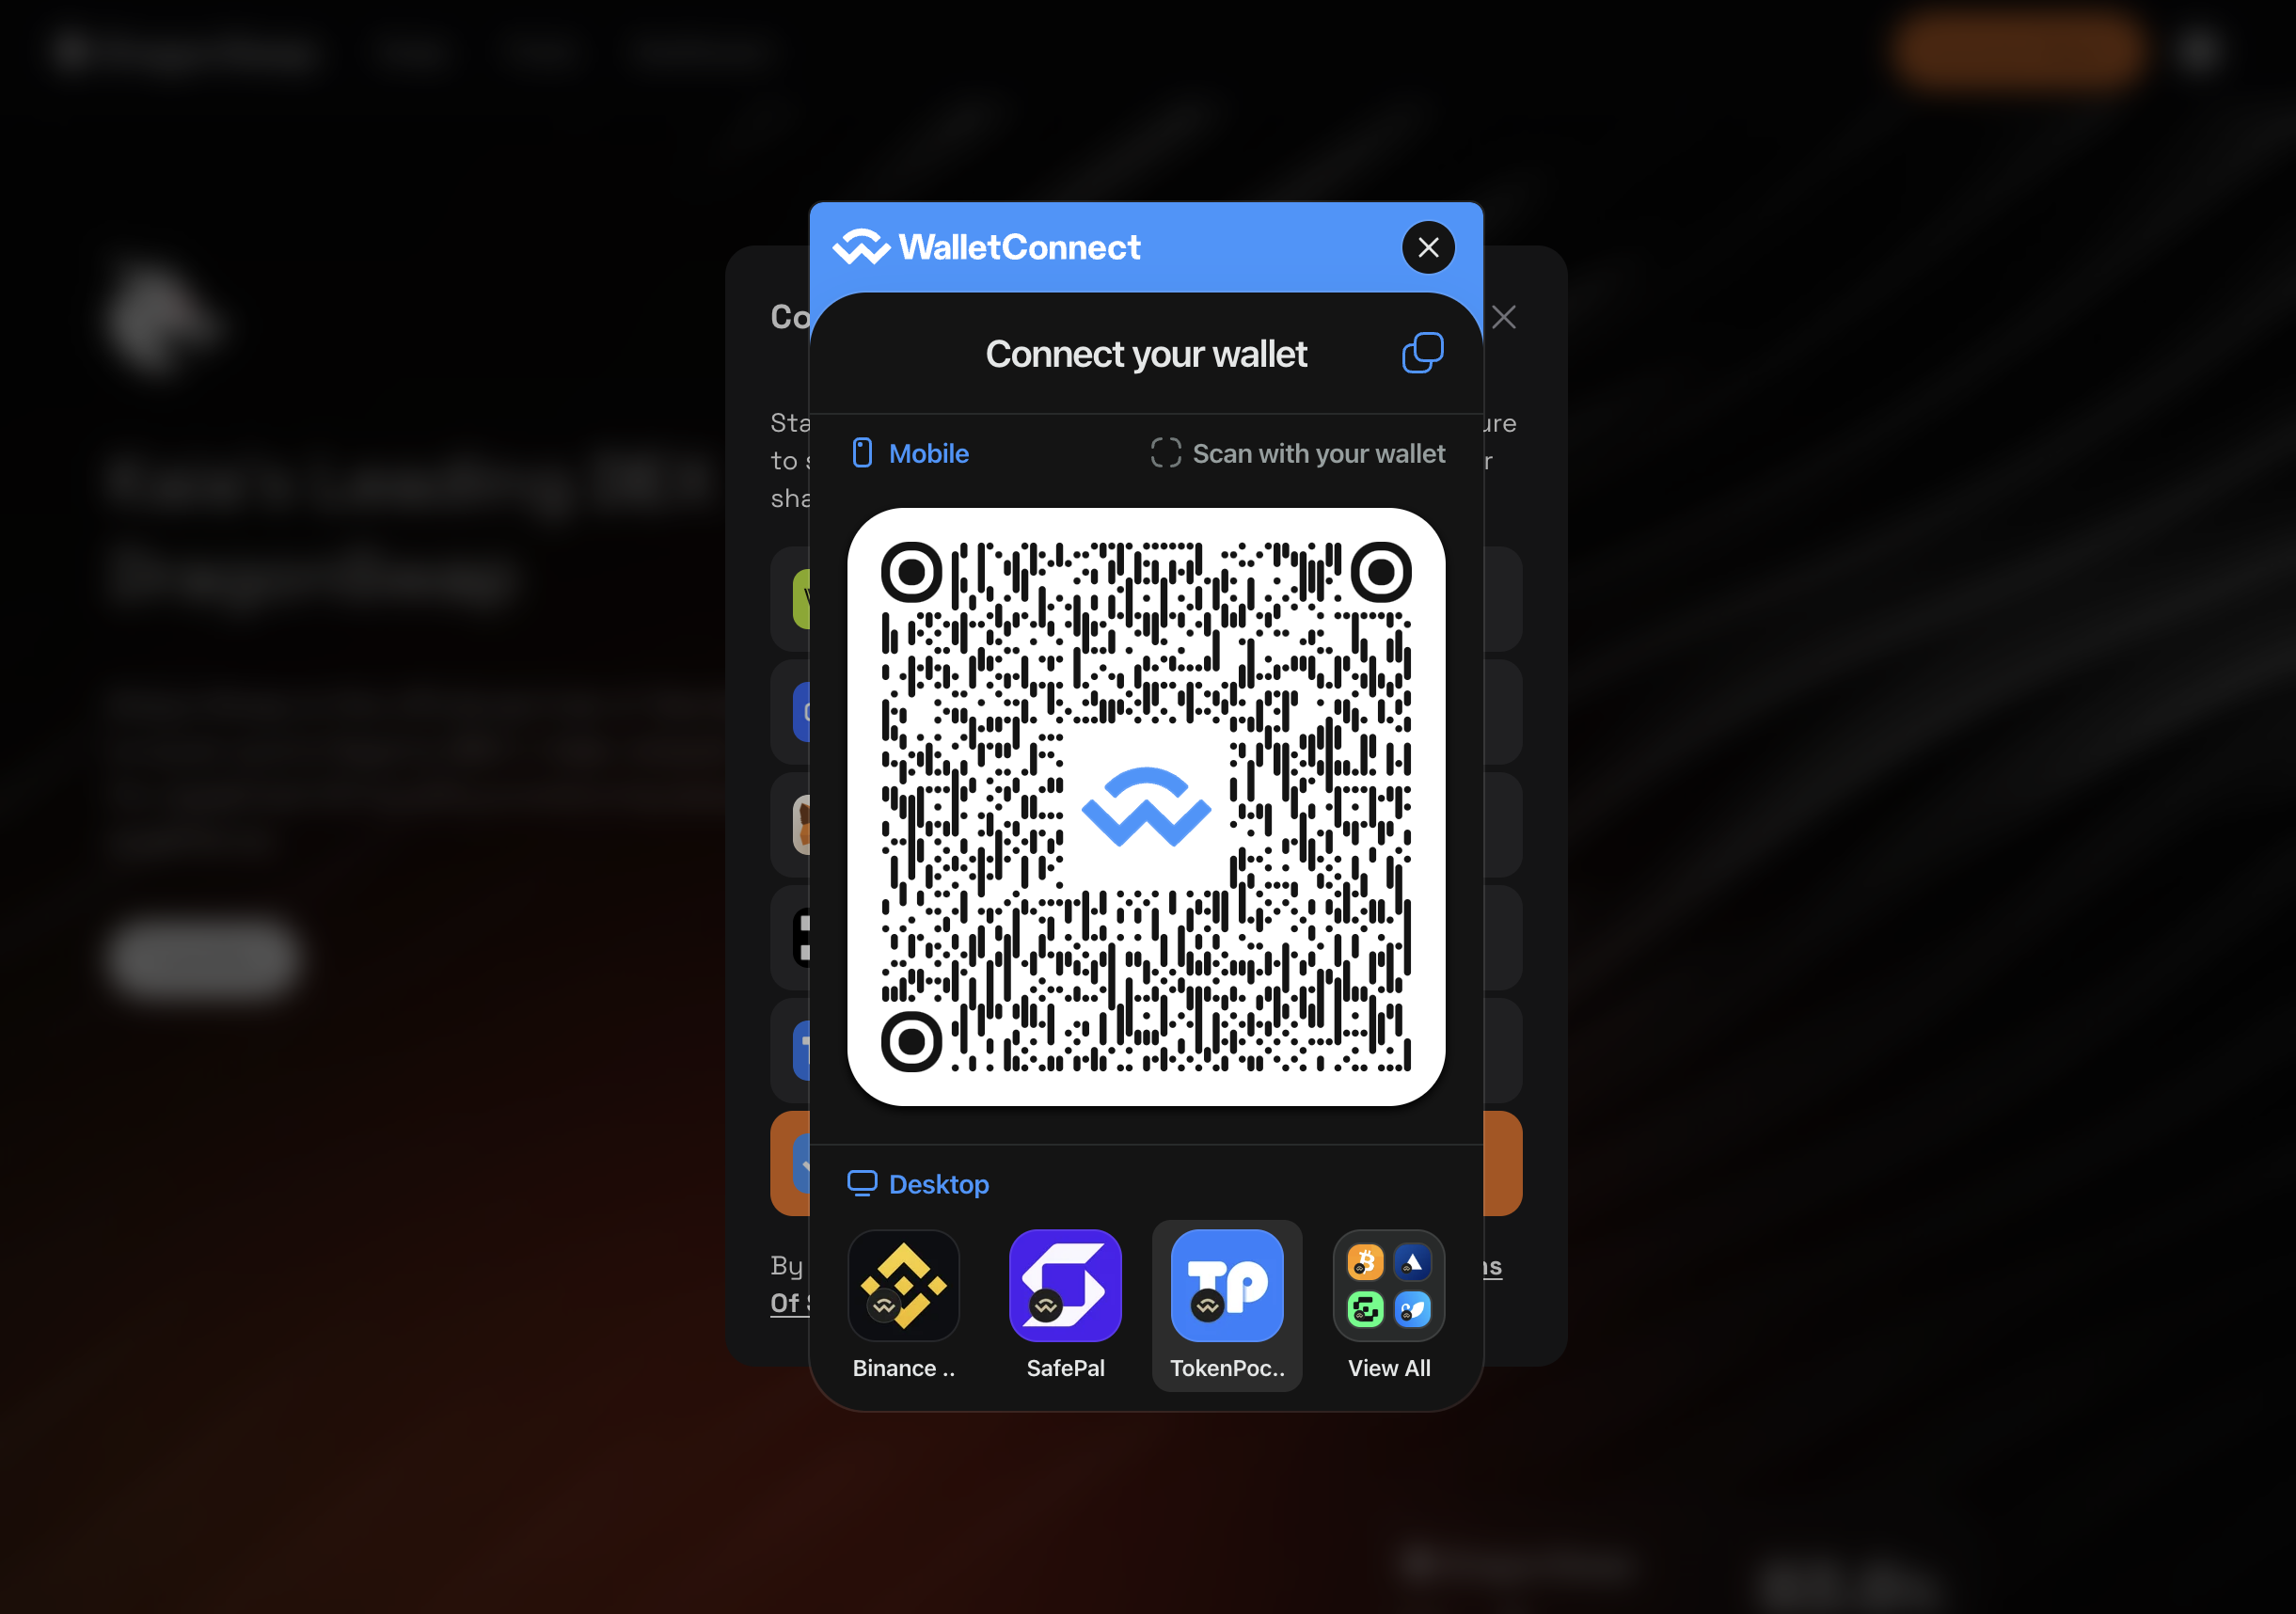
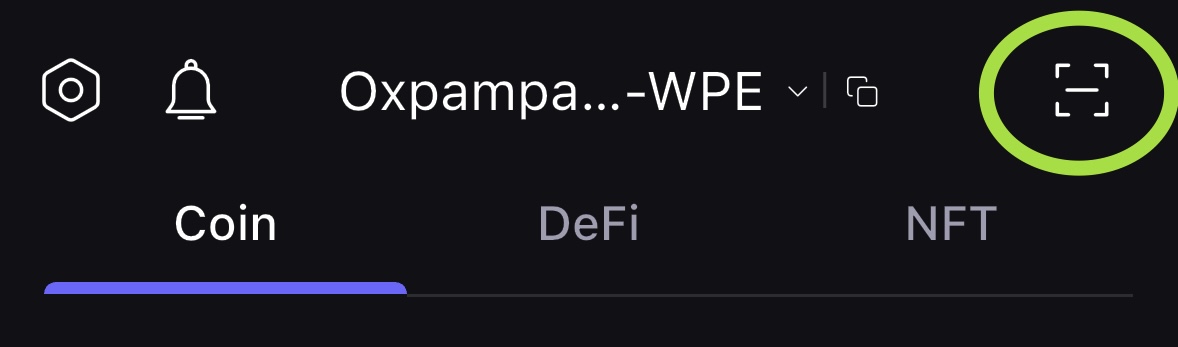
- Scan the QR code with your SafePal App. You can enter the scan process by clicking the scan button at the top right of the App main page.
- After scanning successfully, confirm the connection to the dApp in the App, and click Agree.
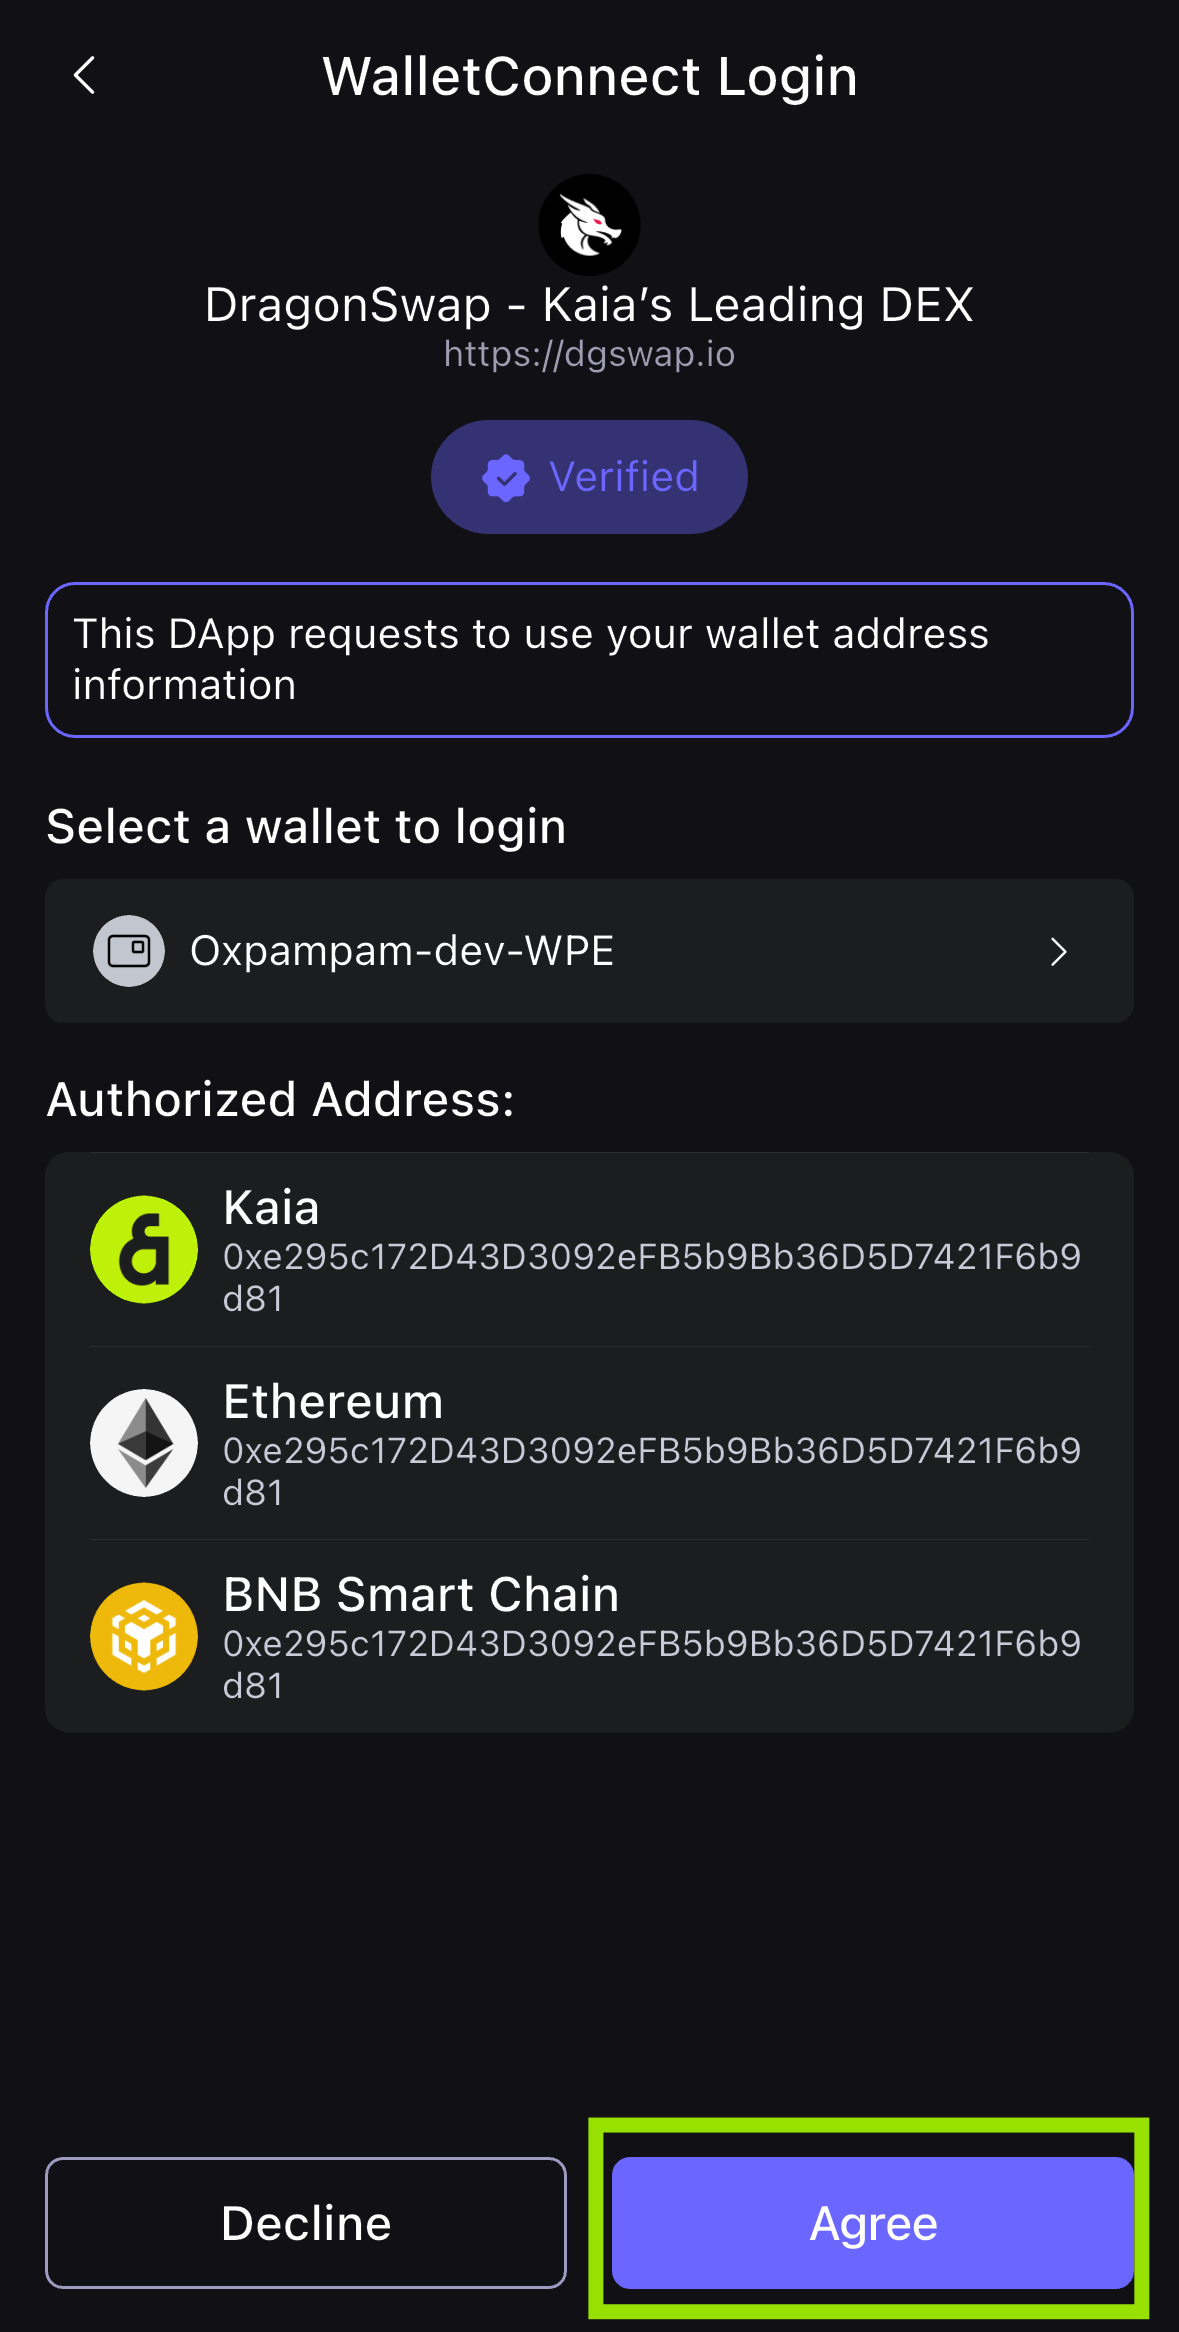
- Then you have successfully connected the wallet to the DragonSwap dApp in your browser! Your wallet address should now show in the DragonSwap connect component.

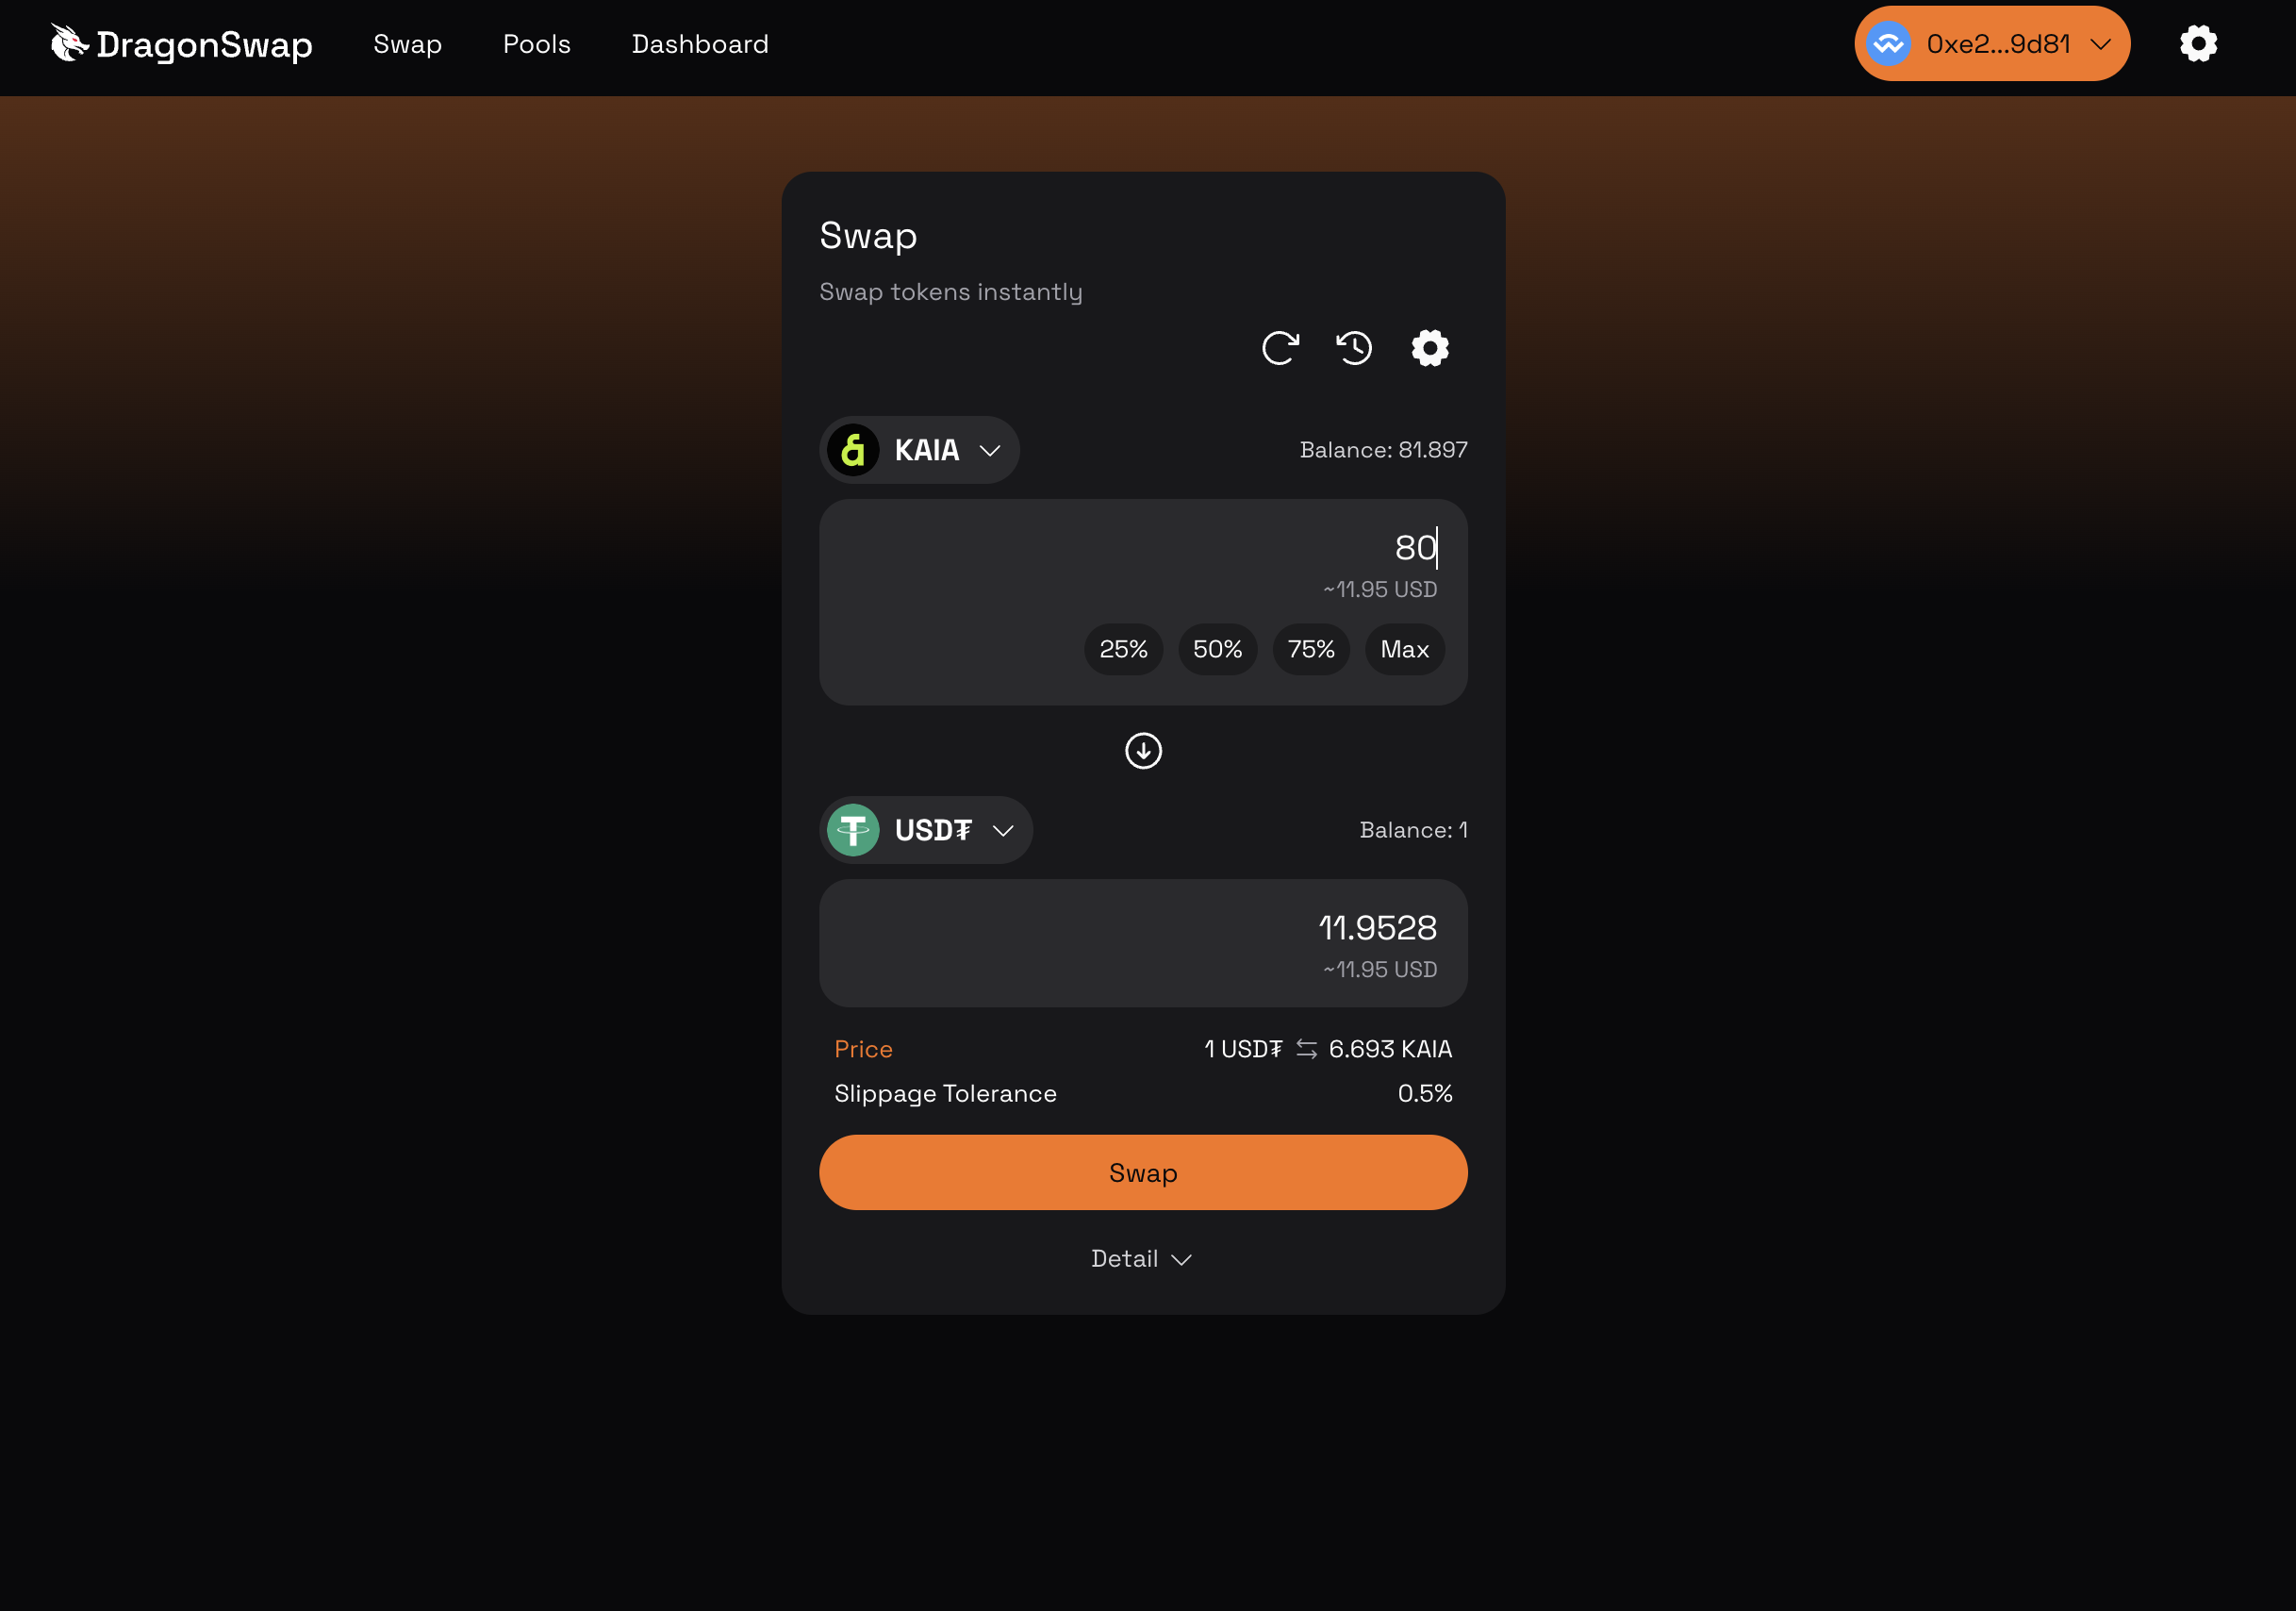
Step 4: Perform transaction
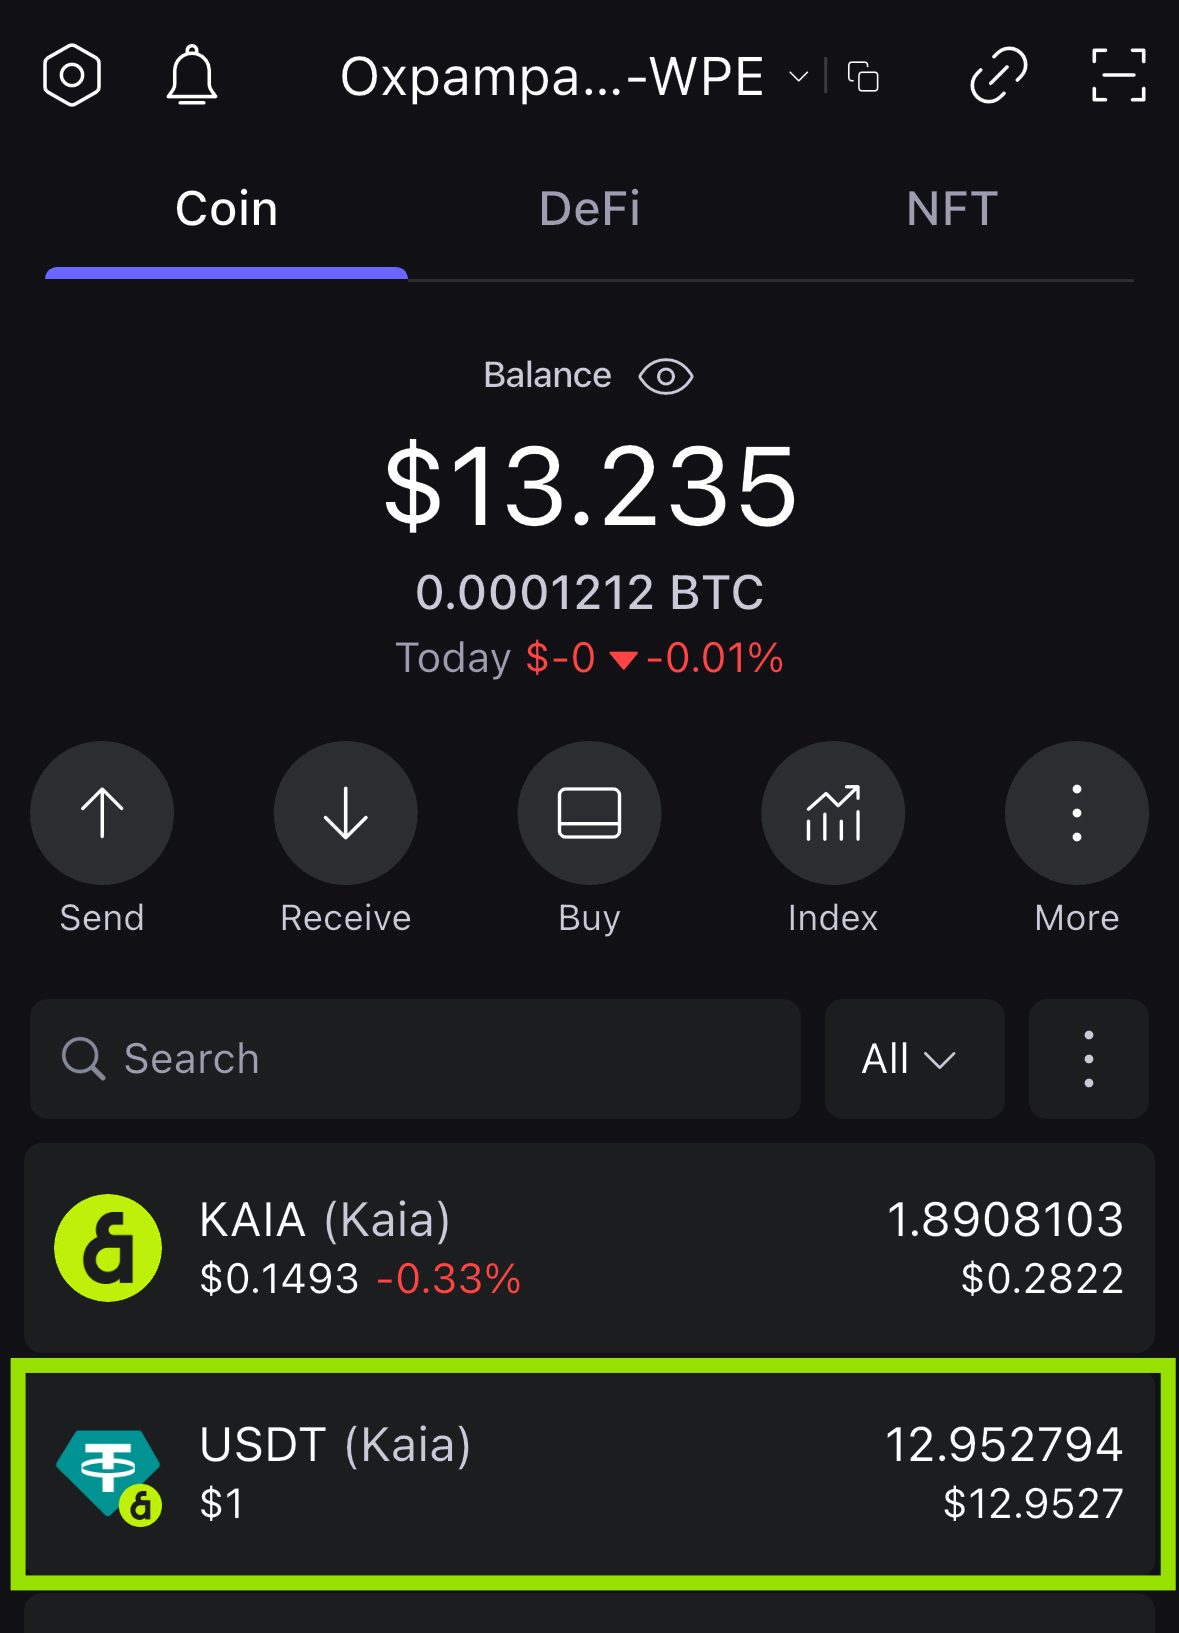
In this section, we will execute a trade by swapping KAIA for USDT. Navigate to Swap page.
- Fill in your swap order and click the Swap button. Make sure to confirm the swap before continuing the transaction.
- Open up your SafePal App and you should see a transaction confirmation page. Click Agree to continue with the transaction.
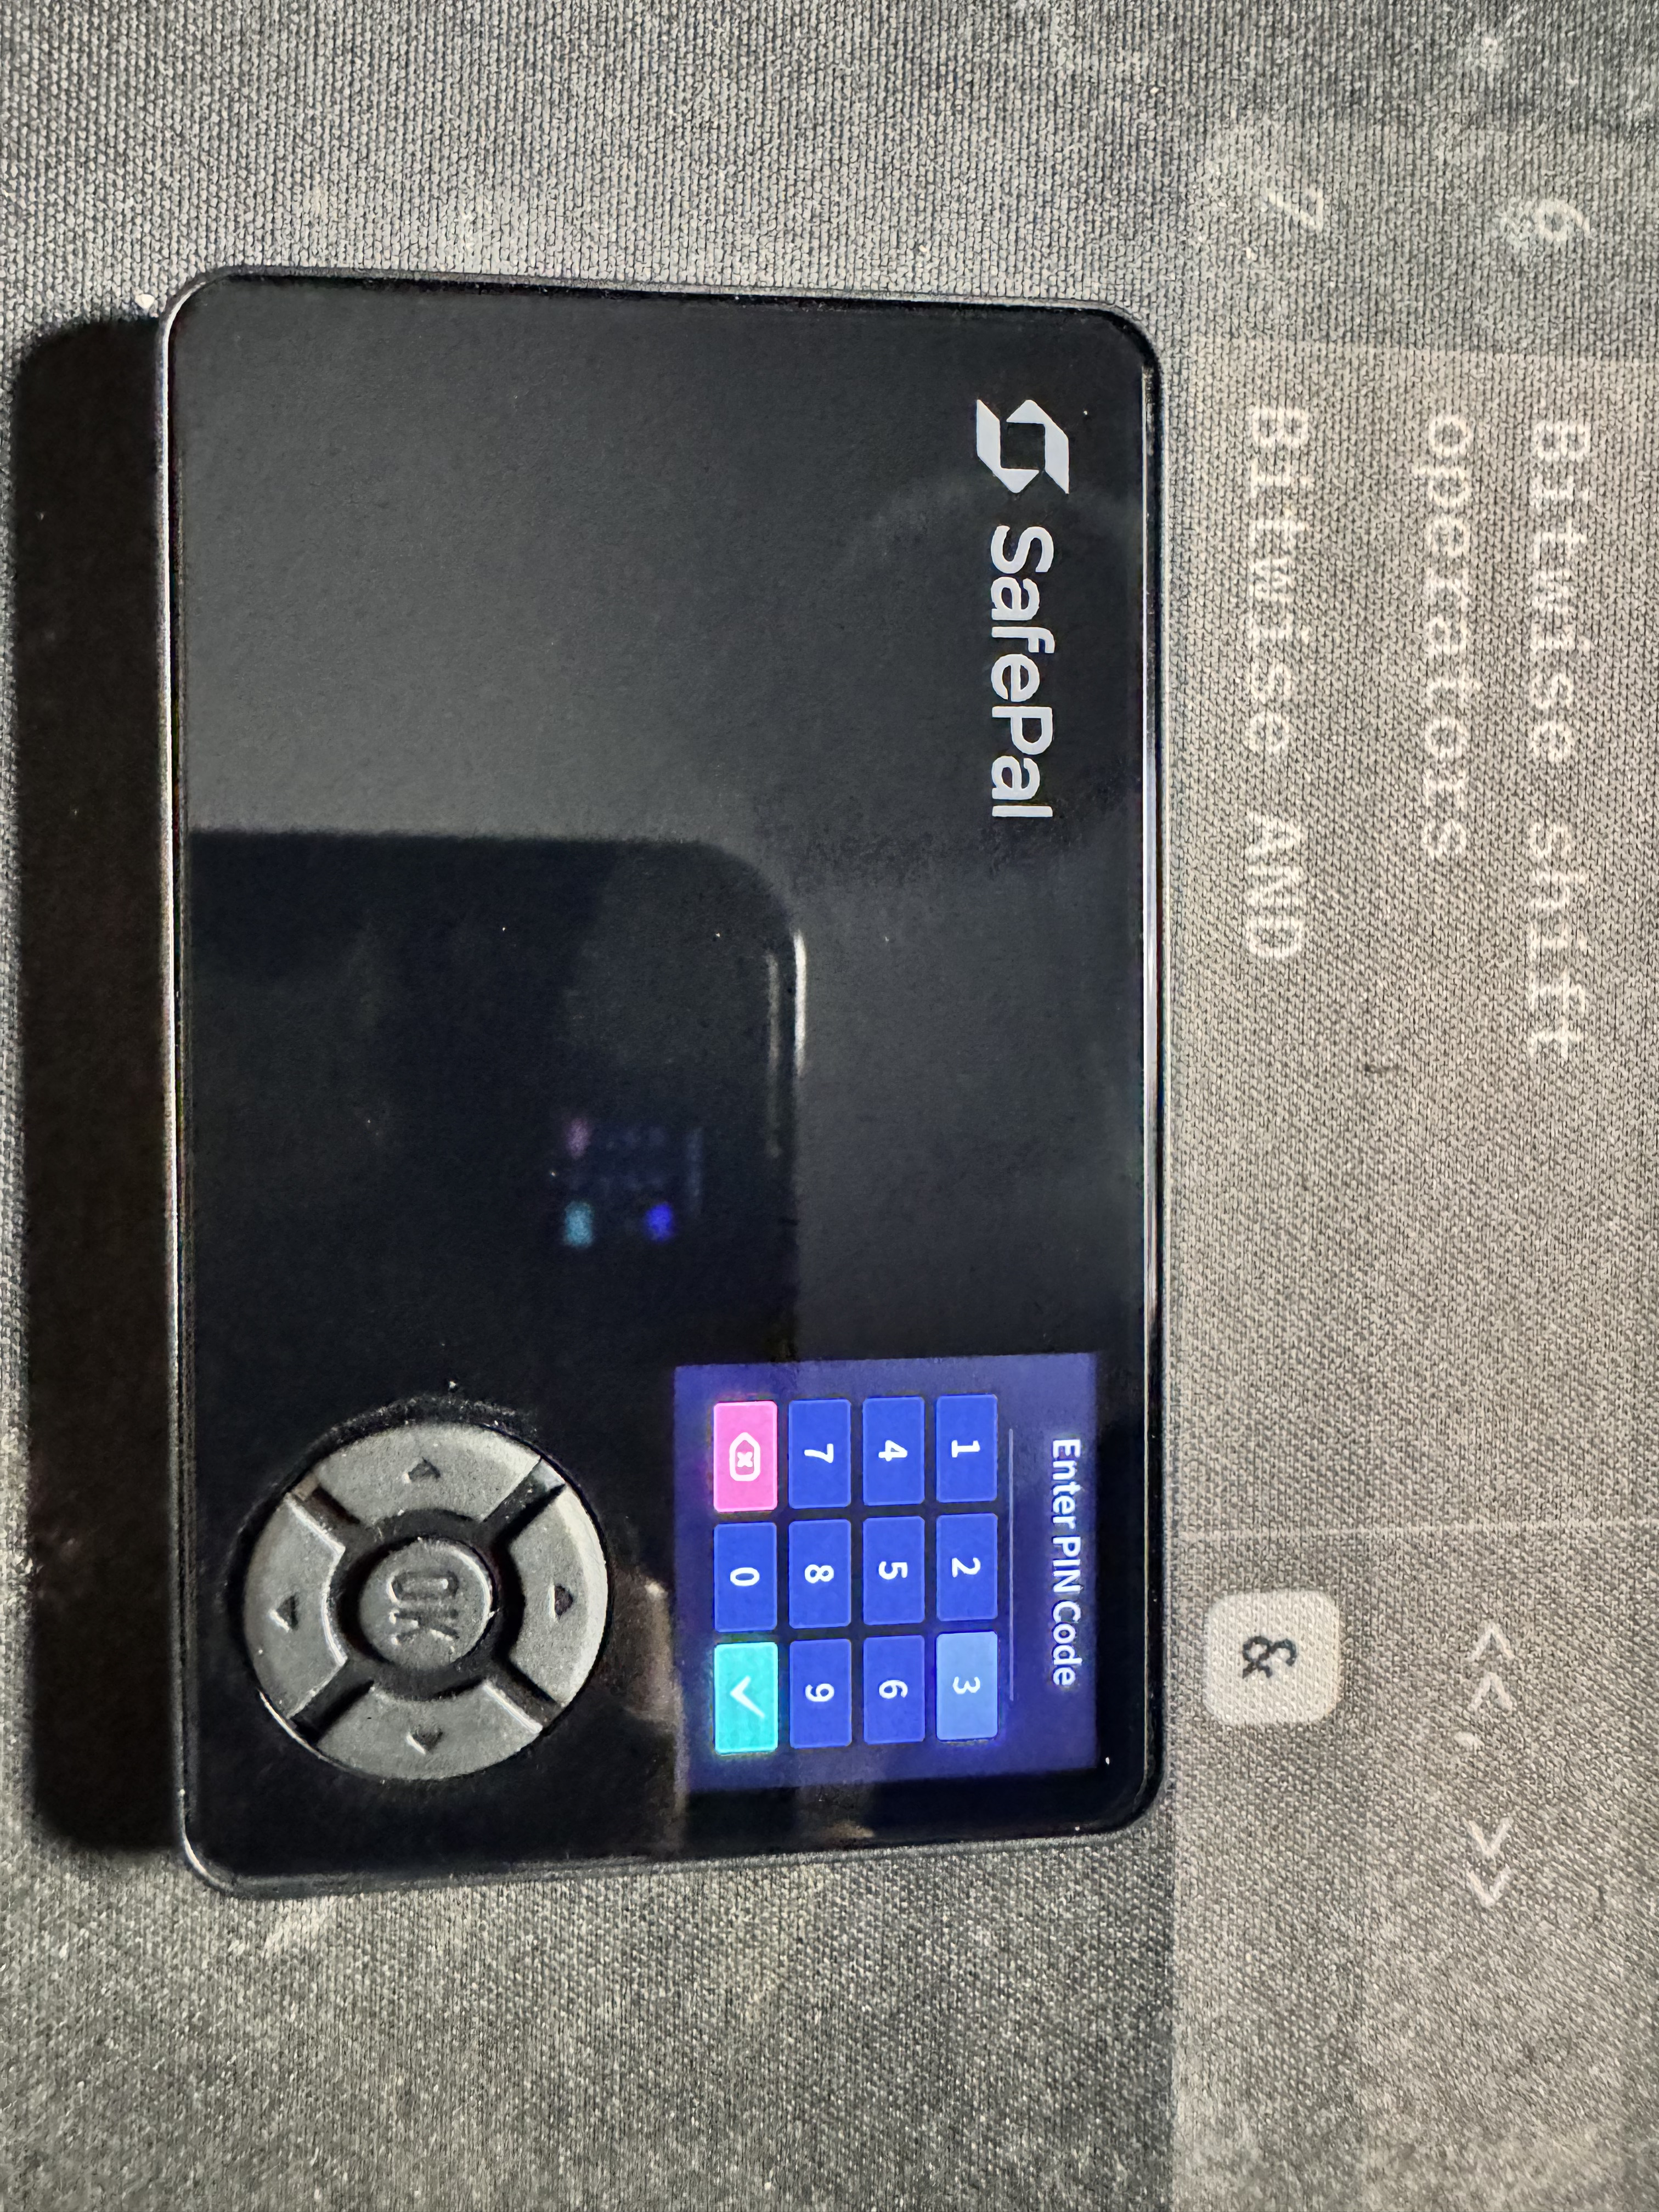
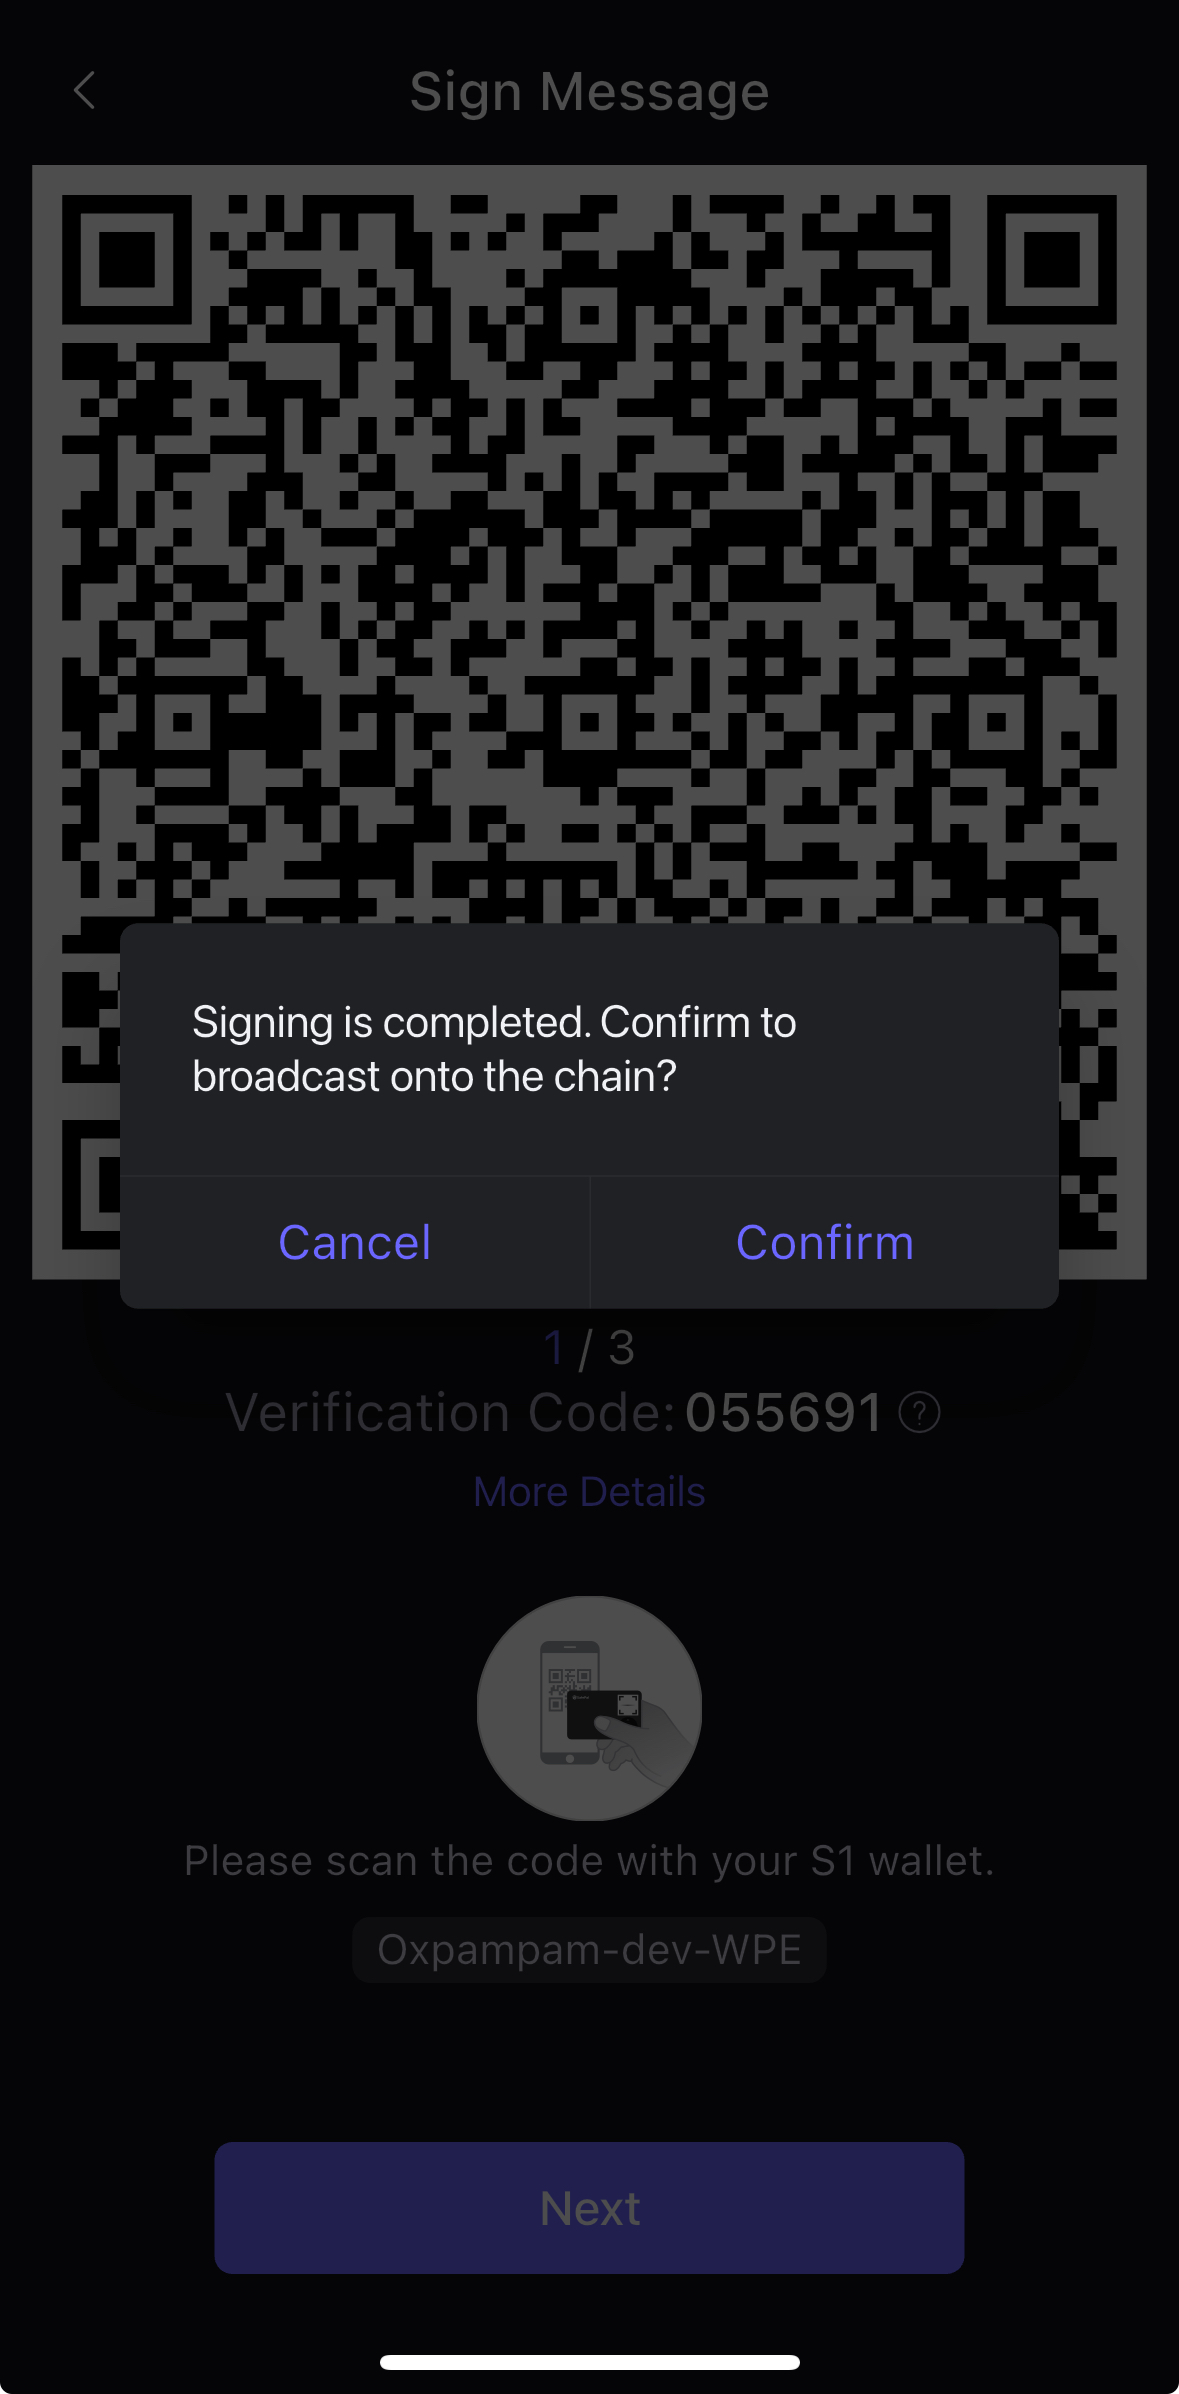
- Open up your S1 device to scan the QR code and sign transaction
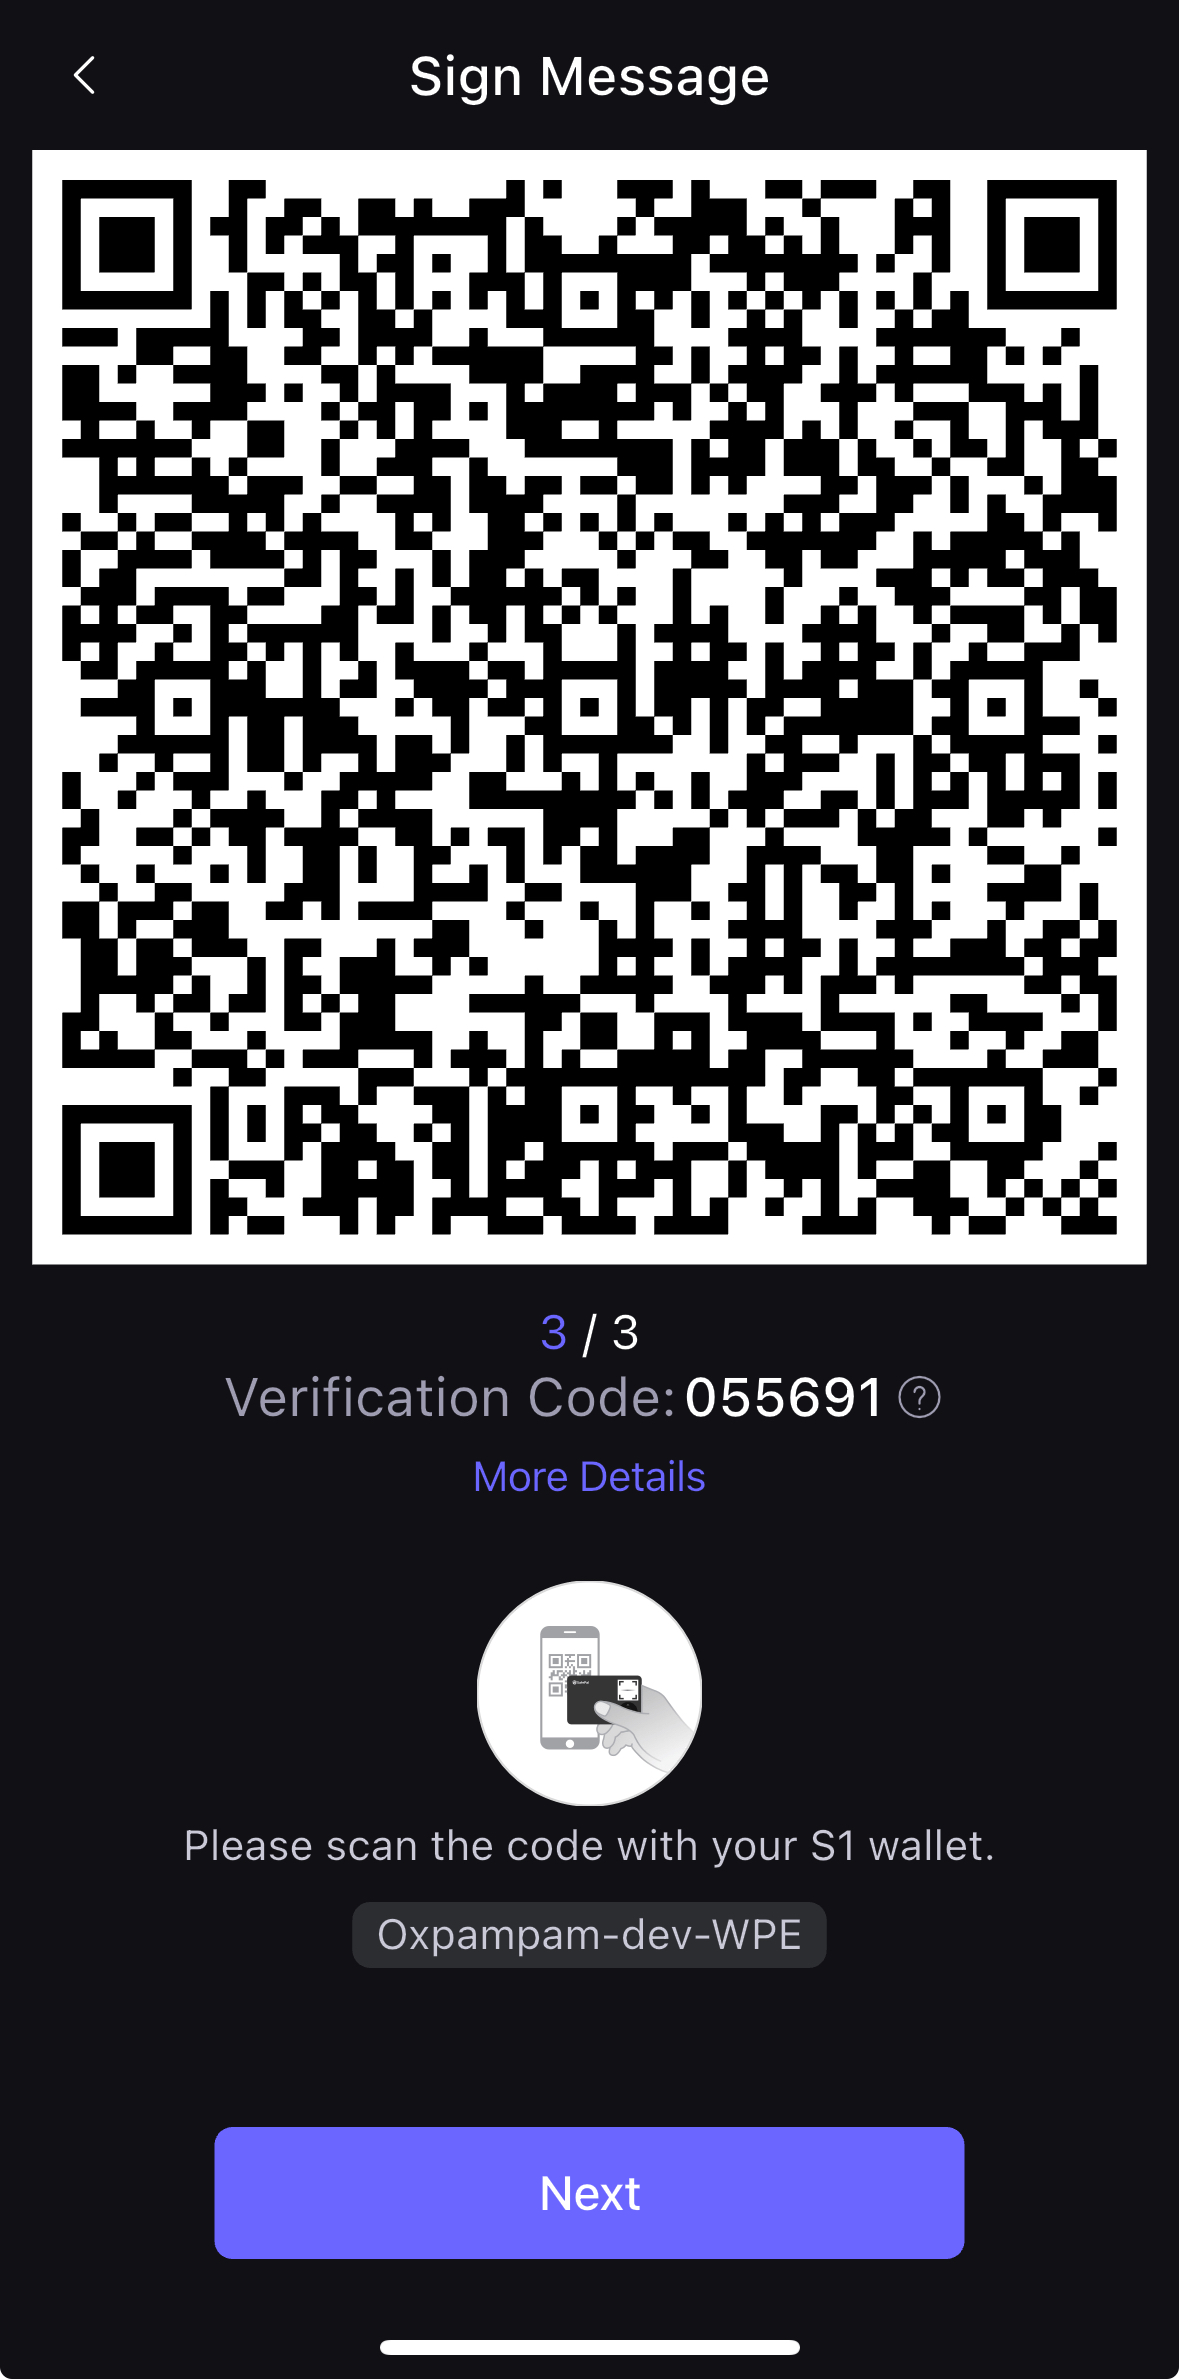
- Enter your S1 device PIN code and after inserting your code, click Next in your SafePal App
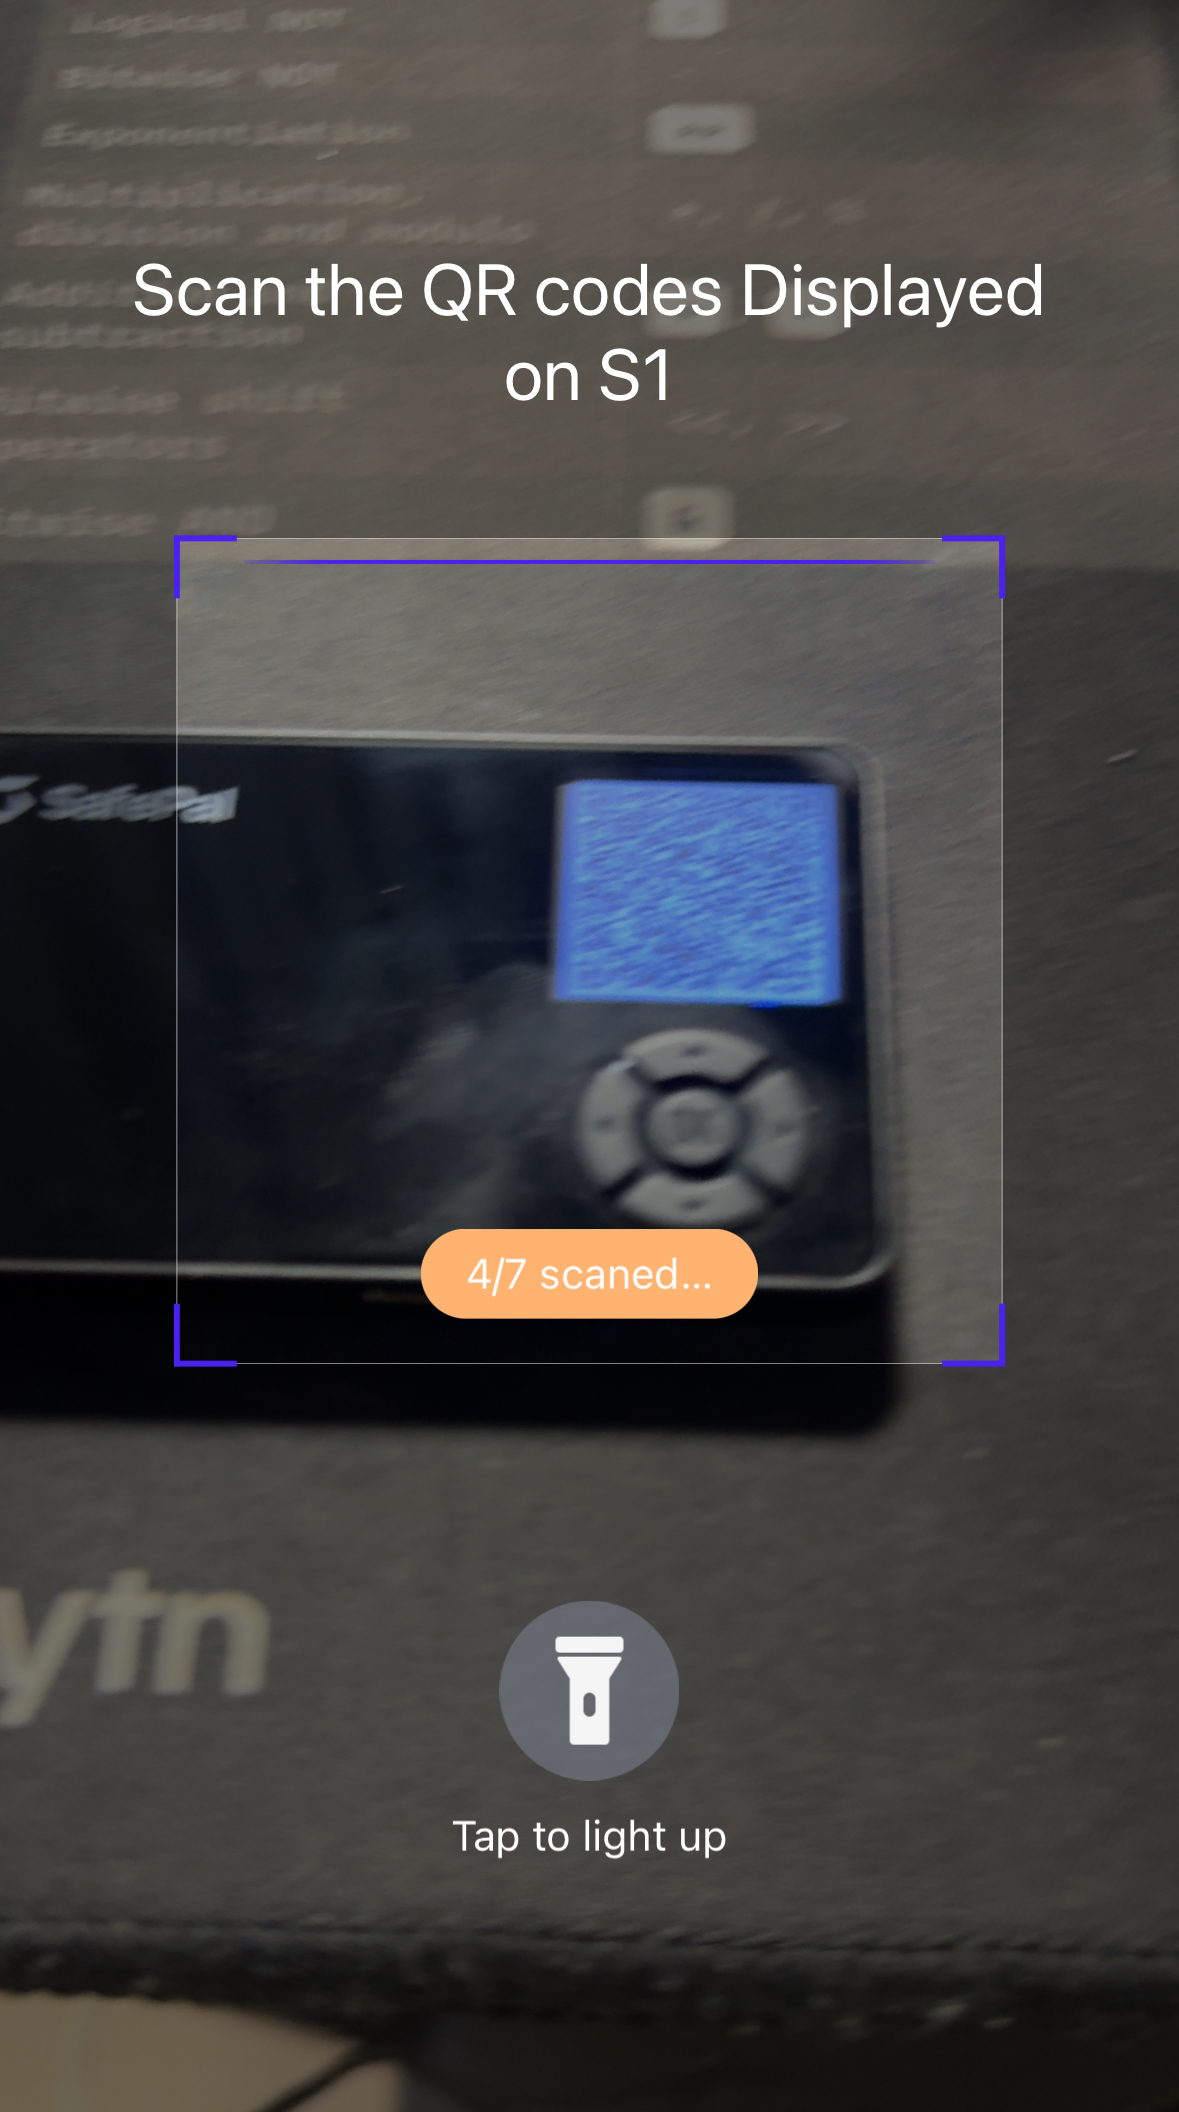
- Scan the dynamic QR code as shown on the S1 device from your SafePal App. Doing this ensures the App receives the signature contained in the QR codes and is ready to broadcast the swap transaction to the blockchain (Kaia).
- You will see a popup after signing is completed to broadcast the transaction. Click Confirm afterwards.
- Once your transaction is confirmed, a Transaction Successful pop-up will appear as shown below.
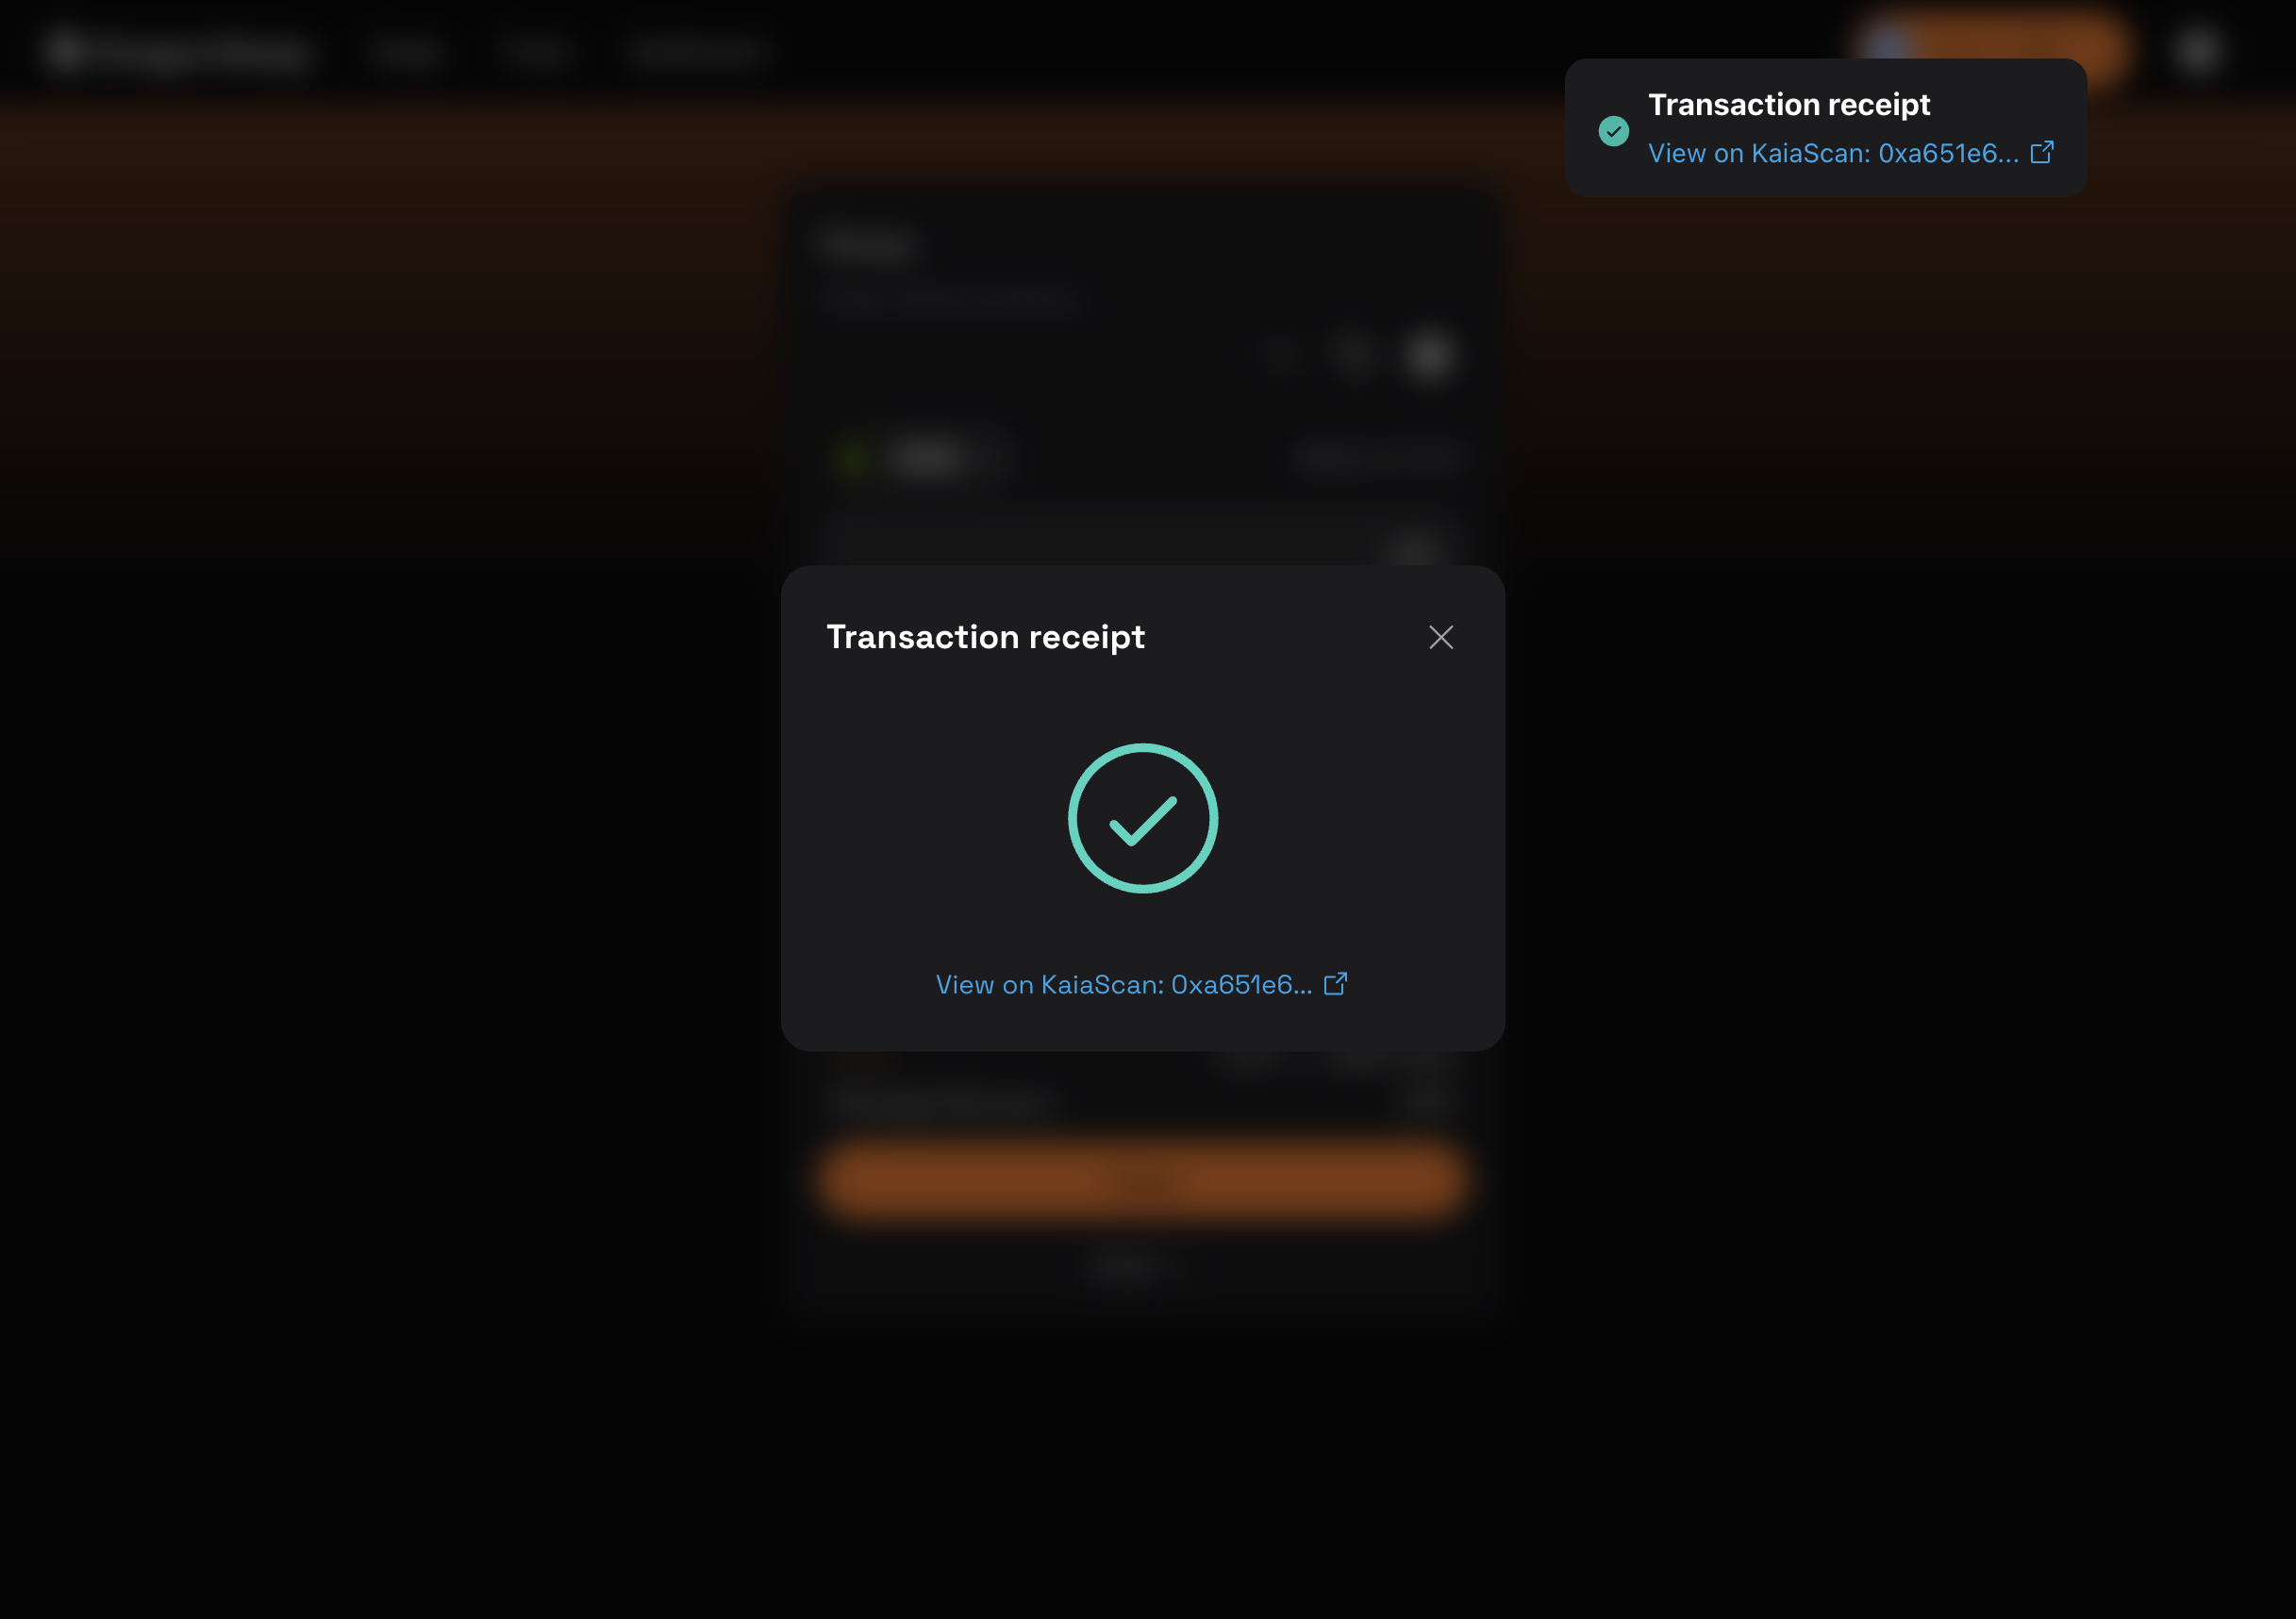
Congratulations. You have successfully signed a transaction, broadcasted the transaction to the blockchain on a third party dApp using your SafePal hardware wallet via walletconnect.
Chapter 4: Advanced & Production-Grade Setups
This chapter covers recipes for securing assets and automating actions in production environments, where security stakes are highest.
4.1. Recipe: Setting Up a Multi-Signature Treasury with Kaia Safe
Kaia Safe allows developers to create an account that can be controlled by multiple owners, significantly improving security.
You should never use a regular wallet to manage large amounts of funds, protocol’s permissions or ownership control. Too many projects have been compromised by basic wallet security failures. Whether you are launching the next big DeFi protocol, managing a DAO treasury, or safeguarding valuable assets, a multi signature wallet is absolutely essential.
In this guide, you will learn how to create a safe on Kaia using Kaia Safe, configure its owners and approval threshold, and execute a basic transaction.
Creating a Safe wallet
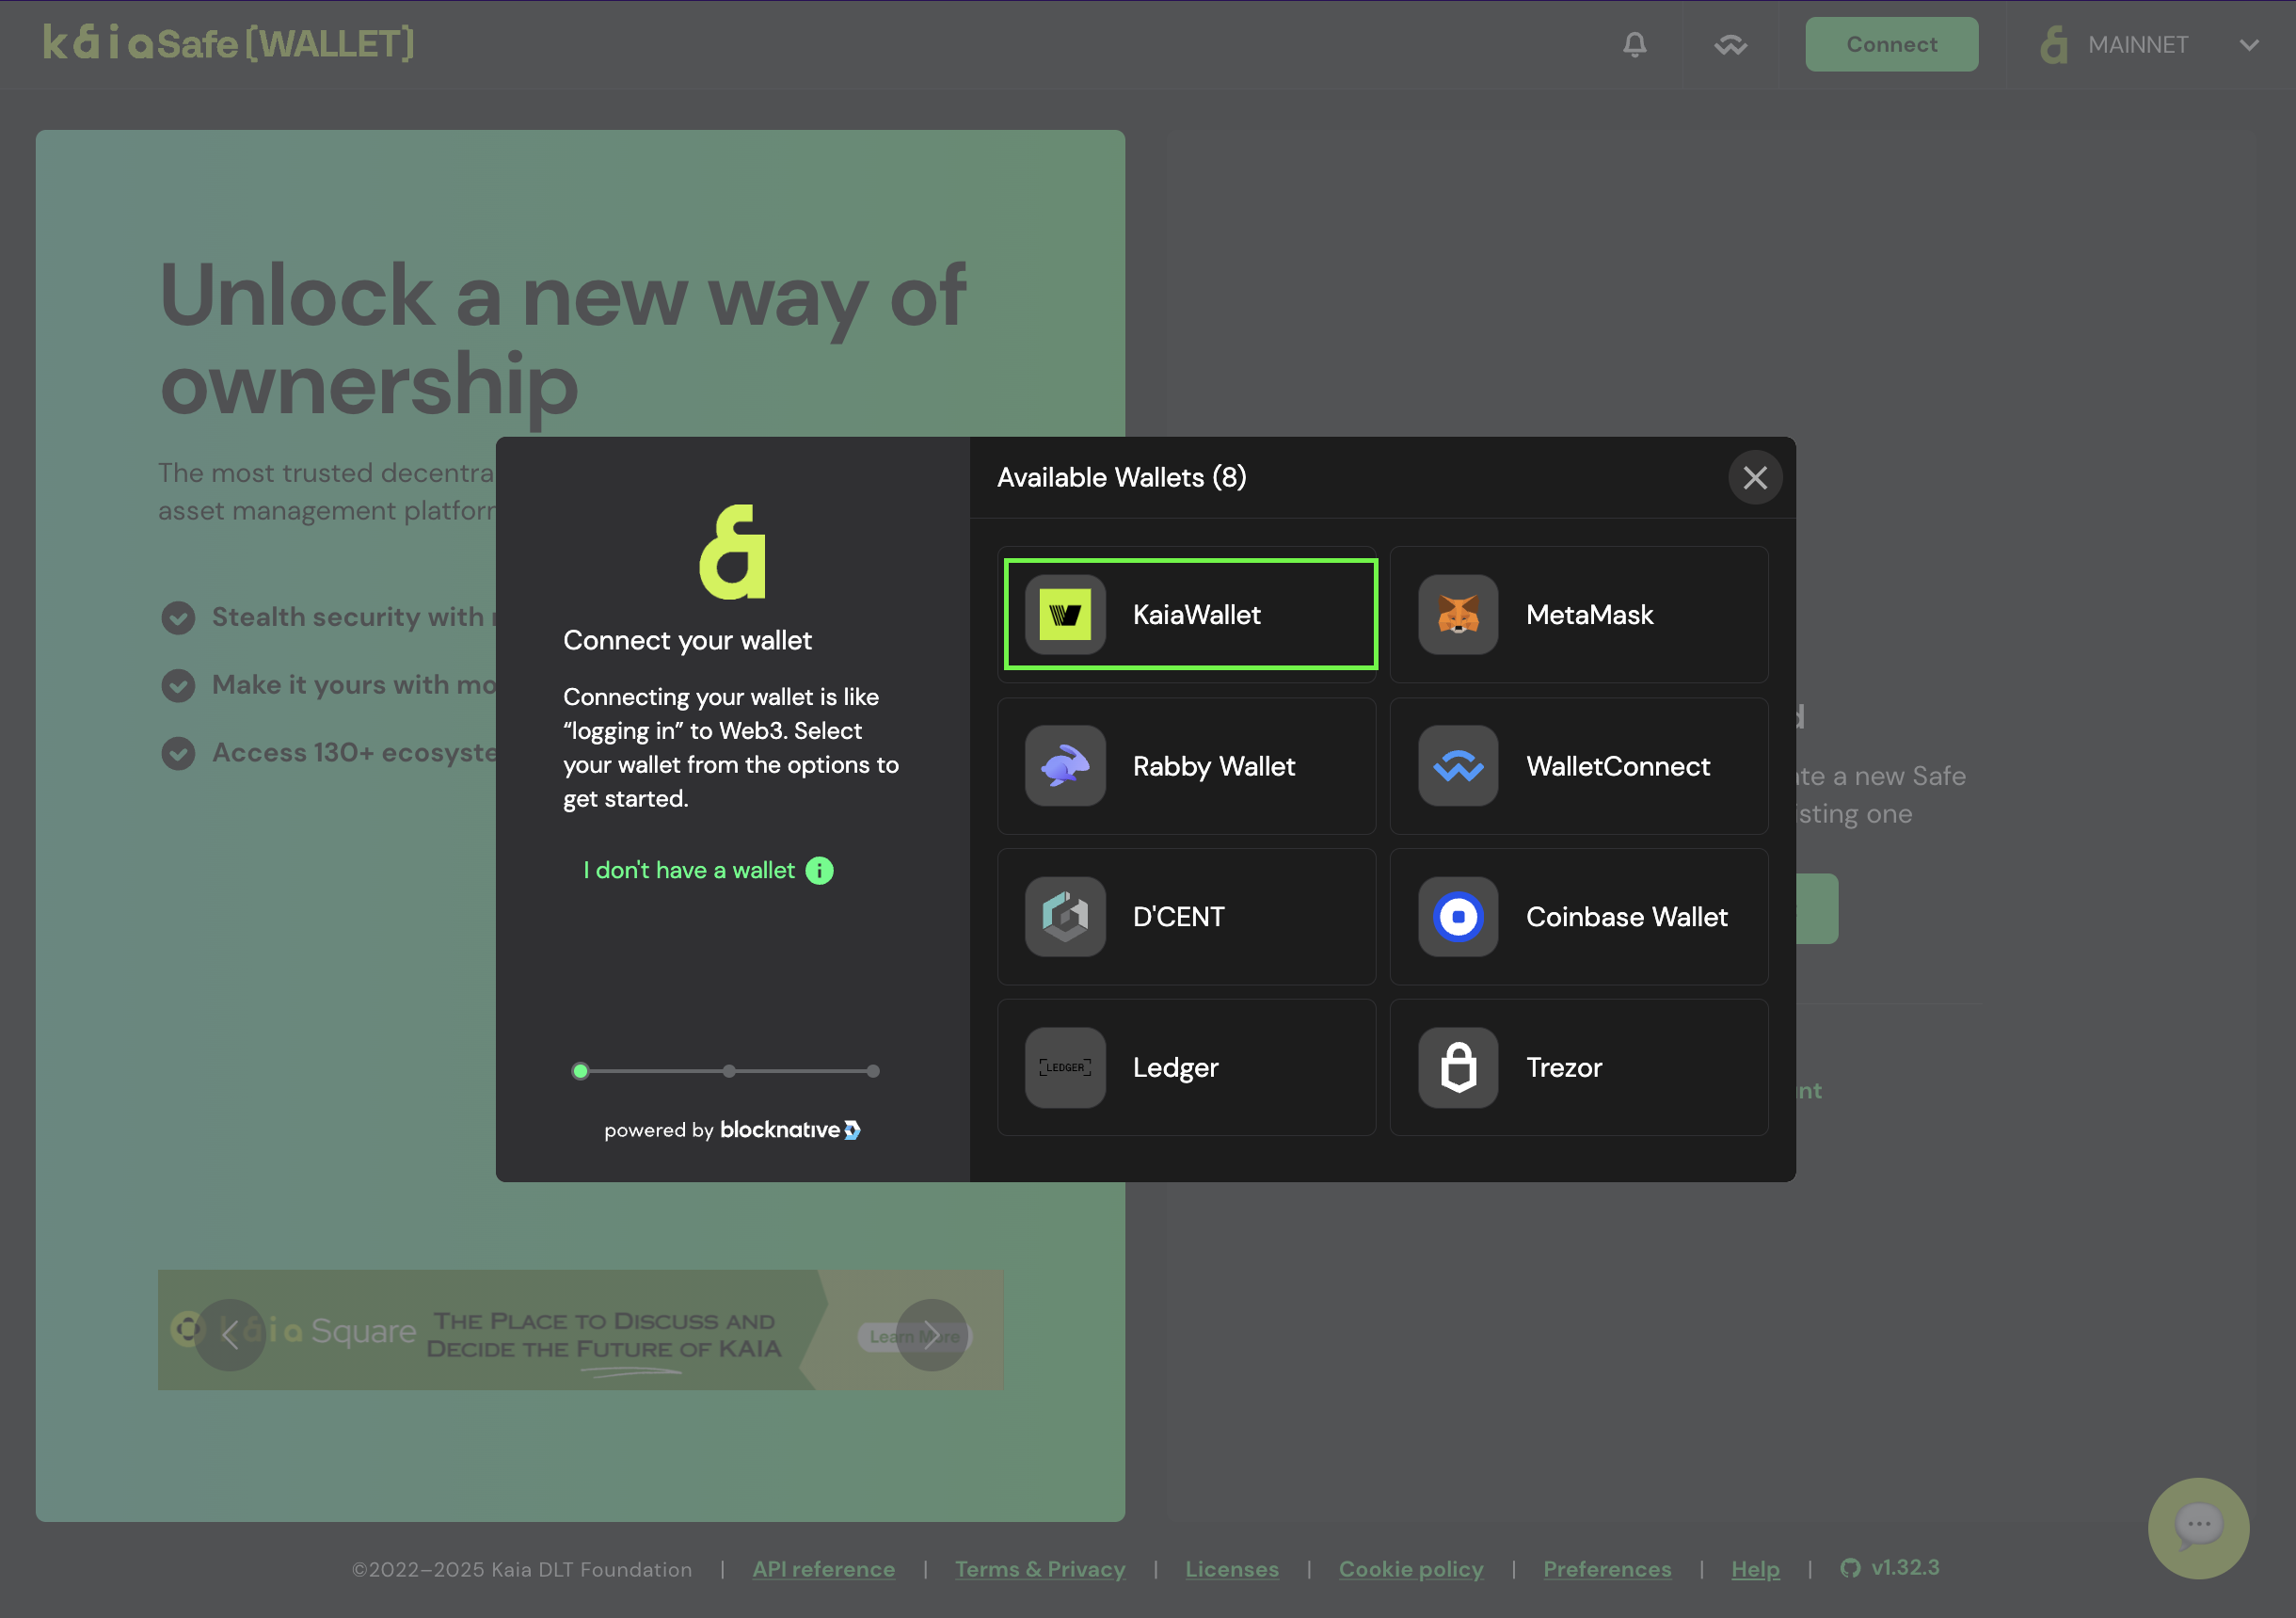
- Visit Kaia Safe App.
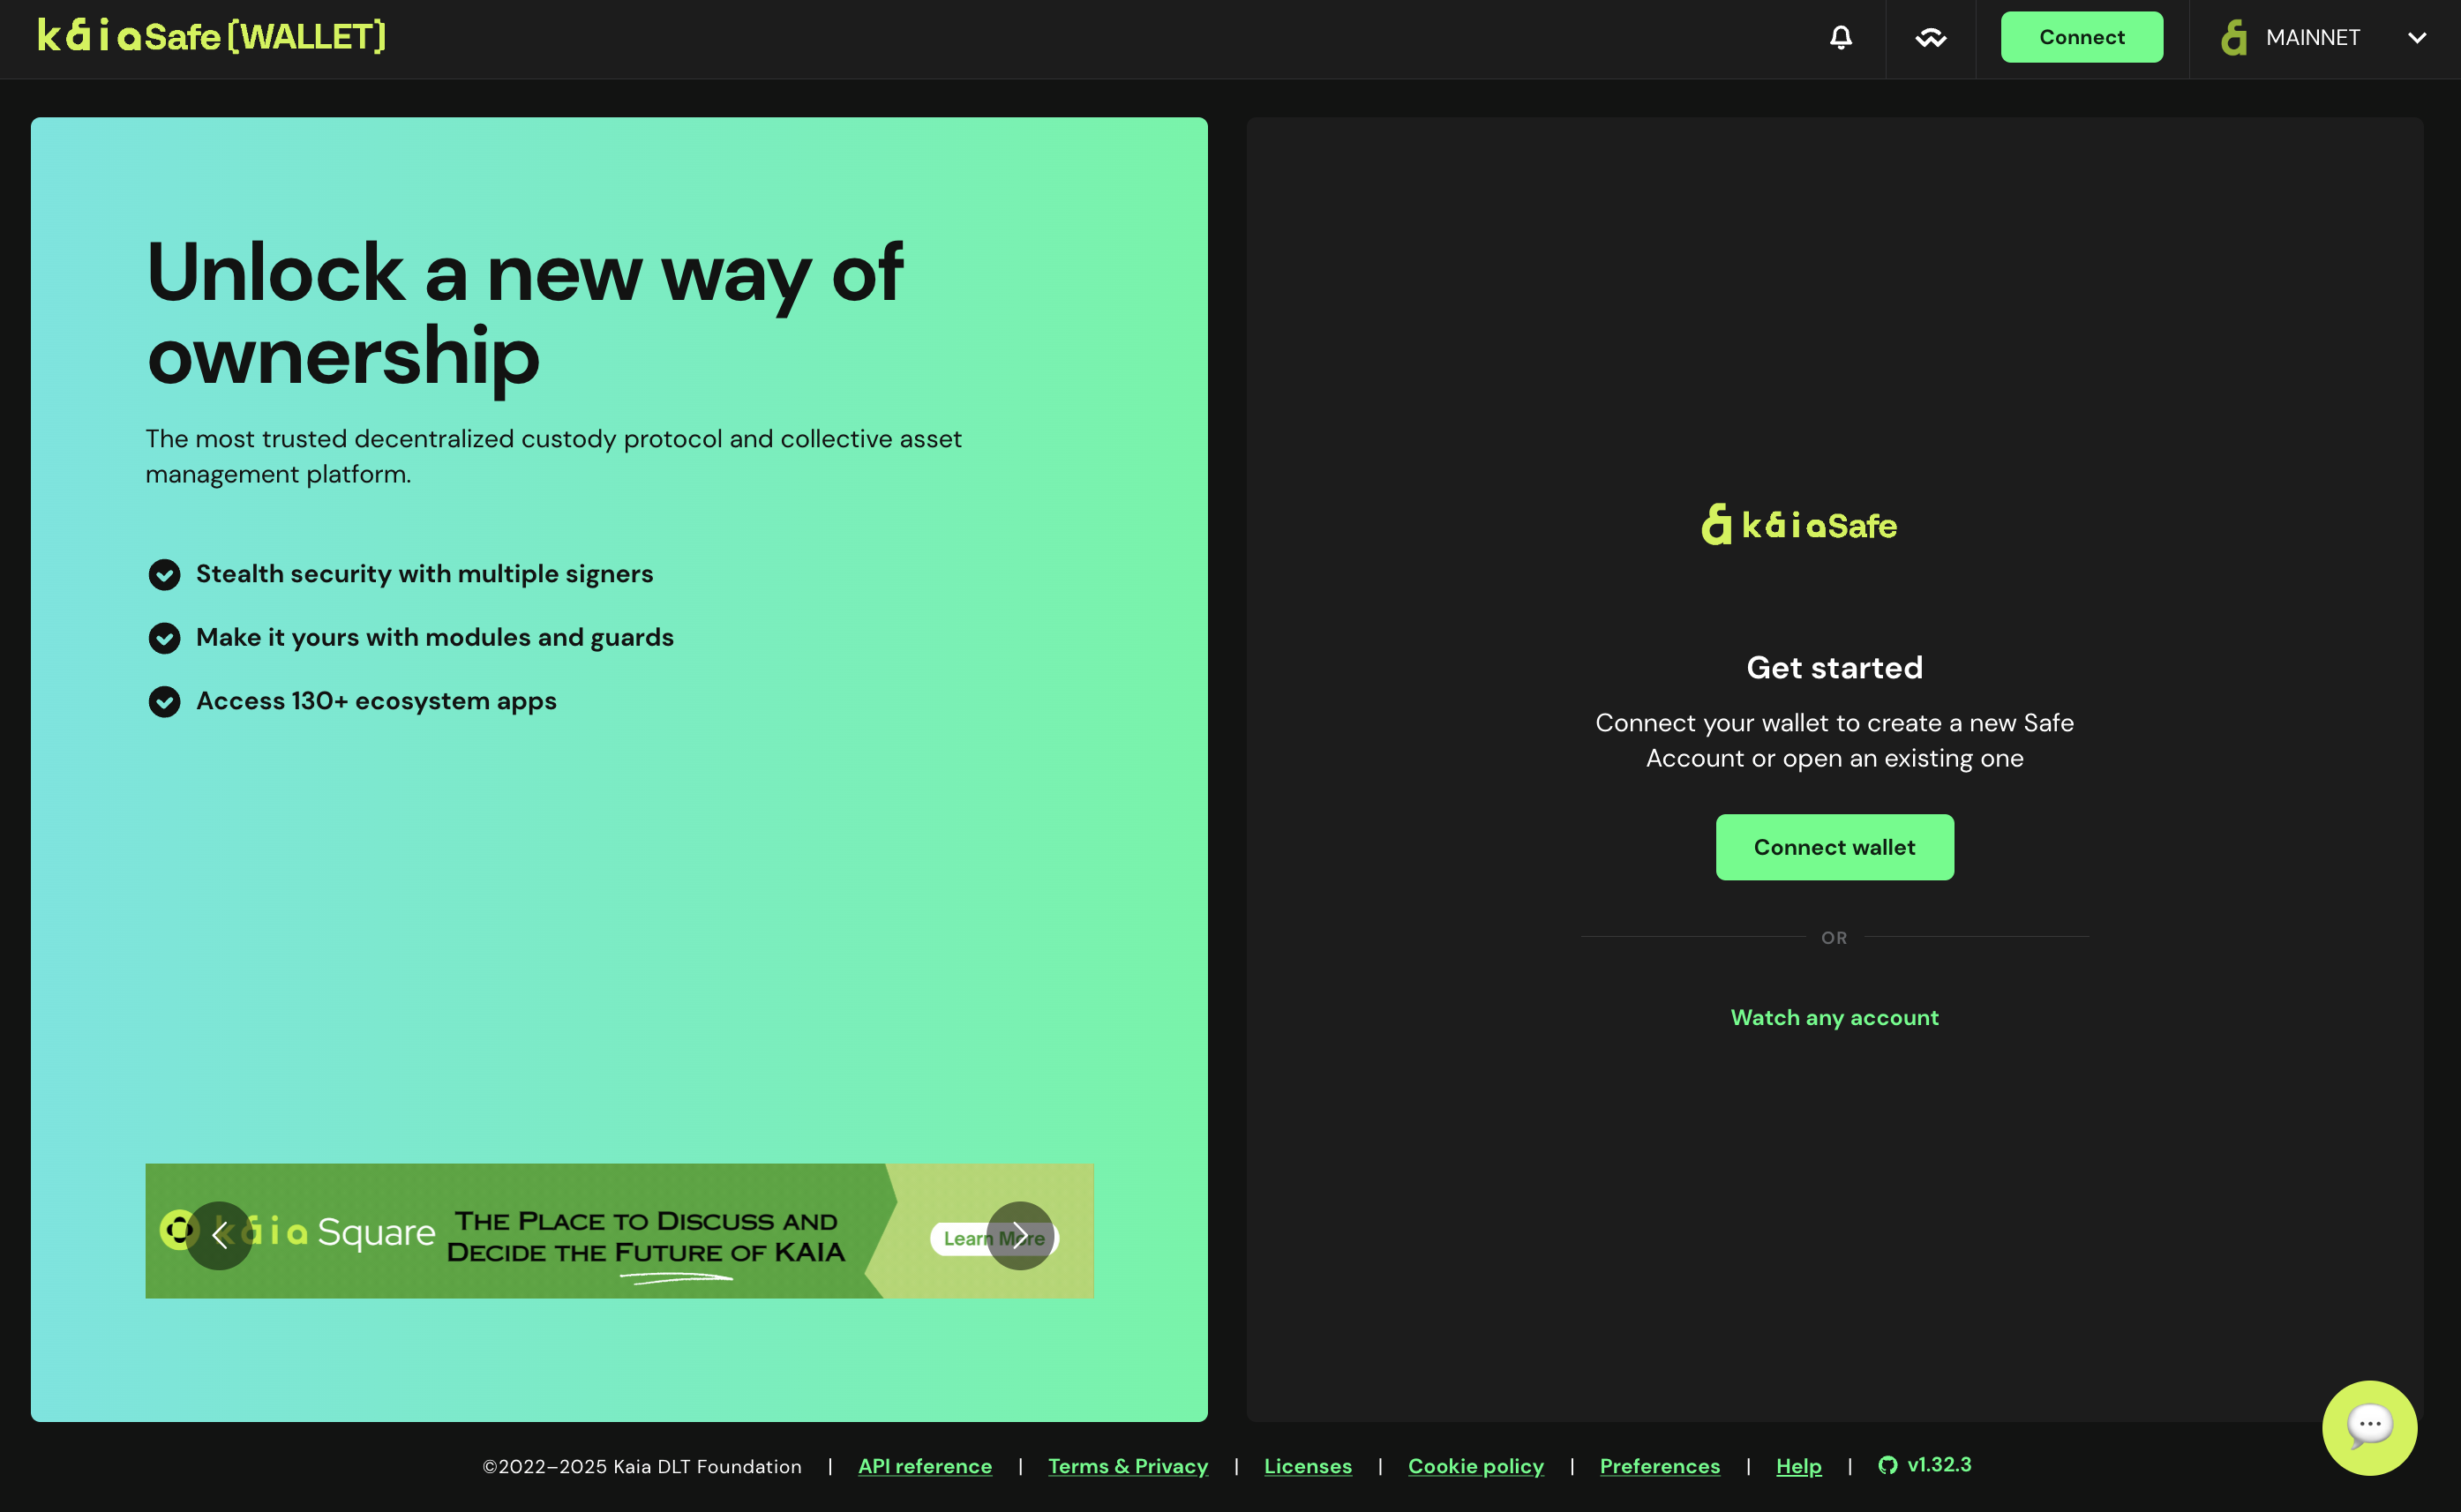
- Connect your wallet. Select the wallet type you want to connect to the Kaia Safe website. For this guide, we will use Kaia Wallet.
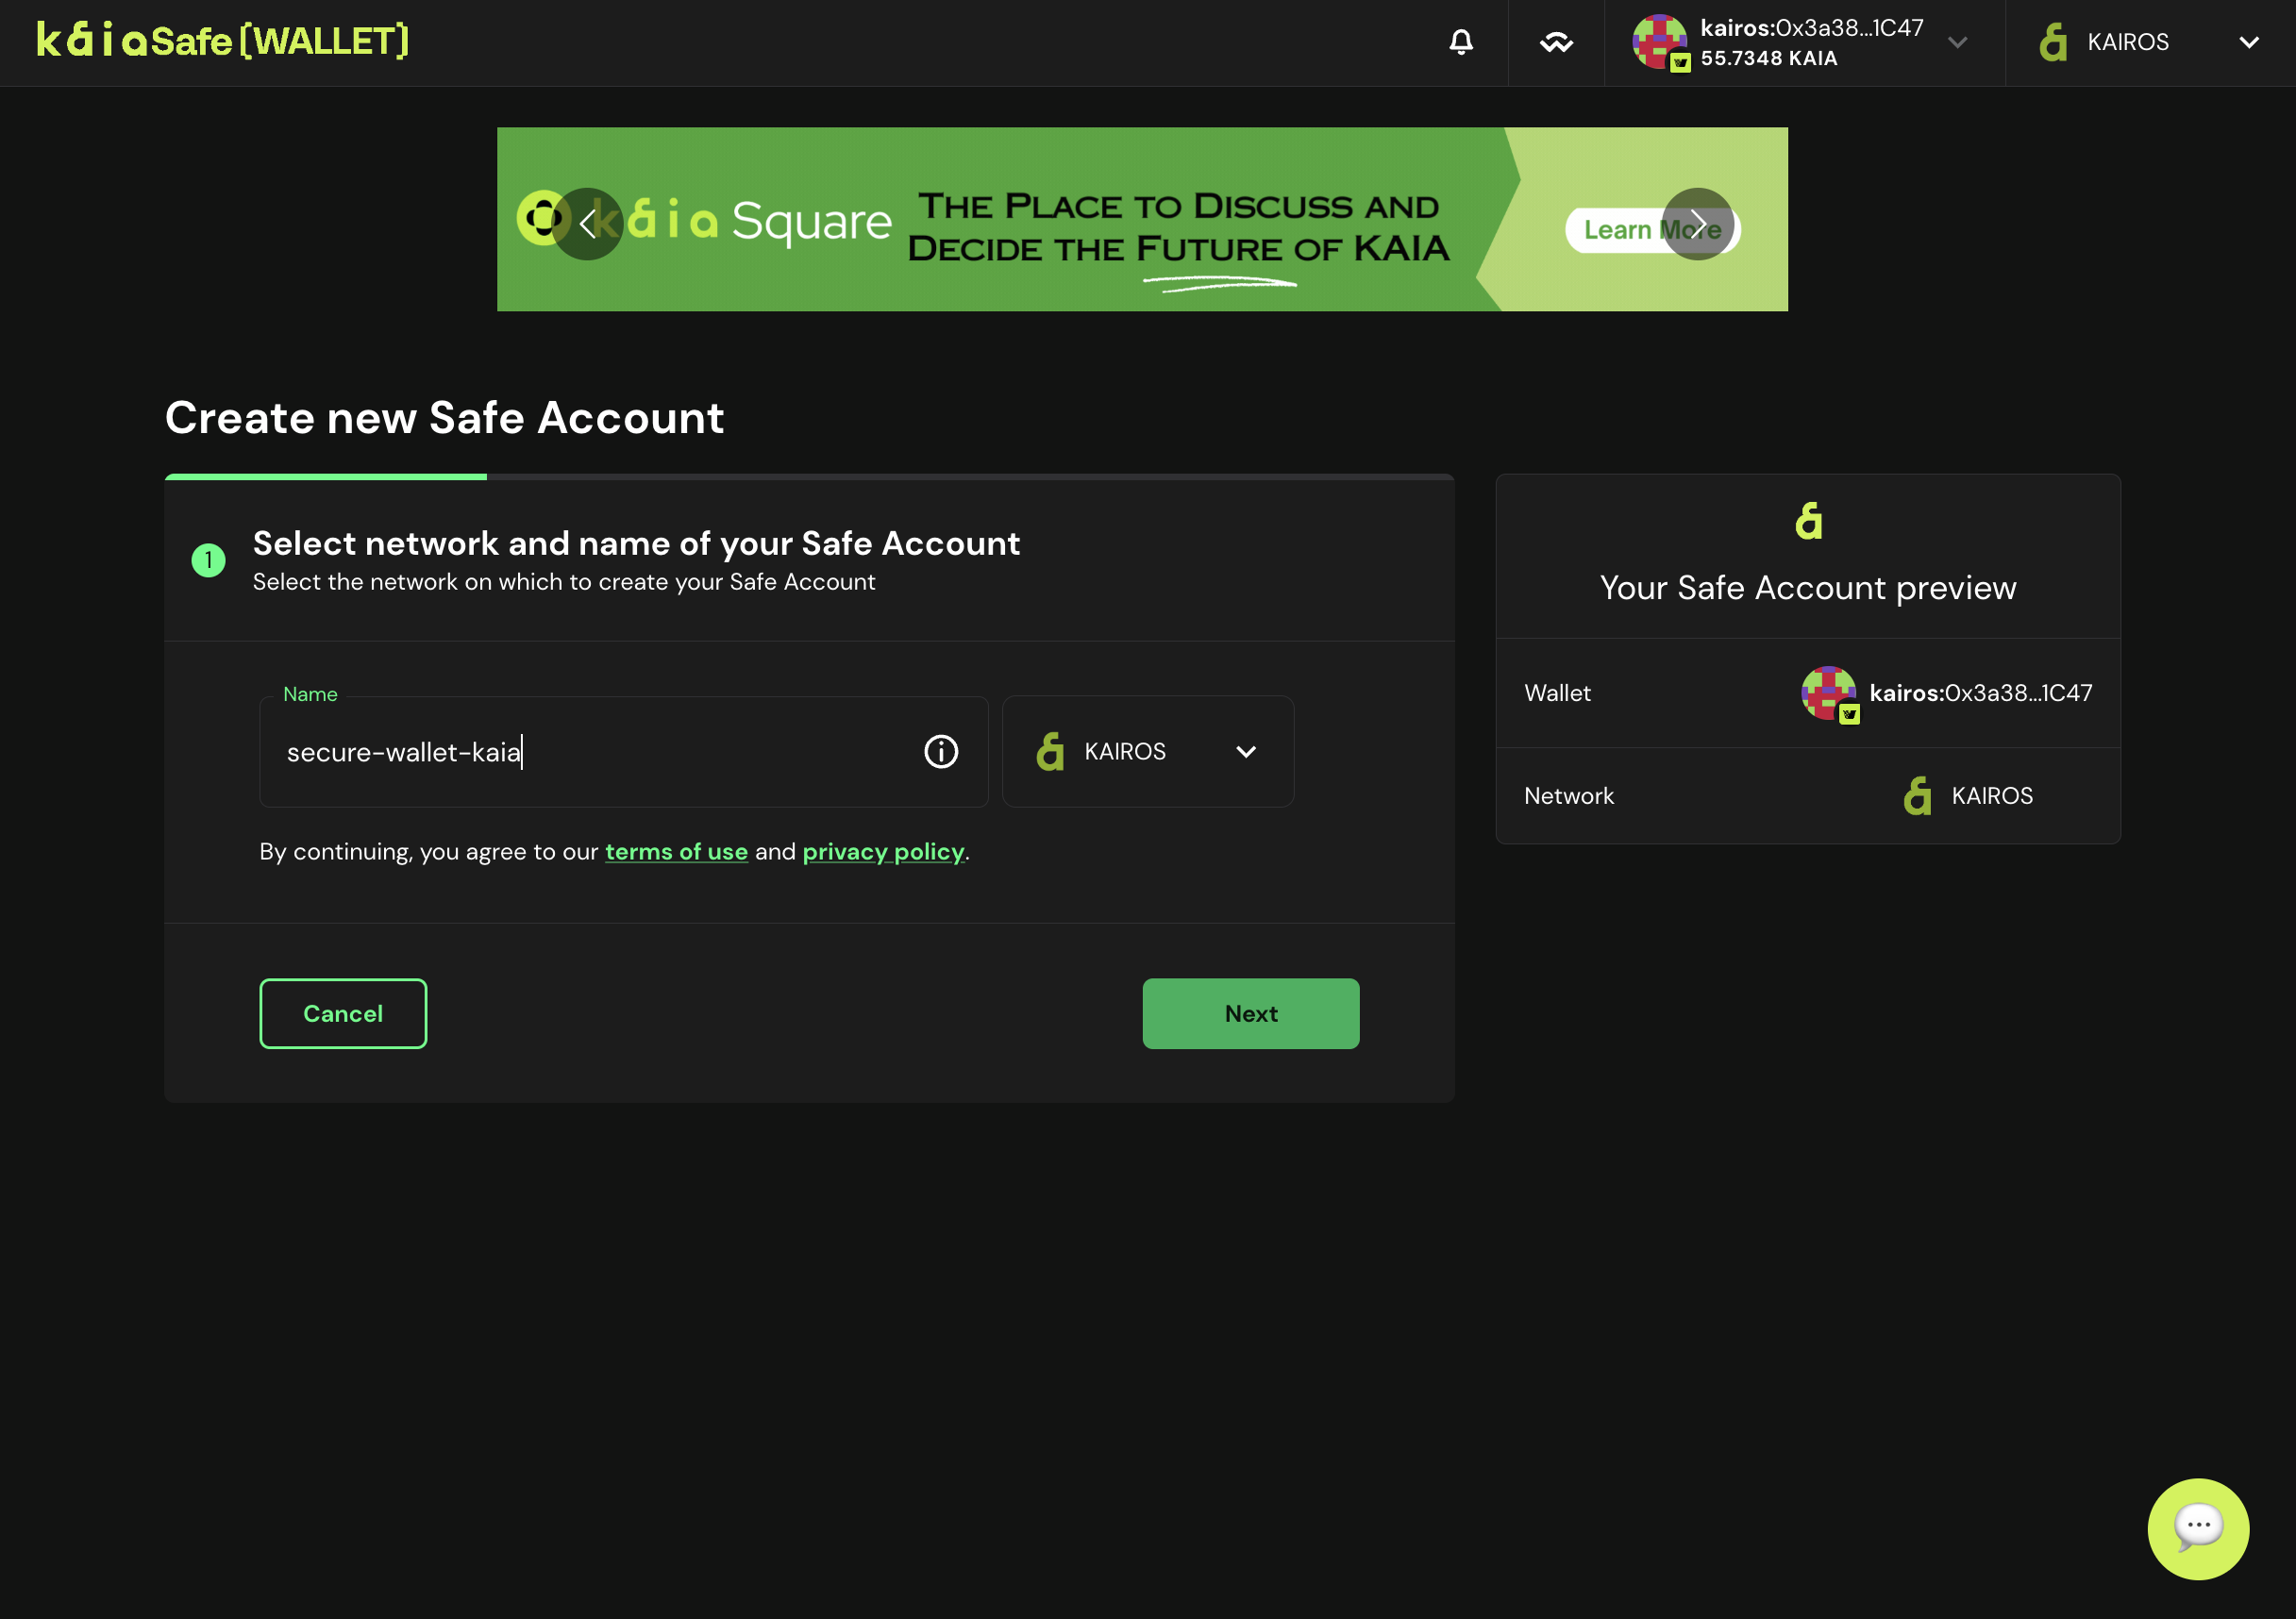
- Name your Safe. After connecting your wallet, click Create Account, and give your Kaia Safe a name.
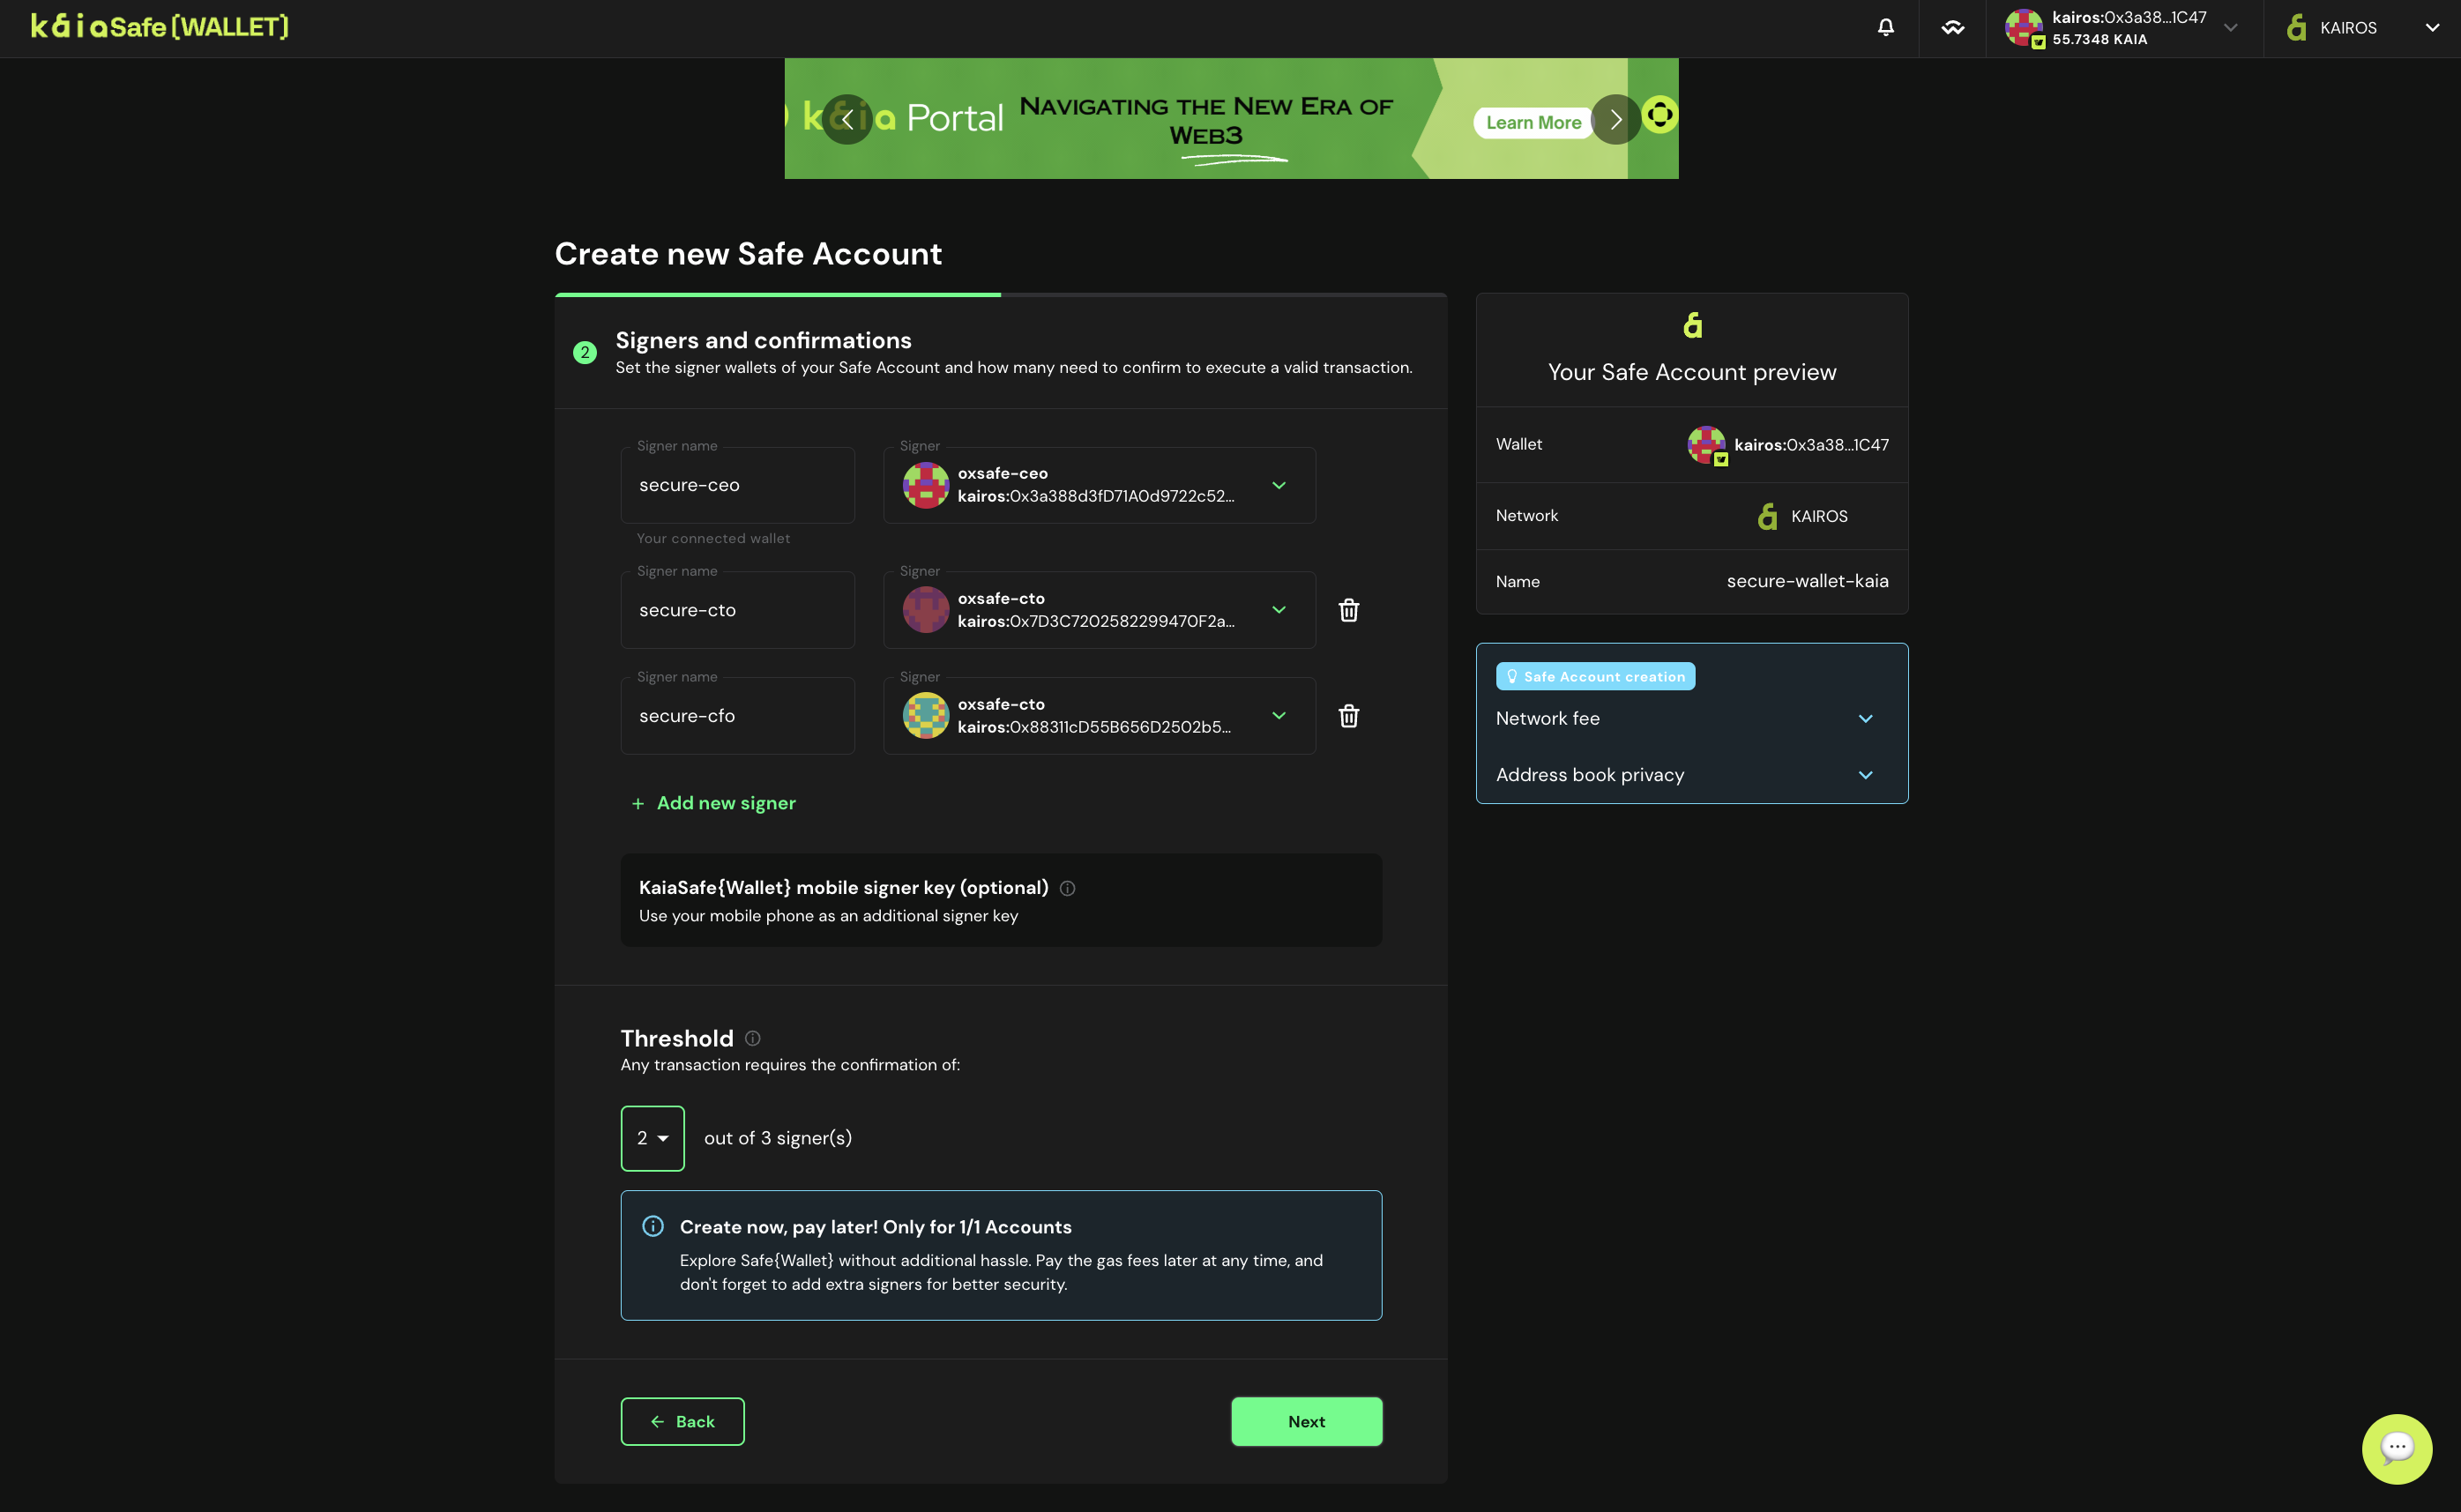
- Configure signers. Configure how many signer confirmations a transaction in your Kaia Safe account needs to be approved. Good practice is to use a threshold of 51% of the total owners e.g., 2 out of 3, 3 out of 5 etc as shown below.
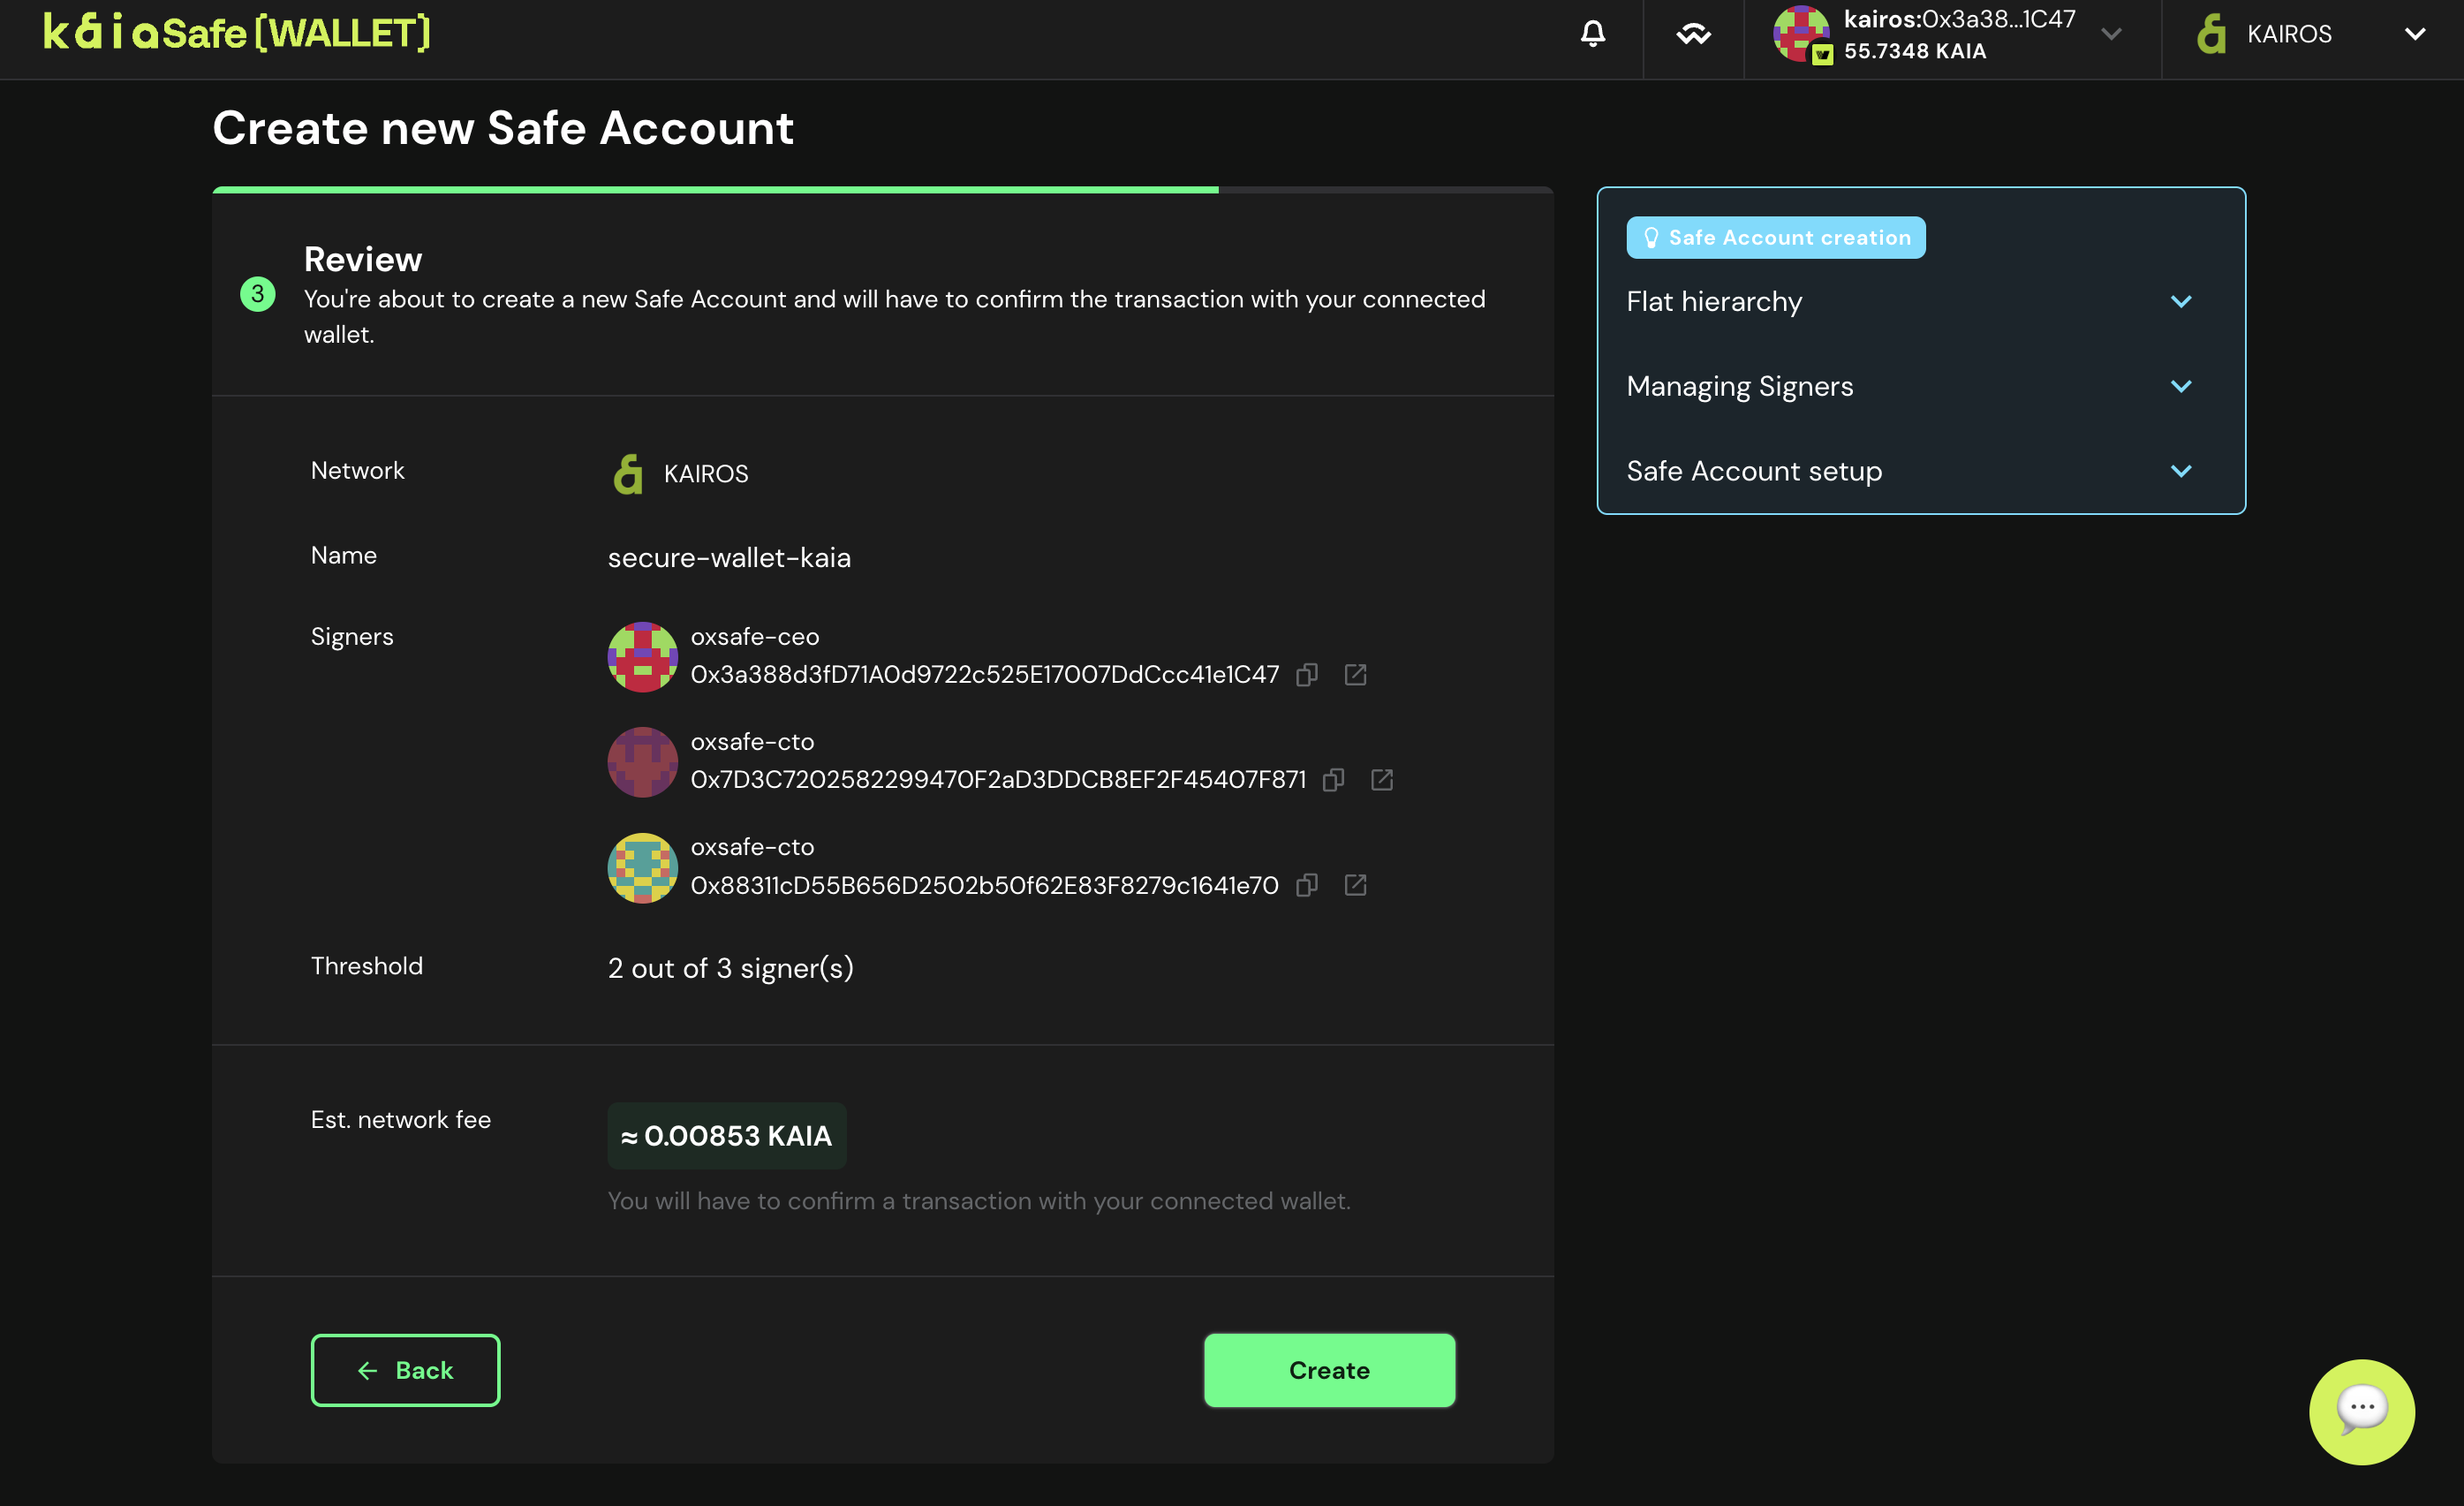
- Deploy your Kaia Safe account. Once you are completely satisfied with all of your Kaia Safe parameters, click Create to submit the creation of your Kaia Safe account.
- Use your wallet. Click on the Start using KaiaSafe Wallet button.
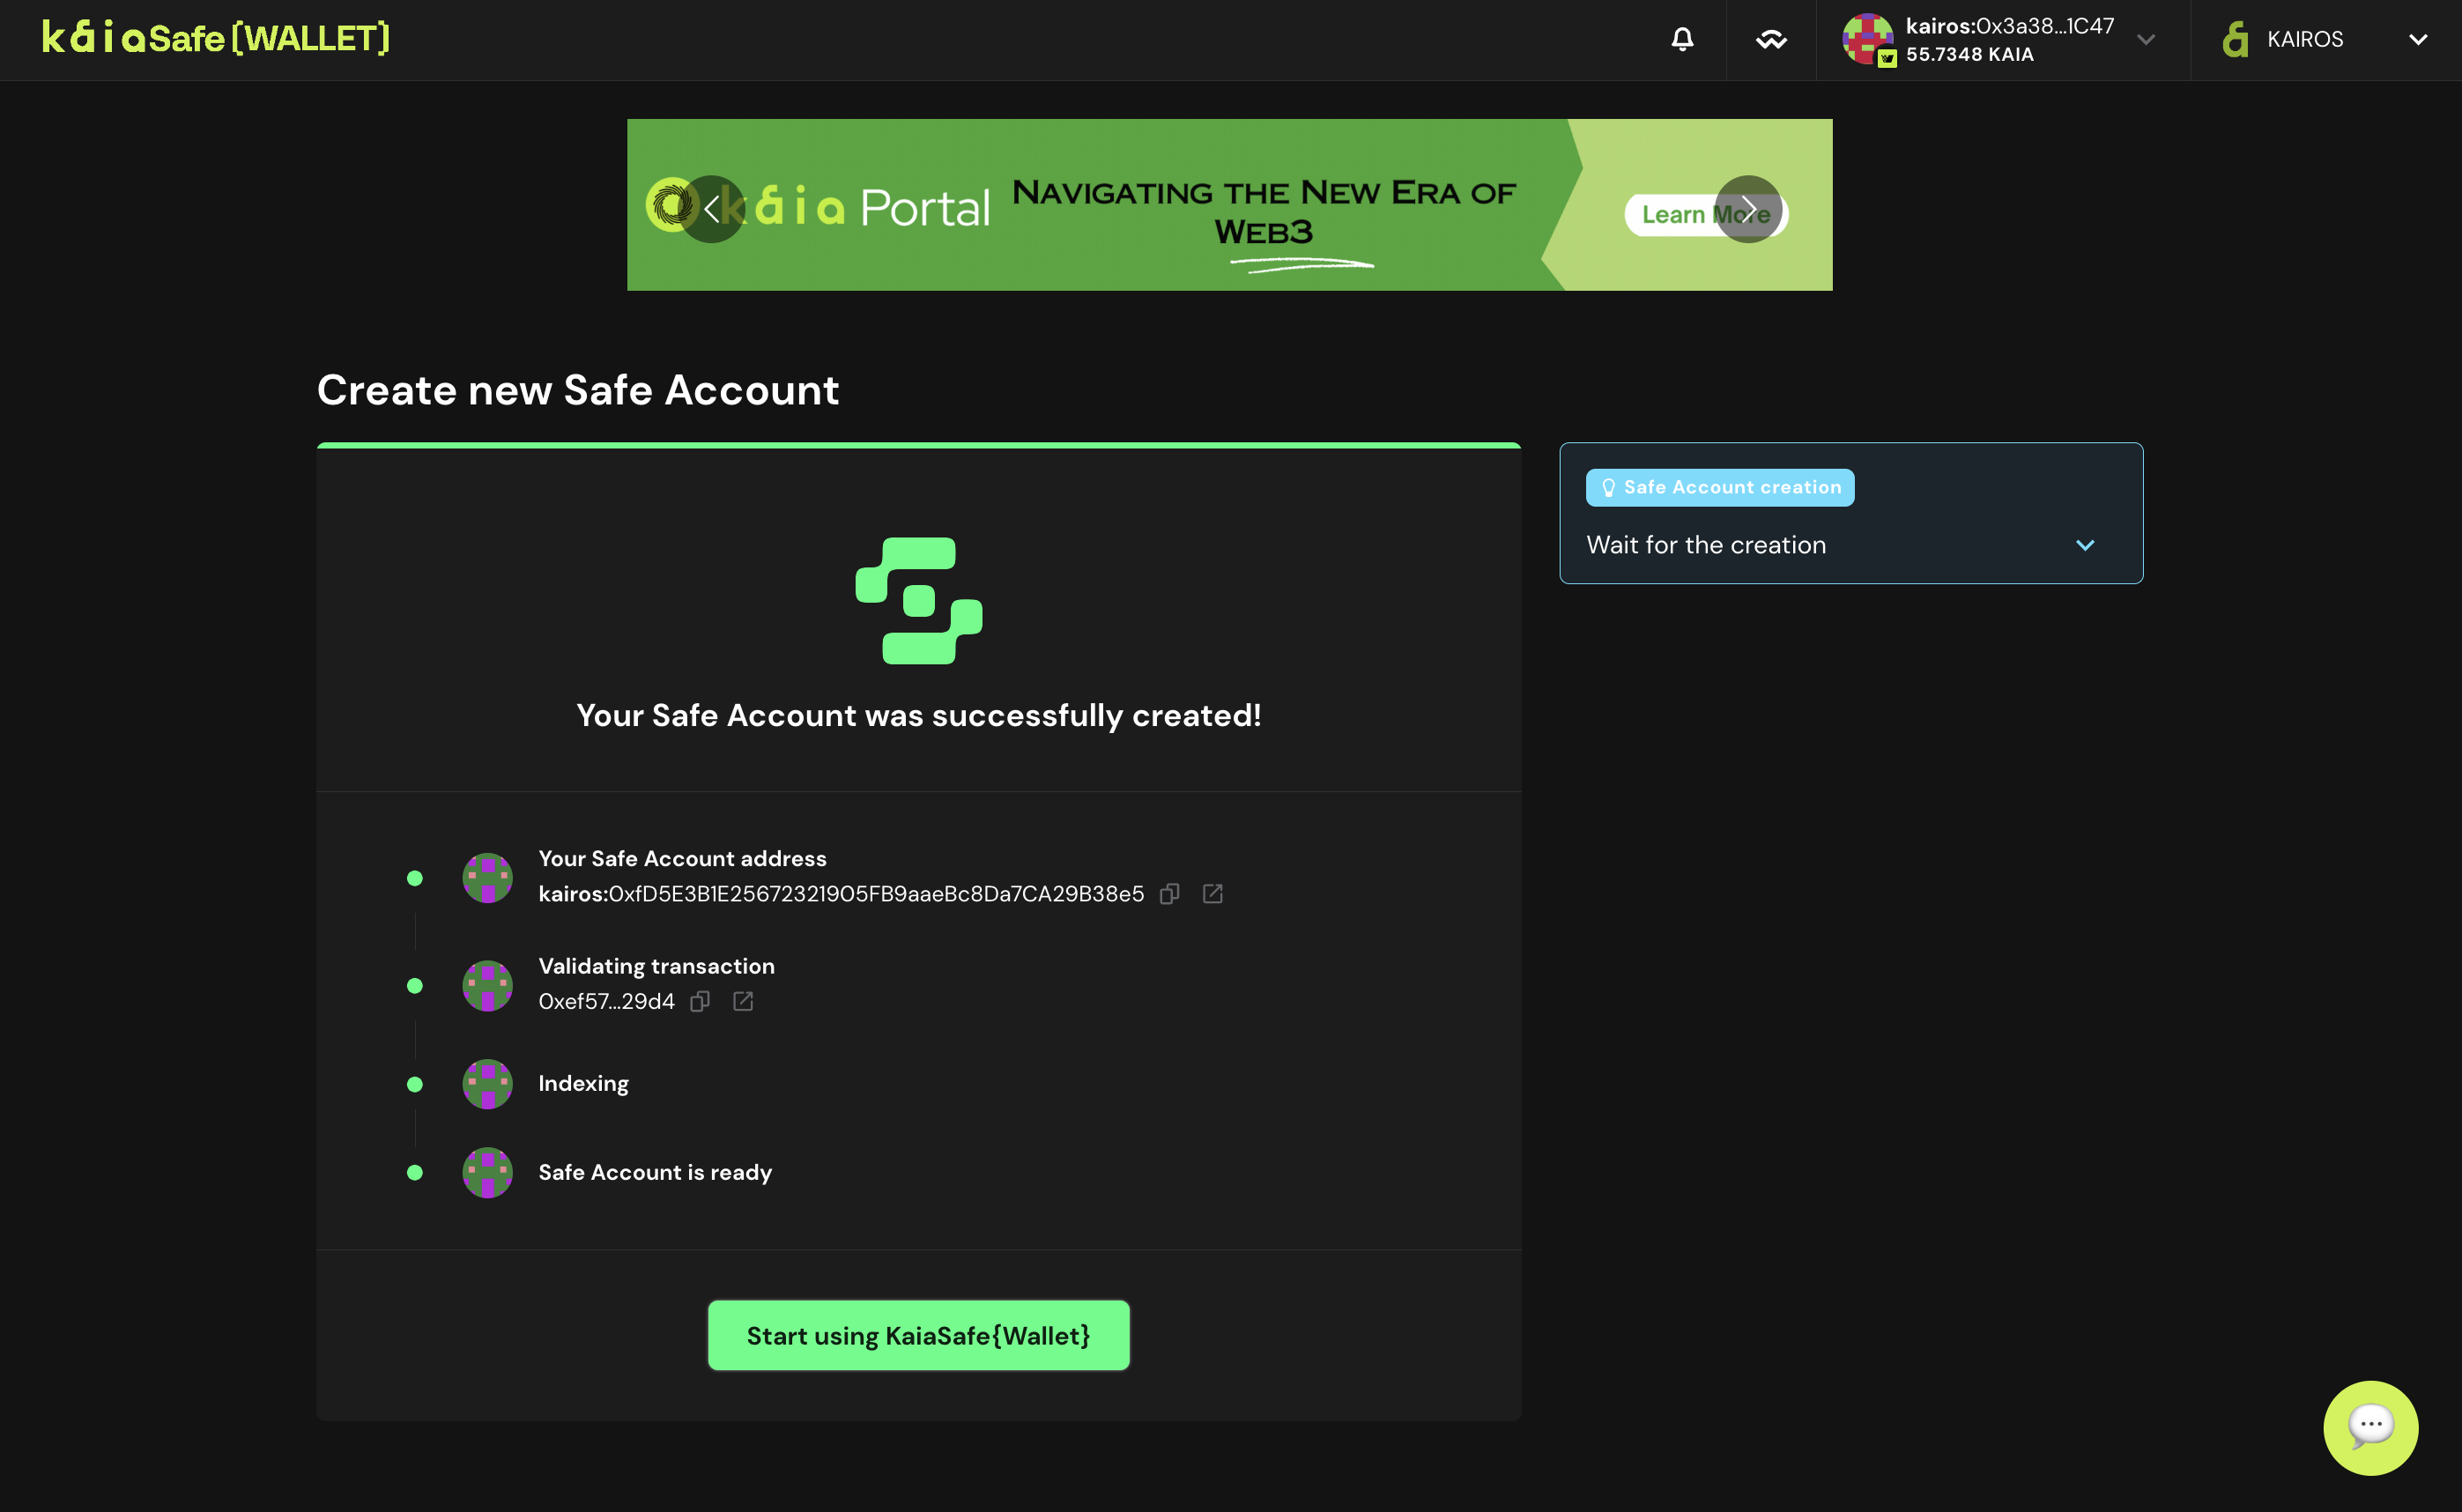
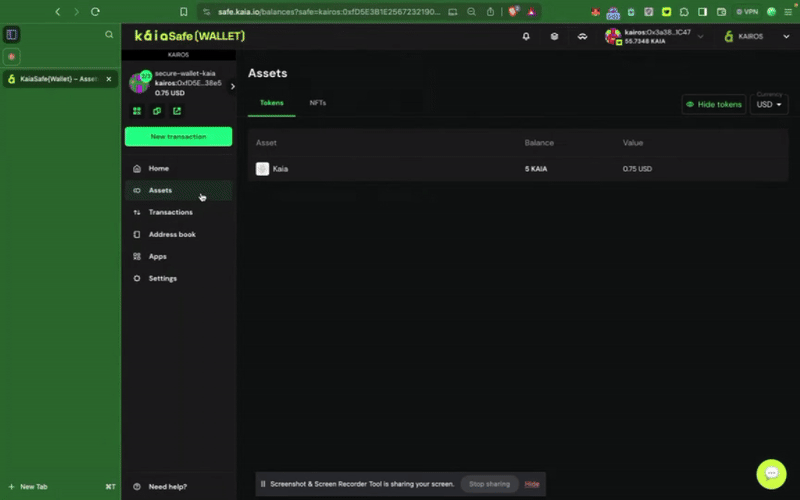
- Access the user interface of your Kaia Safe smart contract wallet as shown below.

Congratulations on successfully creating your Kaia Safe account!
Executing Basic Transaction (Send Native Tokens)
In this section, you'll learn how to execute a basic transaction such as sending native tokens KAIA from your Kaia Safe account to a beneficiary address.
Ensure your Kaia Safe account is sufficiently funded. You can refer to this guide for instructions on how to deposit into your Safe account.
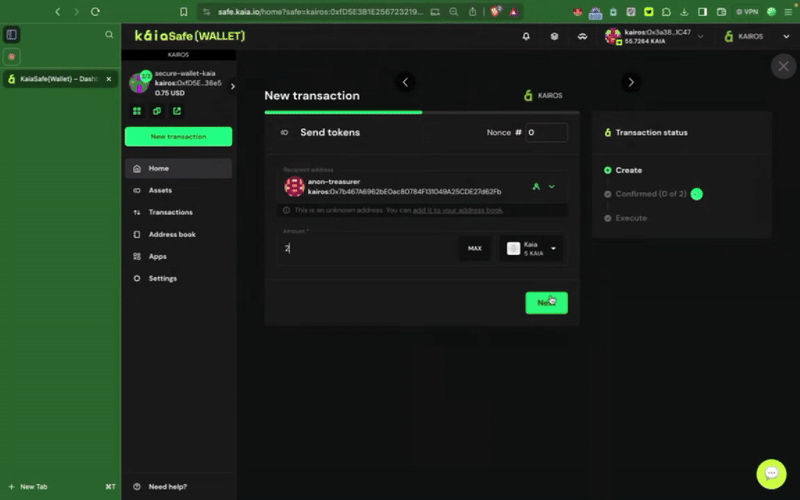
Step 1: Click the New Transaction button in the side menu and select Send tokens to begin a new asset transfer.
Step 2: Choose assets to transfer. Add the recipient address and the amount of KAIA to transfer.
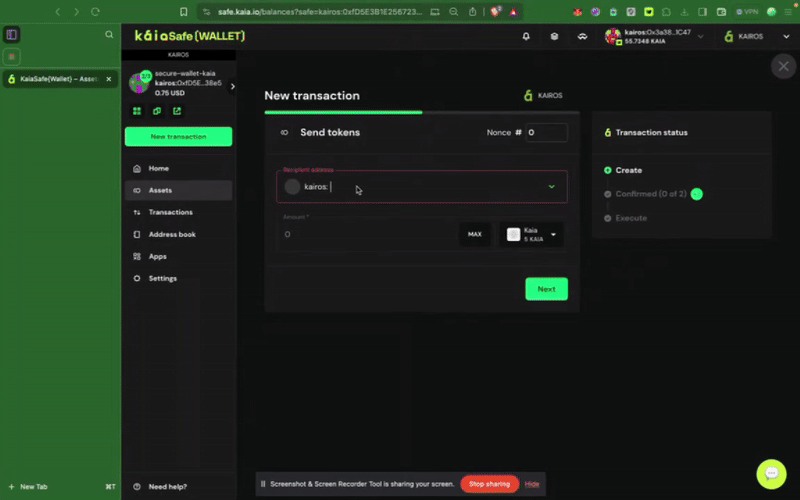
Step 3: Review and submit the transaction. You will need to sign the transaction with your signer wallet, and it will be executed once the confirmation threshold is reached.
4.2. Recipe: Integrating Kaia Safe for Critical Smart Contract Actions
In this guide, you will learn how to assign a Kaia Safe account as an administrator in your smart contract. You will also see how to execute privileged functions such as setTokenPrice() and pause() using the Kaia Safe account, ensuring that only approved signers can perform privilege actions.
Prerequisite
Step 1: Navigate to Remix IDE
Step 2: Compile and deploy the sample token contract
The contract must first be deployed before you may interact with it in your multisig wallet - calling the privileged functions. The first thing we want to do is to set our newly created Kaia Safe account as the initialOwner of the token contract at deployment.
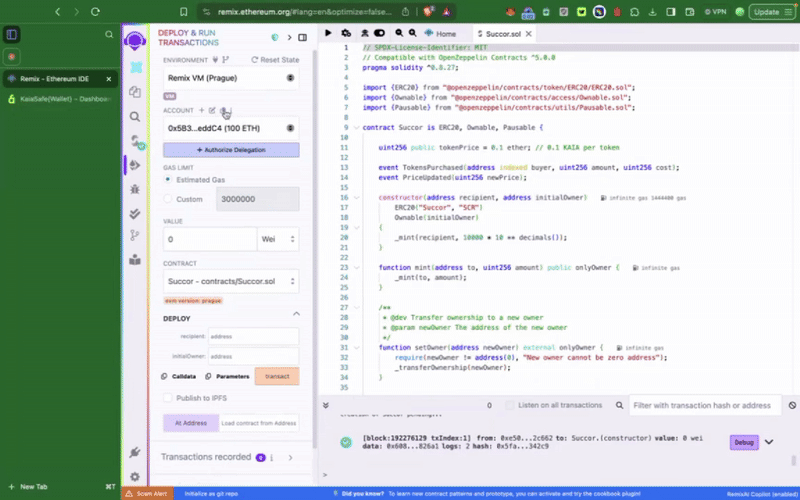
This sample token contract contains privilege functions such as setTokenPrice(), pause() which can only be called by the Kaia Safe account. The next thing we want to do is to execute these actions accordingly. We can either do this using the Transaction builder or programmatically using the Kaia Safe API Kit.
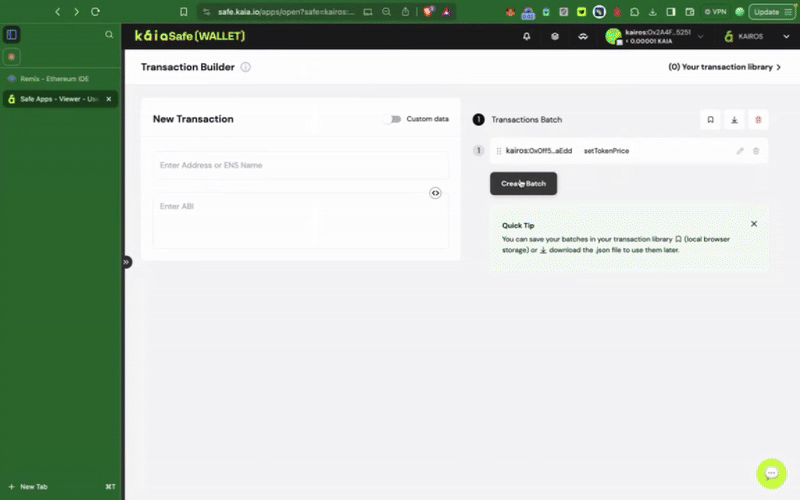
Step 3: Initiate a new transaction
Using Transaction Builder
To interact with a smart contract in your safe wallet, click New Transaction. To complete this step, you will need your already deployed contract address and ABI, as illustrated in the previous step.
Using Kaia Safe API Kit
In this section, you will use the Kaia Safe API Kit to programmatically propose a transaction that calls the setTokenPrice function, collect signatures from the Safe account owners, and execute the transaction.
Prerequisite
- Node.js and npm
- A Safe with several signers
Set up environment
Step 1: Create a project directory.
Copy and paste this command in your terminal to create the project folder.
mkdir kaia-safe-api-contract-examplecd kaia-safe-api-contract-example
Step 2: Initialize an npm project.
Copy and paste this command in your terminal to create a package.json file.
npm init -y
Step 3: Install dependencies.
Using API-Kit is as simple as running the installation command below:
npm install --save-dev @safe-global/api-kit@2.4.2 @safe-global/protocol-kit@4.0.2 @safe-global/safe-core-sdk-types@5.0.2
npm install --save-dev ethers dotenv
Step 4: Import dependencies.
Create a file named app.js. This is where all our code snippets for this interaction would live.
Copy and paste these necessary imports at the top of the app.js file.
import SafeApiKit from "@safe-global/api-kit";import Safe from "@safe-global/protocol-kit";import { OperationType } from "@safe-global/safe-core-sdk-types";import { ethers } from "ethers";import "dotenv/config";
Step 5: Configure Setup
To efficiently illustrate how API-Kit works, we will use a Safe account setup with two or more signers, and threshold of two, so we have multiple signatures that need to be collected when executing a transaction.
Copy and paste the following under the import statements in your app.js file:
const RPC_URL = "https://responsive-green-emerald.kaia-kairos.quiknode.pro";const SAFE_ADDRESS = "<REPLACE WITH SAFE PUBLIC ADDRESS HERE>";const CONTRACT_ADDRESS = "<REPLACE WITH CONTRACT ADDRESS>";const OWNER_1_ADDRESS = "<REPLACE WITH OWNER_1 ADDRESS>";const OWNER_1_PRIVATE_KEY = process.env.OWNER_ONE_PK;const OWNER_2_PRIVATE_KEY = process.env.OWNER_TWO_PK; // OWNER 2 need not have any test KAIA
Step 6: Propose, Confirm, and Execute a Safe Transaction
In this step, you will propose, sign, and execute a smart contract function call using the Safe API-Kit and a Safe account with multiple owners. You will send a transaction from your Safe to call a smart contract method setTokenPrice() — but the same structure applies to any privileged function like pause().
Copy and paste the following under the initial setup in your app.js file:
// Create interface from ABIconst contractABI = [ "function pause()", "function setTokenPrice(uint256 newPrice)",];const iface = new ethers.Interface(contractABI);// Encode function calls// const pauseData = iface.encodeFunctionData("pause", []);const setTokenPriceData = iface.encodeFunctionData("setTokenPrice", [15]);const apiKit = new SafeApiKit.default({ chainId: 1001n, txServiceUrl: "https://docs-safe.kaia.io/txs-baobab/api",});const protocolKitOwner1 = await Safe.default.init({ provider: RPC_URL, signer: OWNER_1_PRIVATE_KEY, safeAddress: SAFE_ADDRESS,});// 1. Create transactionconst safeTransactionData = { to: CONTRACT_ADDRESS, value: "0", data: setTokenPriceData, operation: OperationType.Call,};const safeTransaction = await protocolKitOwner1.createTransaction({ transactions: [safeTransactionData],});const safeTxHash = await protocolKitOwner1.getTransactionHash(safeTransaction);const senderSignature = await protocolKitOwner1.signHash(safeTxHash);console.log(safeTxHash);// 2. Propose transaction to the serviceconst proposeTx = await apiKit.proposeTransaction({ safeAddress: SAFE_ADDRESS, safeTransactionData: safeTransaction.data, safeTxHash, senderAddress: OWNER_1_ADDRESS, senderSignature: senderSignature.data})// 3. Confirmation from Owner 2const protocolKitOwner2 = await Safe.default.init({ provider: RPC_URL, signer: OWNER_2_PRIVATE_KEY, safeAddress: SAFE_ADDRESS})const signature2 = await protocolKitOwner2.signHash(safeTxHash)// Confirm the Safe transactionconst signatureResponse = await apiKit.confirmTransaction( safeTxHash, signature2.data)// 4. Execute transactionconst safeTxn = await apiKit.getTransaction(safeTxHash);const executeTxReponse = await protocolKitOwner1.executeTransaction(safeTxn)const receipt = await executeTxReponse.transactionResponse?.wait();console.log('Transaction executed:');console.log(`https://kairos.kaiascan.io/tx/${receipt.hash}`)
Full Code:
import SafeApiKit from "@safe-global/api-kit";import Safe from "@safe-global/protocol-kit";import { OperationType } from "@safe-global/safe-core-sdk-types";import { ethers } from "ethers";import "dotenv/config";// https://chainlist.org/?search=kaia&testnets=trueconst RPC_URL = "https://responsive-green-emerald.kaia-kairos.quiknode.pro";const SAFE_ADDRESS = "<REPLACE WITH SAFE PUBLIC ADDRESS HERE>";const CONTRACT_ADDRESS = "<REPLACE WITH CONTRACT ADDRESS>";const OWNER_1_ADDRESS = "<REPLACE WITH OWNER_1 ADDRESS>";const OWNER_1_PRIVATE_KEY = process.env.OWNER_ONE_PK;const OWNER_2_PRIVATE_KEY = process.env.OWNER_TWO_PK; // OWNER 2 need not have any test KAIA// Create interface from ABIconst contractABI = [ "function pause()", "function setTokenPrice(uint256 newPrice)",];const iface = new ethers.Interface(contractABI);// Encode function calls// const pauseData = iface.encodeFunctionData("pause", []);const setTokenPriceData = iface.encodeFunctionData("setTokenPrice", [15]);const apiKit = new SafeApiKit.default({ chainId: 1001n, txServiceUrl: "https://docs-safe.kaia.io/txs-baobab/api",});const protocolKitOwner1 = await Safe.default.init({ provider: RPC_URL, signer: OWNER_1_PRIVATE_KEY, safeAddress: SAFE_ADDRESS,});// 1. Create transactionconst safeTransactionData = { to: CONTRACT_ADDRESS, value: "0", data: setTokenPriceData, operation: OperationType.Call,};const safeTransaction = await protocolKitOwner1.createTransaction({ transactions: [safeTransactionData],});const safeTxHash = await protocolKitOwner1.getTransactionHash(safeTransaction);const senderSignature = await protocolKitOwner1.signHash(safeTxHash);console.log(safeTxHash);// 2. Propose transaction to the serviceconst proposeTx = await apiKit.proposeTransaction({ safeAddress: SAFE_ADDRESS, safeTransactionData: safeTransaction.data, safeTxHash, senderAddress: OWNER_1_ADDRESS, senderSignature: senderSignature.data})// 3. Confirmation from Owner 2const protocolKitOwner2 = await Safe.default.init({ provider: RPC_URL, signer: OWNER_2_PRIVATE_KEY, safeAddress: SAFE_ADDRESS})const signature2 = await protocolKitOwner2.signHash(safeTxHash)// Confirm the Safe transactionconst signatureResponse = await apiKit.confirmTransaction( safeTxHash, signature2.data)// 4. Execute transactionconst safeTxn = await apiKit.getTransaction(safeTxHash);const executeTxReponse = await protocolKitOwner1.executeTransaction(safeTxn)const receipt = await executeTxReponse.transactionResponse?.wait();console.log('Transaction executed:');console.log(`https://kairos.kaiascan.io/tx/${receipt.hash}`)
The code performs the following actions:
- Creates an interface from the contract ABI using ethers.Interface
- Encodes the setTokenPrice(uint256) function call
- Initializes Safe API-Kit and Protocol-Kit for both owners
- Creates a Safe transaction
- Proposes the transaction to the Safe service
- Signs the transaction with a second owner
- Confirms the transaction with all required signatures
- Executes the transaction from the Safe
Now let’s see the code in action. Run node app.js in your terminal, and you should see an output like this:
0xfa537bf8282ae36d933c41d867dee1ced93657094efe60c07180a872bb1388fcTransaction executed:https://kairos.kaiascan.io/tx/0xad94e0e8fd2d29602825b3815468dedb14221401438a9fbcfdfbeebaec6e52a7
You should now see your tokenPrice set to 15 on Remix IDE.

Congratulations! You have successfully executed a privilege function from your Kaia Safe Account using the Kaia Safe API-Kit.
Step 4: Review and submit the transaction
Using Transaction Builder
You will need to sign the transaction with your signer wallet, and it will be executed once the confirmation threshold is reached.
Appendices
Appendix A: Glossary of Terms
- Cold Storage: The practice of storing private keys on a device that is physically isolated from the internet.
- dApp (Decentralized Application): An application that runs on a decentralized network like a blockchain, rather than on a central server.
- Encrypted Keystore: A file that contains a private key that has been encrypted with a password.
- Hardware Wallet: A physical device that stores private keys offline and signs transactions internally.
- Multi-Signature (Multi-Sig): A type of wallet that requires approval from multiple independent private keys to authorize a single transaction.
- Private Key: A secret alphanumeric string that gives its owner access to their cryptocurrency and the ability to make transactions. It should never be shared.
- Public Key / Address: A publicly shareable cryptographic key that is used to receive funds. It is derived from the private key.
- Seed Phrase (or Mnemonic Phrase): A list of 12-24 words that serves as a master backup for all the private keys in a crypto wallet.
Appendix B: Sample Environment Configuration
To help readers successfully follow the tutorials and replicate the code examples in this guide, below is a sample configuration of the development environment used during implementation. Aligning your local setup with these versions is recommended to avoid compatibility issues.
Node.js
$ node --version v22.14.0
Hardhat
$ npx hardhat --version 3.0.0-next.20
Foundry (Forge)
$ forge -V forge 1.2.3-stable (a813a2cee7 2025-06-08T15:42:50.507050000Z)
Network Endpoint
- RPC Provider: https://responsive-green-emerald.kaia-kairos.quiknode.pro
- Target Chain: Kairos Testnet (Chain ID: 1001)
- Block Explorer: Kaiascan