Kaia 체인에서 안전한 지갑 관리: 개발자를 위한 쿡북
소개
이 요리책의 대상
Kaia 보안 지갑 쿡북에 오신 것을 환영합니다. 이 가이드는 Kaia 블록체인을 기반으로 구축하는 개발자, 엔지니어, 팀을 위해 작성되었습니다. 이 쿡북은 첫 탈중앙화 애플리케이션(dApp)을 만들든, 자동화된 서비스를 배포하든, 자금을 관리하든, 보안을 우선시하는 사고방식으로 암호화 키와 지갑을 다루는 데 필요한 필수 레시피를 제공합니다.
이 쿡북을 사용하는 방법
이 요리책은 점진적인 학습 경로를 따릅니다:
각 레시피는 이전 섹션의 개념을 기반으로 합니다. Web3 보안을 처음 사용하시나요? 1장](#chapter-1-the-principles-of-private-key-security)부터 시작하세요. 숙련된 개발자입니까? 사용 사례에 맞는 레시피로 이동하기
핵심 철학: 보안 우선
Web3에서는 '키가 아니라 암호가 아니라'라는 문구가 기본적인 진리입니다. 개발자의 경우 이는 소프트웨어 개발 라이프사이클의 모든 부분으로 확장됩니다. 유출된 키 하나로 인해 사용자와 프로젝트 모두에게 치명적인 손실이 발생할 수 있습니다. 이 가이드의 핵심 철학은 보안 우선입니다. 모든 레시피와 권장 사항은 기본적으로 강력하고 안전한 시스템을 구축하여 공격 표면을 최소화하고 첫날부터 자산을 보호하는 데 도움이 되도록 설계되었습니다.
전제 조건
이 쿡북을 최대한 활용하려면 블록체인 개념(예: 공개/개인 키, 거래, 가스 요금)에 대한 기본적인 이해가 있어야 하며 명령줄 인터페이스에 익숙해야 합니다.
1부: 1부: 기본 개념 및 보안 원칙
이 부분에서는 안전한 지갑 관리의 '이유'에 초점을 맞춥니다. 코드를 작성하기 전에 필요한 핵심 지식을 확립합니다.
1장: 개인 키 보안의 원칙
1.1. 키 쌍 이해하기: 계정의 핵심
Kaia에서는 다른 EVM 호환 체인과 마찬가지로 사용자 계정이 사용자 아이디와 비밀번호가 아닙니다. 이는 공개 키와 개인 키의 암호화 키 쌍입니다. 공개 키는 은행 계좌 번호와 같은 공개 주소로, 안전하게 공유할 수 있습니다. 개인 키는 거래나 메시지에 서명하는 등 계정에서 이루어지는 모든 작업을 승인하는 비밀입니다. 이는 보호해야 할 가장 중요한 정보입니다. 개인 키를 소유한 사람은 누구나 계정과 그 자산을 완전하고 불가역적으로 제어할 수 있습니다.
1.2. 안전한 키 생성: Kaia 모범 사례
보안 키는 무작위로 생성된 키입니다. 계정의 보안은 누군가가 내 개인 키를 추측하는 것이 수학적으로 불가능하다는 점에 달려 있습니다. 키를 생성할 때는 항상 잘 검증된 표준 암호화 라이브러리(예: 'ethers-ext'에 포함된 라이브러리 또는 이 가이드에서 설명하는 도구)를 사용하세요. 자신만의 "영리한" 또는 "사람이 읽을 수 있는" 개인 키를 만들려고 시도하지 마세요. 이렇게 하면 무작위성이 크게 줄어들고 추측에 취약해집니다.
1.3. 안전한 키 저장소: 로컬 키 저장소에서 프로덕션 볼트까지
개인 키를 저장하는 방법은 생성하는 방법만큼이나 중요합니다. 개인 키를 일반 텍스트 파일에 저장하는 것은 은행 비밀번호를 스티커 메모에 적어 모니터에 붙여 두는 것과 같은 디지털 방식입니다.
경고: 개인 키를 일반 텍스트 '.env' 파일에 저장하지 마세요. 개발에는 편리하지만 .env 파일은 실수로 버전 관리에 커밋되는 경우가 많아 키가 공개적으로 노출되고 즉시 자금 도난으로 이어질 수 있습니다.
보안 로컬 저장소의 표준은 암호화된 키 저장소 파일(JSON 키 저장소라고도 함)입니다. 이 파일에는 개인 키가 포함되어 있지만 사용자가 선택한 강력한 비밀번호로 암호화되어 있습니다. 키를 사용하려면 키스토어 파일과 메모리에서 암호를 해독할 수 있는 비밀번호를 제공해야 합니다. 프로덕션 시스템의 경우, 키가 애플리케이션 코드에 직접 노출되지 않도록 하는 AWS KMS 또는 Google Cloud KMS와 같은 전용 비밀 관리자를 사용하는 것이 가장 좋습니다.
1.4. 메모리에서 키 처리하기: 런타임 중 노출 최소화하기
보안 소스에서 로드한 경우에도 트랜잭션에 서명하려면 애플리케이션의 메모리에 개인 키가 있어야 합니다. 이러한 노출을 최소화하는 것이 중요합니다. 애플리케이션을 잘 설계하면 키가 가능한 한 짧은 시간 동안 메모리에 보관되고 사용 후 즉시 지워집니다. 이 요리책의 라이브러리와 �레시피는 이 원칙을 따르도록 설계되었습니다.
2장: Kaia 지갑 생태계 탐색하기
2.1. Kaia 지갑
Kaia 지갑은 Kaia 생태계를 위한 기본 브라우저 확장 지갑입니다. 메타마스크와 많은 기능을 공유하지만, 고유한 거래 유형, 수수료 위임 거래, 네트워크 전용 계정 시스템을 지원하며 네트워크에서 원활한 사용자 경험을 제공함으로써 Kaia에 최적화되어 있습니다. 개발자에게는 특정 동작과 API를 이해하는 것이 원활한 디앱 통합을 구축하는 데 중요합니다.
2.2. 콜드 스토리지: 하드웨어 지갑 개요
콜드 스토리지는 인터넷에 연결되지 않은 장치에 개인 키를 보관하는 것을 말합니다. 하드웨어 지갑**은 이러한 목적으로 제작된 물리적 장치입니다. 연결된 컴퓨터에 개인 키를 노출하지 않고 내부적으로 트랜잭션��에 서명합니다. 따라서 고가치 자산을 보호하는 데 있어 최고의 표준이 됩니다. 이 가이드에서는 공식적으로 지원되는 DCENT 및 SafePal 하드웨어 지갑에 중점을 두고 설명합니다.
2.3. 다중 서명 지갑: Kaia 세이프 소개
다중 서명(또는 "다중 서명") 지갑은 트랜잭션이 실행되기 전에 여러 개의 개인 키를 승인해야 하는 스마트 컨트랙트입니다. 예를 들어 2대 3 다중 서명의 경우 지정된 소유자 3명 중 2명의 승인이 필요합니다. 이는 단일 장애 지점을 방지하기 때문에 팀 자금, 재무 및 중요한 스마트 컨트랙트 관리를 위한 표준입니다. Kaia 세이프는 Kaia 네트워크의 기본 다중 서명 솔루션입니다.
2부: 지갑 관리를 위한 실용적인 레시피
이제 1부의 기본 보�안 원칙을 이해했으니 이제 이를 실천에 옮길 차례입니다. 이 섹션에서는 개별 개발 설정부터 프로덕션급 솔루션에 이르기까지 실제 시나리오에 대한 단계별 가이드를 제공합니다.
구축 내용:
- 파운드리 및 하드햇을 위한 안전한 개발 환경
- 팀 협업을 위한 다중 서명 재무 설정
- 다양한 지갑 유형과 dApp 통합
3장: 개별 개발자 및 dApp을 위한 설정
이 장에서는 개발 과정에서 지갑을 설정하고 관리하기 위한 실습 가이드를 제공하며, 코드의 첫 줄부터 보안을 강조합니다.
3.1. 레시피: 첫 번째 Kaia 개발 지갑
Kaia를 처음 사용하거나 Kaia 지갑을 처음 설정하는 경우, 지갑 시작하기 섹션을 참조하시기 바랍니다. 지갑 설치, 안전한 계정 생성 및 백업, 추가 계정 추가, 지갑 자금 조달과 같은 필수 단계를 다룹니다.
3.2. 레시피: 파운드리 프로젝트에서 안전하게 계정 관리하기
파운드리](https://book.getfoundry.sh)를 사용하면 캐스트 지갑 CLI를 통해 암호화된 지갑을 가져올 수 있습니다. 현재 RPC URL과 같은 다른 값은 암호화할 수 없지만, 암호화된 키를 환경 변수와 결합하면 여전히 안전한 설정이 가능합니다.
1단계: 파운드리 설치 및 초기화
파운드리를 설치하지 않은 경우 터미널에서 아래 명령을 실행하세요:
curl -L https://foundry.paradigm.xyz | bash
그런 다음 다음 명령을 실행하여 파운드리 프로젝트를 초기화합니다:
foundryupforge init foundry-encryptedcd foundry-encrypted
이제 파운드리의 기본 템플릿이 있는 폴더가 생겼을 것입니다.
2단계: 지갑 가져오기
캐스트 지갑 CLI를 사용하여 지갑을 가져올 수 있습니다. 귀하의 지갑 이름**을 원하는 지갑 이름으로 바꾸고 다음 명령을 실행하기만 하면 됩니다:
cast wallet import your-wallet-name --interactive
개인 키를 입력하면 암호화를 위한 비밀번호를 설정하라는 메시지가 표시됩니다. 암호화된 키는 기본 경로 ~/.foundry/keystore에 있는 로컬 키 저장소에 저장됩니다.
:::note* * 대화형 플래그는 터미널 기록에 개인키가 저장되지 않도록 하는 데 사용됩니다. :::

3단계: 환경 파일 생성 및 소싱
지갑을 �암호화한 후에는 RPC 엔드포인트를 안전하게 보관해야 합니다. Foundry는 아직 RPC URL과 같은 값에 대한 암호화를 제공하지 않으므로 이러한 유형의 비밀 값에는 .env 파일을 사용하는 것이 일반적이고 안전한 선택입니다.
프로젝트의 루트 디렉토리에 .env 파일을 생성하고 KAIROS_RPC_URL을 추가합니다:
KAIROS_RPC_URL=https://responsive-green-emerald.kaia-kairos.quiknode.pro
그리고 스크립트를 실행하기 전에 로드하세요:
source .env
4단계: 스크립트 실행
지갑 가져오기를 완료하고 구성에 RPC 엔드포인트를 추가했습니다. 이제 스크립트를 실행하고 컨트랙트를 배포할 준비가 되었습니다.
기본 파운드리 템플릿에는 카운터 컨트랙트를 배포하는 샘플 스크립트가 포함되어 있습니다. 자신의 지갑 이름과 RPC 엔드포인트를 사용하도록 이 스크립트를 수정해야 합니다.
위조 생성* 또는 _위조 스크립트_를 사용하여 스크립트를 실행하는 경우,
- 를 입력하면 단말기에서 개인 키를 암호화하는 데 사용한 ��비밀번호를 입력하라는 메시지가 표시됩니다.
- 비밀번호를 입력하면 파운드리가 스크립트를 실행하고 컨트랙트를 배포합니다.
위조 생성 사용
forge create --rpc-url $KAIROS_RPC_URL src/Counter.sol:Counter --broadcast --account your-wallet-name

위조 스크립트 사용
forge script script/Counter.s.sol:CounterScript --rpc-url $KAIROS_RPC_URL --account your-wallet-name --broadcast
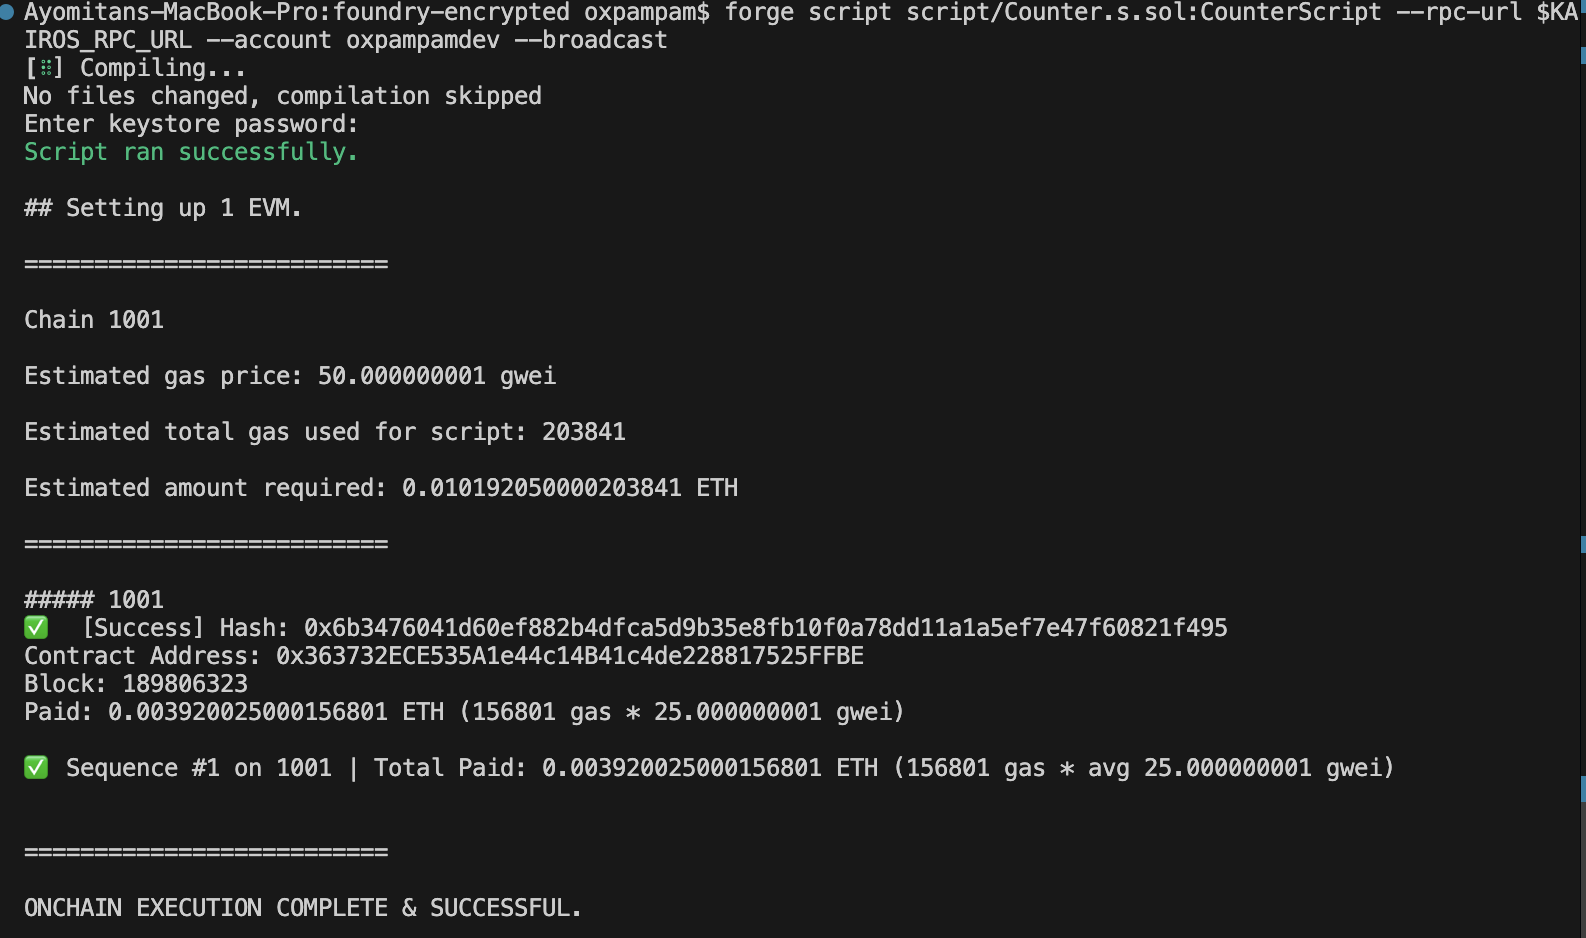
축하합니다. Foundry에서 암호화된 비밀을 성공적으로 구성하고 배포 스크립트에서 이를 사용했습니다.
3.3. 레시피: 하드햇 프로젝트에서 안전하게 계정 관리하기
하드햇 3(현재 베타 버전)은 내장된 비밀 관리자를 통해 암호화된 비밀을 도입합니다. 이 기능은 버전 관리에 커밋되어서는 안 되는 API 키를 사용하여 개인 키 또는 RPC URL과 같은 민감한 문자열 기반 비밀을 안전하게 저장할 수 있도록 지원합니다.
1단계: 새 하드햇 프로젝트 만들기
터미널에서 다음 명령을 실행하여 새 하드햇 프로젝트를 만듭니다.
mkdir hardhat-encrypted && cd hardhat-encryptednpm init -ynpx hardhat --init
메시지에 대한 기본 답변을 수락합니다. 그��런 다음 하드햇 버전을 실행하여 프로젝트 버전을 확인합니다:
npx hardhat --version
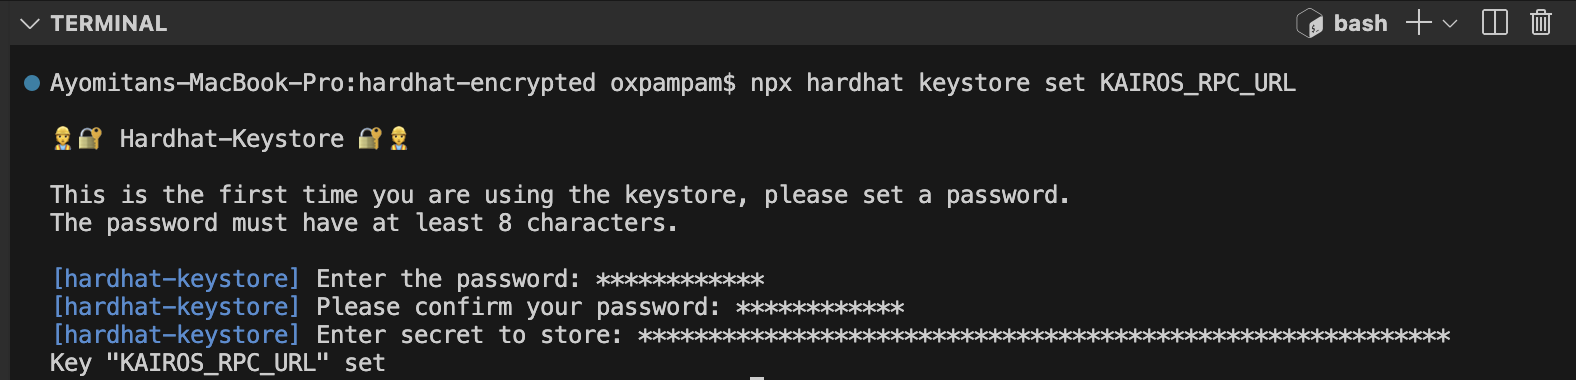
2단계: 암호화된 비밀 설정
RPC URL을 저장하려면 다음 명령을 실행합니다:
npx hardhat keystore set KAIROS_RPC_URL
개인 키를 암호화된 방식으로 저장하려면 다음 명령을 실행합니다:
npx hardhat keystore set PRIVATE_KEY

3단계: 암호화된 비밀 확인
비밀번호가 암호화되었는지 확인하려면 다음 명령을 실행합니다:
npx hardhat keystore list
암호화된 비밀 목록에 KAIROS_RPC_URL과 PRIVATE_KEY가 표시되어야 합니다.
비밀값을 다시 검색하려면 아래 명령을 실행합니다. 암호 해독을 위해 마스터 키를 입력하라는 메시지가 표시됩니다.
npx hardhat keystore get KAIROS_RPC_URL
비밀 번호가 설정되면 구성 파일을 업데이트하여 프로젝트에서 안전하게 참조할 수 있도록 합니다.
4단계: 구성에서 참조 암호
hardhat.config.ts`를 열고 네트워크 섹션을 업데이트하여 암호화된 비밀번호를 참조하세요. 비밀 번호가 다른 경우 그에 따라 항목을 조정하세요.
import { configVariable } from "hardhat/config";module.exports = { networks: { kairos: { url: configVariable("KAIROS_RPC_URL"), accounts: [configVariable("PRIVATE_KEY")], }, },};
이제 배포 스크립트에서 암호화된 비밀을 일반 텍스트로 노출하지 않고도 암호화된 비밀을 사용할 수 있습니다.
5단계: 배포 스크립트에서 암호화된 비밀 사용
아래 명령어를 사용하여 ignition/modules의 Counter.ts 모듈을 통해 컨트랙트를 배포하세요. 이 모듈은 Counter.sol을 배포하고 값 5로 incBy 함수를 호출합니다.
npx hardhat ignition deploy --network kairos ignition/modules/Counter.ts
명령을 실행하면 이전에 생성한 비밀번호를 묻는 메시지가 하드햇에서 표시됩니다.
이는 Kairos 네트워크가 키스토어로 구성되어 있기 때문에 필요합니다. 작업이나 스크립트가 암호화된 비밀에 의존하는 경우에만 메시지가 표시됩니다. 비밀번호가 입력되면 하드햇은 컨트랙트를 배포하고 5 값으로 incBy 함수를 실행합니다.
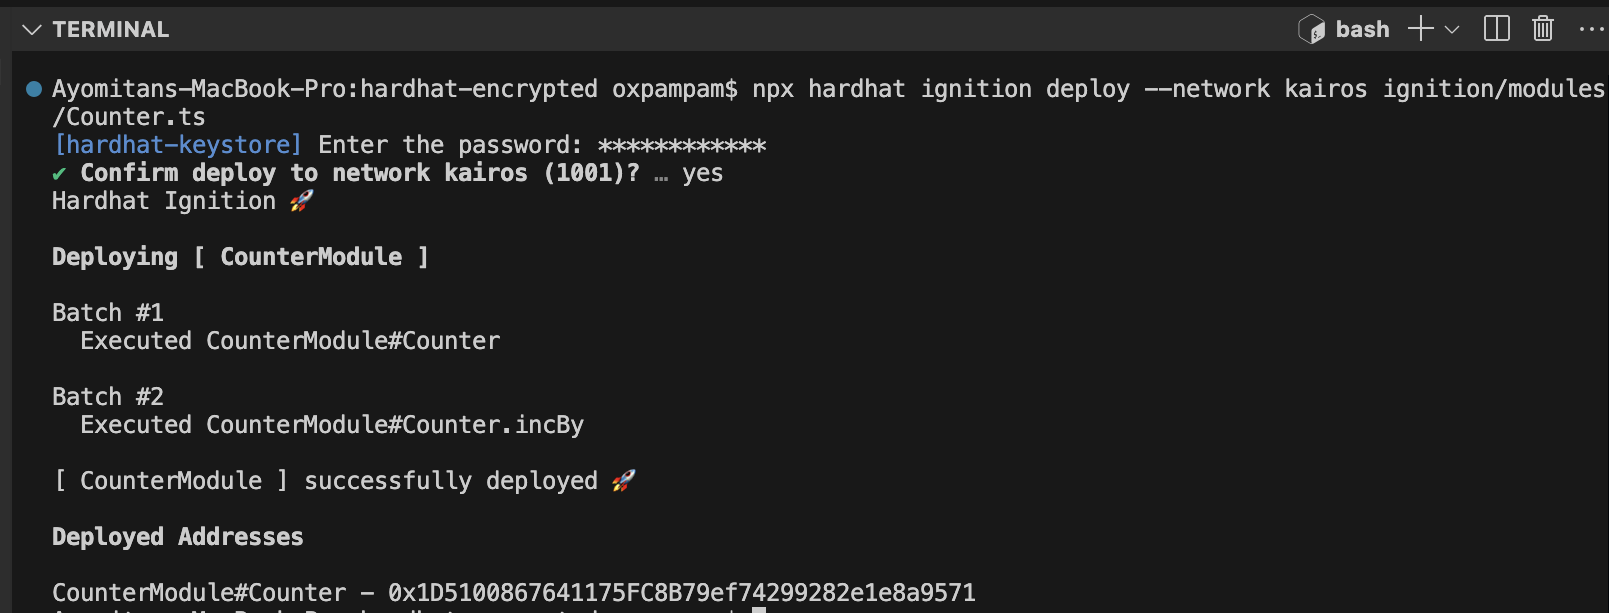
축하합니다. Hardhat에서 암호화된 비밀을 성공적으로 구성하고 배포 스크립트에서 이를 사용했습니다.
3.4. 레시피: 하드웨어 지갑(SafePal)을 dApp에 연결하기
이 섹션에서는 SafePal S1 하드웨어 지갑을 타사 탈중앙화 애플리케이션(DApp)에 연결하고 거래 서명을 요청하는 방법을 알아보세요.
1단계: Safepal S1 지갑 설정하기
DApp에 연결하기 전에 SafePal S1 장치가 올바르게 설정되어 있는지 확인하세요. 이 설정 가이드](https://safepalsupport.zendesk.com/hc/en-us/articles/360046051752-How-to-Set-Up-a-S1-Hardware-Wallet)를 아직 완료하지 않았다면 이 가이드를 따르세요.
디바이스가 이미 구성되어 있는 경우 이 단계를 건너뛸 수 있습니다.
2단계: S1 장치를 SafePal 앱과 페어링하기
SafePal S1은 완전한 오프라인 하드웨어 지갑으로, 인터넷에 직접 연결하거나 블록체인 네트워크와 통신할 수 없습니다. dApp과 상호 작용하거나 거래에 서명하려면 장치를 SafePal 앱과 페어링해야 합니다.
SafePal 앱은 블록체인 데이터를 가져오고, 거래를 브로드캐스팅하고, dApp 상호작용을 중계하는 중개자 역할을 하며, 개인 키가 오프라인 S1 장치에 안전하게 저장되도록 합니다.
페어링 과정을 완료하려면 이 페어링 가이드를 따르세요.
3단계: dApp에 연결합니다.
이 단계에서는 WalletConnect를 사용하여 SafePal S1 하드웨어 지갑을 탈중앙화 애플리케이션(dApp)에 연결합니다.
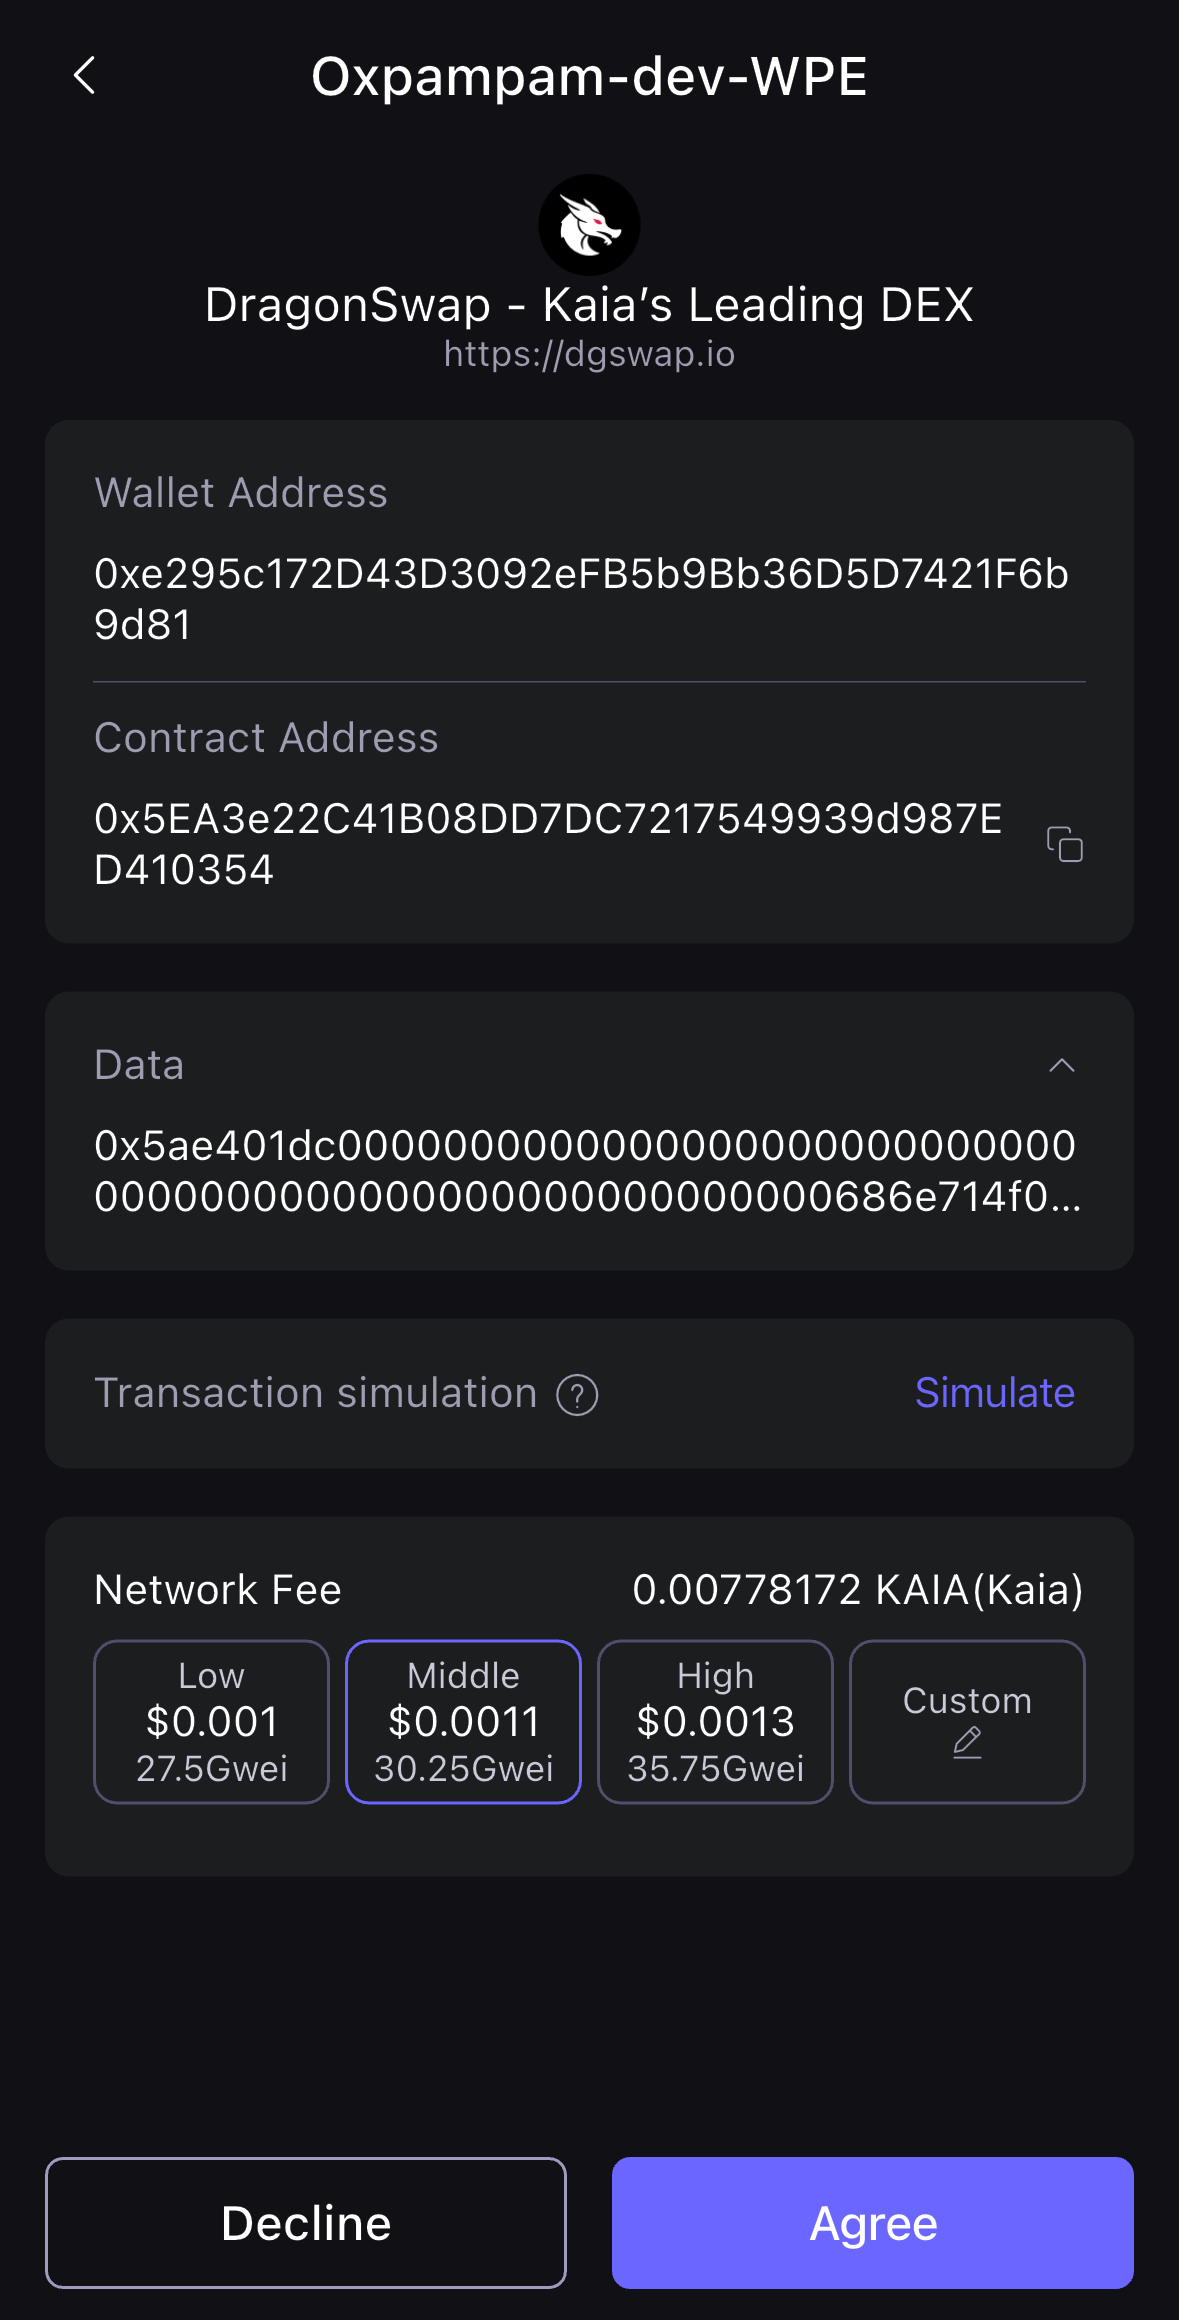
이 가이드에서는 Kaia의 대표적인 탈중앙화 거래소(DEX)인 드래곤스왑을 예시 디앱으로 사용하겠습니다. 월렛커넥트를 사용하여 브라우저를 통해 연결이 이루어집니다.
- 브라우저에 디앱 URL을 입력하여 드래곤스왑 디앱을 실행한 다음 웹사이트 오른쪽 상단의 지갑 연결 버튼을 클릭합니다.
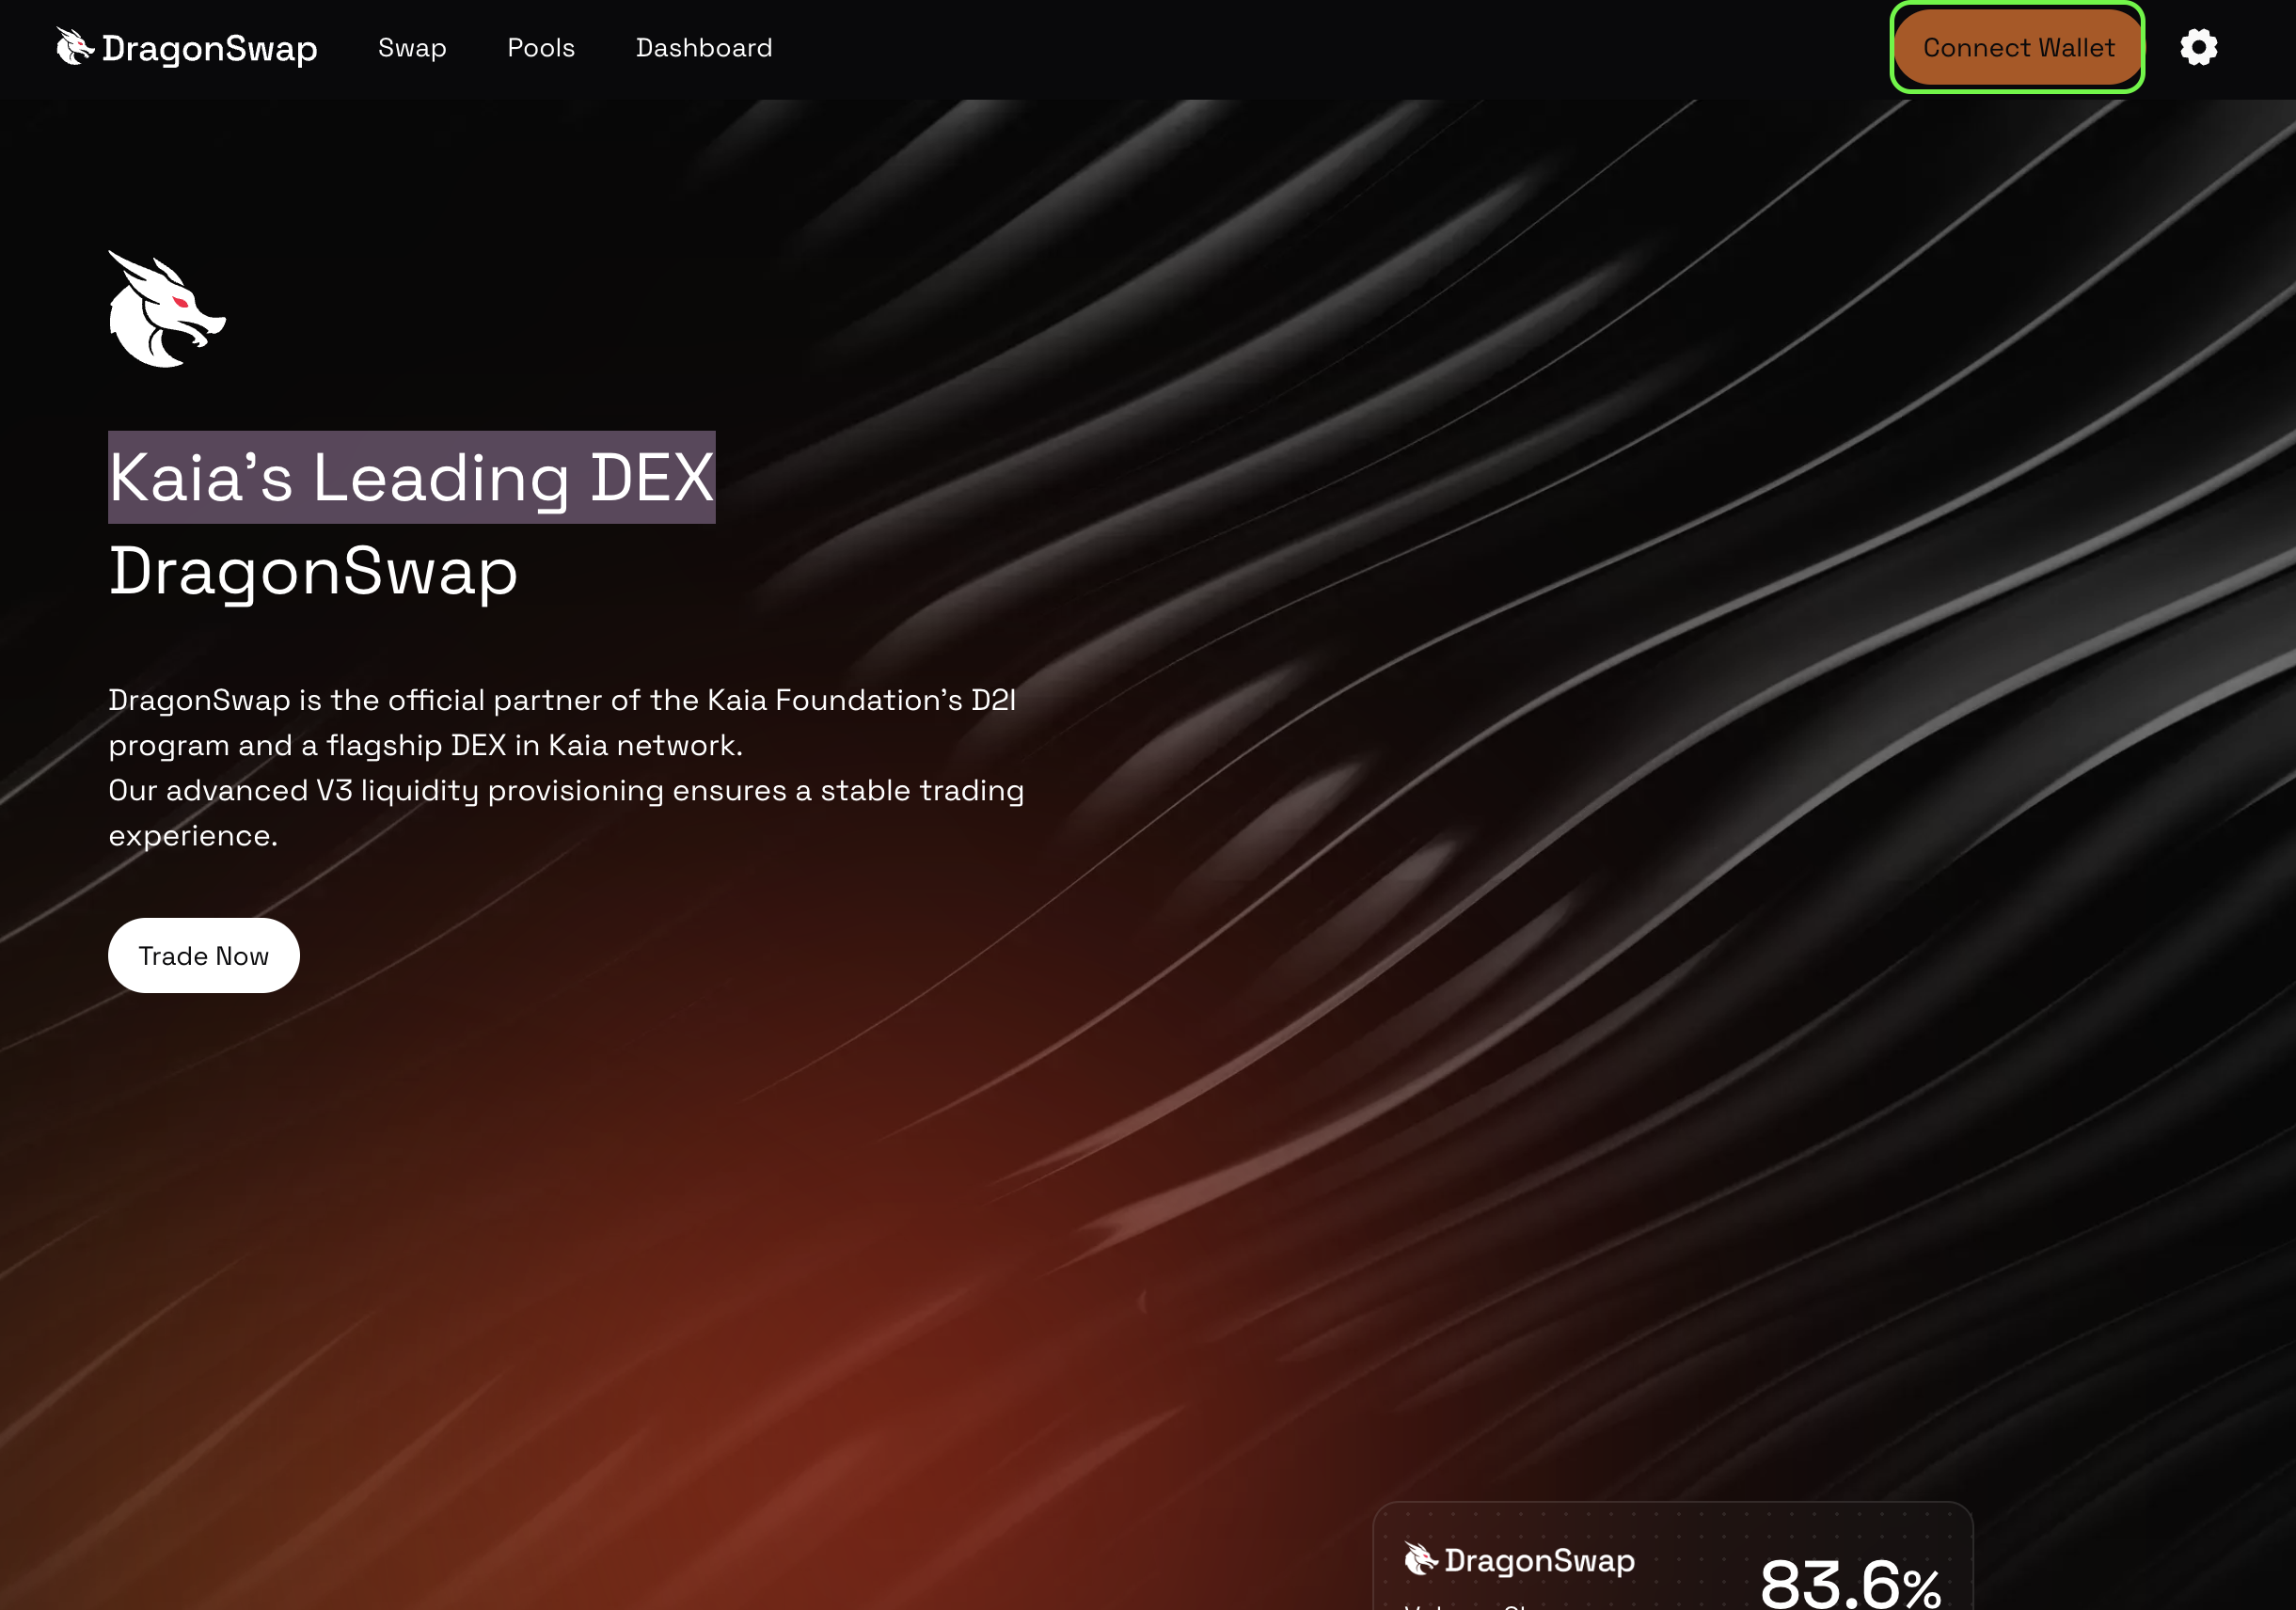
- 모든 연결 옵션 중에서 지갑 연결을 클릭합니다. 화면에 QR코드가 표시됩니다.
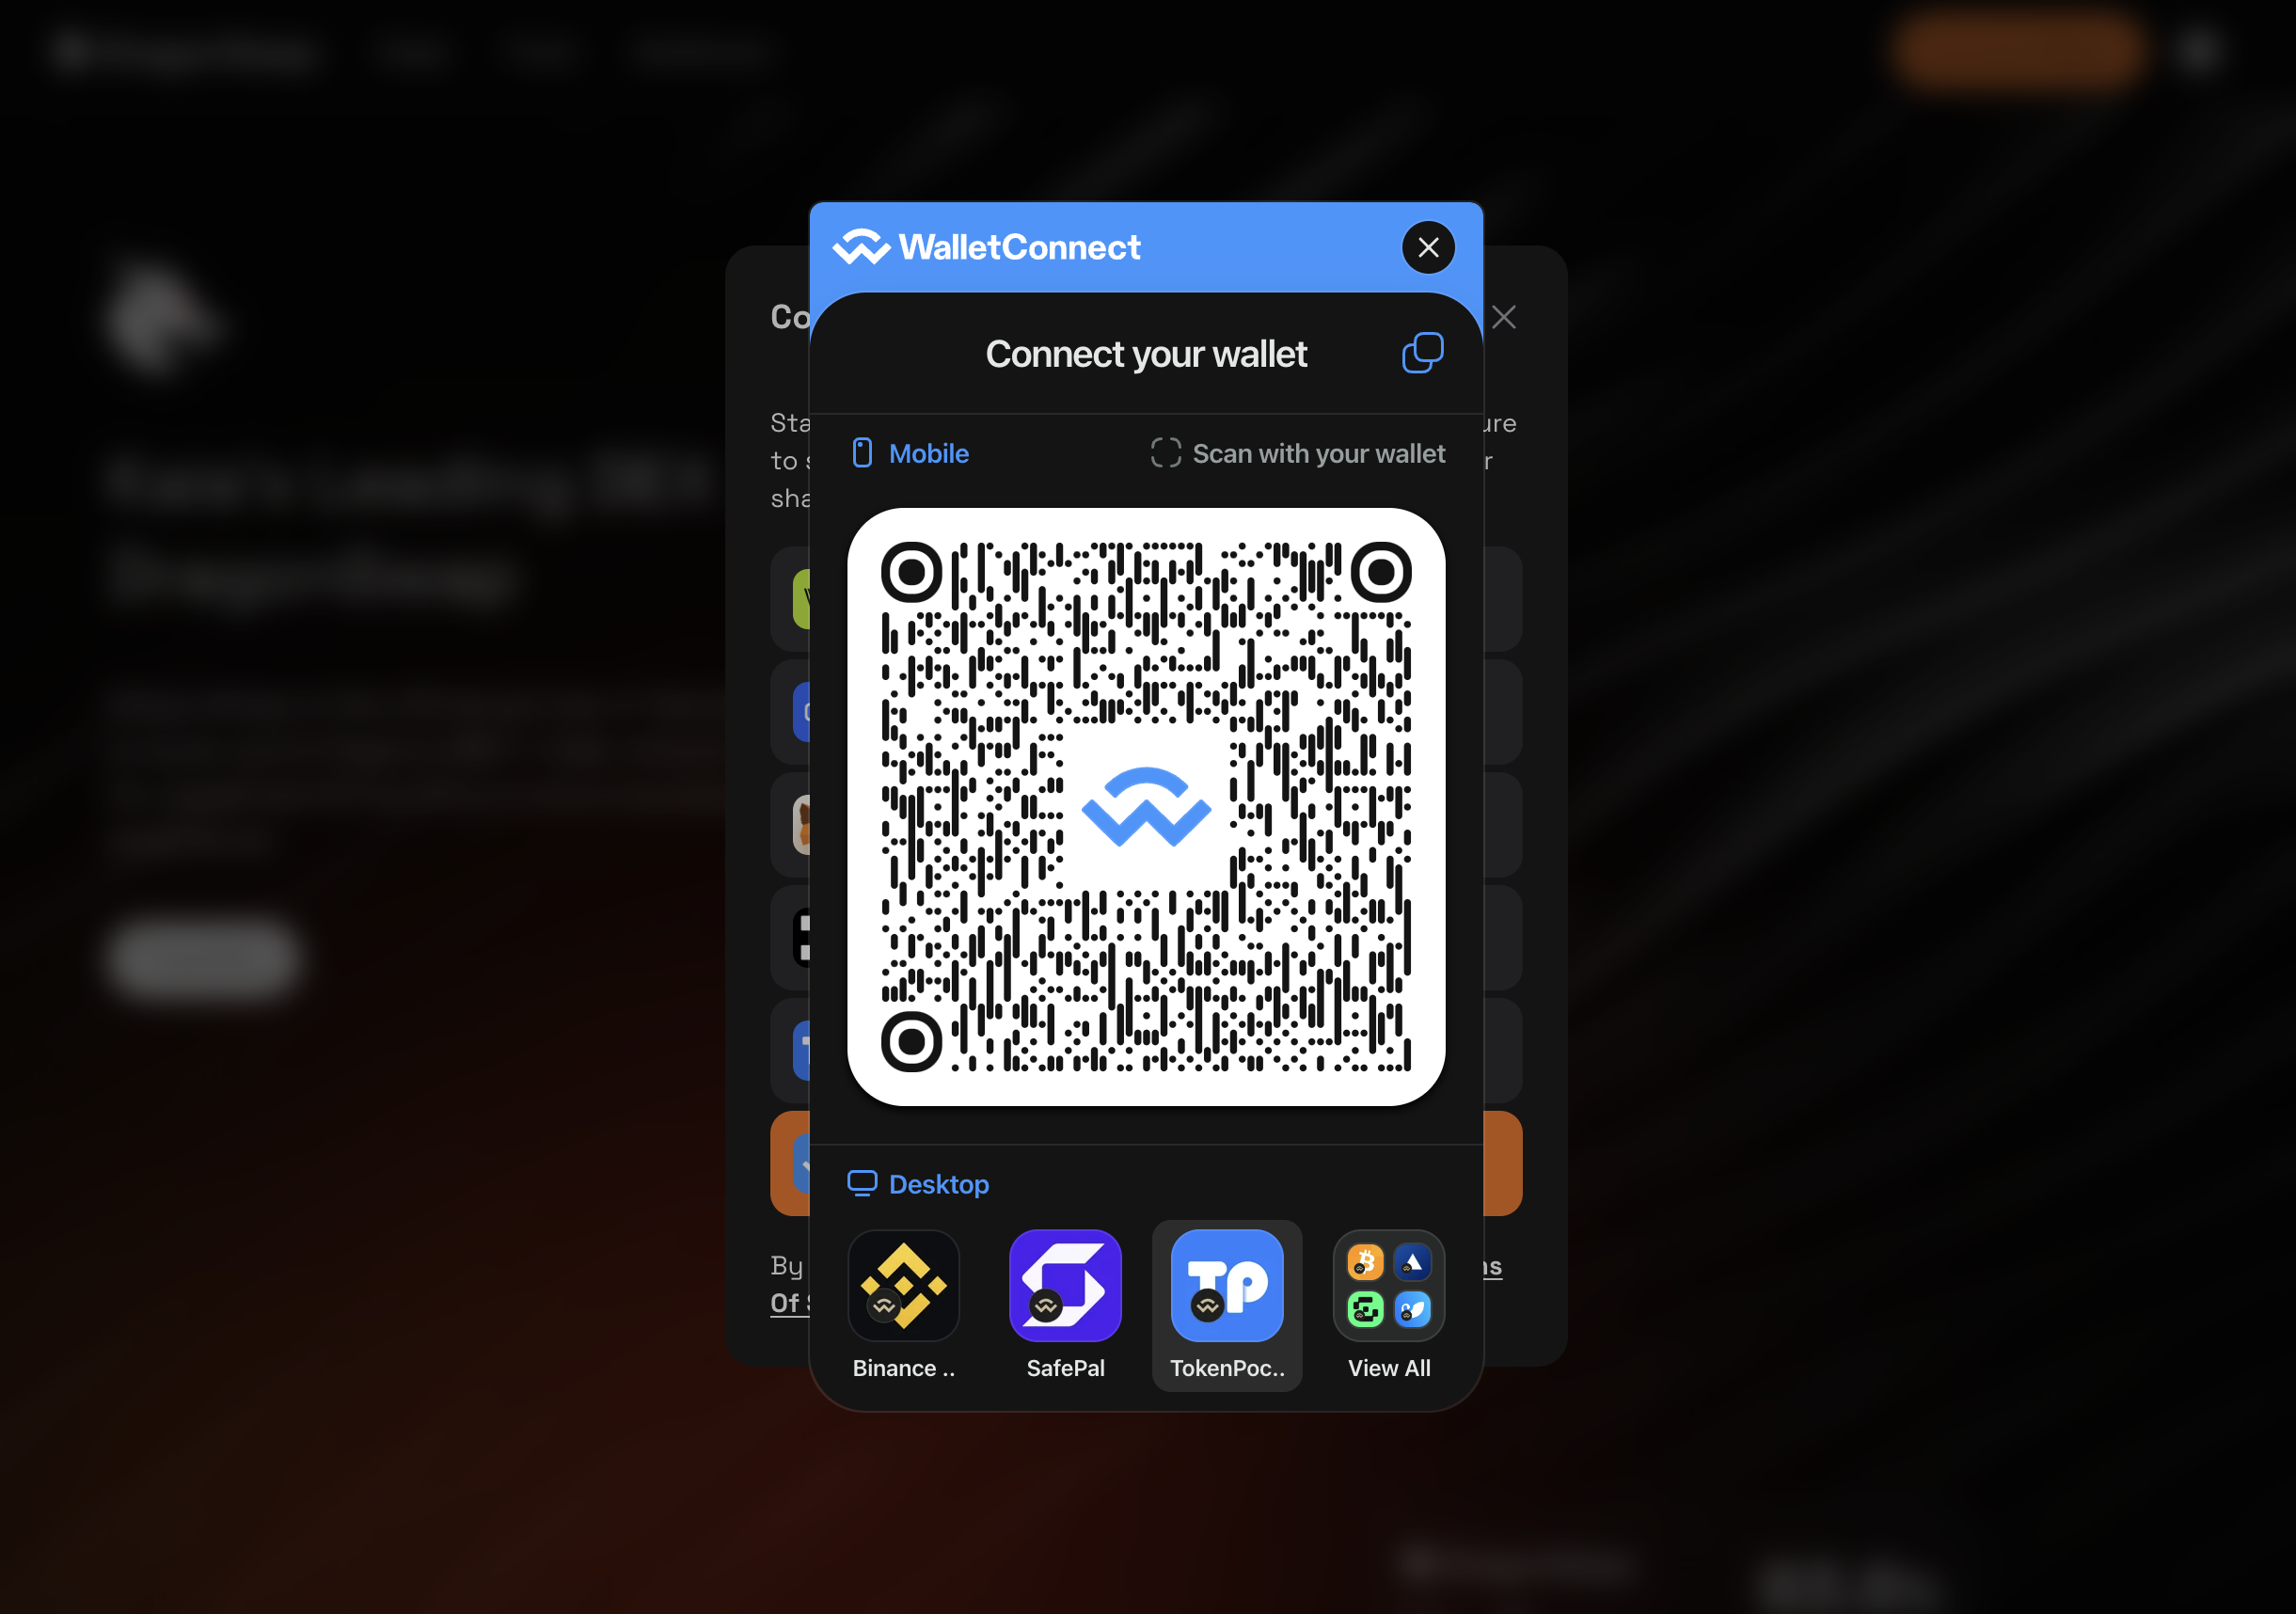
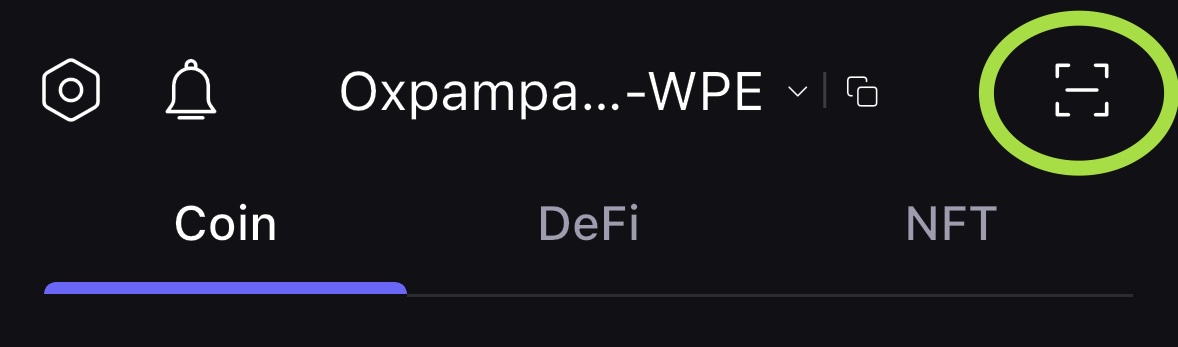
- SafePal 앱으로 QR 코드를 스캔합니다. 앱 메인 페이지의 오른쪽 상단에 있는 스캔 버튼을 클릭하여 스캔 프로세스로 들어갈 수 있습니다.
- 스캔이 성공적으로 완료되면 앱에서 디앱 연결을 확인한 후 동의를 클릭합니다.
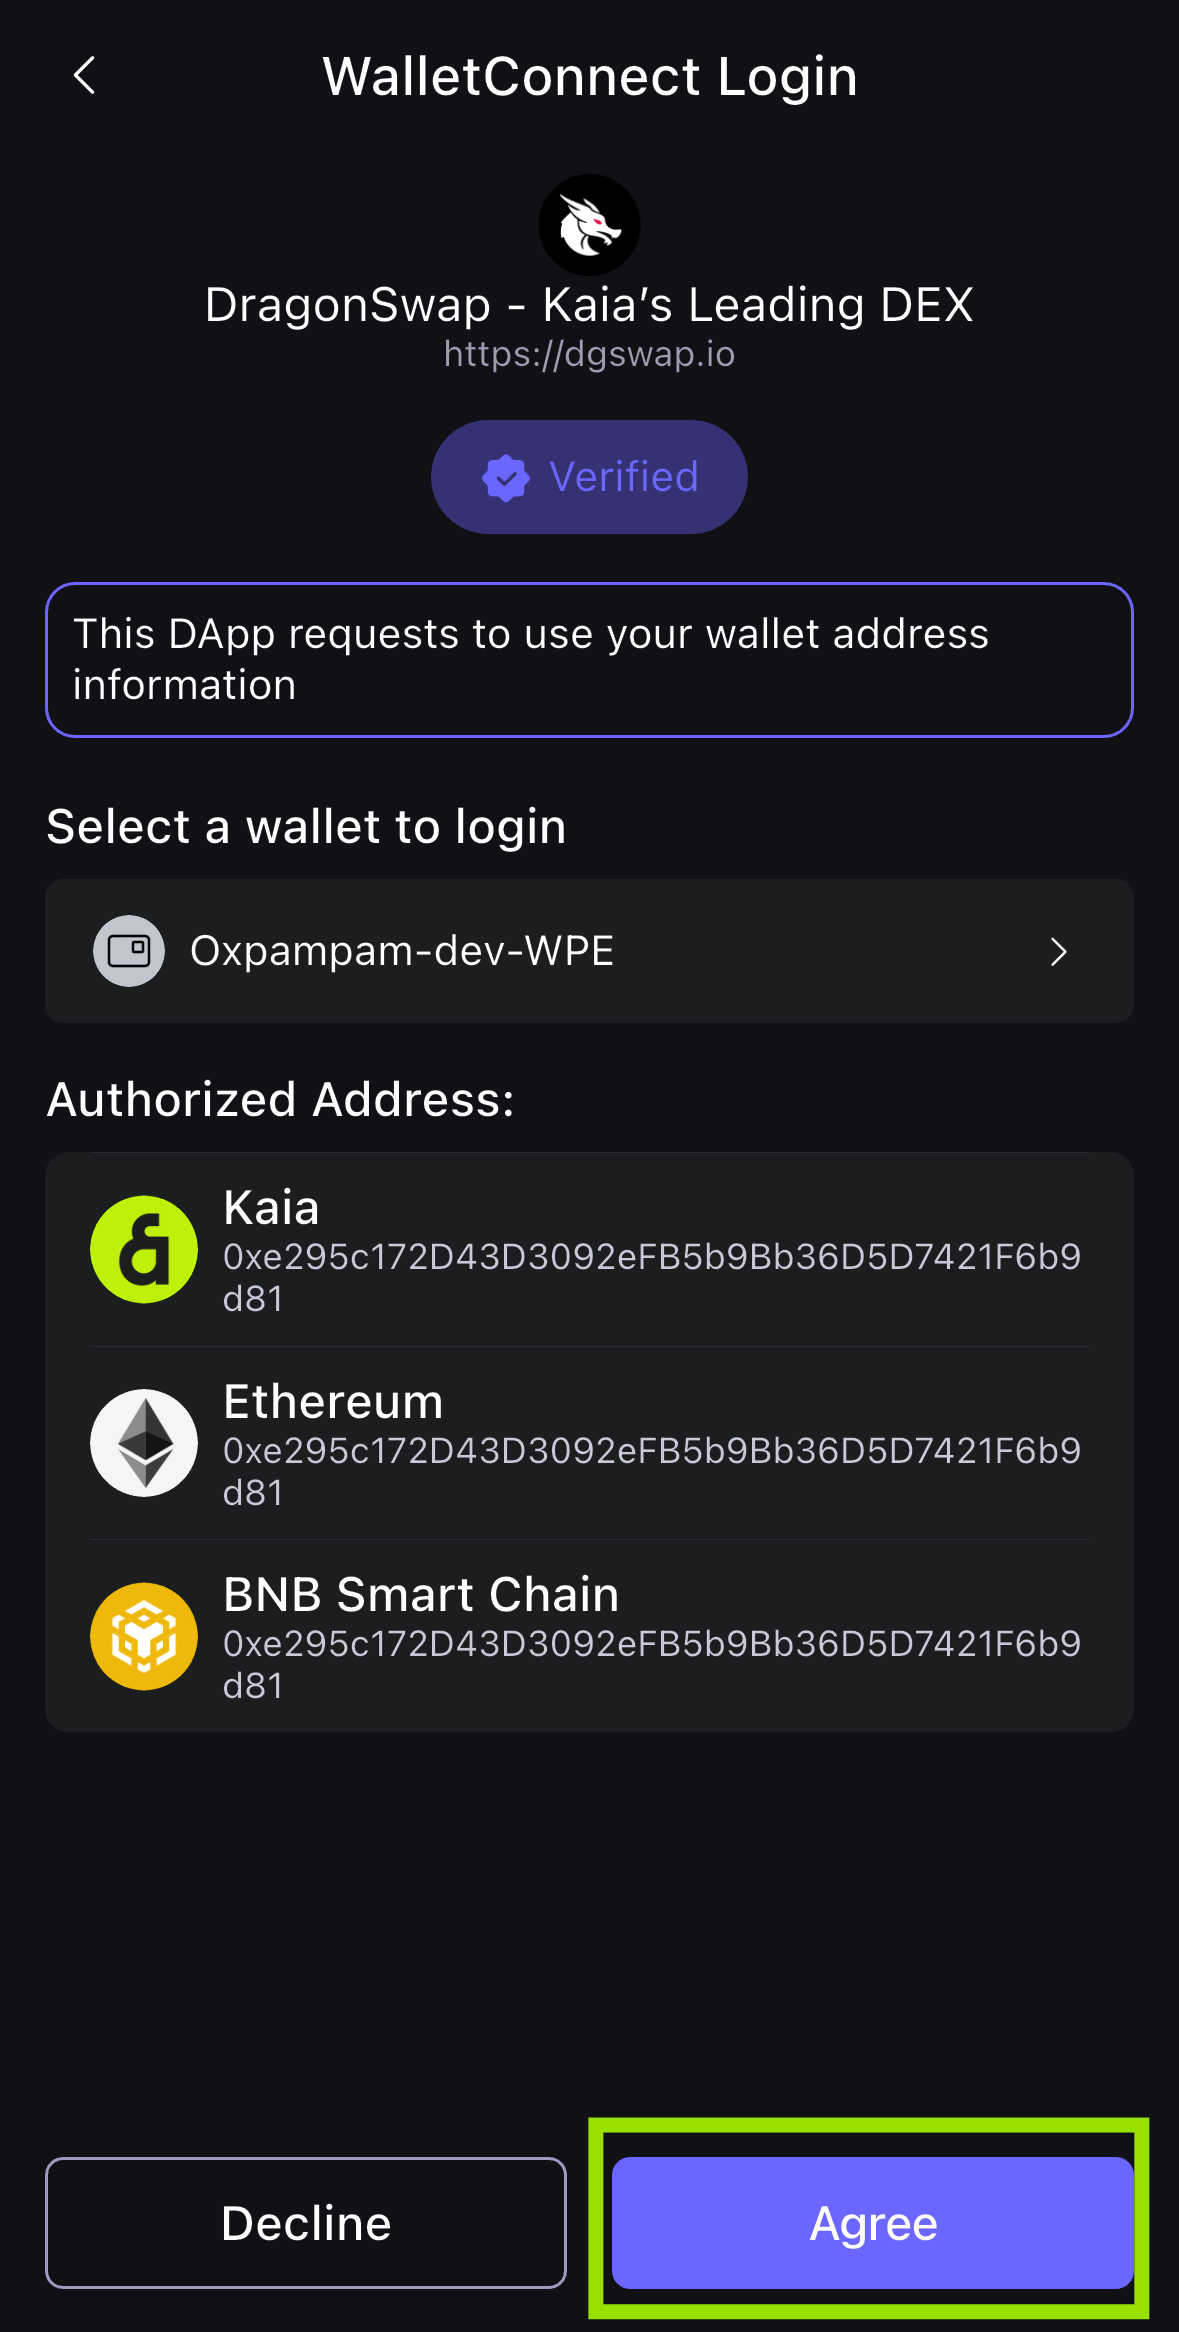
- 그러면 브라우저에서 지갑을 드래곤스왑 디앱에 성공적으로 연결한 것입니다! 이제 지갑 주소가 드래곤스왑 연결 구성 요소에 표시될 것입니다.

4단계: 거래 수행
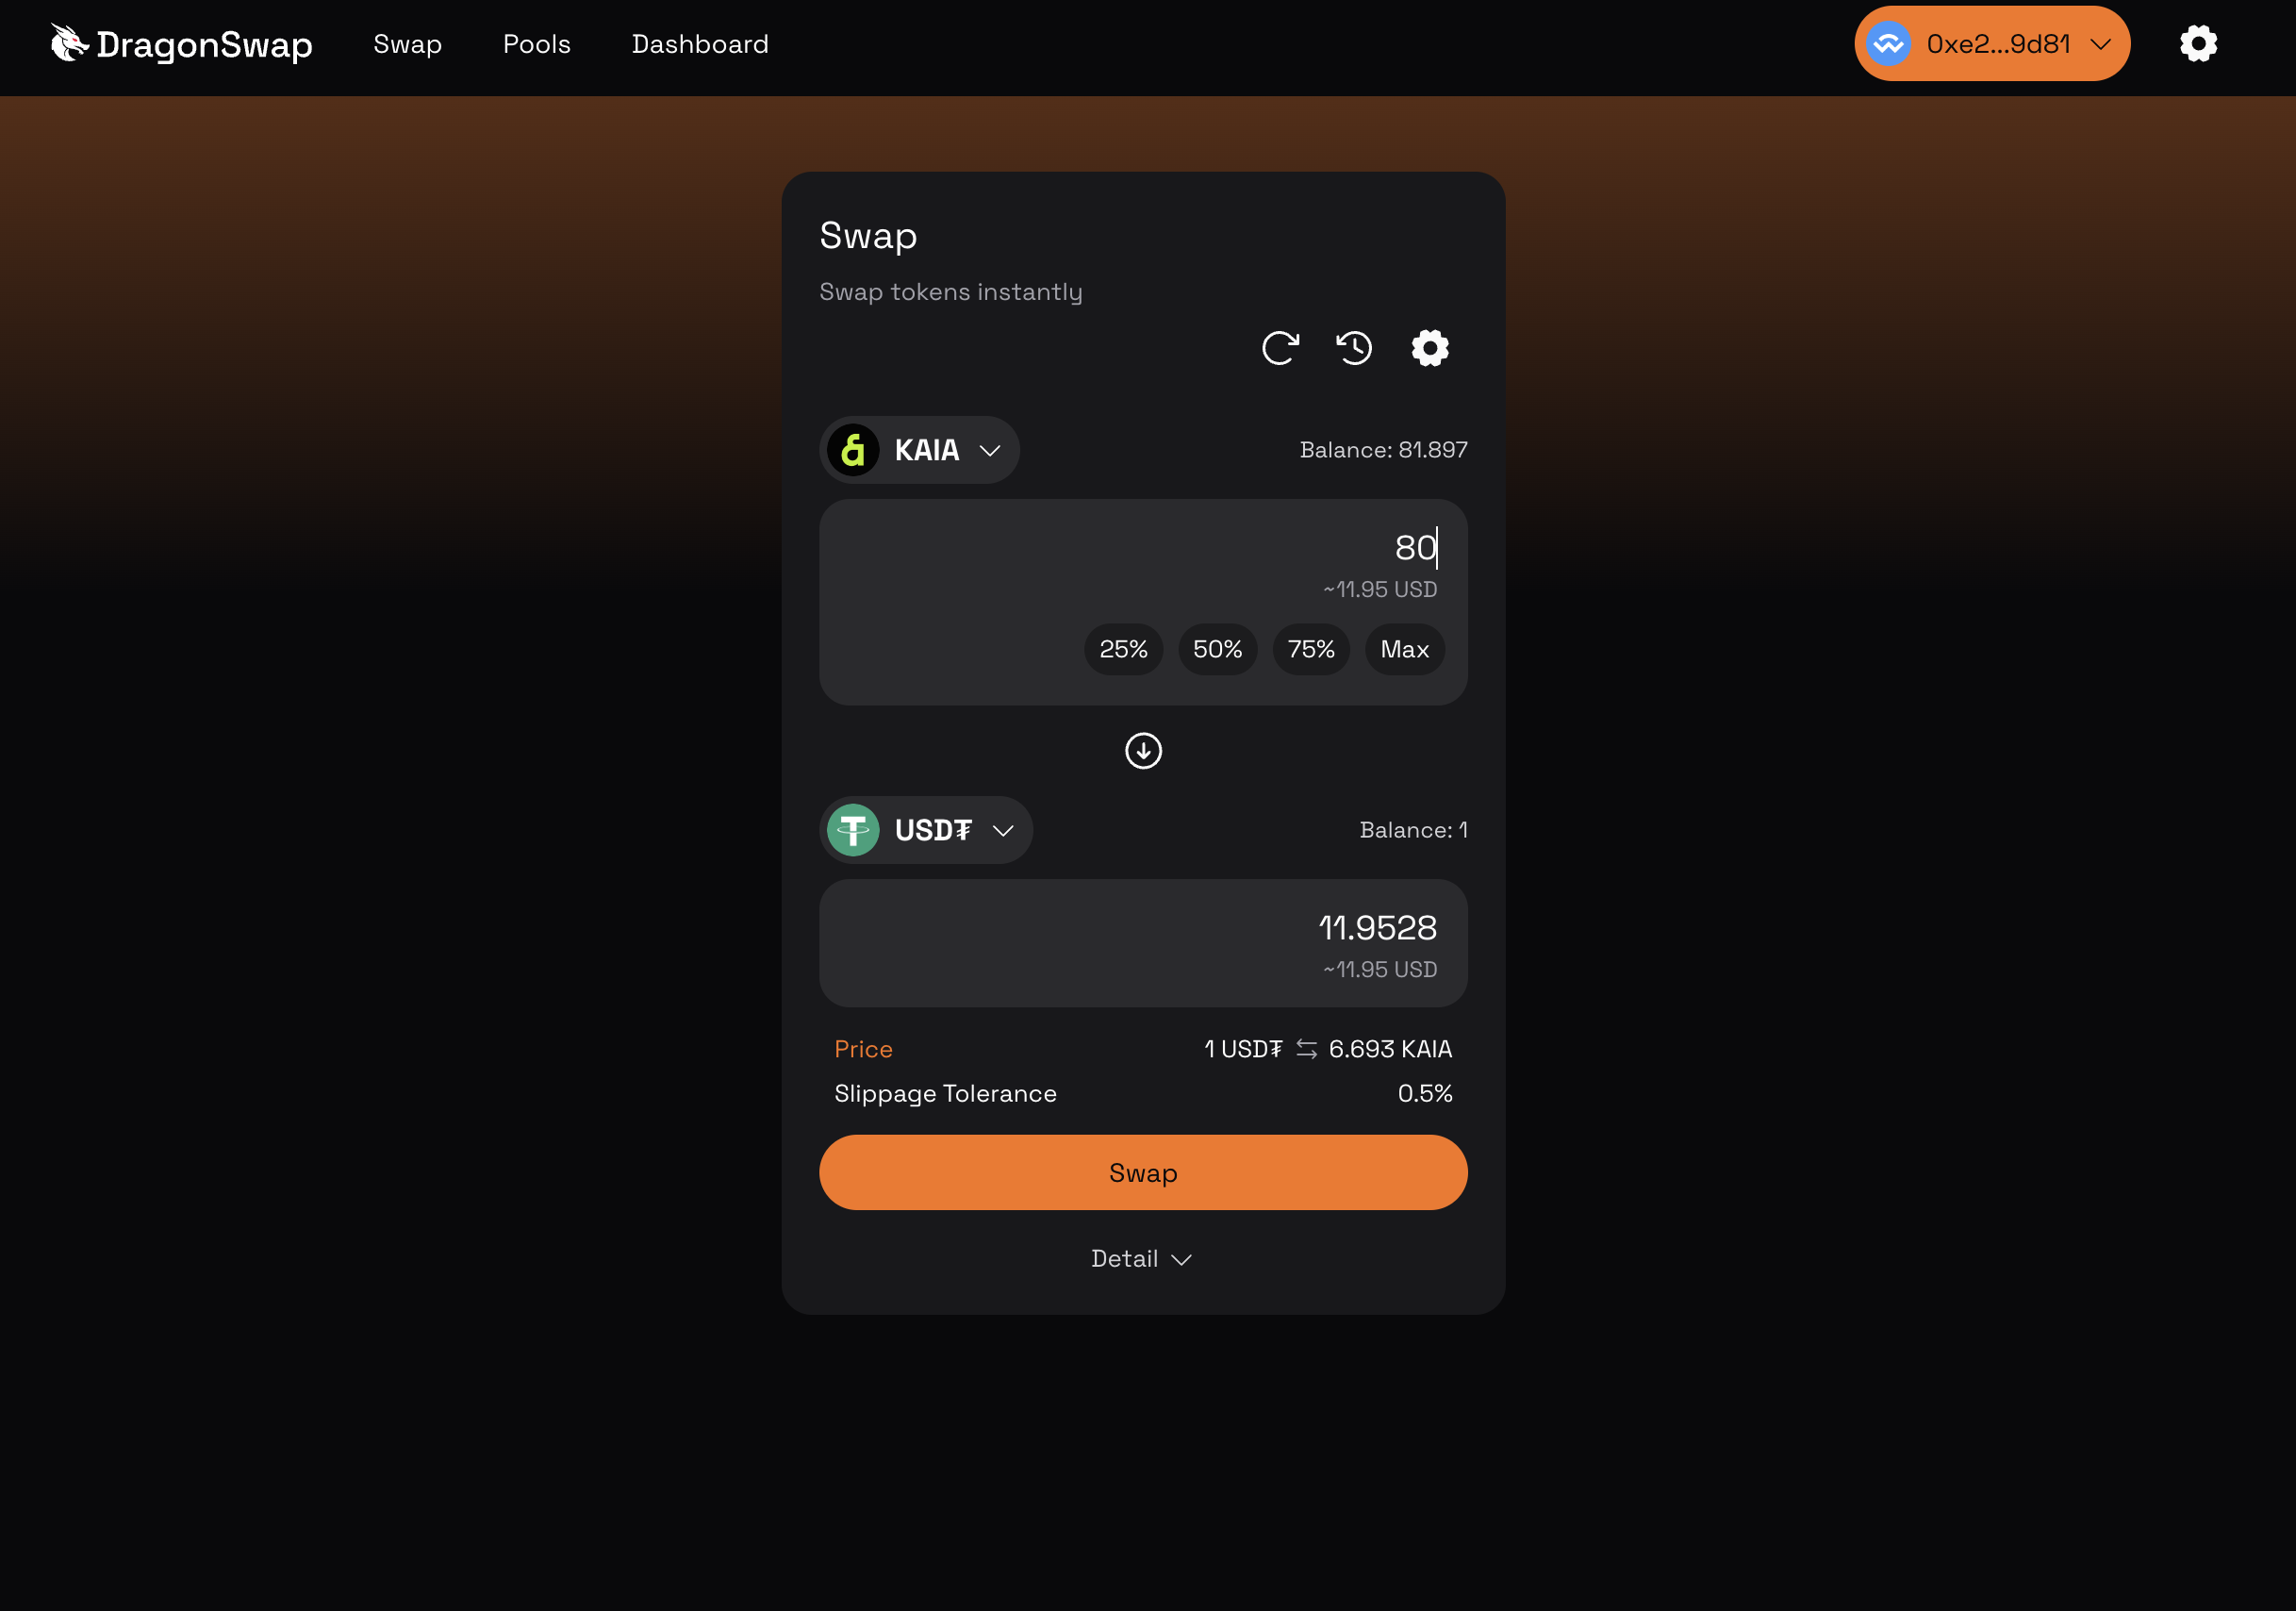
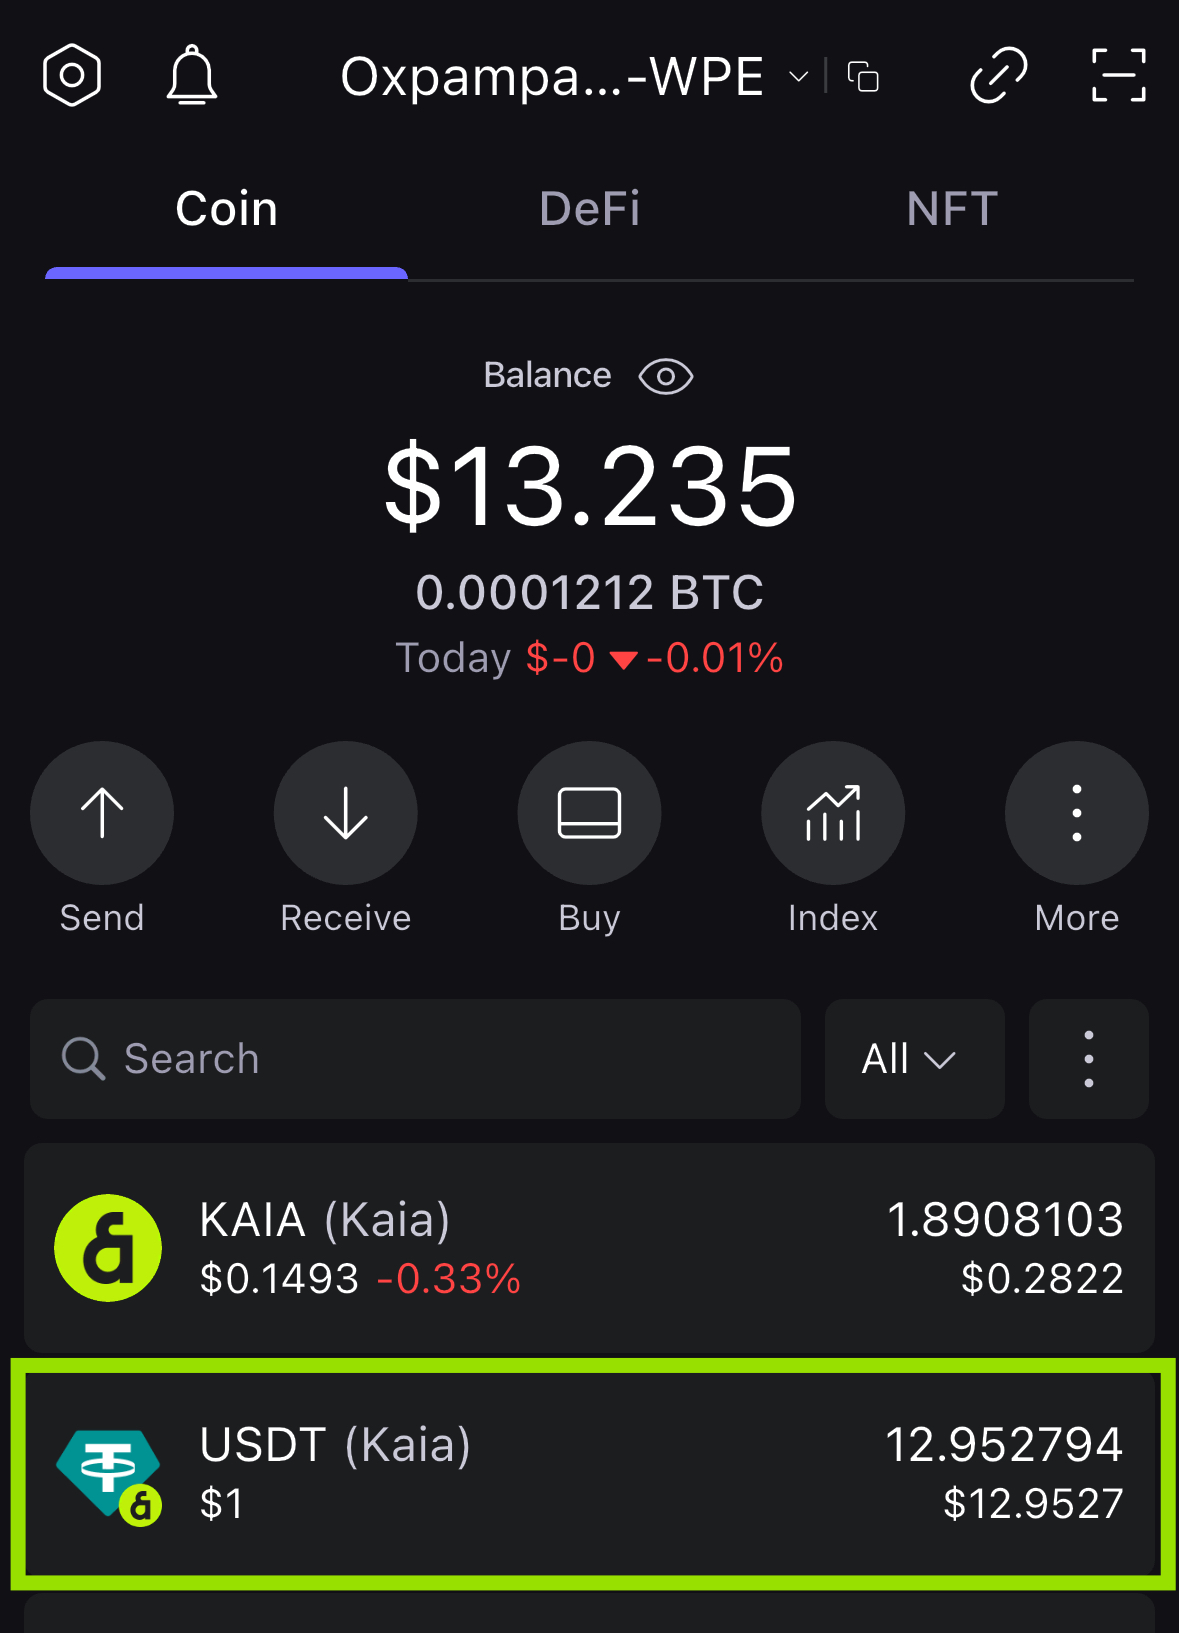
이 섹션에서는 KAIA를 USDT로 교환하는 방식으로 거래를 실행하겠습니다. 스왑](https://dgswap.io/swap/) 페이지로 이동합니다.
- 스왑 주문을 입력하고 스왑 버튼을 클릭합니다. 거래를 계속하기 전에 스왑을 확인하시기 바랍니다.
- SafePal 앱을 열면 거래 확인 페이지가 표시됩니다. 거래를 계속하려면 동의를 클릭합니다.
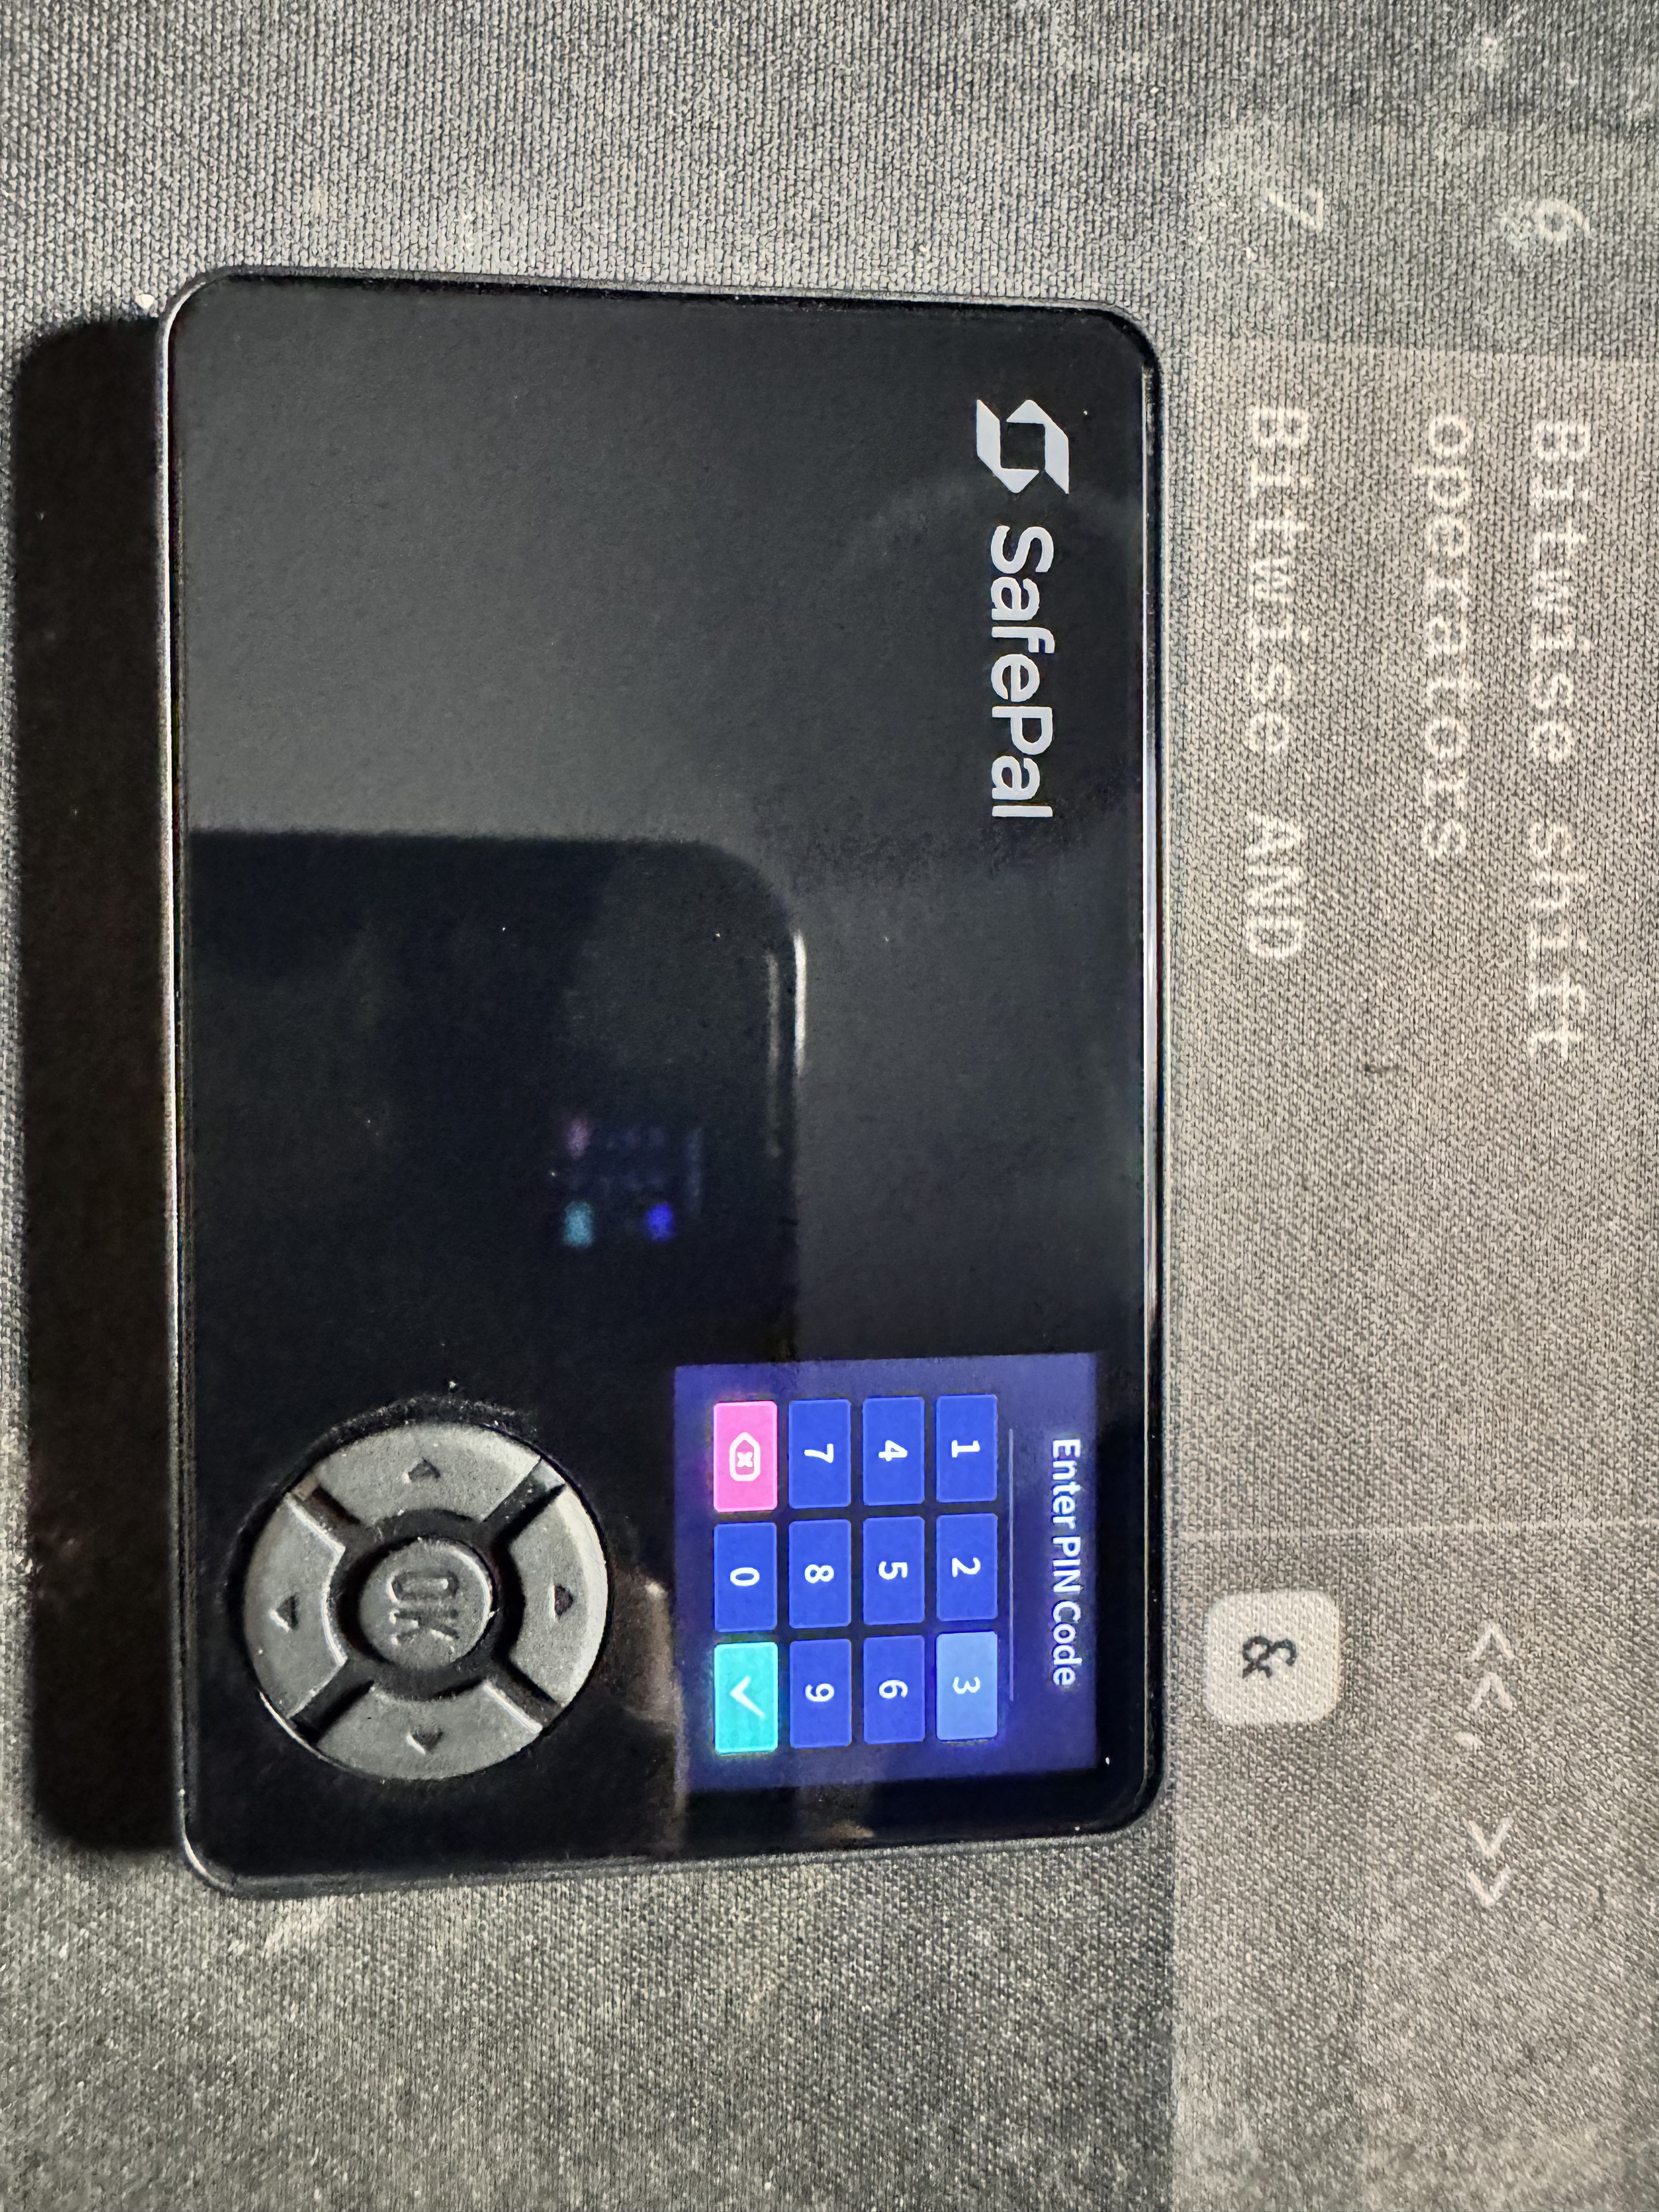
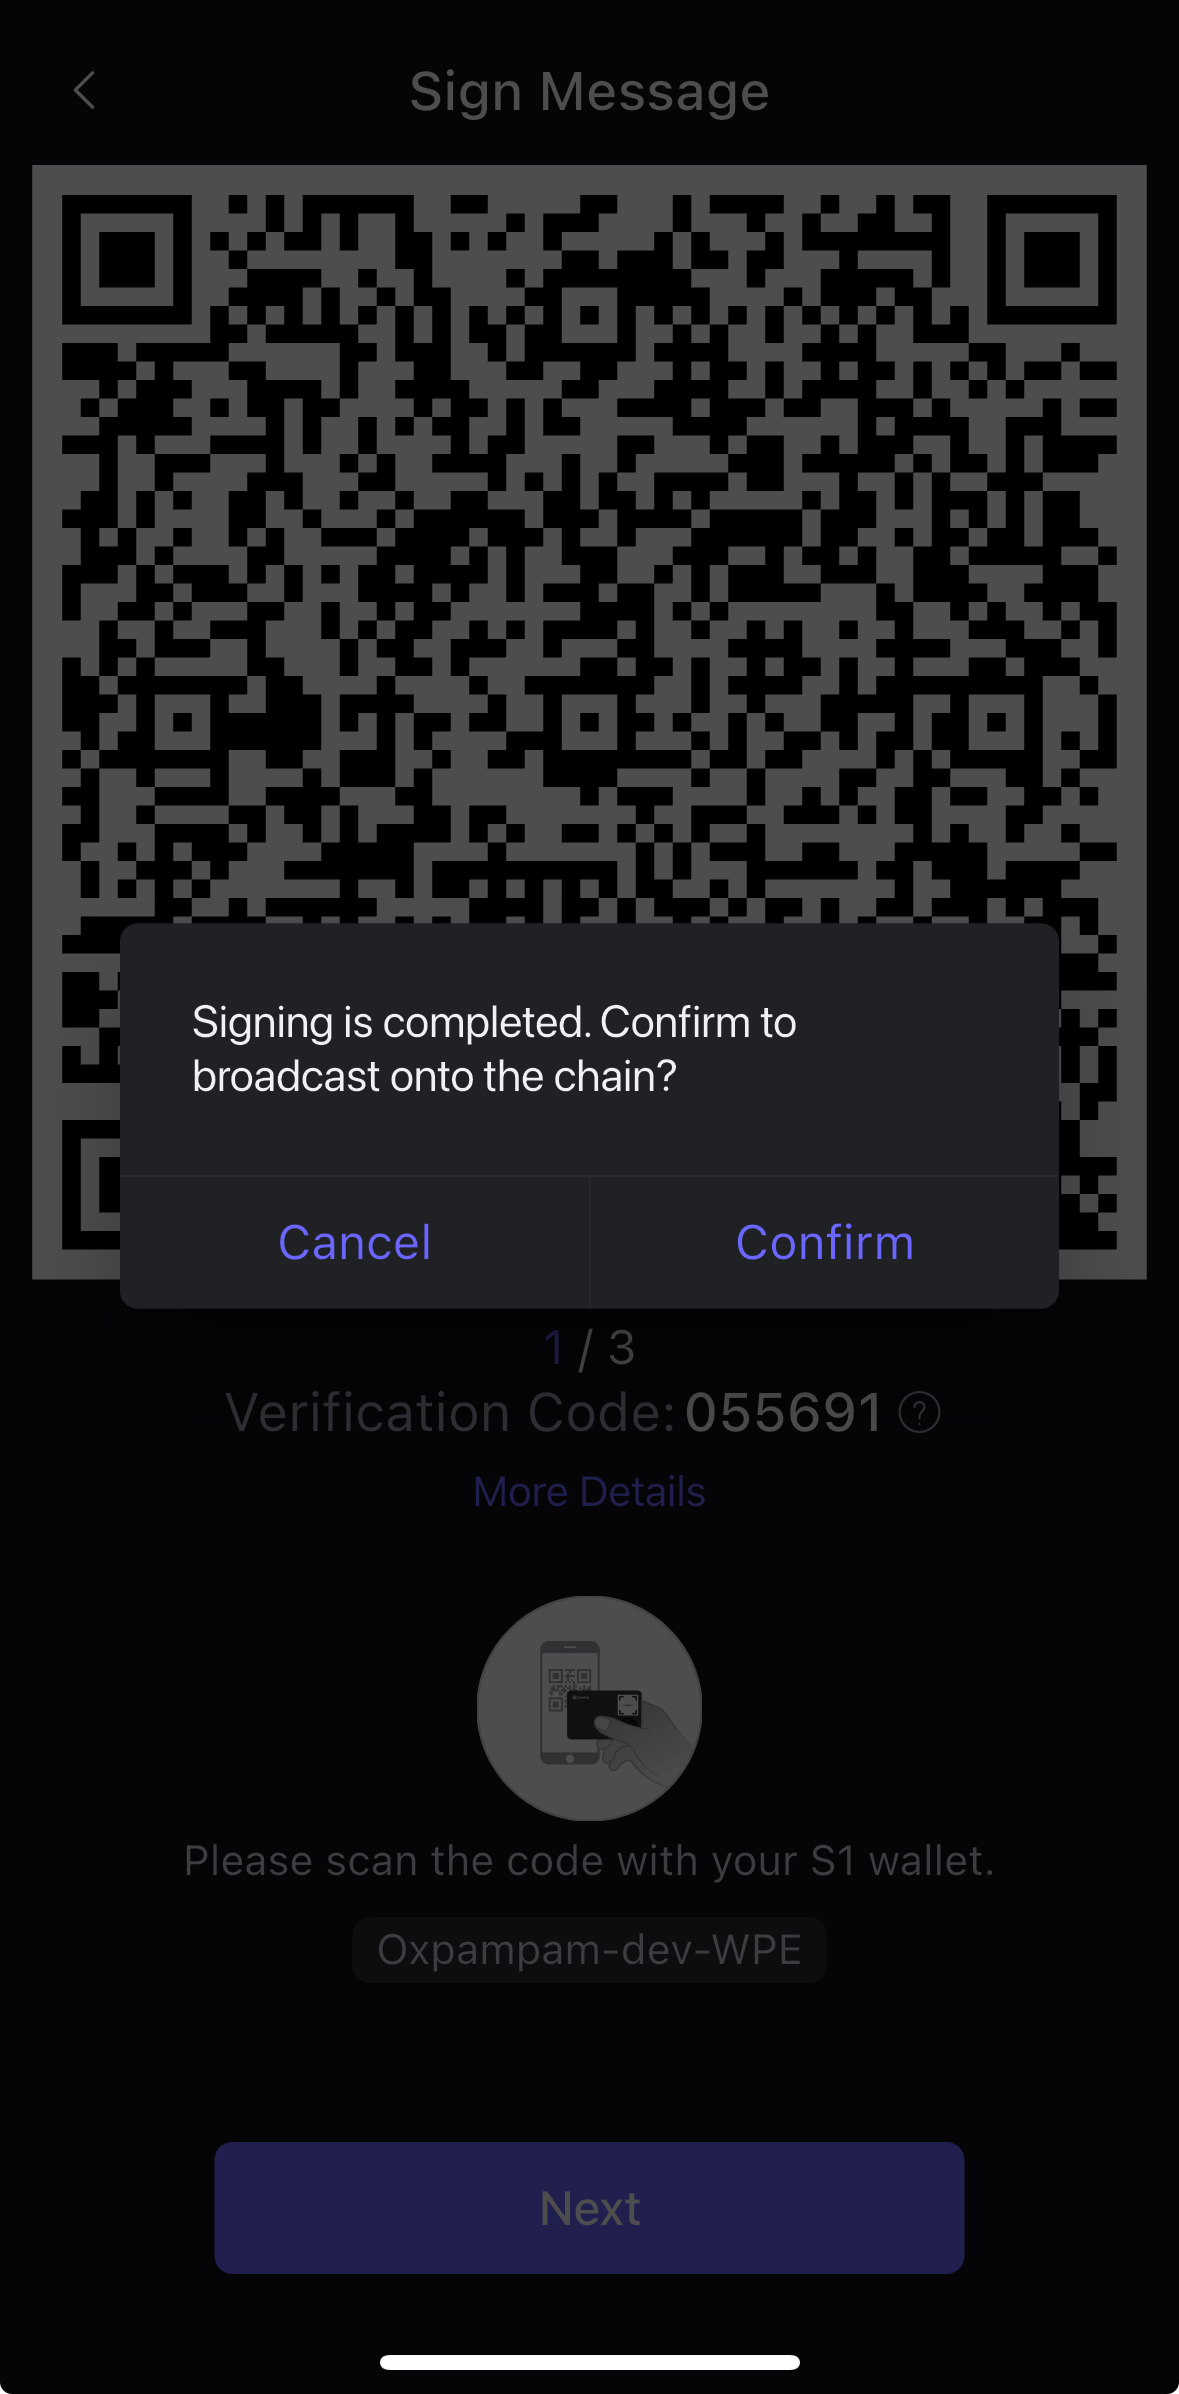
- S1 기기를 열어 QR 코드를 스캔하고 거래에 서명하세요.
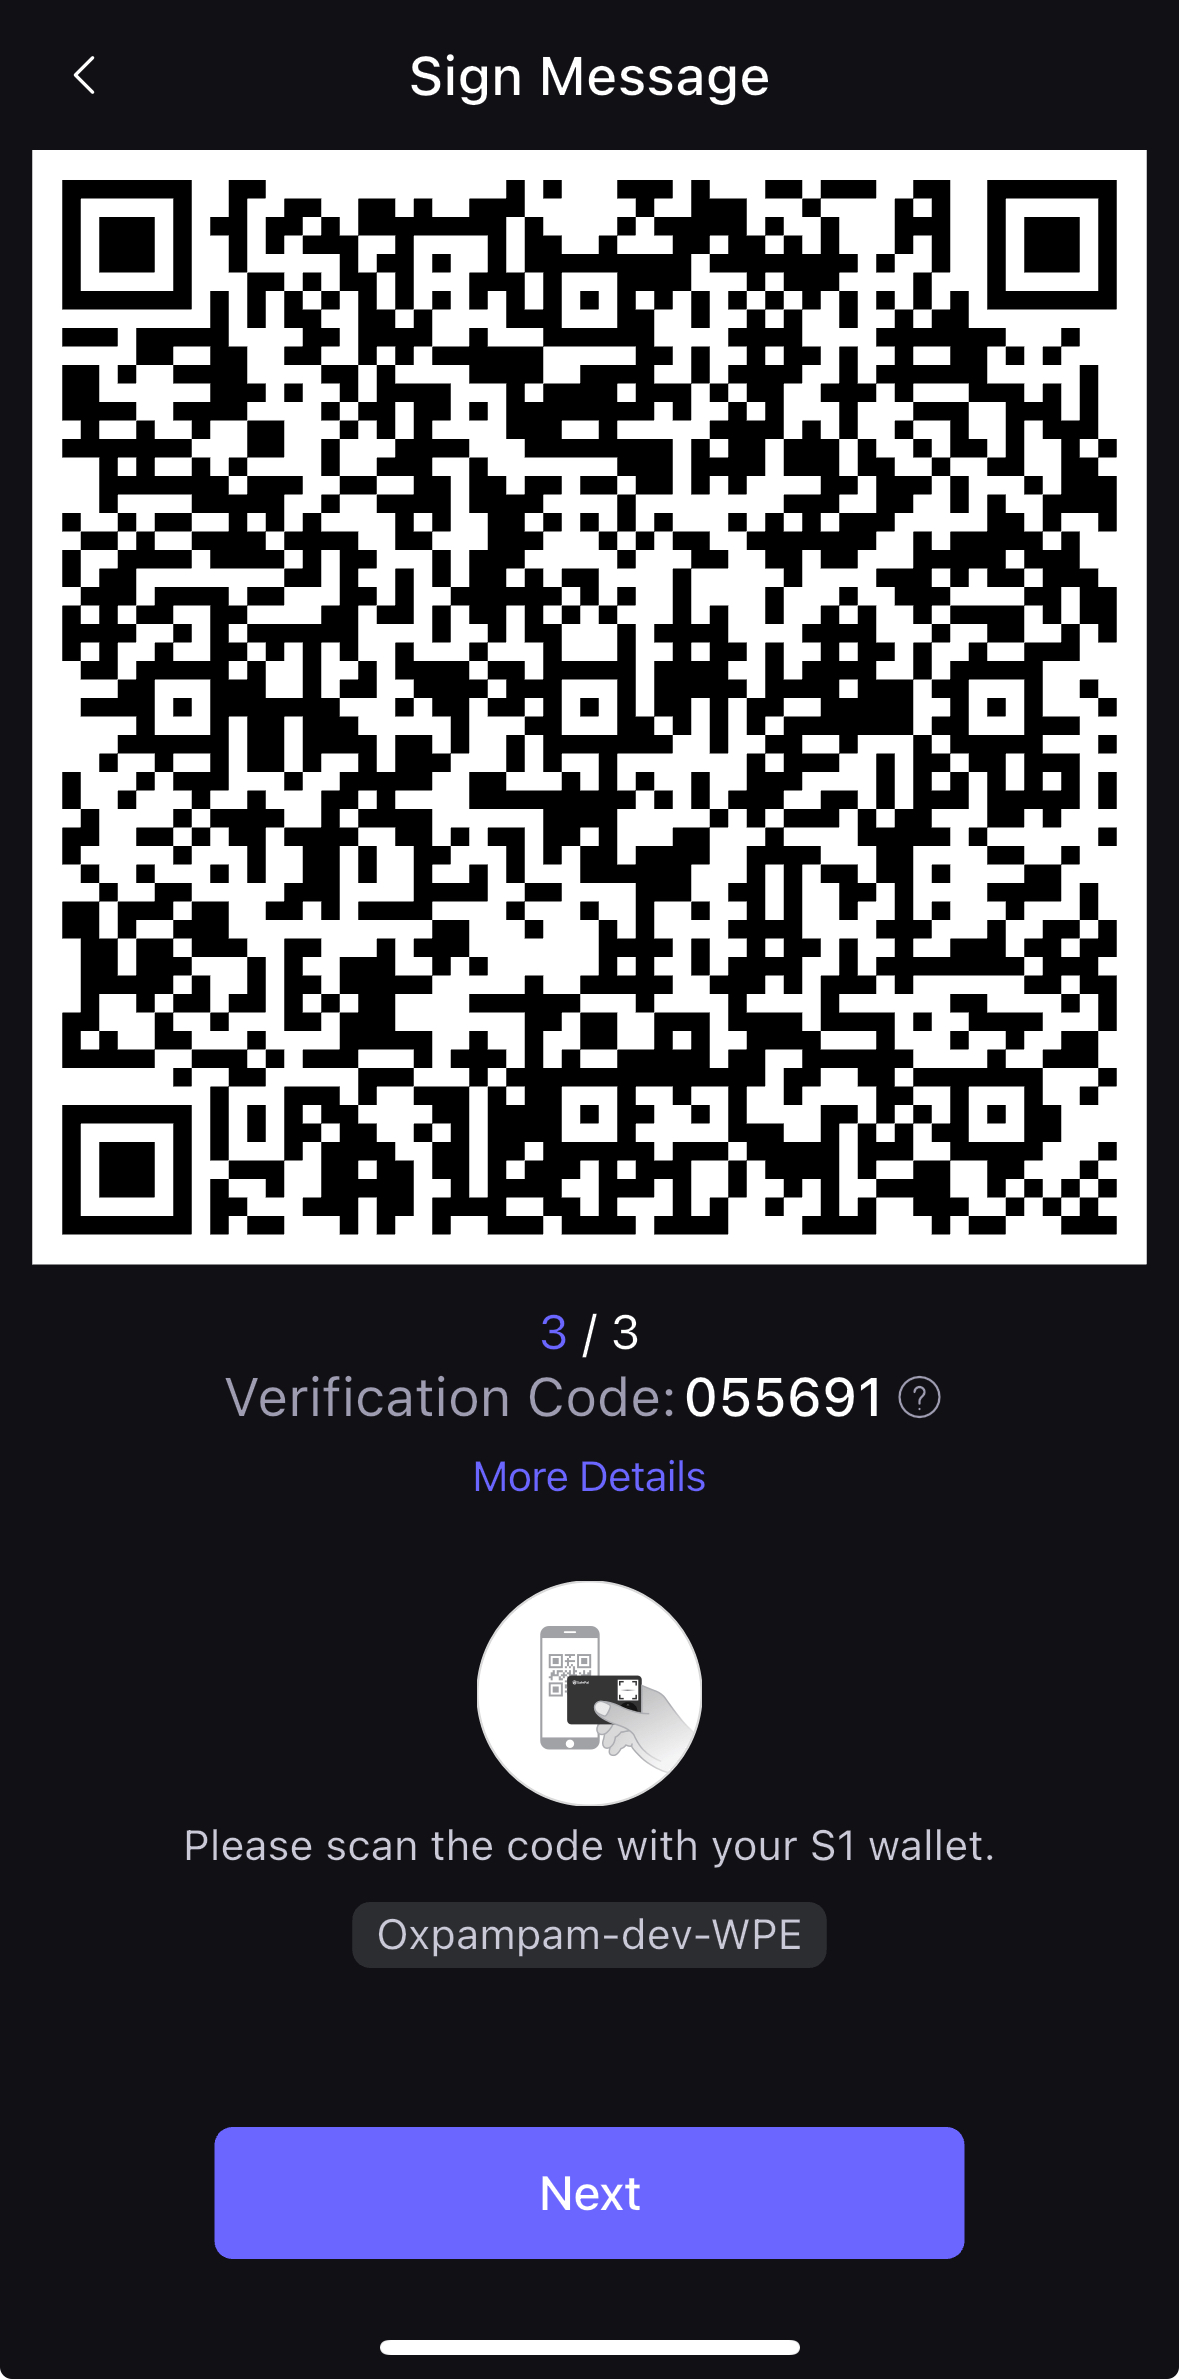
- S1 장치 PIN 코드를 입력하고 코드를 입력한 후 SafePal 앱에서 다음을 클릭합니다.
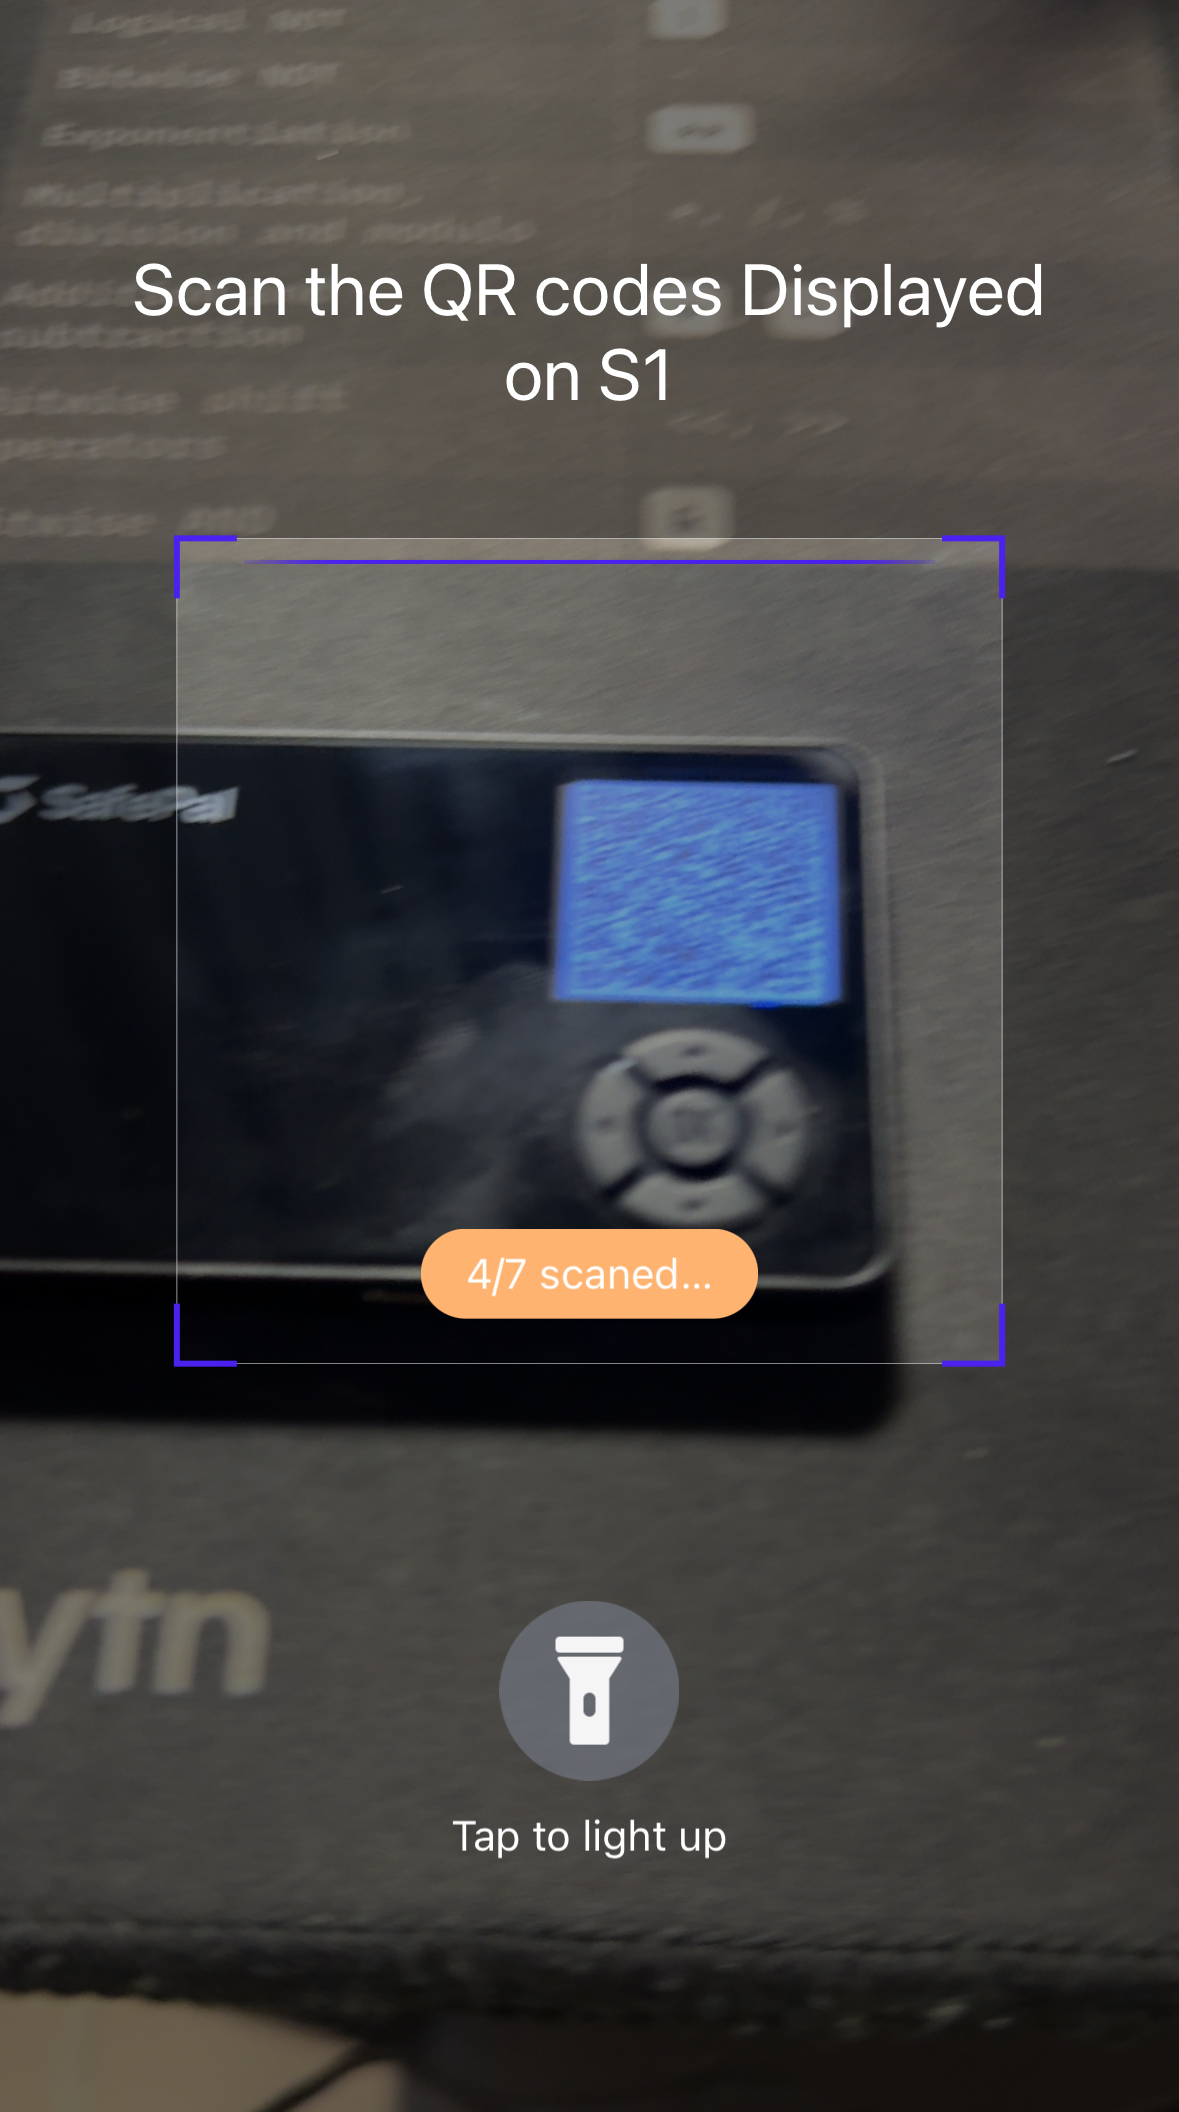
- S1 장치에 표시된 동적 QR 코드를 SafePal 앱에서 스캔합니다. 이렇게 하면 앱이 QR�코드에 포함된 서명을 수신하고 스왑 거래를 블록체인(Kaia)에 브로드캐스트할 준비가 된 것입니다.
- 서명이 완료되면 트랜잭션을 브로드캐스트하는 팝업이 표시됩니다. 이후 확인을 클릭합니다.
- 거래가 확인되면 아래와 같이 거래 성공 팝업이 표시됩니다.
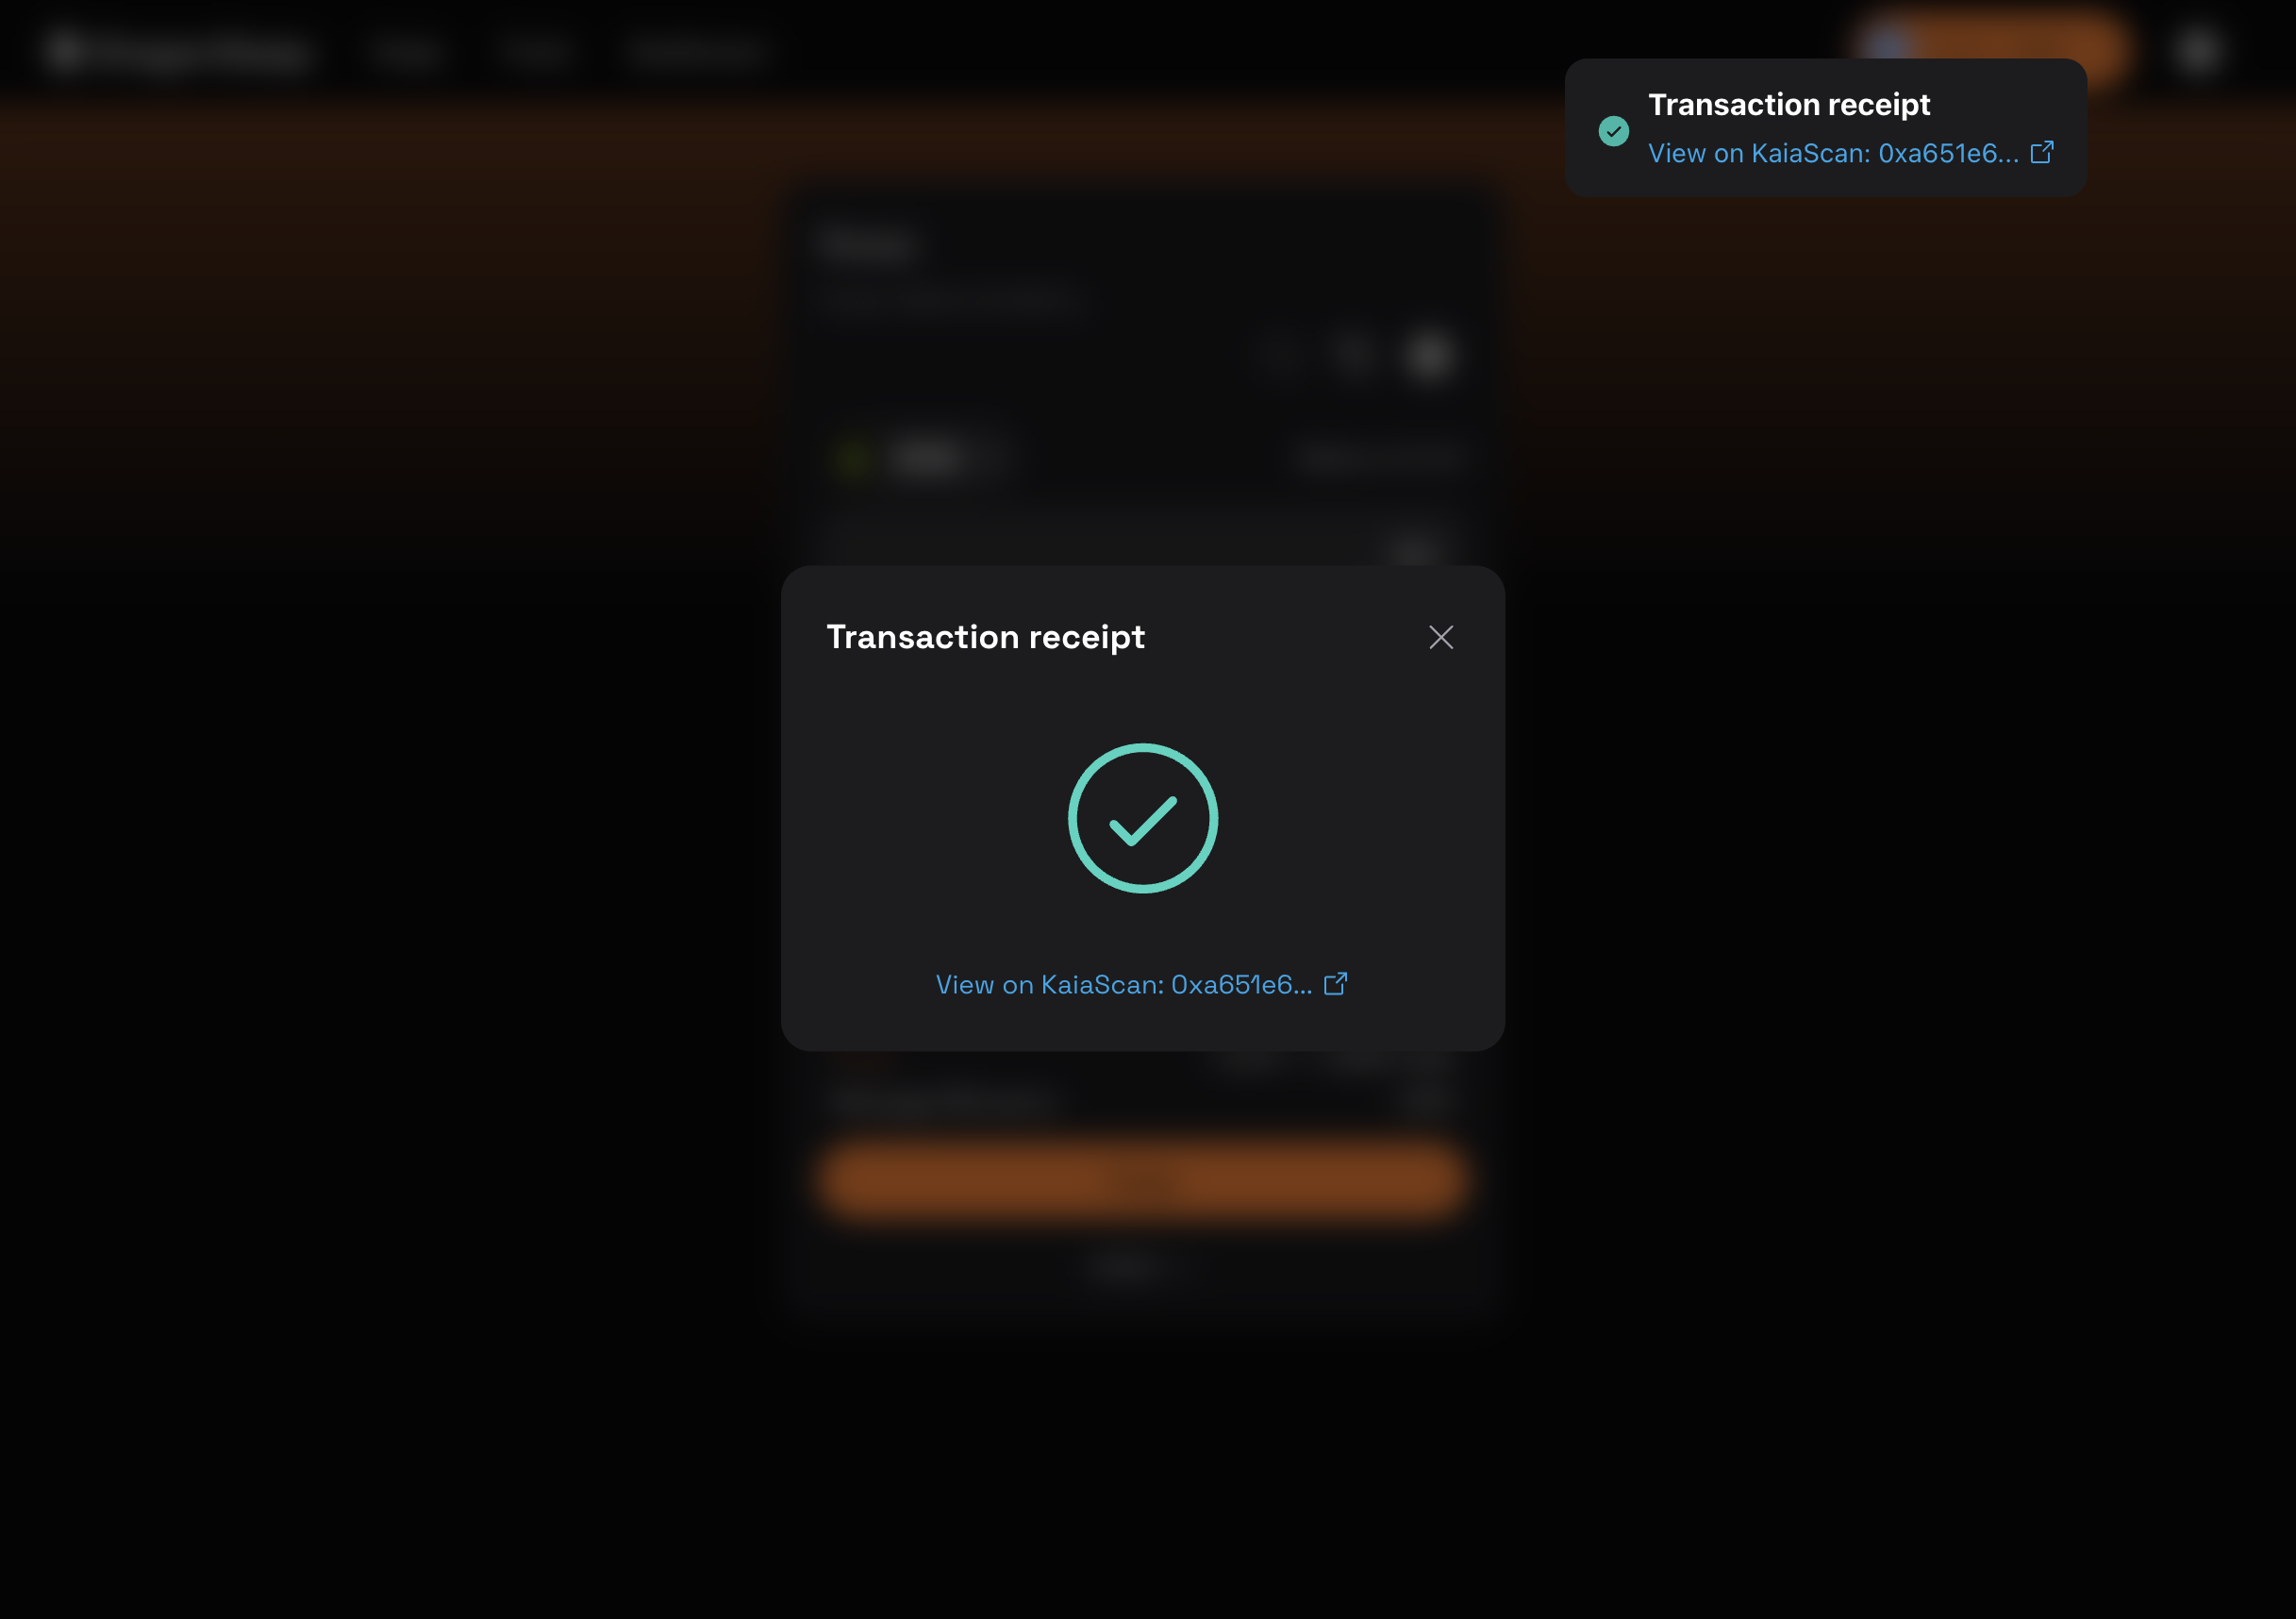
축하합니다. 거래에 성공적으로 서명하고 지갑커넥트를 통해 SafePal 하드웨어 지갑을 사용하여 타사 dApp의 블록체인에 거래를 브로드캐스트했습니다.
4장: 고급 및 프로덕션급 설정
이 장에서는 보안 위험이 가장 높은 프로덕션 환경에서 자산을 보호하고 작업을 자동화하는 방법을 다룹니다.
4.1. 레시피: Kaia 금고로 다중 서명 금고 설정��하기
Kaia 세이프는 개발자가 여러 소유자가 제어할 수 있는 계정을 생성하여 보안을 크게 향상시킬 수 있습니다.
대량의 자금, 프로토콜의 권한 또는 소유권 관리를 위해 일반 지갑을 사용해서는 안 됩니다. 너무 많은 프로젝트가 기본적인 지갑 보안 실패로 인해 피해를 입었습니다. 차세대 대형 탈중앙 금융 프로토콜을 출시하든, DAO 자산을 관리하든, 귀중한 자산을 보호하든 다중 서명 지갑은 필수입니다.
이 가이드에서는 Kaia 금고에서 Kaia 금고를 만들고, 소유자와 승인 임계값을 구성하고, 기본 거래를 실행하는 방법을 알려드리겠습니다.
안전한 지갑 만들기
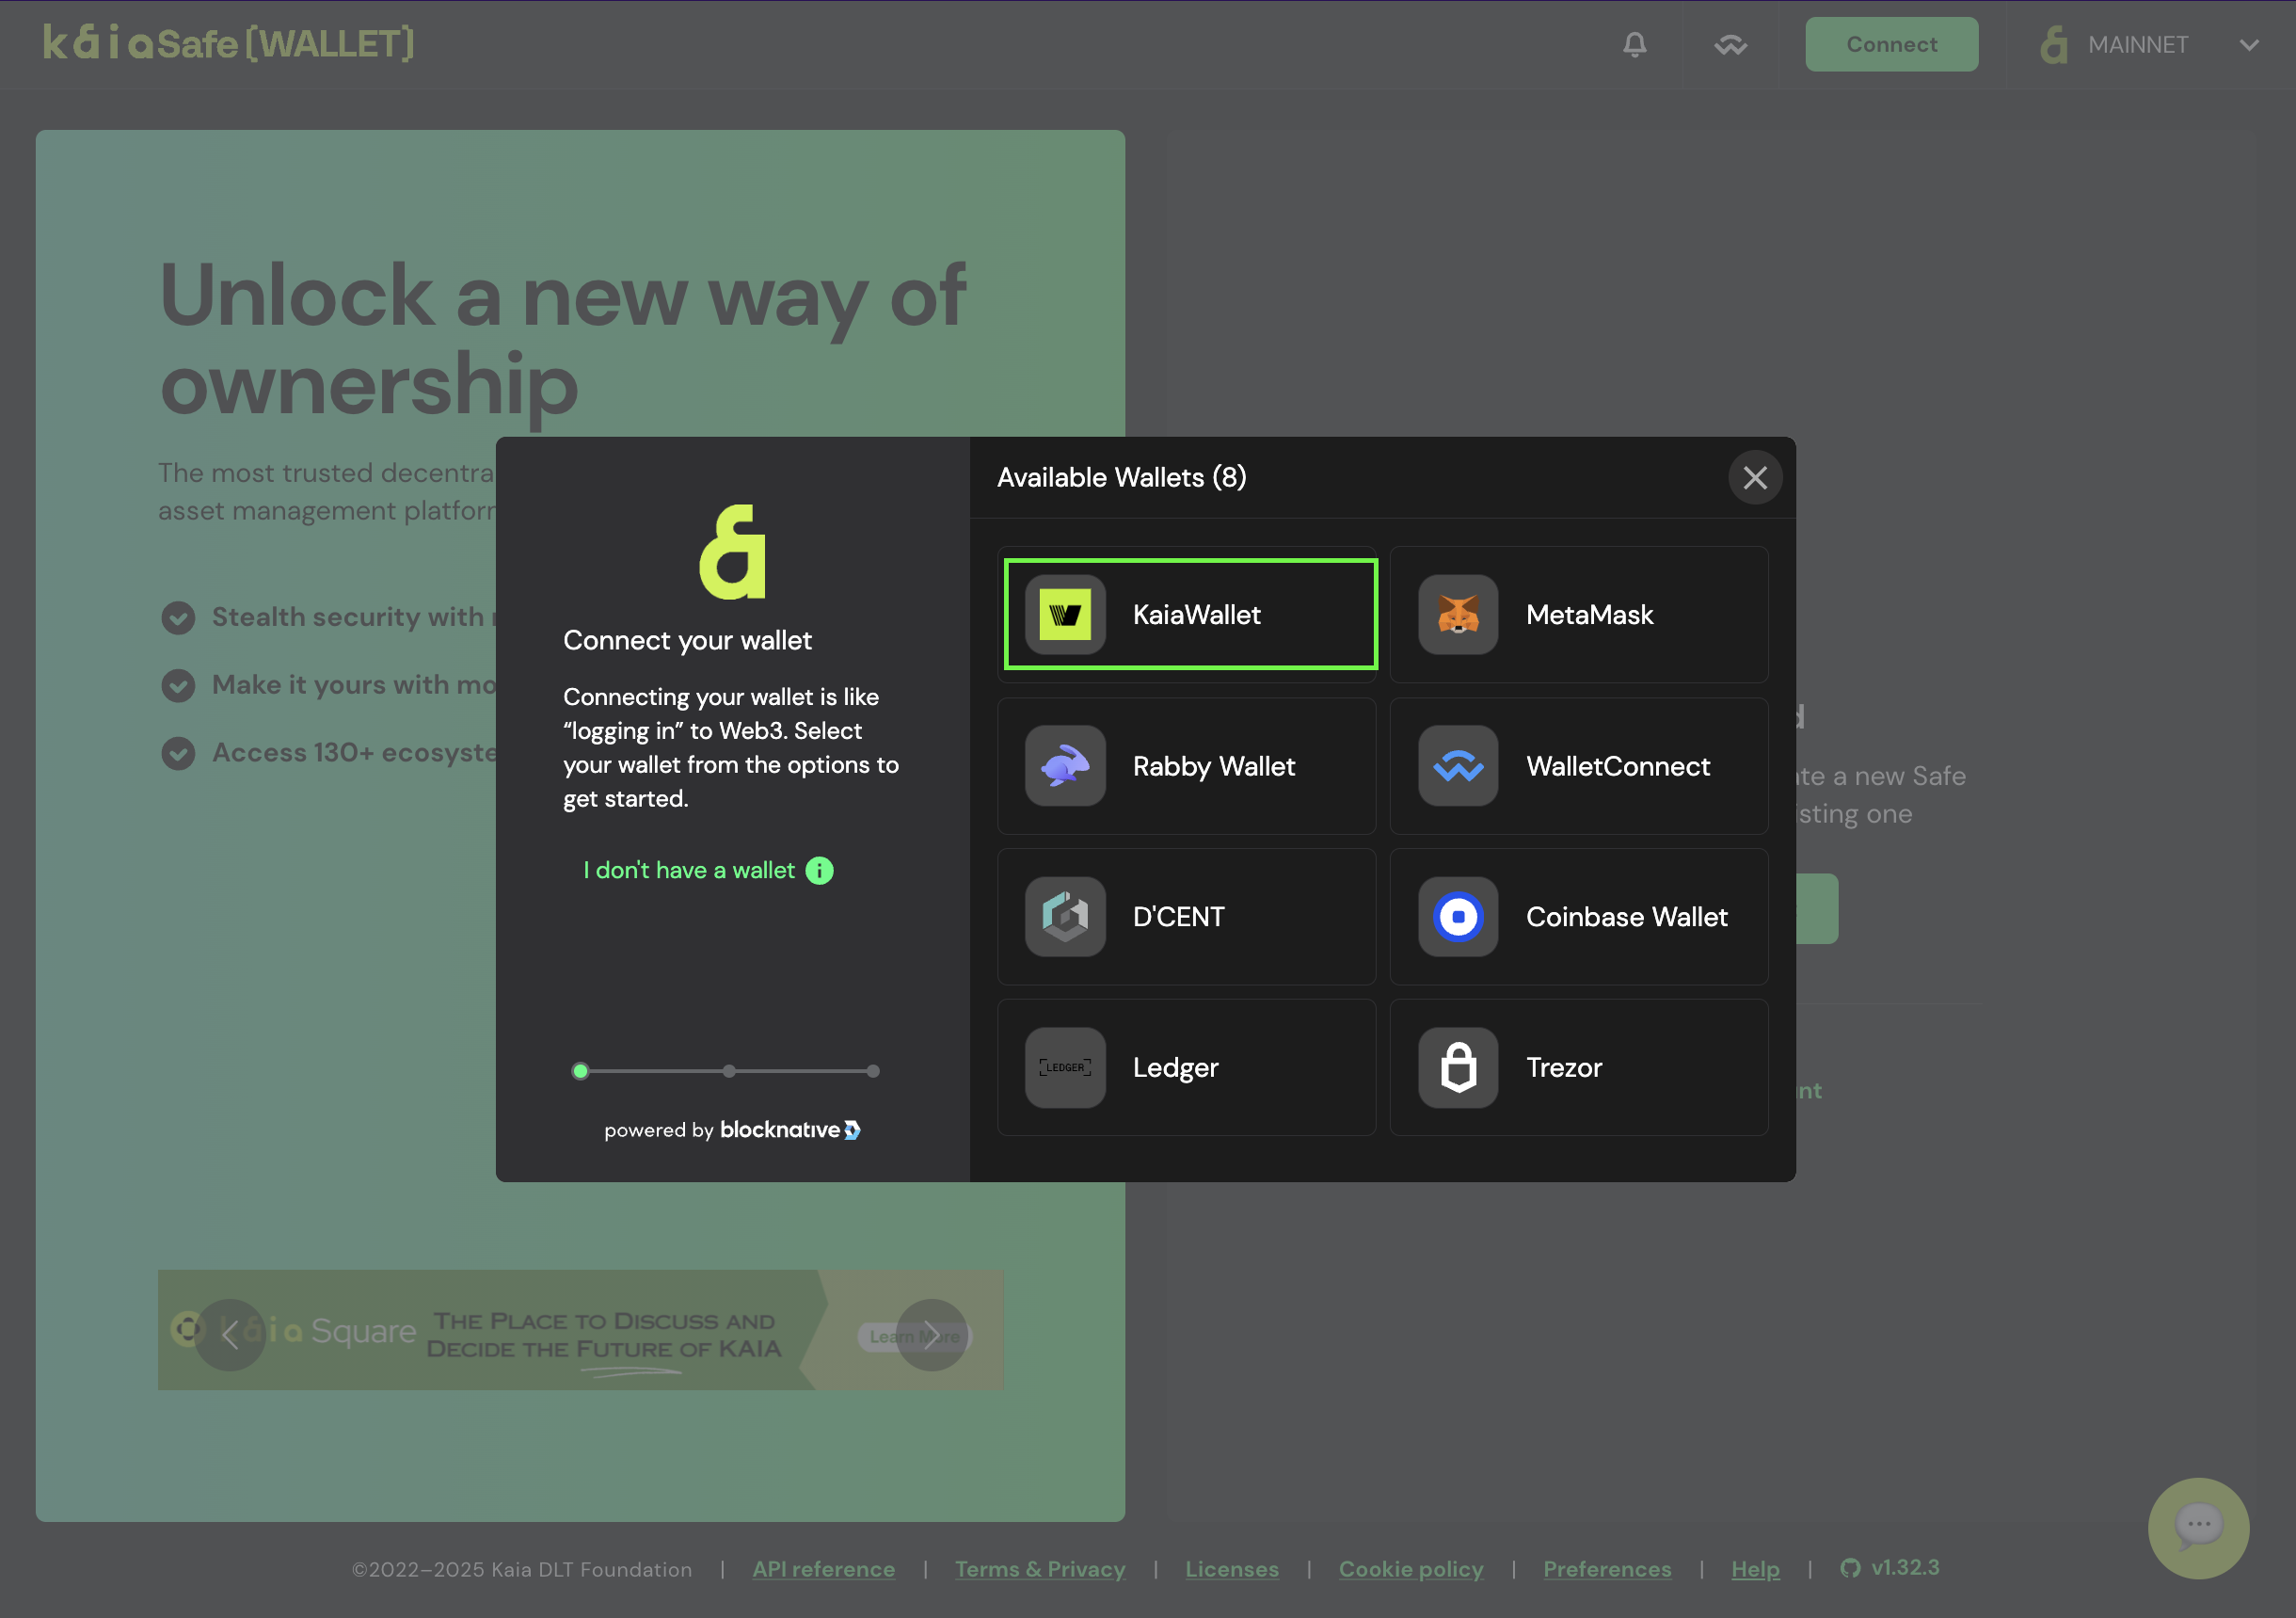
- Kaia 세이프 앱](https://app.safe.global/welcome)을 방문하세요.
- 지갑 연결. Kaia Safe 웹사이트에 연결하려는 지갑 유형을 선택합니다. 이 가이드에서는 Kaia 지갑을 사용하겠습니다.
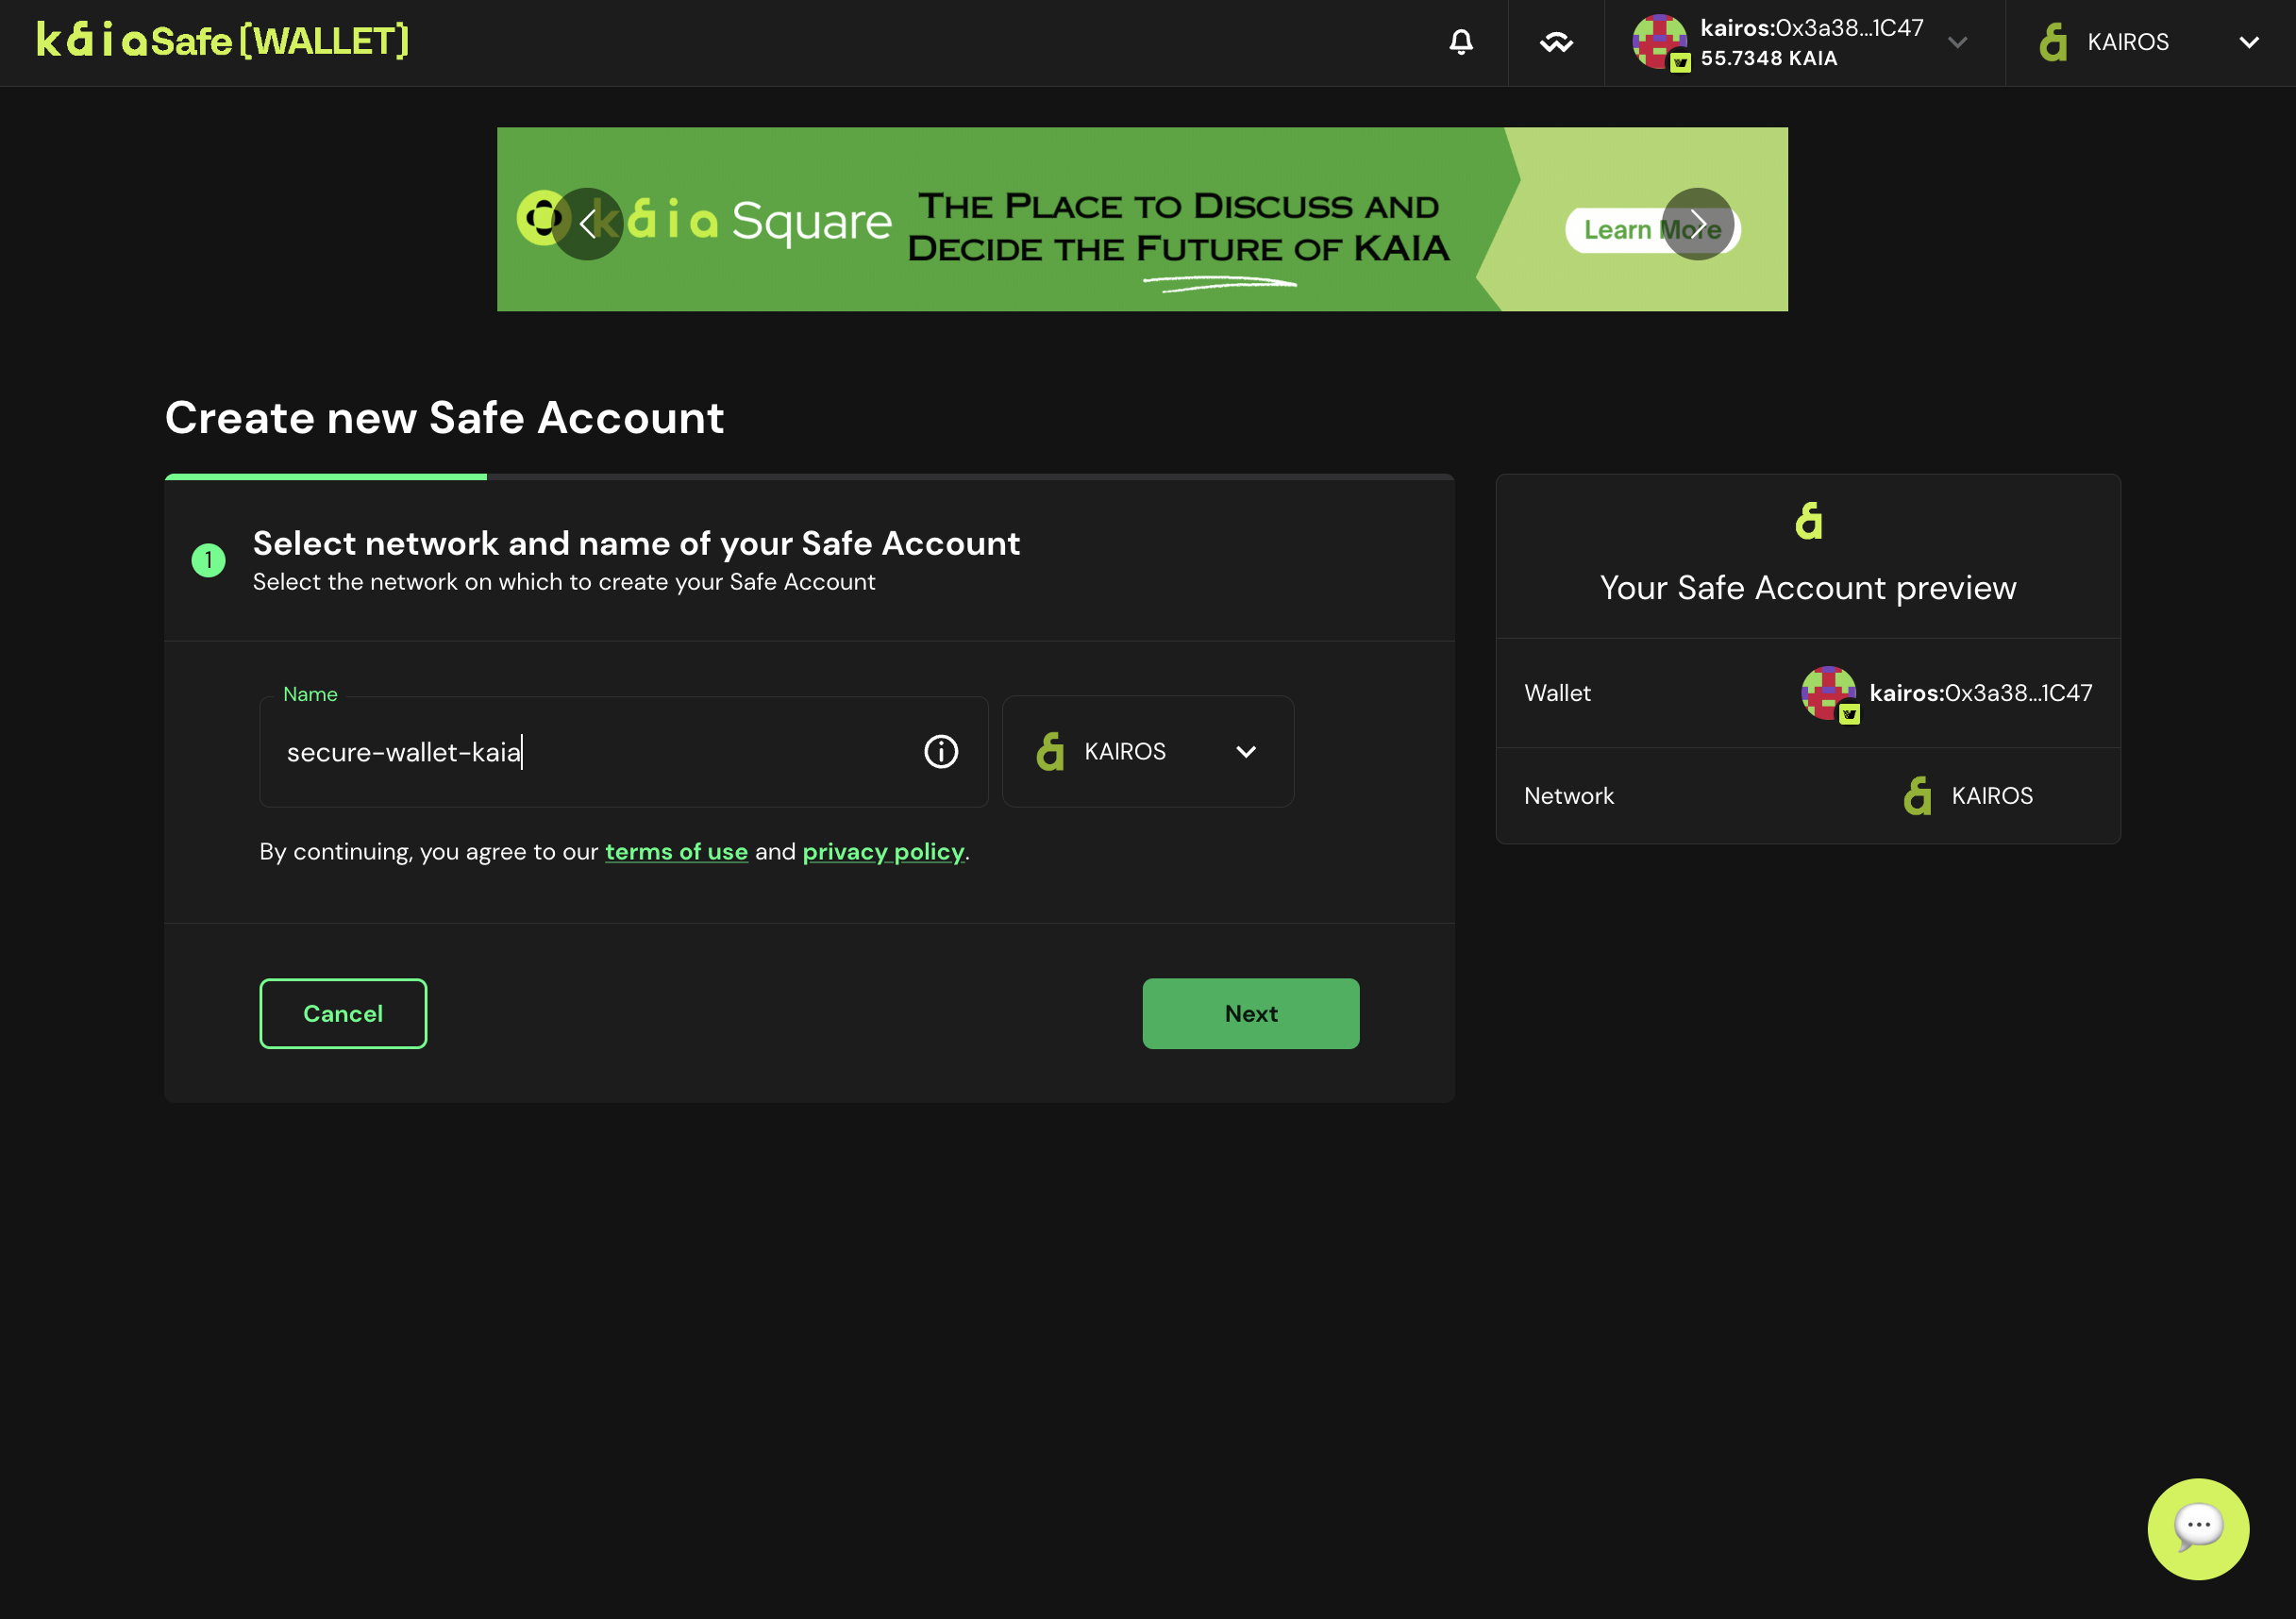
- 금고 이름을 지정합니다. 지갑을 연결한 후 계정 만들기를 클릭하고 Kaia 금고의 이름을 지정합니다.
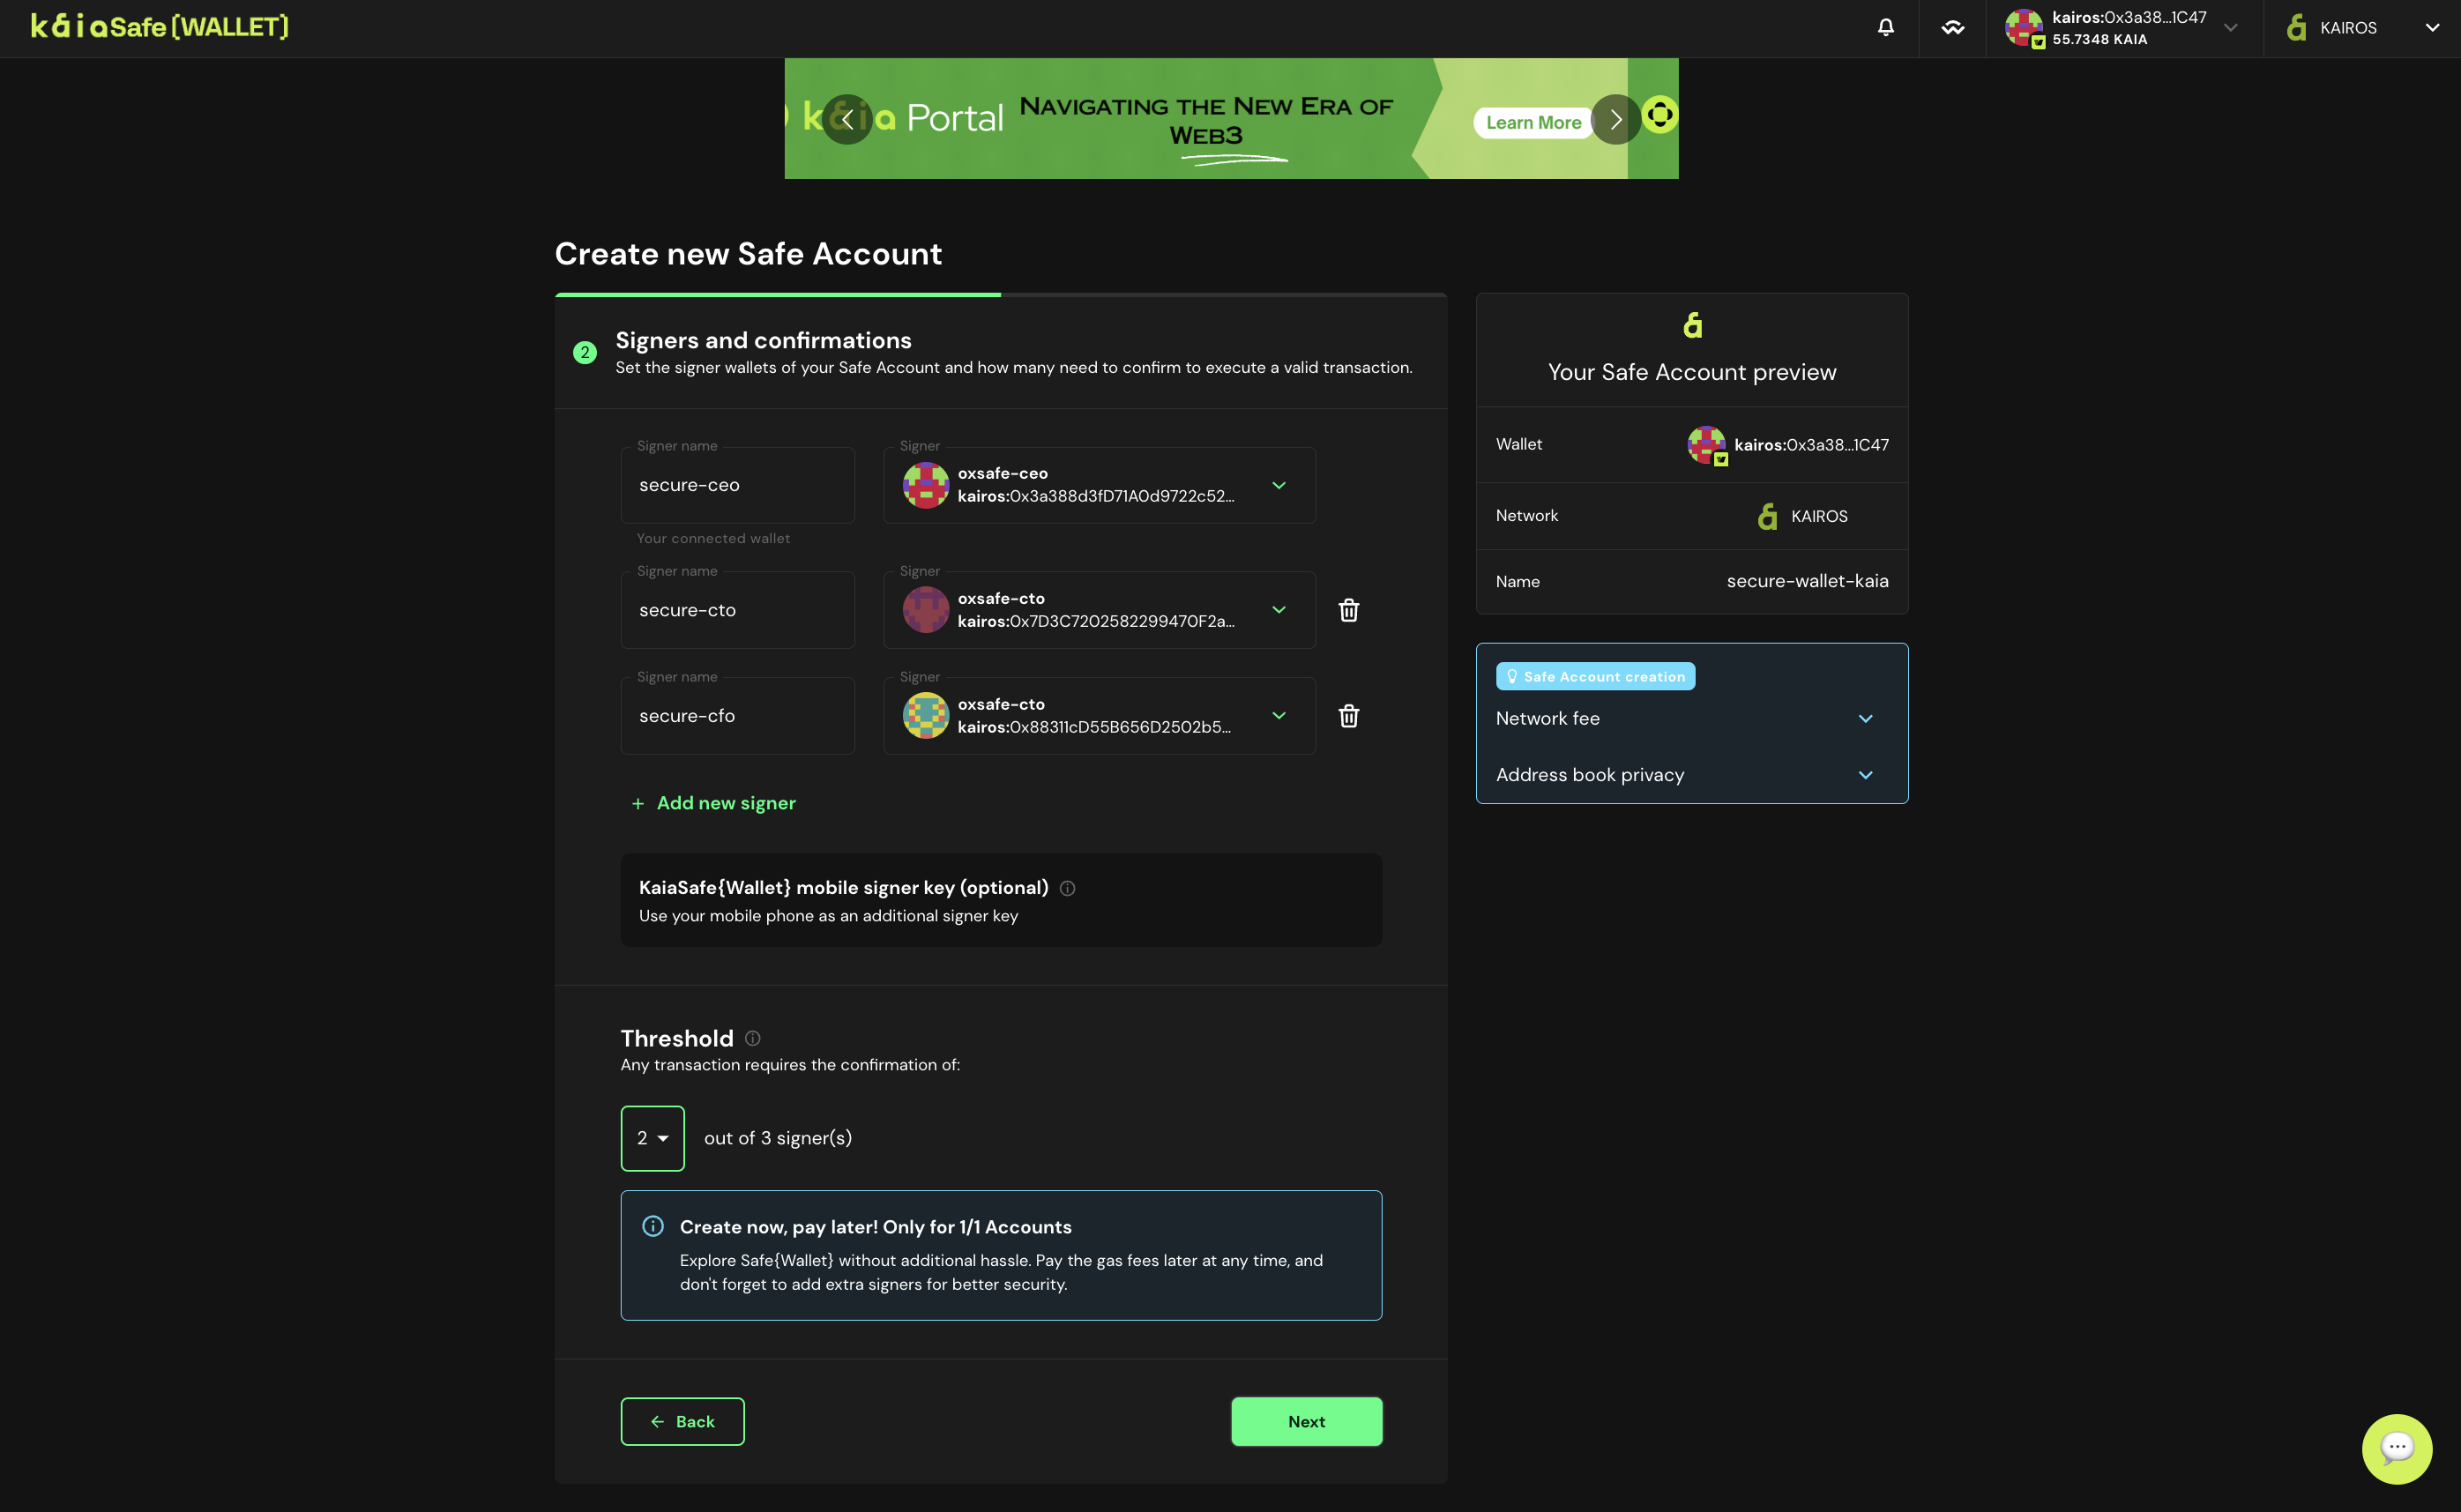
- 서명자 구성. Kaia Safe 계정에서 거래를 승인하는 데 필요한 서명자 확인 횟수를 구성합니다. 아래와 같이 전체 소유자의 51%(예: *3명 중 2명, *5명 중 3명 등)의 임계값을 사용하는 것이 좋습니다.
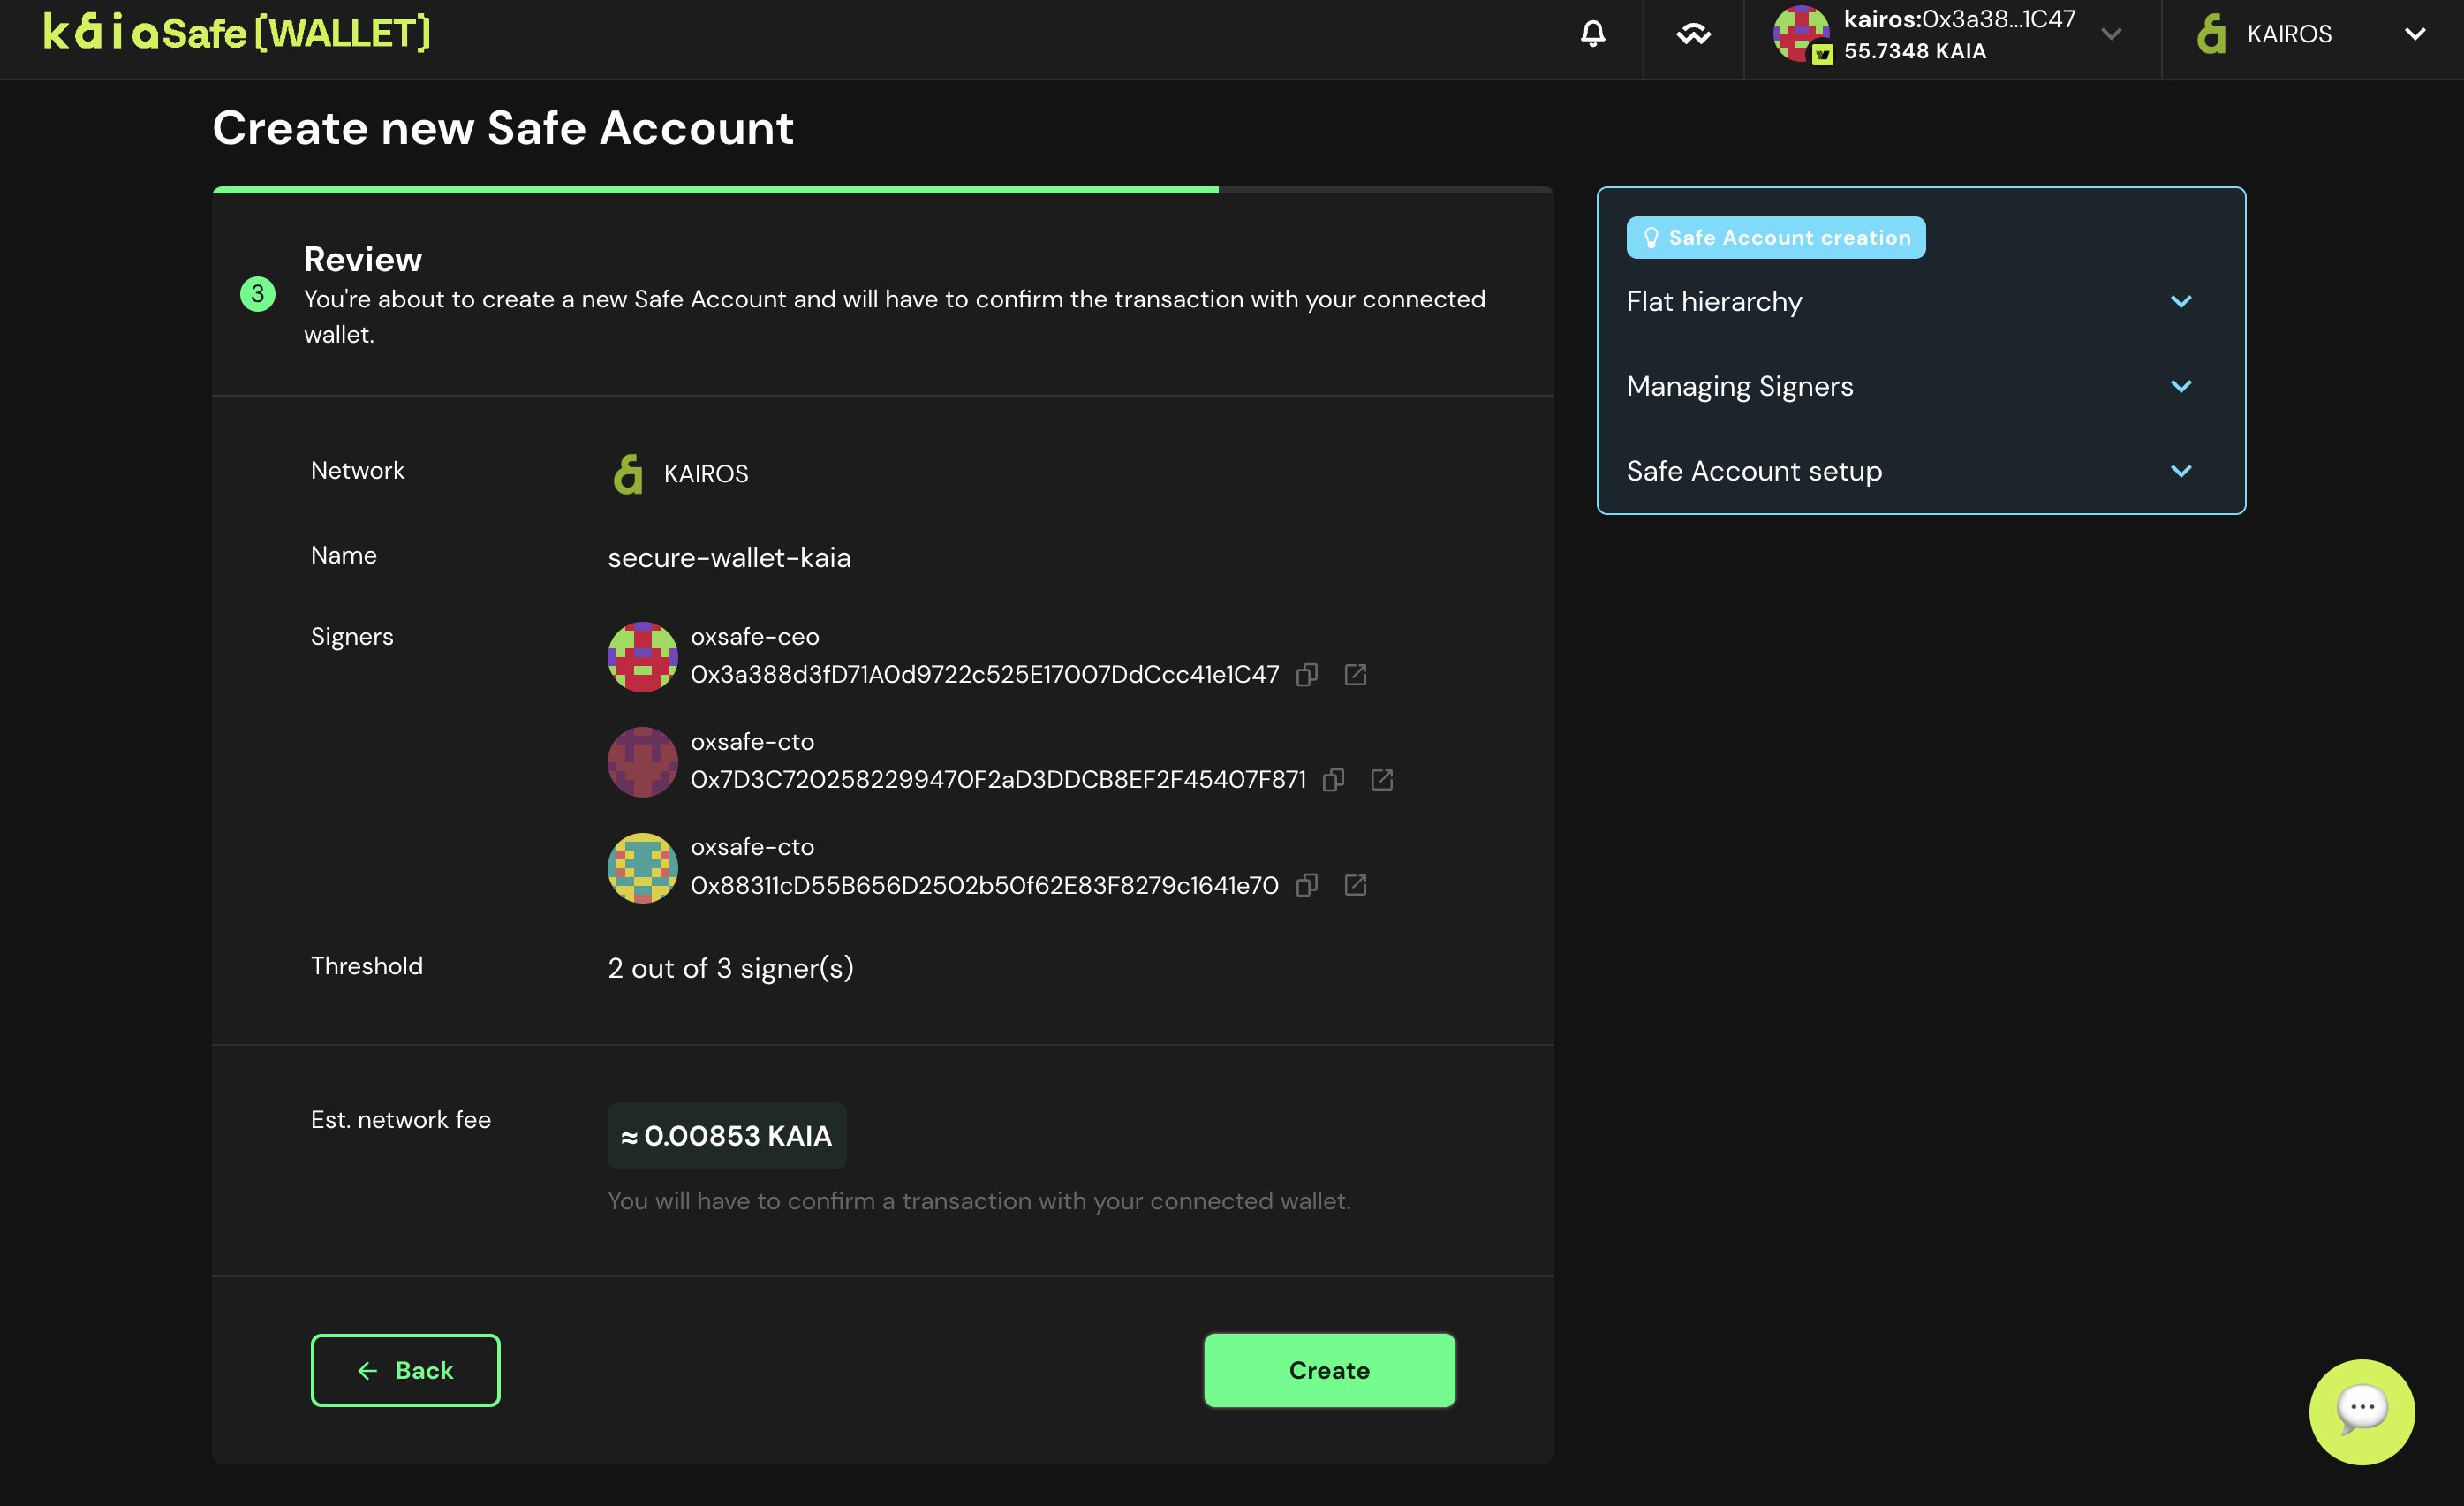
- Kaia 세이프 계정을 배포합니다. 모든 Kaia 세이프 매개변수에 완전히 만족하면 만들기를 클릭하여 Kaia 세이프 계정 생성을 제출하세요.
- 지갑 사용. Kaia세이프 월렛 사용 시작** 버튼을 클릭합니다.
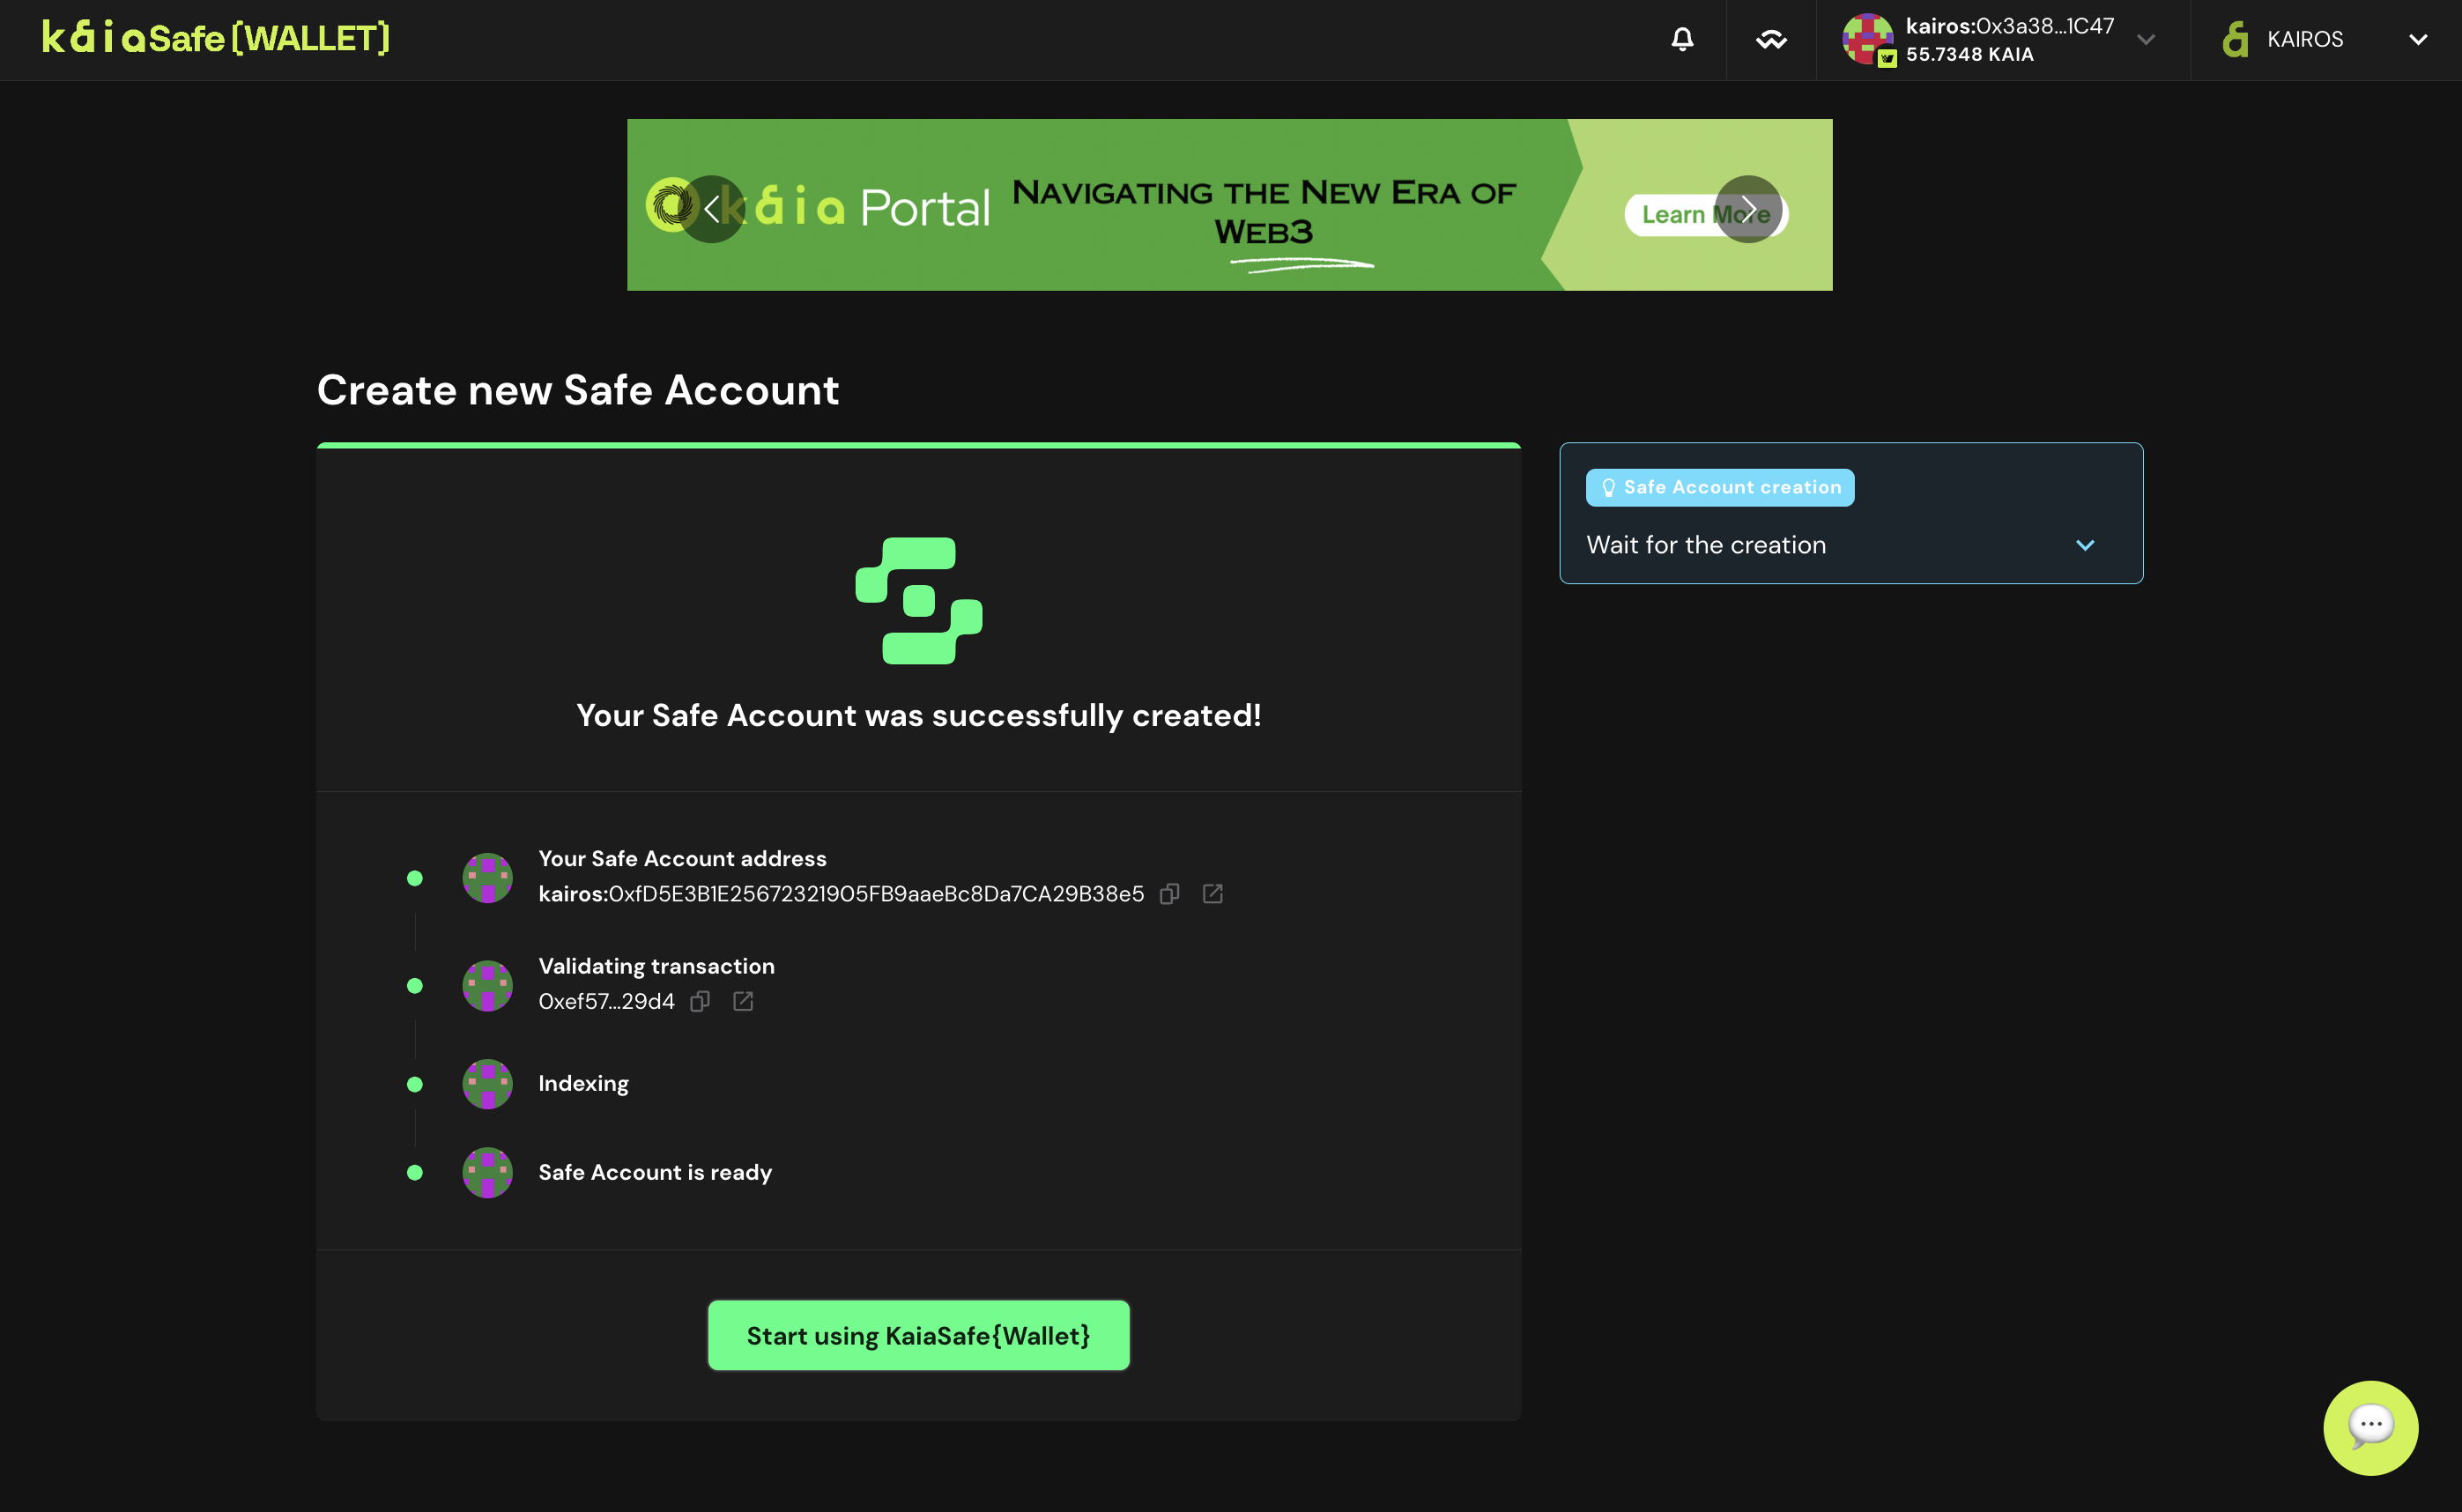
- 아래와 같이 Kaia 세이프 스마트 컨트랙트 지갑의 사용자 인터페이스에 액세스합니다.
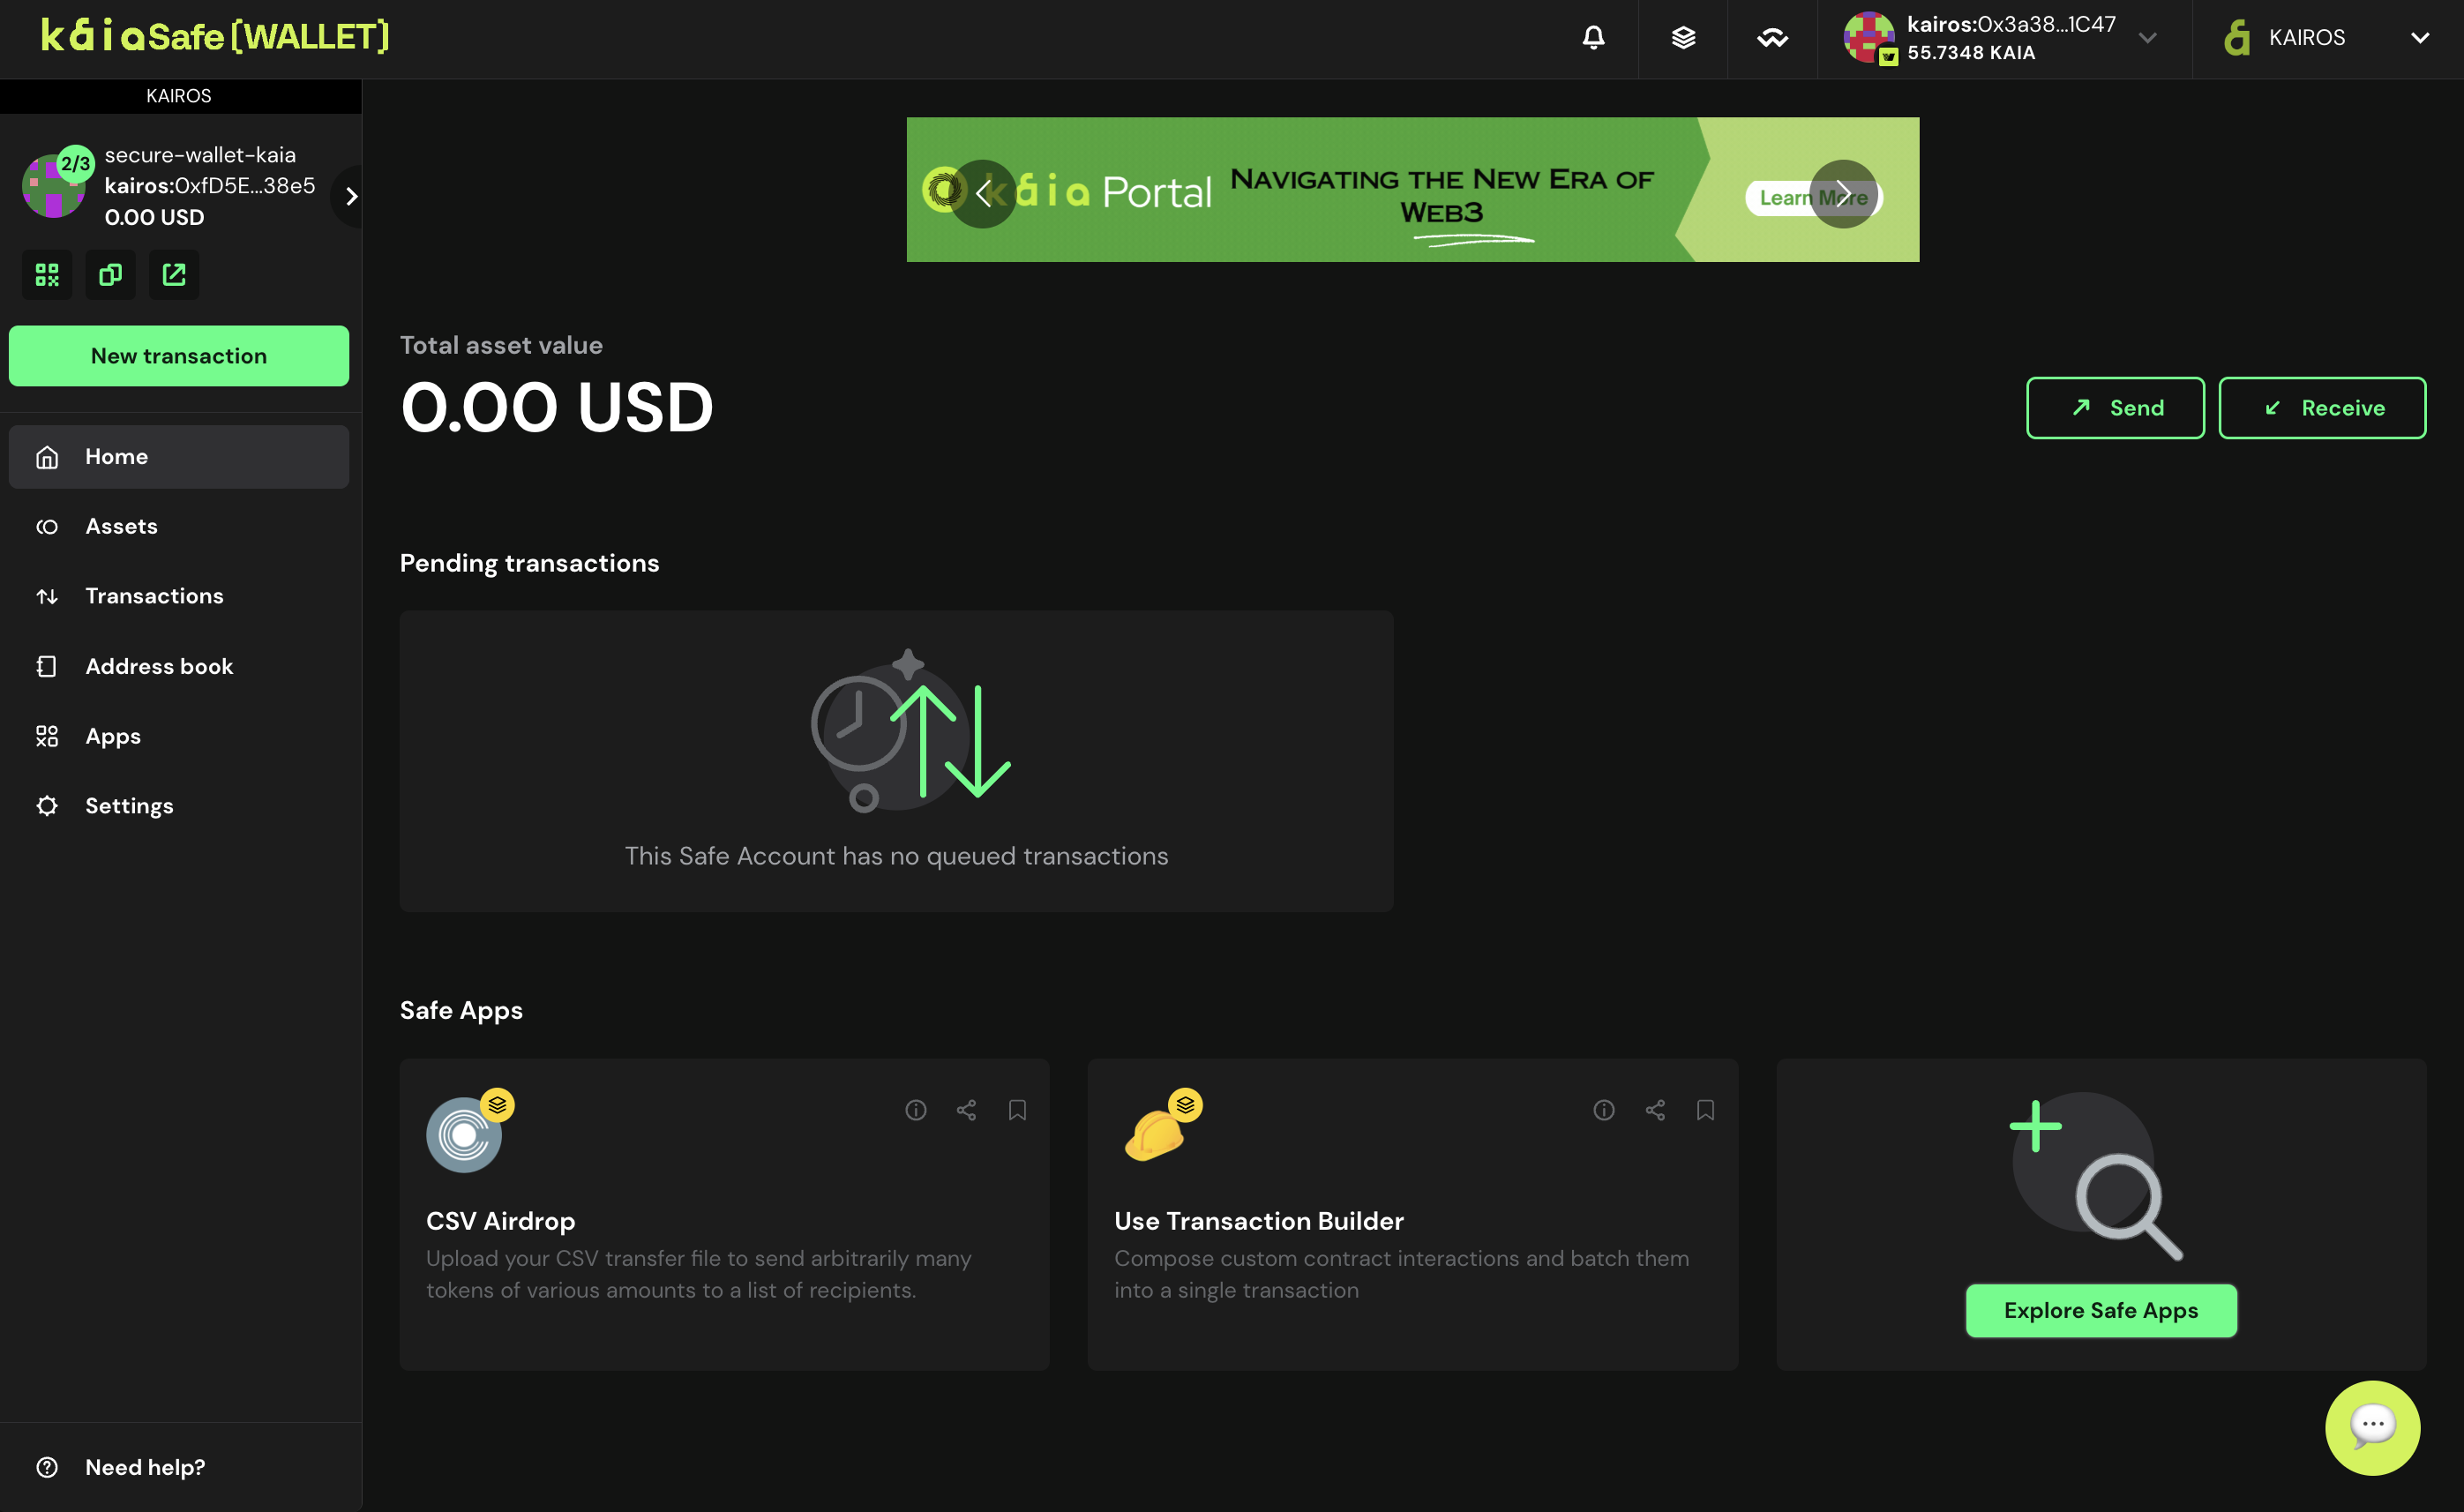
Kaia 세이프 계정을 성공적으로 생성하신 것을 축하드립니다!
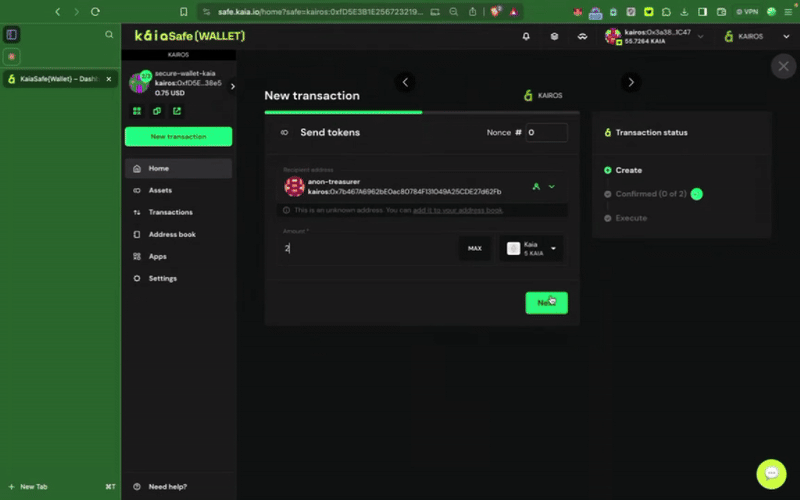
기본 트랜잭션 실행(네이티브 토큰 보내기)
이 섹션에서는 Kaia 세이프 계정에서 수취인 주소로 네이티브 토큰 Kaia를 보내는 등의 기본 트랜잭션을 실행하는 방법을 알아보세요.
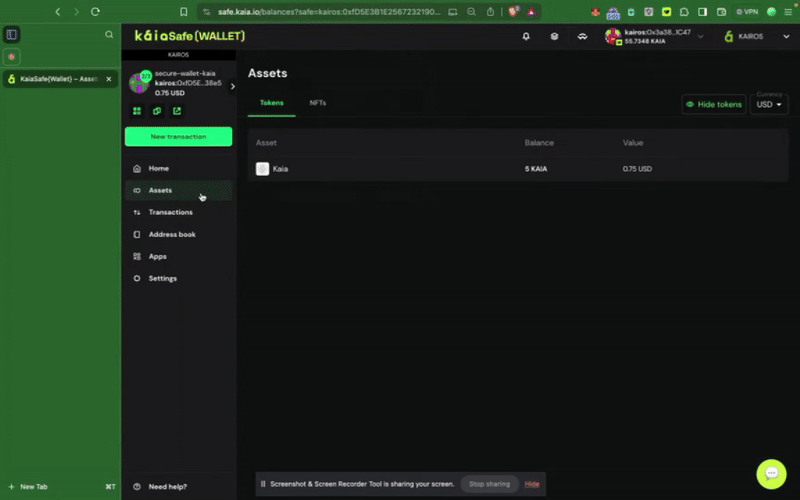
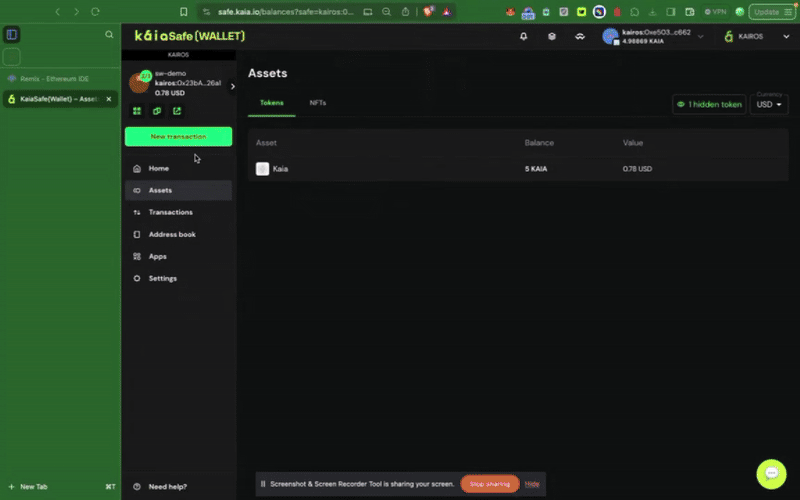
Kaia 세이프 계정에 충분한 자금이 있는지 확인하세요. 이 가이드를 참조하여 Safe 계정에 입금하는 방법을 안내받을 수 있습니다.
1단계: 사이드 메뉴에서 새 트랜잭션 버튼을 클릭하고 토큰 보내기를 선택해 새로운 자산 전송을 시작합니다.
2단계: 이전할 자산을 선택합니다. 송금할 수취인 주소와 Kaia 금액을 추가합니다.
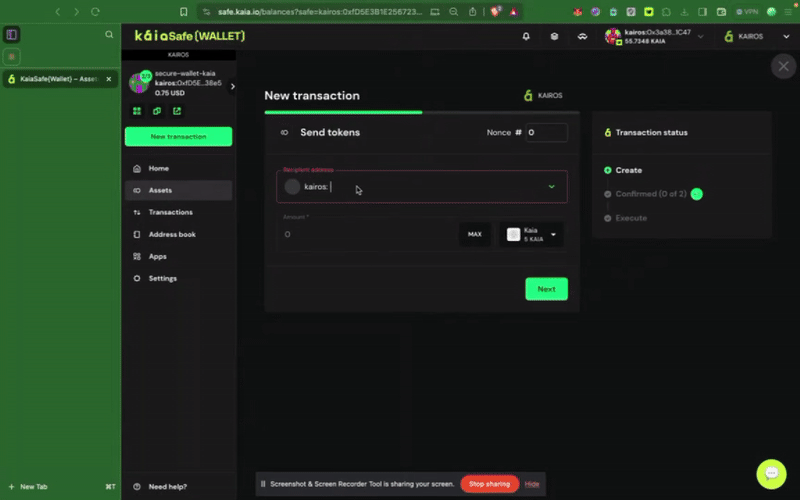
3단계: 거래를 검토하고 제출합니다. 서명자 지갑으로 거래에 서명해야 하며, 확인 임계값에 도달하면 거래가 실행됩니다.
4.2. 레시피: 중요한 스마트 컨트랙트 작업을 위해 Kaia 세이프 통합하기
이 가이드에서는 스마트 컨트랙트에서 Kaia 세이프 계정을 관리자로 지정하는 방법을 알려드리겠습니다. 또한 승인된 서명자만 권한 작업을 수행할 수 있도록 Kaia 세이프 계정을 사용하여 setTokenPrice() 및 **pause()**와 같은 권한 함수를 실행하는 방법도 확인할 수 있습니다.
전제 조건
1단계: Remix IDE로 이동합니다.
2단계: 샘플 토큰 컨트랙��트 컴파일 및 배포
멀티서명 지갑에서 권한이 있는 함수를 호출하여 컨트랙트와 상호작용하려면 먼저 컨트랙트를 배포해야 합니다. 가장 먼저 해야 할 일은 배포 시 새로 생성한 Kaia 세이프 계정을 토큰 컨트랙트의 initialOwner로 설정하는 것입니다.
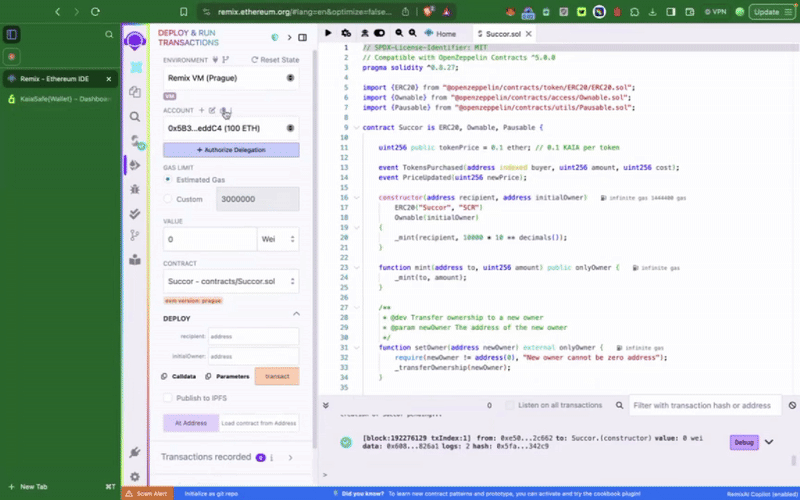
이 샘플 토큰 컨트랙트에는 Kaia 세이프 계정으로만 호출할 수 있는 setTokenPrice(), **pause()**와 같은 권한 함수가 포함되어 있습니다. 다음으로 해야 할 일은 이러한 작업을 적절히 실행하는 것입니다. 트랜잭션 빌더를 사용하거나 Kaia 세이프 API 키트를 사용하여 프로그래밍 방식으로 이 작업을 수행할 수 있습니다.
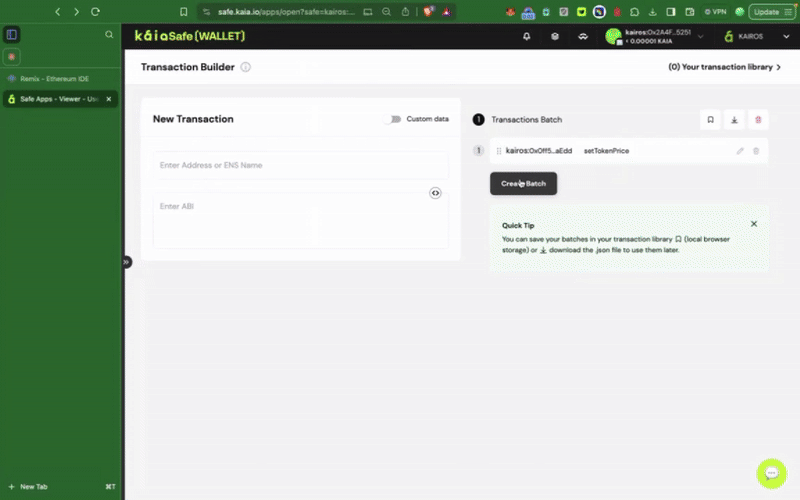
3단계: 새 거래 시작하기
트랜잭션 빌더 사용
안전 지갑의 스마트 컨트랙트와 상호작용하려면 새 거래를 클릭하세요. 이 단계를 완료하려면 이전 단계에서 설명한 ��대로 이미 배포한 컨트랙트 주소와 ABI가 필요합니다.
Kaia 세이프 API 키트 사용
이 섹션에서는 Kaia 세이프 API 키트를 사용해 setTokenPrice 함수를 호출하는 트랜잭션을 프로그래밍 방식으로 제안하고, 세이프 계정 소유자의 서명을 수집하고, 트랜잭션을 실행하는 방법을 설명합니다.
전제 조건
- Node.js 및 npm
- 서명자가 여러 명인 금고
환경 설정
1단계: 프로젝트 디렉터리 만들기.
터미널에 이 명령을 복사하여 붙여넣어 프로젝트 폴더를 만듭니다.
mkdir kaia-safe-api-contract-examplecd kaia-safe-api-contract-example
2단계: npm 프로젝트 초기화하기.
터미널에 이 명령을 복사하여 붙여넣어 package.json 파일을 만듭니다.
npm init -y
3단계: 종속성 설치.
API-Kit 사용은 아래 설치 명령을 실행하는 것만큼 간단합니다:
npm install --save-dev @safe-global/api-kit@2.4.2 @safe-global/protocol-kit@4.0.2 @safe-global/safe-core-sdk-types@5.0.2
npm install --save-dev ethers dotenv
4단계: 종속성 가져오기.
'app.js'라는 파일을 만듭니다. 이 상호작용을 위한 모든 코드 스니펫이 여기에 있습니다.
필요한 임포트를 복사하여 app.js 파일 상단에 붙여넣습니다.
import SafeApiKit from "@safe-global/api-kit";import Safe from "@safe-global/protocol-kit";import { OperationType } from "@safe-global/safe-core-sdk-types";import { ethers } from "ethers";import "dotenv/config";
5단계: 설정 구성
API-Kit의 작동 방식을 효율적으로 설명하기 위해 서명자가 2명 이상이고 임계값이 2인 안전 계정을 설정하여 거래를 실행할 때 수집해야 하는 서명을 여러 개 사용하겠습니다.
app.js` 파일의 가져오기 문 아래에 다음을 복사하여 붙여넣습니다:
const RPC_URL = "https://responsive-green-emerald.kaia-kairos.quiknode.pro";const SAFE_ADDRESS = "<REPLACE WITH SAFE PUBLIC ADDRESS HERE>";const CONTRACT_ADDRESS = "<REPLACE WITH CONTRACT ADDRESS>";const OWNER_1_ADDRESS = "<REPLACE WITH OWNER_1 ADDRESS>";const OWNER_1_PRIVATE_KEY = process.env.OWNER_ONE_PK;const OWNER_2_PRIVATE_KEY = process.env.OWNER_TWO_PK; // OWNER 2 need not have any test KAIA
6단계: 안전한 거래 제안, 확인 및 실행
이 단계에서는 Safe API-Kit과 여러 소유자가 있는 Safe 계정을 사용하여 스마트 컨트랙트 함수 호출을 제안, 서명 및 실행합니다. 금고에서 트랜잭션을 전송하여 스마트 컨트랙트 메서드 **setTokenPrice()**를 호출하지만, **pause()**와 같은 모든 권한 함수에도 동일한 구조가 적용됩니다.
app.js` 파일의 초기 설정 아래에 다음을 복사하여 붙여넣습니다:
// Create interface from ABIconst contractABI = [ "function pause()", "function setTokenPrice(uint256 newPrice)",];const iface = new ethers.Interface(contractABI);// Encode function calls// const pauseData = iface.encodeFunctionData("pause", []);const setTokenPriceData = iface.encodeFunctionData("setTokenPrice", [15]);const apiKit = new SafeApiKit.default({ chainId: 1001n, txServiceUrl: "https://docs-safe.kaia.io/txs-baobab/api",});const protocolKitOwner1 = await Safe.default.init({ provider: RPC_URL, signer: OWNER_1_PRIVATE_KEY, safeAddress: SAFE_ADDRESS,});// 1. Create transactionconst safeTransactionData = { to: CONTRACT_ADDRESS, value: "0", data: setTokenPriceData, operation: OperationType.Call,};const safeTransaction = await protocolKitOwner1.createTransaction({ transactions: [safeTransactionData],});const safeTxHash = await protocolKitOwner1.getTransactionHash(safeTransaction);const senderSignature = await protocolKitOwner1.signHash(safeTxHash);console.log(safeTxHash);// 2. Propose transaction to the serviceconst proposeTx = await apiKit.proposeTransaction({ safeAddress: SAFE_ADDRESS, safeTransactionData: safeTransaction.data, safeTxHash, senderAddress: OWNER_1_ADDRESS, senderSignature: senderSignature.data})// 3. Confirmation from Owner 2const protocolKitOwner2 = await Safe.default.init({ provider: RPC_URL, signer: OWNER_2_PRIVATE_KEY, safeAddress: SAFE_ADDRESS})const signature2 = await protocolKitOwner2.signHash(safeTxHash)// Confirm the Safe transactionconst signatureResponse = await apiKit.confirmTransaction( safeTxHash, signature2.data)// 4. Execute transactionconst safeTxn = await apiKit.getTransaction(safeTxHash);const executeTxReponse = await protocolKitOwner1.executeTransaction(safeTxn)const receipt = await executeTxReponse.transactionResponse?.wait();console.log('Transaction executed:');console.log(`https://kairos.kaiascan.io/tx/${receipt.hash}`)
전체 코드:
import SafeApiKit from "@safe-global/api-kit";import Safe from "@safe-global/protocol-kit";import { OperationType } from "@safe-global/safe-core-sdk-types";import { ethers } from "ethers";import "dotenv/config";// https://chainlist.org/?search=kaia&testnets=trueconst RPC_URL = "https://responsive-green-emerald.kaia-kairos.quiknode.pro";const SAFE_ADDRESS = "<REPLACE WITH SAFE PUBLIC ADDRESS HERE>";const CONTRACT_ADDRESS = "<REPLACE WITH CONTRACT ADDRESS>";const OWNER_1_ADDRESS = "<REPLACE WITH OWNER_1 ADDRESS>";const OWNER_1_PRIVATE_KEY = process.env.OWNER_ONE_PK;const OWNER_2_PRIVATE_KEY = process.env.OWNER_TWO_PK; // OWNER 2 need not have any test KAIA// Create interface from ABIconst contractABI = [ "function pause()", "function setTokenPrice(uint256 newPrice)",];const iface = new ethers.Interface(contractABI);// Encode function calls// const pauseData = iface.encodeFunctionData("pause", []);const setTokenPriceData = iface.encodeFunctionData("setTokenPrice", [15]);const apiKit = new SafeApiKit.default({ chainId: 1001n, txServiceUrl: "https://docs-safe.kaia.io/txs-baobab/api",});const protocolKitOwner1 = await Safe.default.init({ provider: RPC_URL, signer: OWNER_1_PRIVATE_KEY, safeAddress: SAFE_ADDRESS,});// 1. Create transactionconst safeTransactionData = { to: CONTRACT_ADDRESS, value: "0", data: setTokenPriceData, operation: OperationType.Call,};const safeTransaction = await protocolKitOwner1.createTransaction({ transactions: [safeTransactionData],});const safeTxHash = await protocolKitOwner1.getTransactionHash(safeTransaction);const senderSignature = await protocolKitOwner1.signHash(safeTxHash);console.log(safeTxHash);// 2. Propose transaction to the serviceconst proposeTx = await apiKit.proposeTransaction({ safeAddress: SAFE_ADDRESS, safeTransactionData: safeTransaction.data, safeTxHash, senderAddress: OWNER_1_ADDRESS, senderSignature: senderSignature.data})// 3. Confirmation from Owner 2const protocolKitOwner2 = await Safe.default.init({ provider: RPC_URL, signer: OWNER_2_PRIVATE_KEY, safeAddress: SAFE_ADDRESS})const signature2 = await protocolKitOwner2.signHash(safeTxHash)// Confirm the Safe transactionconst signatureResponse = await apiKit.confirmTransaction( safeTxHash, signature2.data)// 4. Execute transactionconst safeTxn = await apiKit.getTransaction(safeTxHash);const executeTxReponse = await protocolKitOwner1.executeTransaction(safeTxn)const receipt = await executeTxReponse.transactionResponse?.wait();console.log('Transaction executed:');console.log(`https://kairos.kaiascan.io/tx/${receipt.hash}`)
이 코드는 다음 작업을 수행합니다:
- ethers.Interface를 사용하여 컨트랙트 ABI에서 인터페이스를 생성합니다.
- setTokenPrice(uint256) 함수 호출을 인코딩합니다.
- 두 소유자 모두에 대해 Safe API-Kit 및 Protocol-Kit 초기화
- 안전한 거래 생성
- 세이프 서비스에 트랜잭션을 제안합니다.
- 두 번째 소유자와 거래에 서명합니다.
- 모든 필수 서명으로 거래를 확인합니다.
- 금고에서 트랜잭션을 실행합니다.
이제 코드가 실제로 작동하는 모습을 살펴보겠습니다. 터미널에서 node app.js를 실행하면 다음과 같은 출력이 표시됩니다:
0xfa537bf8282ae36d933c41d867dee1ced93657094efe60c07180a872bb1388fcTransaction executed:https://kairos.kaiascan.io/tx/0xad94e0e8fd2d29602825b3815468dedb14221401438a9fbcfdfbeebaec6e52a7
이제 Remix IDE에서 '토큰 가격'이 15로 설정되어 있을 것입니다.

축하합니다! Kaia 세이프 API 키트를 사용하여 Kaia 세이프 계정에서 권한 기능을 성공적으로 실행했습니다.
4단계: 거래 검토 및 제출
트랜잭션 빌더 사용
서명자 지갑으로 거래에 서명해야 하며, 확인 임계값에 도달하면 거래가 실행됩니다.
부록
부록 A: 용어집
- 콜드 스토리지: 인터넷과 물리적으로 격리된 장치에 개인 키를 저장하는 방식입니다.
- 디앱(탈중앙화 애플리케이션): 중앙 서버가 아닌 블록체인과 같은 탈중앙화된 네트워크에서 실행되는 애플리케이션.
- 암호화된 키 저장소: 비밀번호로 암호화된 개인 키가 포함된 파일입니다.
- 하드웨어 지갑: 개인 키를 오프라인에 저장하고 내부적으로 거래에 서명하는 물리적 장치입니다.
- 다중 서명(다중 서명): 단일 거래를 승인하기 위해 여러 개의 독립적인 개인 키의 승인이 필요한 지갑 유형입니다.
- 개인 키: 소유자에게 암호화폐에 대한 액세스 권한과 거래를 할 수 있는 기능을 제공하는 비밀 영숫자 문자열입니다. 절대 공유해서는 안 됩니다.
- 공개 키/주소: 자금을 받는 데 사용되는 공개적으로 공유할 수 있는 암호화 키입니다. 개인 키에서 파생됩니다.
- 시드 문구(또는 니모닉 문구): 암호화폐 지갑에 있는 모든 개인 키의 마스터 백업 역할을 하는 12~24개의 단어 목록입니다.
부록 B: 샘플 환경 구성
독자들이 튜토리얼을 성공적으로 따라하고 이 가이드의 코드 예제를 복제할 수 있도록 구현하는 데 사용되는 개발 환경의 샘플 구성은 다음과 같습니다. 호환성 문제를 방지하려면 로컬 설정을 이러한 버전에 맞추는 것이 좋습니다.
Node.js
$ node --version v22.14.0
하드햇
$ npx hardhat --version 3.0.0-next.20
파운드리(주조)
$ forge -V forge 1.2.3-stable (a813a2cee7 2025-06-08T15:42:50.507050000Z)
네트워크 엔드포인트
- RPC 제공업체: https://responsive-green-emerald.kaia-kairos.quiknode.pro
- 타겟 체인: Kairos 테스트넷 (체인 ID: 1001)
- 차단 탐색기: KaiaScan