Build a dApp using Scaffold-ETH 2

Introduction
Scaffold-ETH 2 is an open-source toolkit for building decentralized applications (dApps) on Ethereum and other EVM-compatible blockchains, like Kaia. Developers can easily deploy a Solidity smart contract and launch a dApp with a React frontend thanks to Scaffold-ETH 2.
The Scaffold-ETH 2 toolkit was built using Next.js, RainbowKit, Hardhat, Foundry, Wagmi, and TypeScript. Developers can easily create, test, and deploy smart contracts using Hardhat or Foundry, as well as build a React frontend using Next.js.
In this tutorial, you will learn how to deploy, run a contract and build a dApp on Kaia using Scaffold-ETH 2.
Prerequisites
To get started with in this guide, you will need:
- Node (>= v18.17)
- Yarn (v1 or v2+)
- Familiarity with Javascript and React basics such as hooks
- Metamask Wallet
- Test KAIA from Faucet
- RPC Endpoint: you can obtain this from one of the supported endpoint providers
Setting up development environment
To install Scaffold-ETH 2, you have two options, either to install by cloning Scaffold-ETH 2 repository or by using npx create-eth@latest.
For the sake of this guide, we will use the npx method to bootstrap our Scaffold-ETH 2 project.
Bootstrap a Scaffold-ETH 2 project by running the command below:
npx create-eth@latest
You will be presented with a series of prompts:
Project Name: Input your project name: Enter a name for your project, e.g., kaia-scaffold-example.
Solidity Framework; What solidity framework do you want to use?: Choose your preferred solidity framework (Hardhat, Foundry). For this guide, we will use the Hardhat framework.
Install packages?: Press Enter for yes (default option) or type n and press Enter for no Once the setup is complete, navigate to the project directory.
cd project-name// e.g cd kaia-scaffold-example

Highlight of the development process with Scaffold-ETH 2
The process for developing a project with Scaffold-ETH 2 can be outlined as follows:
- Update the network configurations for Hardhat to target Kaia in packages/hardhat/hardhat.config.ts file
- Add your smart contracts to the packages/hardhat/contracts
- Edit your deployment scripts in the packages/hardhat/deploy
- Deploy your smart contracts to Kaia
- Verify your smart contracts with hardhat verify plugin
- Configure your frontend to target Kaia in the packages/nextjs/scaffold.config.ts file
- Edit your frontend as needed in the packages/nextjs/pages directory
For the sake of this guide, we’ll use the default sample contract and frontend available after Scaffold-ETH 2 installation. All that is required is to modify these components for Kaia. In that case, we’ll split the configurations into Hardhat and Next.js configurations.
Hardhat Configuration
In this section, you'll modify the network configurations in the Hardhat configuration file to target Kaia under the packages/hardhat folder.
Configure Hardhat for Kaia
Step 1: Configure your network
The first thing we want to do is to configure hardhat.config.ts to support Kaia networks. Go to packages/hardhat/hardhat.config.ts and add your Kaia networks to the networks object.
- Kaia Mainnet
- Kairos Testnet
networks: { // … other networks kaia: { chainId: 8217, url: "https://public-en.node.kaia.io", accounts: [deployerPrivateKey], }, }
networks: { // … other networks kairos: { chainId: 1001, url: "https://public-en-kairos.node.kaia.io", accounts: [deployerPrivateKey], }, }
Step 2: Generate a new account or add one to deploy the contract(s) from
The next thing you want to do is to configure your account. You can generate a random account / private key by running:
yarn generate
It will automatically add the encrypted private key (DEPLOYER_PRIVATE_KEY_ENCRYPTED) in your .env file.
You will be prompted to enter a password which will be used to encrypt your private key. Do not forget this password as you'll need it for future deployments and account queries.
If you prefer to import your private key, run:
yarn account:import
You will be prompted to paste your private key and set the encryption password. It will store your encrypted private key in your .env file.
You can check the configured (generated or imported) account and balances with:
yarn account
For this step, you will need to also enter your password to decrypt the private key and view the account information and balances.
Deploy Contract to Kaia
After configuring Hardhat to support the Kaia network, the next step is to compile and deploy the sample contract.
First, you can compile your contract by running:
yarn compile
Next, to deploy your contract, you have two options:
Option 1: Set a default network
Configure the defaultNetwork field in your hardhat.config.ts file to kaia or kairos.
When you run yarn deploy, the contract will be deployed to the specified default network.
Option 2: Specify a network explicitly
To deploy to a specific network, use the --network flag when running the deployment command:
yarn deploy --network network_name
e.g: yarn deploy --network kairos
Output:
% yarn deploy✔ Enter password to decrypt private key:Nothing to compileNo need to generate any newer typings.deploying "YourContract" (tx: 0x90d0587fcbbfd34057c9bc8c77a3ae56807bcee20c19b278499ca5da70affbbb)...: deployed at 0xb1ea8476debb6d3021cC3a179B9eC21e01742d82 with 534186 gas👋 Initial greeting: Building Unstoppable Apps!!!📝 Updated TypeScript contract definition file on ../nextjs/contracts/deployedContracts.ts
Verify Your Deployed Contract
To verify our already deployed contract, we'll use the hardhat verify plugin. All that is required is to add the following configuration to your hardhat.config.ts under the harhdat-verify etherscan configuration object.
- Kaia Mainnet
- Kairos Testnet
etherscan: { apiKey: { kaia: "unnecessary", }, customChains: [ { network: "kaia", chainId: 8217, urls: { apiURL: "https://mainnet-api.kaiascan.io/hardhat-verify", browserURL: "https://kaiascan.io", }, }, ], },
etherscan: { apiKey: { kairos: "unnecessary", }, customChains: [ { network: "kairos", chainId: 1001, urls: { apiURL: "https://kairos-api.kaiascan.io/hardhat-verify", browserURL: "https://kairos.kaiascan.io", }, }, ], },
Next is to copy and paste the following command in your terminal to verify the smart contract:
Example
yarn hardhat-verify --network network_name contract_address "Constructor arg 1"
Actual
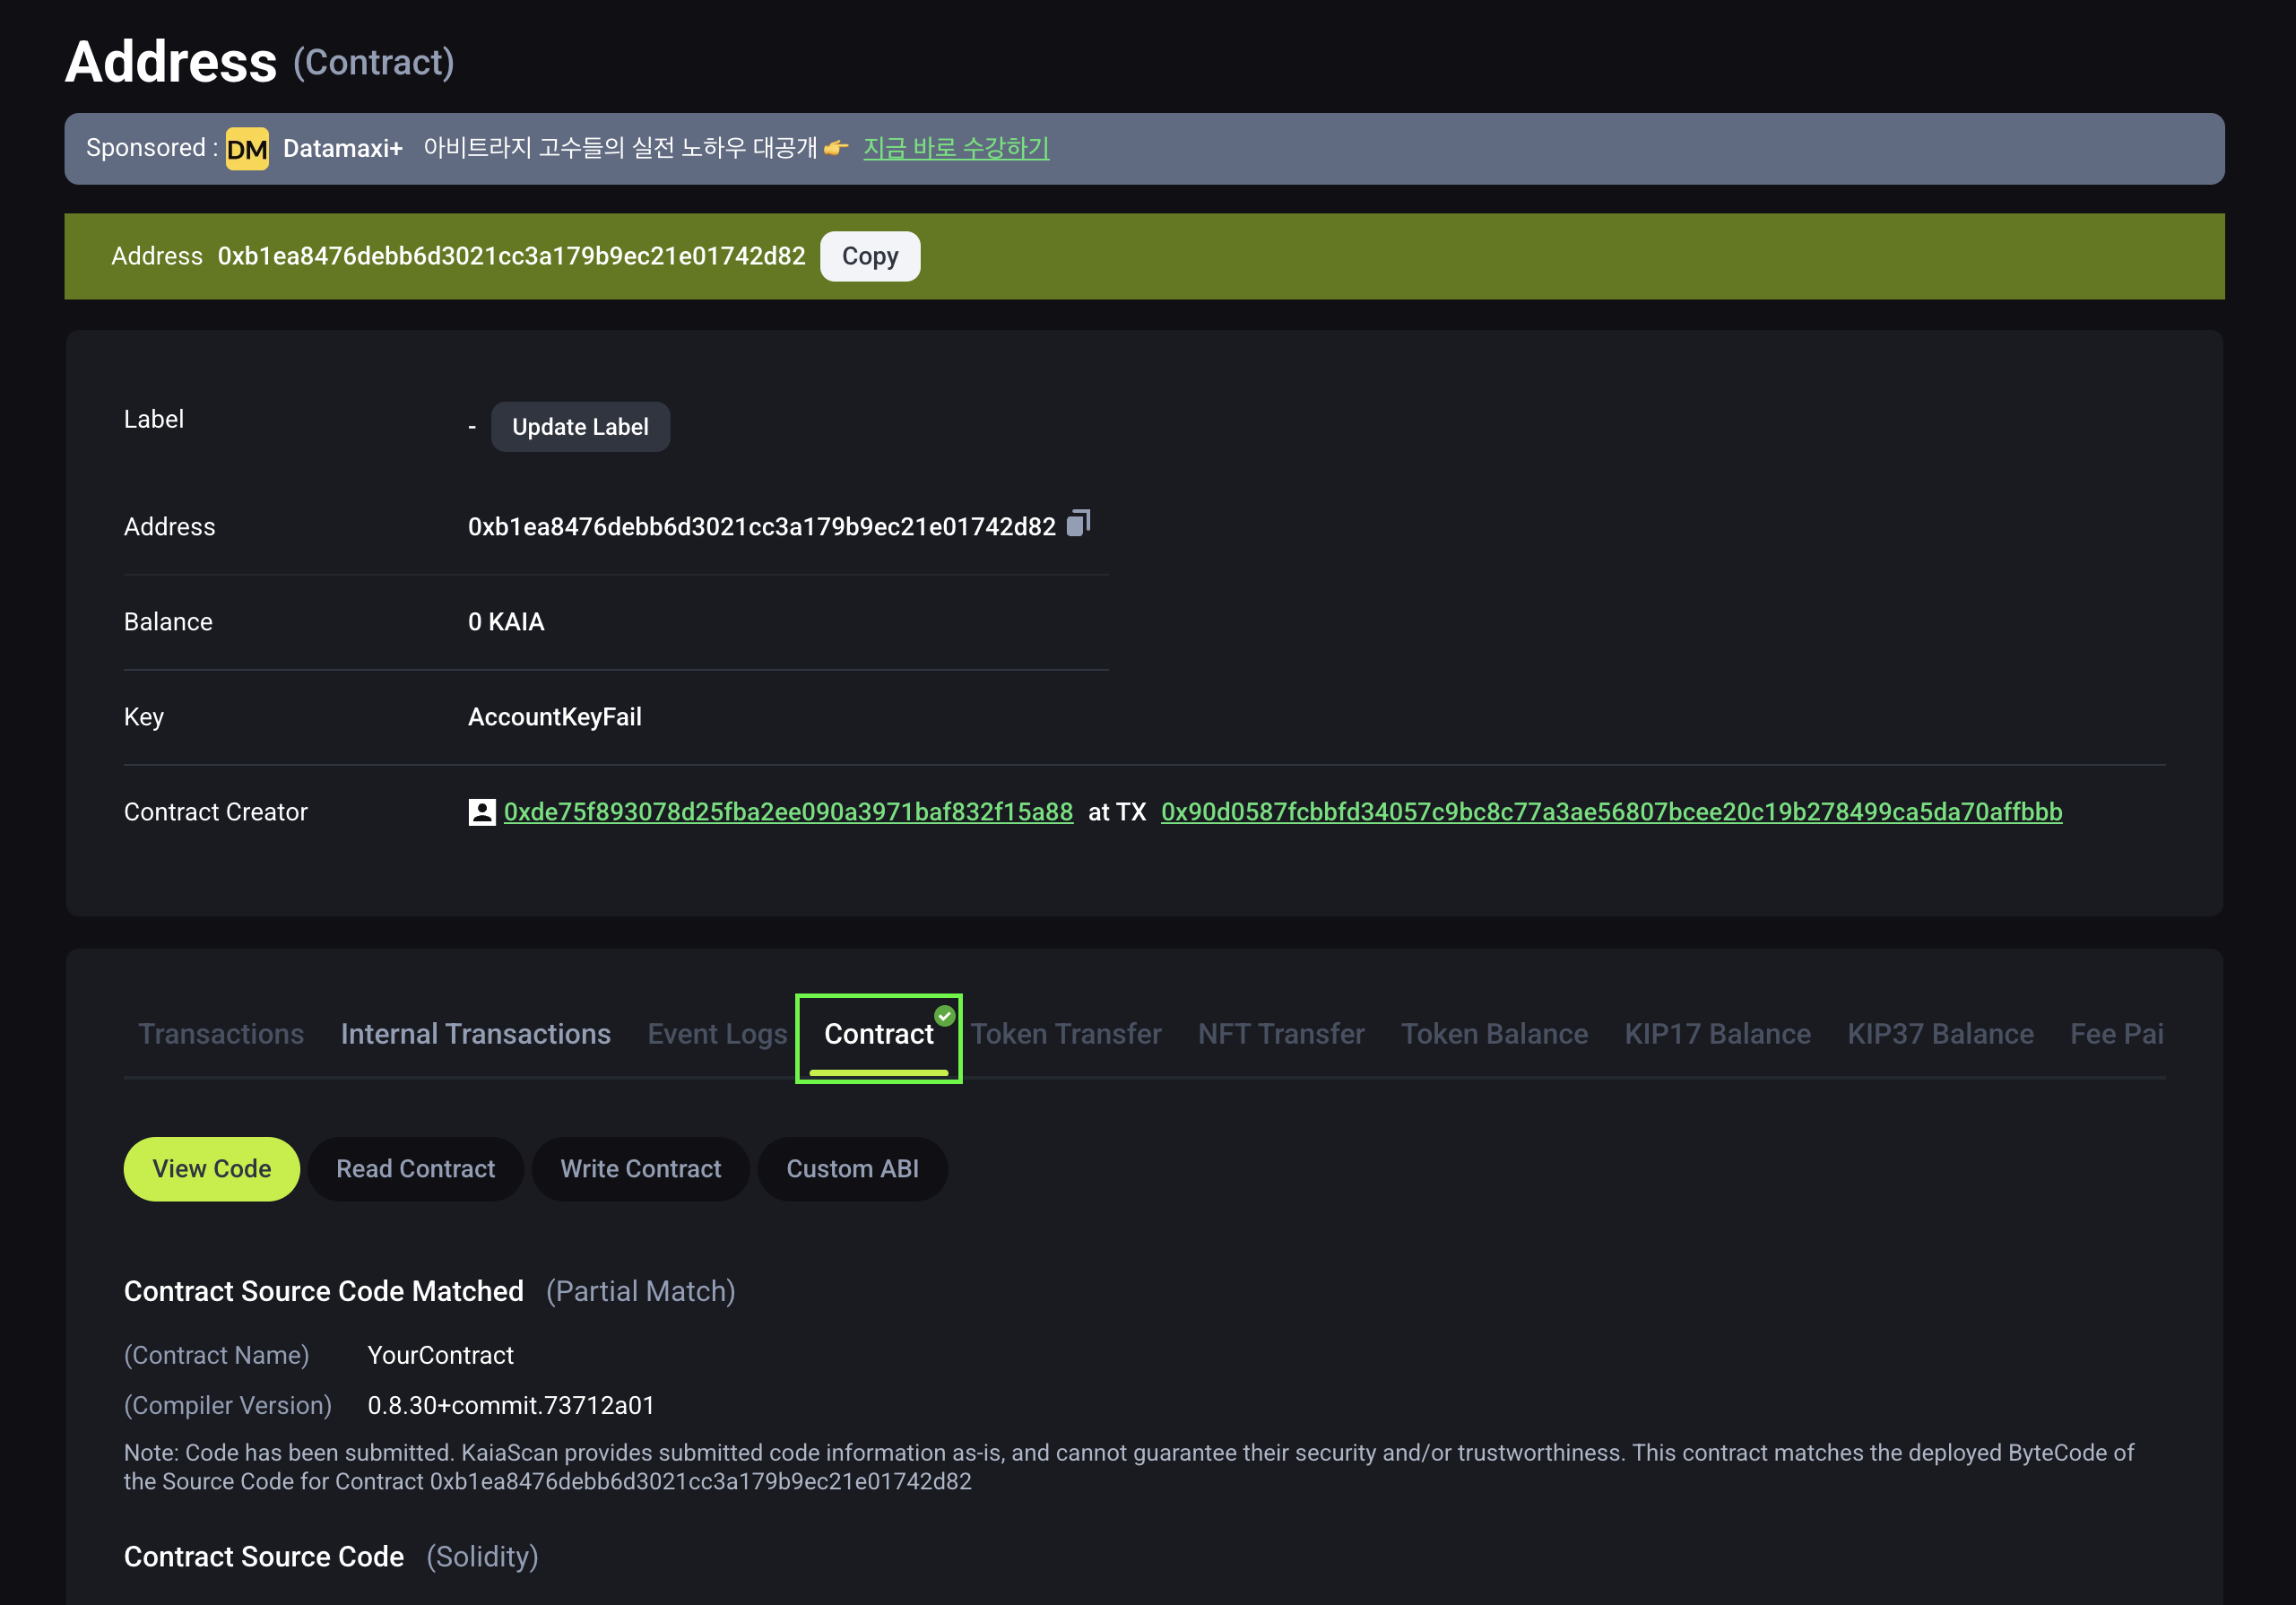
yarn hardhat-verify --network kairos 0xb1ea8476debb6d3021cC3a179B9eC21e01742d82 "0xDe75f893078D25fBA2eE090A3971baF832F15A88"
As you can see above, to verify your contracts, you have to pass in the network name, contract address and constructor arguments (if any). After a short wait, the console will display the verification result and, if successful, the URL to the verified contract on KaiaScan will be provided.
Output:
% yarn hardhat-verify --network kairos 0xb1ea8476debb6d3021cC3a179B9eC21e01742d82 "0xDe75f893078D25fBA2eE090A3971baF832F15A88"Successfully submitted source code for contractcontracts/YourContract.sol:YourContract at 0xb1ea8476debb6d3021cC3a179B9eC21e01742d82for verification on the block explorer. Waiting for verification result...Successfully verified contract YourContract on the block explorer.https://kairos.kaiascan.io/address/0xb1ea8476debb6d3021cC3a179B9eC21e01742d82#code
For more information about verifying smart contracts on Kaia using the Hardhat Verify plugin, please refer to the Hardhat Verify Plugin guide.
Next.js Configuration
In this section, you'll modify the Next.js configuration to target Kairos Testnet (where the smart contract was deployed to) under the packages/nextjs folder. In this folder, we intend to modify the targetNetwork array in the scaffoldConfig object in scaffold.config.ts file.
Modify the targetNetwork array
targetNetworks: [chains.kaia, chains.kairos],
That's all required to configure Next.js! Next, is to launch the dApp in your localhost.
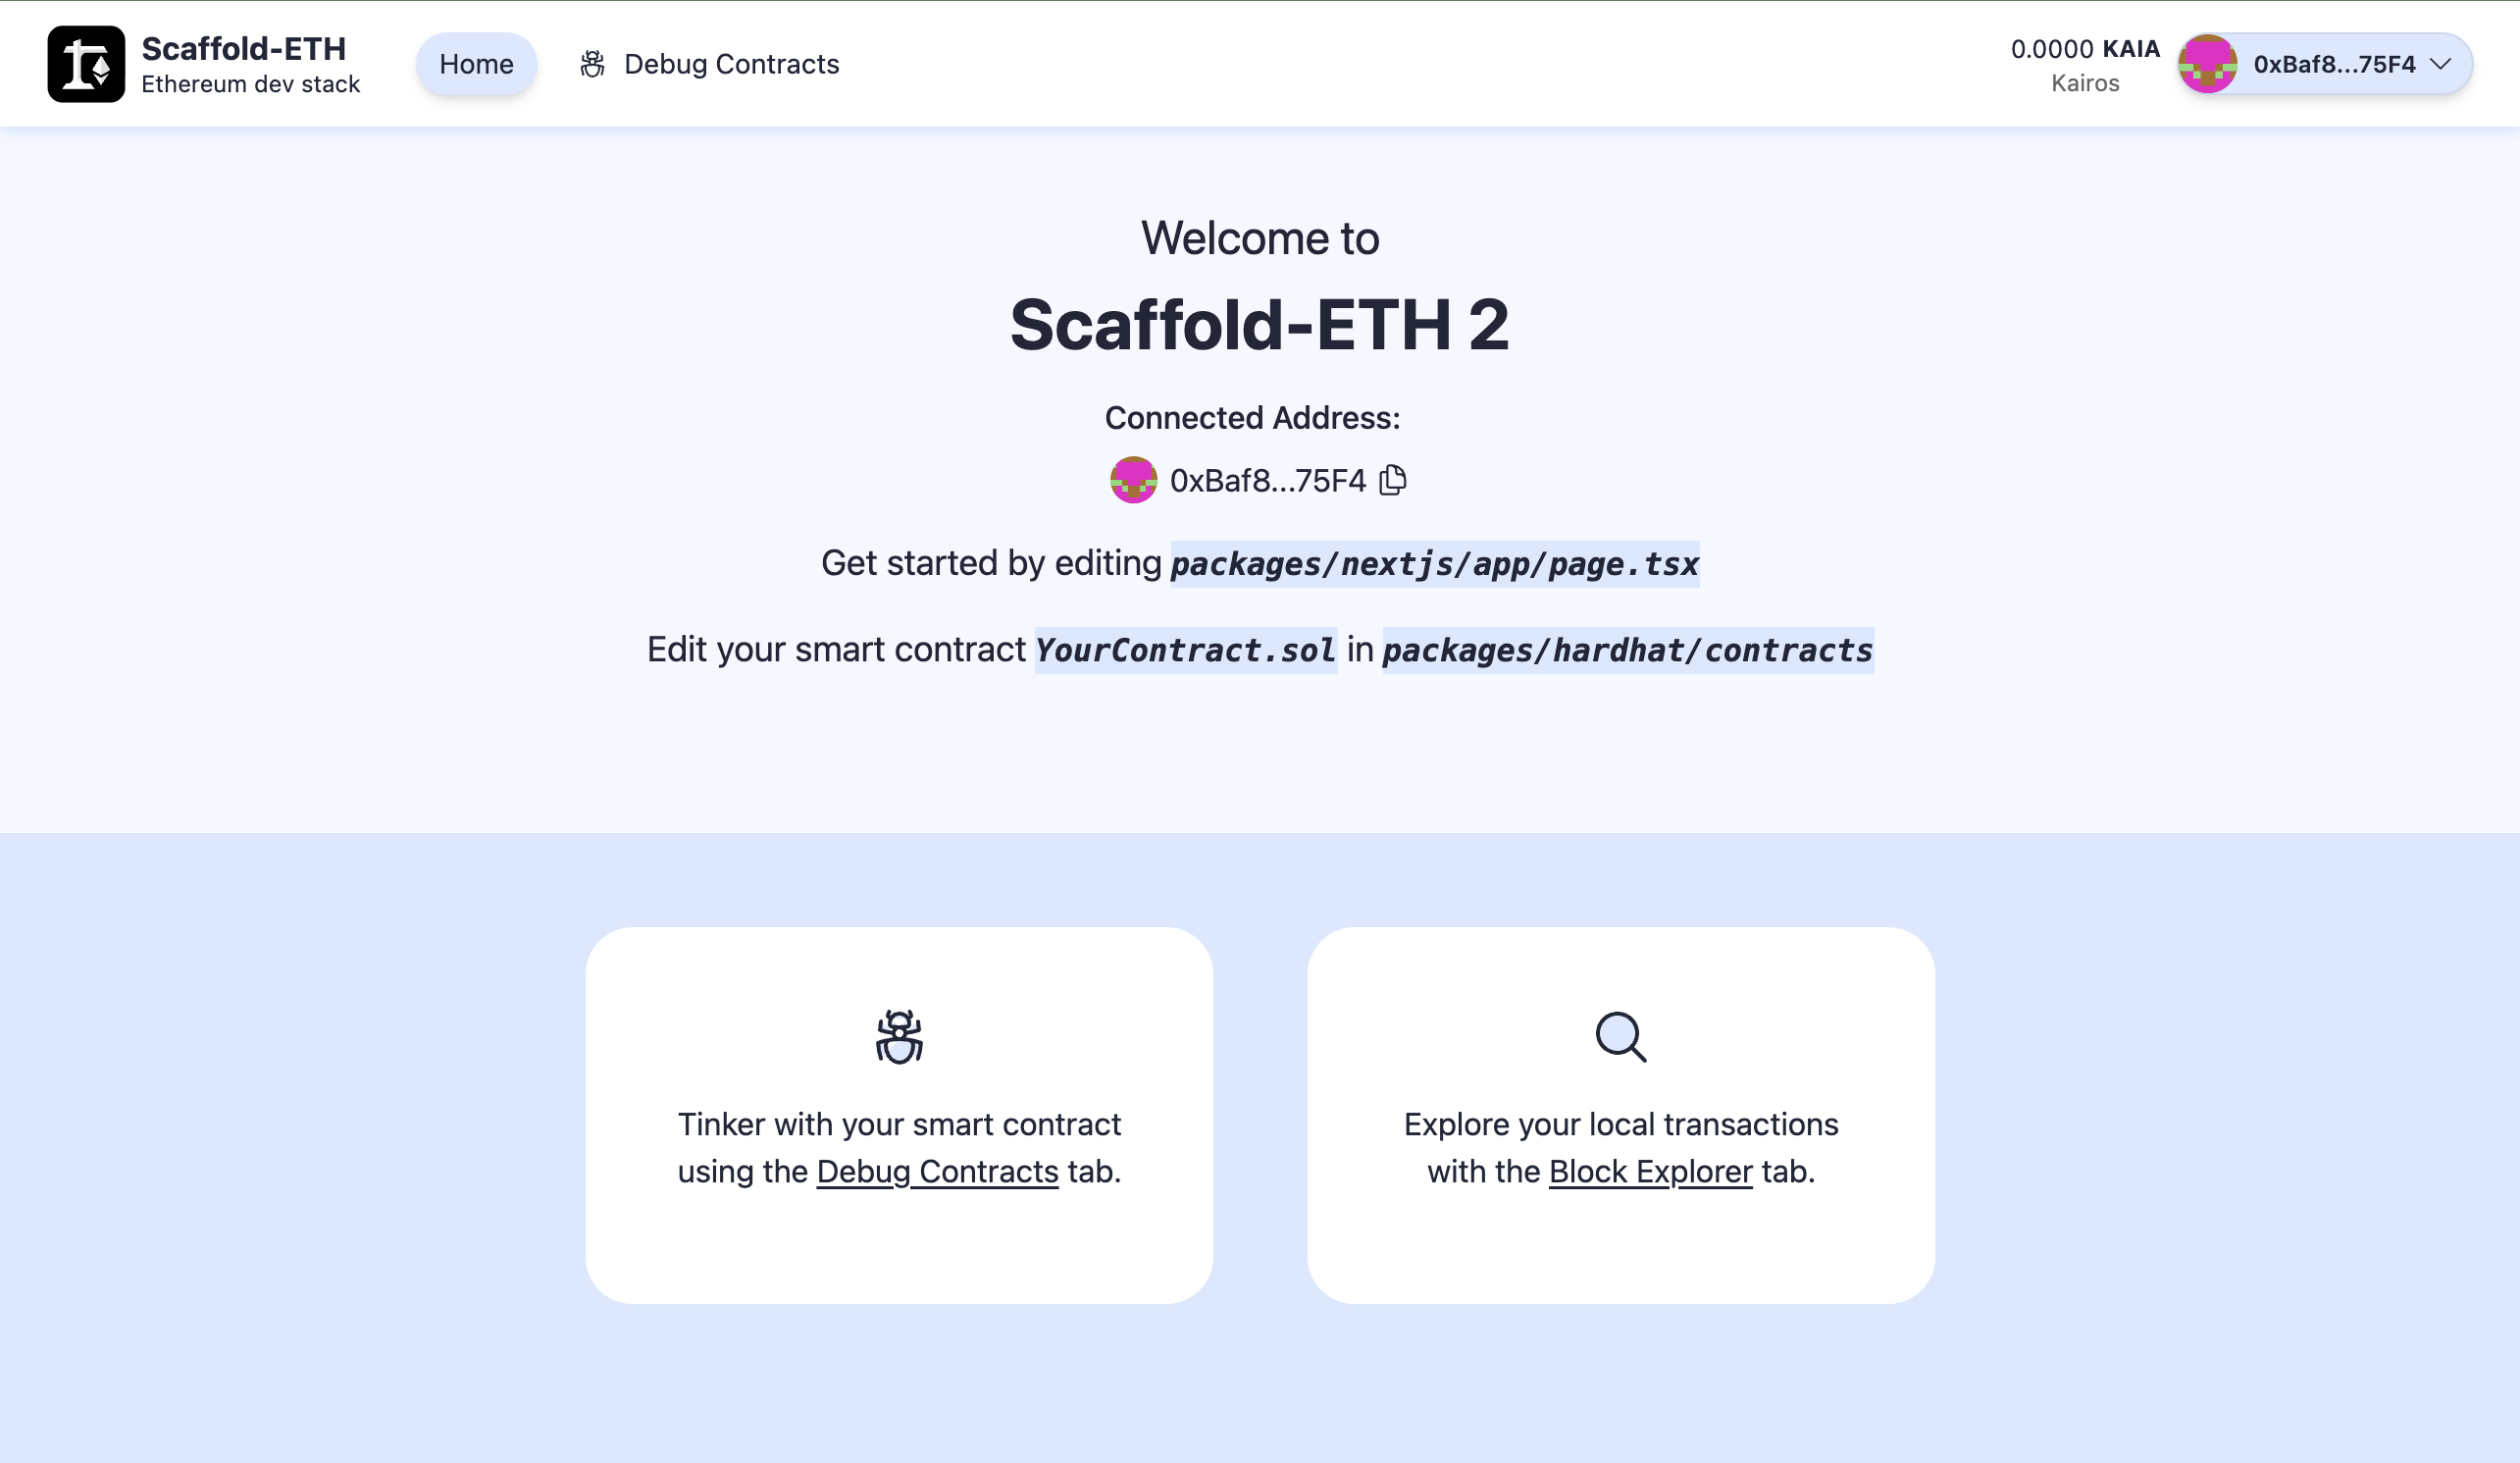
Launch the dApp in your Localhost
After making all the necessary configurations, you can now launch the example dApp on your localhost.
To do so, run:
yarn start
You should now be able to access a React-based dApp frontend at http://localhost:3000/. Feel free to interact with the dApp by connecting your wallet or checking out the contract debugger page.
Conclusion
Congratulations! You have successfully used Scaffold-ETH 2 to deploy a contract and run a dApp on Kaia. Now that you understand the workings of Scaffold-ETH 2, feel free to create and deploy your own smart contracts and modify the frontend to fit your dApp's needs!
Visit Scaffold-ETH 2 Docs for more information and Kaia Forum if you have any questions.