將 Web3-Onboard 集成到 dApp 中

導言
利用 Web3-Onboard 這樣的工具,項目和開發人員可以快速將多個錢包集成到他們的去中心化應用程序(dApps)中。 在 Web3-Onboard 的幫助下,用戶入職變得更加簡單。 Web3-Onboard 確實有不同的功能,從支持多種錢包到用戶可以將賬戶連接到不同的鏈或網絡並接收即時交易通知等等。
在本指南中,您將使用 Web3-Onboard 庫集成多個錢包(如 Coinbase Wallet、Metamask、WalletConnect 等)。 到您在 Kaia 網絡上構建的 dApp 中。
先決條件
- 一個正在運行的 react 項目(執行
npx create-react-app project-name命令) - 安裝必要的錢包(Coinbase Wallet、Metamask)。
- RPC 端點:您可以從其中一個支援的 端點提供者 取得。
- 從 水龍頭測試 KAIA:為賬戶注入足夠的 KAIA。
開始
Web3-Onboard 作為與鏈無關的錢包庫,支持所有與 EVM 兼容的網絡,還能靈活地向庫中添加新的網絡。 在本指南中,我們將使用 Web3-Onboard 將 Kaia Mainnet 和 Kaia Testnet Kairos 添加到我們的 dApp 中。 說完這些,讓我們開始使用 Web3-Onboard 將多錢包兼容性集成到您在 Kaia Network 上構建的 dApp 中。
設置板載模塊和錢包模塊
第 1 步:安裝 @web3-onboard/core
npm i @web3-onboard/core
第 2 步:導入和實例化錢包模塊
在這一步中,您可以使用錢包模塊在您的 dApp 中添加儘可能多的錢包。 但在本指南中,您將在 web3-Onboard 實現中添加 Coinbase 錢包、WalletConnect、注入式錢包。 有關可使用 Web3-Onboard 添加到 dApp 的錢包模塊列表,請參閱此 docs 。
npm install @web3-onboard/coinbase // Coinbase Walletnpm install @web3-onboard/walletconnect // WalletConnectnpm install @web3-onboard/injected-wallets // Used to connect to Metamask
在您的 App.js 文件中,實例化錢包模塊,以便與您的 dApp 集成。 請注意,每個模塊都有自己獨特的選項參數,如備用 JSON RPC URL 或默認鏈 ID。
import coinbaseWalletModule from "@web3-onboard/coinbase";import walletConnectModule from "@web3-onboard/walletconnect";import injectedModule from "@web3-onboard/injected-wallets";const coinbaseWalletSdk = coinbaseWalletModule();const walletConnect = walletConnectModule();const injected = injectedModule();const modules = [coinbaseWalletSdk, walletConnect, injected];
第 3 步:安裝和導入乙醚
Web3-Onboard 提供程序可與 ethers.js 和 web3.js 等庫一起使用。 在本指南中,我們將使用 ethers.js 進行 Kaia 區塊鏈調用,如獲取用戶賬戶、獲取餘額、簽署交易、發送交易、讀取和寫入智能合約。
npm install --save ethers
在您的 App.js 文件中,像這樣導入 ethers 軟件包:
import { ethers } from "ethers";
第 4 步:導入和設置 Web3ReactProvider
在此步驟中,您將使用創建的模塊和與庫兼容的鏈列表實例化 Onboard。 打開您的 App.js 文件並粘貼下面的代碼:
import Onboard from "@web3-onboard/core";const ETH_MAINNET_RPC_URL = `Paste ETH RPC URL`;const KAIA_MAINNET_URL = `Paste KAIA MAINNET URL`const KAIROS_TESTNET_URL = `Paste KAIROS TESTNET URL`const onboard = Onboard({ wallets: modules, // created in previous step chains: [ { id: "0x1", // chain ID must be in hexadecimal token: "ETH", namespace: "evm", label: "Ethereum Mainnet", rpcUrl: ETH_MAINNET_RPC_URL }, { id: "0x2019", // chain ID must be in hexadecimal token: "KAIA", namespace: "evm", label: "Kaia Mainnet", rpcUrl: KAIA_MAINNET_URL }, { id: "0x3e9", // chain ID must be in hexadecimel token: "KAIA", namespace: "evm", label: "Kairos Testnet", rpcUrl: KAIROS_TESTNET_URL }, // you can add as much supported chains as possible ], appMetadata: { name: "Kaia-web3-onboard-App", // change to your dApp name icon: "https://pbs.twimg.com/profile_images/1620693002149851137/GbBC5ZjI_400x400.jpg", // paste your icon logo: "https://pbs.twimg.com/profile_images/1620693002149851137/GbBC5ZjI_400x400.jpg", // paste your logo description: "Web3Onboard-Kaia", recommendedInjectedWallets: [ { name: "Coinbase", url: "https://wallet.coinbase.com/" }, { name: "MetaMask", url: "https://metamask.io" } ] }});
設置實用工具功能
在本指南中,我們將使用 truncateAddress() 和 toHex() 等實用工具函數。 truncateAddress() "函數接收有效地址,並返回所傳遞地址的更易讀格式。 而 toHex() 函數則將數字轉換為十六進制。 以下步驟展示瞭如何在項目中設置和使用 utils 函數。
步驟 1:在 src 根文件夾中創建一個 utils.js 文件。
在新創建的 utils.js 文件中粘貼以下代碼。
export const truncateAddress = (address) => { if (!address) return "No Account"; const match = address.match( /^(0x[a-zA-Z0-9]{2})[a-zA-Z0-9]+([a-zA-Z0-9]{4})$/ ); if (!match) return address; return `${match[1]}…${match[2]}`; }; export const toHex = (num) => { const val = Number(num); return "0x" + val.toString(16); };
第 2步在您的 App.js 文件中導入函數。
import { truncateAddress, toHex } from "./utils";
連接錢包
在 App.js 文件的 App 函數中,調用板載實例上的 connectWallet() 方法來啟動板載彈出式模塊。
function App() { const connectWallet = async () => { try { const wallets = await onboard.connectWallet(); } catch (error) { console.error(error); } }; return ( <div className="App"> <button onClick={connectWallet}>Connect Wallet</button> </div> );}
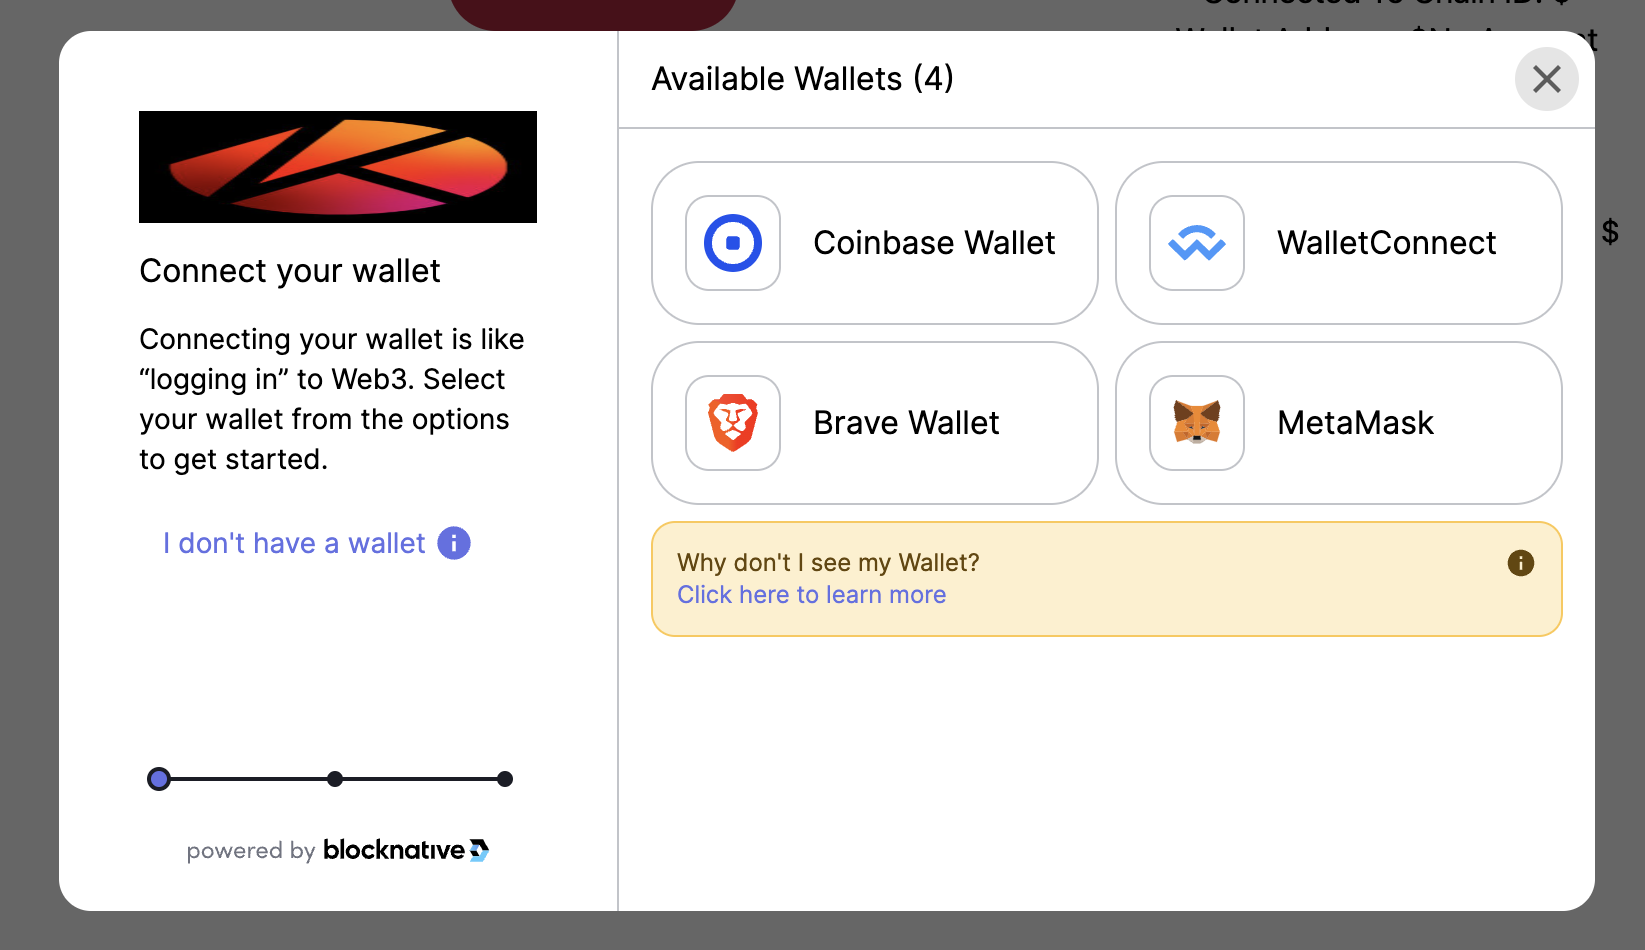
點擊 "連接錢包 "按鈕後,您將看到一個模態,允許您無縫連接 Coinbase 錢包和 dApp 中的其他實例化錢包。
斷開錢包連接
斷開連接的錢包可以通過調用板載實例上的 disconnectWallet() 方法和用戶主錢包的標籤來實現。 此外,一個好的做法是刷新狀態,清除之前存儲的連接數據。
function App() { const connectWallet = async () => { try { const wallets = await onboard.connectWallet(); } catch (error) { console.error(error); } }; const disconnect = async () => { const [primaryWallet] = await onboard.state.get().wallets; if (primaryWallet) await onboard.disconnectWallet({ label: primaryWallet.label }); refreshState(); }; // refresh state const refreshState = () => { setAccount(""); setChainId(""); setProvider(); // make sure to add every other state declared here. }; return ( <div className="App"> <button onClick={connectWallet}>Connect Wallet</button> <button onClick={disconnect}>Disconnect</button> </div> );}
訪問連接、賬戶和網絡信息
成功連接錢包後,您可以使用 onboard.state.get() 方法獲取通過 onboard 實例存儲的連接狀態。 您也可以在初始連接時獲取狀態。 現在,你可以修改 connectWallet() 方法,返回一個錢包狀態列表,將其存儲在你的狀態中,並在整個應用程序中使用。
第 1 步:導入 React 的 useState
import { useState } from 'react';
第 2 步:修改應用程序功能中的代碼
function App() { const [provider, setProvider] = useState(); const [account, setAccount] = useState(); const [chainId, setChainId] = useState(); const connectWallet = async () => { try { const wallets = await onboard.connectWallet(); const { accounts, chains, provider } = wallets[0]; setProvider(provider); setAccount(accounts[0].address); setChainId(chains[0].id); } catch (error) { console.error(error); } }; ... return ( <div className="App"> <div> { !account ? ( <button onClick={connectWallet}> Connect Wallet</button> ) : ( <button onClick={disconnect}>Disconnect</button> )} </div> <div>Wallet Address: ${truncateAddress(account)}</div> <div>Network Chain ID: ${chainId}</div> </div> );}
交換網絡
為了提示用戶在 dApp 中切換網絡,Web3-Onboard 在 Onboard 的初始化實例上提供了一個 setChain 方法。 請注意,在應用程序啟動時,目標網絡必須已通過板載實例初始化。
const switchNetwork = async () => {await onboard.setChain({ chainId: toHex(1001) });};return ( <div className="App"> <button onClick={switchNetwork}>Switch Network</button> </div>)
發送本地事務
成功連接到錢包後,可以將錢包連接返回的提供程序對象存儲到狀態變量中,就像在 connectWallet() 函數中所做的那樣。 因此,您可以使用該提供者和簽名者對象向區塊鏈發送交易。
// add to the existing useState hook. const [txHash, setTxHash] = useState(); const sendKaia = async () => { if (!provider) { console.log("provider not initialized yet"); return; } // 本指南使用 6.3.0 版的 ethers。 const ethersProvider = new ethers.BrowserProvider(provider); // 對於 6.3.0 以下的 ethers 版本。 // const provider = new ethers.providers.Web3Provider(provider); const signer = await ethersProvider.getSigner(); // 提交交易到區塊鏈並等待它被挖掘 const tx = await signer.sendTransaction({ to:"0x75Bc50a5664657c869Edc0E058d192EeEfD570eb", value: ethers.parseEther("0.1"), maxPriorityFeePerGas: "5000000000「, // 每個瓦斯的最大優先費用 maxFeePerGas: 」6000000000000", // 每個瓦斯的最大費用 }) const receipt = await tx.wait(); setTxHash(receipt.hash) }return ( <div className="App"> <button onClick={sendKlay}>Send Klay</button> <div>Send-Kaia Tx Hash : {txHash ?<a href={`https://kairos.kaiascan.io/tx/${txHash}`} target="_blank">KaiaScan</a> : ' '} </div> </div> <div className="App"> </div>);
與智能合約互動
有了 Web3-Onboard 提供者和簽名者對象,您就可以進行合約交互,例如寫入和讀取部署在區塊鏈上的智能合約。
// add to existing useState hook const [contractTx, setContractTx] = useState(); const [contractMessage, setContractMessage] = useState(); const writeToContract = async (e) => { e.preventDefault(); if (!provider) { console.log("provider not initialized yet"); return; } // this guide uses ethers version 6.3.0. const ethersProvider = new ethers.BrowserProvider(provider); // for ethers version below 6.3.0. // const provider = new ethers.providers.Web3Provider(provider); const signer = await ethersProvider.getSigner(); // Paste your contractABI const contractABI = [ { "inputs": [ { "internalType": "uint256", "name": "_initNum", "type": "uint256" } ], "stateMutability": "nonpayable", "type": "constructor" }, { "inputs": [], "name": "retrieve", "outputs": [ { "internalType": "uint256", "name": "", "type": "uint256" } ], "stateMutability": "view", "type": "function" }, { "inputs": [ { "internalType": "uint256", "name": "num", "type": "uint256" } ], "name": "store", "outputs": [], "stateMutability": "nonpayable", "type": "function" } ] // Paste your contract address const contractAddress = "0x3b01E4025B428fFad9481a500BAc36396719092C"; // const contract = new Contract(contractAddress, contractABI, provider); const contract = new ethers.Contract(contractAddress, contractABI, signer); const value = e.target.store_value.value; // Send transaction to smart contract to update message const tx = await contract.store(value); // Wait for transaction to finish const receipt = await tx.wait(); const result = receipt.hash; setContractTx(result) } const readFromContract = async () => { if (!provider) { console.log("provider not initialized yet"); return; } // this guide uses ethers version 6.3.0. const ethersProvider = new ethers.BrowserProvider(provider); // for ethers version below 6.3.0. // const provider = new ethers.providers.Web3Provider(provider); // paste your contract ABI const contractABI = [ { "inputs": [ { "internalType": "uint256", "name": "_initNum", "type": "uint256" } ], "stateMutability": "nonpayable", "type": "constructor" }, { "inputs": [], "name": "retrieve", "outputs": [ { "internalType": "uint256", "name": "", "type": "uint256" } ], "stateMutability": "view", "type": "function" }, { "inputs": [ { "internalType": "uint256", "name": "num", "type": "uint256" } ], "name": "store", "outputs": [], "stateMutability": "nonpayable", "type": "function" } ] // paste your contract address const contractAddress = "0x3b01E4025B428fFad9481a500BAc36396719092C"; // const contract = new Contract(contractAddress, contractABI, provider); const contract = new ethers.Contract(contractAddress, contractABI, ethersProvider) // Read message from smart contract const contractMessage = await contract.retrieve(); setContractMessage(contractMessage.toString()) } return ( <div className="App"> <form onSubmit={writeToContract}> <input name="store_value" placeholder="Set contract value" required/> <input type="submit" value="Store"/> </form> <button onClick={readFromContract}>Read From Contract</button> <div>Write-to-contract Tx Hash: ${contractTx}</div> <div>Read-from-contract Message: ${contractMessage}</div> </div> )
故障排除
Polyfill node core module error
BREAKING CHANGES: webpack<5 used to include polyfills for node.js core modules by default.
使用 webpack 版本 5 時會出現此錯誤。 在此版本中,默認情況下不再支持 NodeJS polyfills。 要解決這個問題,請參閱本 指南。
下一步
有關 Web3-Onboard 的更多深入指南,請參閱 Blocknative 文檔 和 Blocknative Github 存儲庫。 此外,您還可以在 GitHub 上找到本指南的完整實現代碼。