使用 Chainlink CCIP 在 Kaia 上建立跨鏈 NFT:實用指南
介紹
NFT 已經成為區塊鏈技術最知名的用例之一,能夠創建獨一無二、可驗證的數位資產。 然而,傳統的 NFT 實作被綁定在單一區塊鏈上。 此限制降低了靈活性,並使資產無法在社群、流動性和效用可能不同的生態系統中自由移動。
跨鏈 NFT 可讓 NFT 在區塊鏈之間無縫移動,同時保留其唯一性和來源,從而解決了這一挑戰。 透過 Chainlink 的跨鏈互通協定 (CCIP),開發人員可以使用標準化、安全的訊息傳輸架構,在各鏈之間建立可靠的橋梁。
在本指南中,您將使用「燒機-造幣」模式建立並部署 Crosschain NFT。 NFT 會在來源鏈上燒錄,並在目的地鏈上以相同的 tokenId 和元資料重新製作,以確保在任何時候都只有一份有效的副本存在。
要求
開始之前,請確認您已完成下列設定:
- Node.js 和 npm
- 硬帽
- 安裝:安裝:
npm install --save-dev hardhat - 初始化專案:
npx hardhat --init
- 安裝:安裝:
- MetaMask 錢包
- 建立或設定開發錢包。
- 將 Kaia Kairos Testnet 和 Ethereum Sepolia 網路同時加入 MetaMask。
- 來自水龍頭的測試代幣
- KAIA: 部署契約或傳送交易時,在 Kaia 上支付瓦斯費。
- LINK (testnet):以 LINK 付款時涵蓋 CCIP 費用。
- Sepolia ETH: 支付 Sepolia 上的瓦斯費,如果選擇了,也可以支付原生 ETH 的 CCIP 費用。
- Filebase 帳戶
- 需要上傳和擷取 NFT 元資料 (IPFS 儲存)。
跨鏈 NFT 如何運作?
NFT 是記錄在單一區塊鏈上的唯一數位代幣。 其核心行為,包括鑄幣、轉讓和所有權,都是由與該鏈相連的智慧型契約所定義的。 正因如此,如果沒有額外的機制,NFT 就無法自然地在區塊鏈間移動。 為了實現互操作性,開發人員會在多個鏈上部署配套合約,並透過跨鏈訊息將其連結起來。 結果就是跨區塊鏈 NFT:存在於各區塊鏈上的等價代幣,但在任何特定時間只有一份是有效的。
跨鏈 NFT 通常以三種方式之一實現:
-
** 燒錄與鑄造**:在來源鏈上燒錄 NFT,然後在目的地鏈上鑄造等值的 NFT。
-
鎖定和鑄造:在來源鏈上鎖定 NFT,並在目的地鑄造複本。 返回時需要燒毀複製品以解鎖正本。
-
** 鎖定與解鎖**:相同的集合部署在多個鏈上。 擁有者鎖定一條鏈上的 NFT,以解鎖另一條鏈上的對應副本,確保一次只能使用一個副本。
在本指南中,我們將使用燃燒和薄荷模型來進行 Crosschain NFT。 NFT 將從一條鏈上移除,並在另一條鏈上重新建立,整個過程由 Chainlink CCIP 驅動。
開始使用
在本指南中,您將使用 Chainlink CCIP 在 Kaia Kairos Testnet 和 Ethereum Sepolia 之間製造和傳輸跨鏈 NFT。
到最後,您將能夠
- 初始化同時為 Kairos Testnet 和 Ethereum Sepolia 設定的 Hardhat 專案
- 新增 Chainlink CCIP 契約和介面為依賴項目
- 實施跨鏈 NFT 契約,並針對跨鏈轉移採用燒幣機制
- 將合約部署到兩個網路,並跨鏈傳送 NFT。
建立硬頭帽專案
在本教程中,我們將使用 Hardhat 3 來部署和互動我們的合約。 Hardhat 3 提供了新功能,例如本機支援加密的 keystores、在 Solidity 中撰寫測試的能力,以及改進的專案工具。
按照以下步驟設定專案:
-
驗證 Node.js 和 npm 安裝
執行下列指令以驗證 Node.js 和 npm 是否已安裝:
node -vnpm -v
-
初始化新的專案目錄
建立新資料夾,導覽到其中,並初始化 Node.js 專案:
mkdir ccip-nft-kaia-hardhat-example cd ccip-nft-kaia-hardhat-example npm init -y
-
建立硬帽專案
運行:
npx hardhat --init
出現提示時,請選擇包含 Node.js 測試 runner 和 ethers 的範例專案。 在目前目錄中初始化,並安裝所有需要的相依性。
安裝所需的合約
安裝 Chainlink CCIP 合約:
npm i @chainlink/contracts-ccip --save-dev
安裝標準 Chainlink 合約:
npm i @chainlink/contracts --save-dev
安裝 OpenZeppelin 契約 (提供 ERC-721 及其他基礎實作):
npm i @openzeppelin/contracts --save-dev
設定 NFT 元資料
在撰寫合約之前,讓我們先定義我們要鑄造的 NFT 的規格。 每個 NFT 都需要描述其名稱、描述和影像的元資料,儲存於 JSON 檔案中,並託管於 IPFS。
在本指南中,我們將使用 Filebase 來儲存影像和元資料。 如果您想要建立自己的 NFT,請透過 Filebase 將影像和 metadata JSON 檔案上傳至 IPFS。 上傳後,按一下檔案索引標籤中的檔案名稱,並複製 IPFS URL。 它看起來會與此相似:
https://disastrous-turquoise-parakeet.myfilebase.com/ipfs/QmY1LZF8JHo2r3h4X5VzLLXtJujqnBFGTyo2aqR9joXnt8
以下是您可以使用的範例 metadata 檔案:
{ "name": "Kairos NFT", "description": "gkaia frens! gazuaaaaa!!!", "image": "https://disastrous-turquoise-parakeet.myfilebase.com/ipfs/QmRvQc4wZCp6NF7dFL4ywiWTG7FSH3KKGUAkXGgsdYfcKi"}
撰寫智慧型契約
在本節中,您將使用由 Chainlink CCIP 驅動的燃燒-造幣模型實現合約,使 NFT 在區塊鏈之間轉移。
在專案的 contracts 目錄中建立新檔案,命名為 CrosschainNFT.sol,並將下列程式碼貼入其中:
// SPDX-License-Identifier: MITpragma solidity ^0.8.20;import {ERC721} from "@openzeppelin/contracts/token/ERC721/ERC721.sol";import {ERC721URIStorage} from "@openzeppelin/contracts/token/ERC721/extensions/ERC721URIStorage.sol";import {ERC721Burnable} from "@openzeppelin/contracts/token/ERC721/extensions/ERC721Burnable.sol";import {IERC20} from "@openzeppelin/contracts/interfaces/IERC20.sol";import {SafeERC20} from "@openzeppelin/contracts/token/ERC20/utils/SafeERC20.sol";import {ReentrancyGuard} from "@openzeppelin/contracts/utils/ReentrancyGuard.sol";import {Client} from "@chainlink/contracts-ccip/contracts/libraries/Client.sol";import {IRouterClient} from "@chainlink/contracts-ccip/contracts/interfaces/IRouterClient.sol";import {IAny2EVMMessageReceiver} from "@chainlink/contracts-ccip/contracts/interfaces/IAny2EVMMessageReceiver.sol";import {OwnerIsCreator} from "@chainlink/contracts/src/v0.8/shared/access/OwnerIsCreator.sol";import {LinkTokenInterface} from "@chainlink/contracts/src/v0.8/shared/interfaces/LinkTokenInterface.sol";/** * THIS IS AN EXAMPLE CONTRACT THAT USES HARDCODED VALUES FOR CLARITY. * THIS IS AN EXAMPLE CONTRACT THAT USES UN-AUDITED CODE. * DO NOT USE THIS CODE IN PRODUCTION. */ // Source chain is Ethereum Sepolia // Destination chain is Kairos Testnetcontract CrosschainNFT is ERC721, ERC721URIStorage, ERC721Burnable, IAny2EVMMessageReceiver, ReentrancyGuard, OwnerIsCreator { using SafeERC20 for IERC20; enum PayFeesIn { Native, LINK } error InvalidRouter(address router); error OnlyOnEthereumSepolia(); error NotEnoughBalanceForFees(uint256 currentBalance, uint256 calculatedFees); error NothingToWithdraw(); error FailedToWithdrawEth(address owner, address target, uint256 value); error ChainNotEnabled(uint64 chainSelector); error SenderNotEnabled(address sender); error OperationNotAllowedOnCurrentChain(uint64 chainSelector); struct crosschainNFTDetails { address crosschainNFTAddress; bytes ccipExtraArgsBytes; } uint256 constant ETHEREUM_SEPOLIA_CHAIN_ID = 11155111; string tokenNFTURI = "https://disastrous-turquoise-parakeet.myfilebase.com/ipfs/QmY1LZF8JHo2r3h4X5VzLLXtJujqnBFGTyo2aqR9joXnt8"; IRouterClient internal immutable i_ccipRouter; LinkTokenInterface internal immutable i_linkToken; uint64 private immutable i_currentChainSelector; uint256 private _nextTokenId; mapping(uint64 destChainSelector => crosschainNFTDetails crosschainNFTPerChain) public s_chains; event ChainEnabled(uint64 chainSelector, address xNftAddress, bytes ccipExtraArgs); event ChainDisabled(uint64 chainSelector); event CrossChainSent( address from, address to, uint256 tokenId, uint64 sourceChainSelector, uint64 destinationChainSelector ); event CrossChainReceived( address from, address to, uint256 tokenId, uint64 sourceChainSelector, uint64 destinationChainSelector ); modifier onlyRouter() { if (msg.sender != address(i_ccipRouter)) { revert InvalidRouter(msg.sender); } _; } modifier onlyOnEthereumSepolia() { if (block.chainid != ETHEREUM_SEPOLIA_CHAIN_ID) { revert OnlyOnEthereumSepolia(); } _; } modifier onlyEnabledChain(uint64 _chainSelector) { if (s_chains[_chainSelector].crosschainNFTAddress == address(0)) { revert ChainNotEnabled(_chainSelector); } _; } modifier onlyEnabledSender(uint64 _chainSelector, address _sender) { if (s_chains[_chainSelector].crosschainNFTAddress != _sender) { revert SenderNotEnabled(_sender); } _; } modifier onlyOtherChains(uint64 _chainSelector) { if (_chainSelector == i_currentChainSelector) { revert OperationNotAllowedOnCurrentChain(_chainSelector); } _; } constructor(address ccipRouterAddress, address linkTokenAddress, uint64 currentChainSelector) ERC721("Cross Chain NFT", "XNFT") { if (ccipRouterAddress == address(0)) revert InvalidRouter(address(0)); i_ccipRouter = IRouterClient(ccipRouterAddress); i_linkToken = LinkTokenInterface(linkTokenAddress); i_currentChainSelector = currentChainSelector; } function mint() external onlyOnEthereumSepolia { uint256 tokenId = _nextTokenId++; _safeMint(msg.sender, tokenId); _setTokenURI(tokenId, tokenNFTURI); } function enableChain(uint64 chainSelector, address crosschainNFTAddress, bytes memory ccipExtraArgs) external onlyOwner onlyOtherChains(chainSelector) { s_chains[chainSelector] = crosschainNFTDetails({crosschainNFTAddress: crosschainNFTAddress, ccipExtraArgsBytes: ccipExtraArgs}); emit ChainEnabled(chainSelector, crosschainNFTAddress, ccipExtraArgs); } function disableChain(uint64 chainSelector) external onlyOwner onlyOtherChains(chainSelector) { delete s_chains[chainSelector]; emit ChainDisabled(chainSelector); } function crossChainTransferFrom( address from, address to, uint256 tokenId, uint64 destinationChainSelector, PayFeesIn payFeesIn ) external nonReentrant onlyEnabledChain(destinationChainSelector) returns (bytes32 messageId) { string memory tokenUri = tokenURI(tokenId); _burn(tokenId); Client.EVM2AnyMessage memory message = Client.EVM2AnyMessage({ receiver: abi.encode(s_chains[destinationChainSelector].crosschainNFTAddress), data: abi.encode(from, to, tokenId, tokenUri), tokenAmounts: new Client.EVMTokenAmount[](0), extraArgs: s_chains[destinationChainSelector].ccipExtraArgsBytes, feeToken: payFeesIn == PayFeesIn.LINK ? address(i_linkToken) : address(0) }); // Get the fee required to send the CCIP message uint256 fees = i_ccipRouter.getFee(destinationChainSelector, message); if (payFeesIn == PayFeesIn.LINK) { if (fees > i_linkToken.balanceOf(address(this))) { revert NotEnoughBalanceForFees(i_linkToken.balanceOf(address(this)), fees); } // Approve the Router to transfer LINK tokens on contract's behalf. It will spend the fees in LINK i_linkToken.approve(address(i_ccipRouter), fees); // Send the message through the router and store the returned message ID messageId = i_ccipRouter.ccipSend(destinationChainSelector, message); } else { if (fees > address(this).balance) { revert NotEnoughBalanceForFees(address(this).balance, fees); } // Send the message through the router and store the returned message ID messageId = i_ccipRouter.ccipSend{value: fees}(destinationChainSelector, message); } emit CrossChainSent(from, to, tokenId, i_currentChainSelector, destinationChainSelector); } /// @inheritdoc IAny2EVMMessageReceiver function ccipReceive(Client.Any2EVMMessage calldata message) external virtual override onlyRouter nonReentrant onlyEnabledChain(message.sourceChainSelector) onlyEnabledSender(message.sourceChainSelector, abi.decode(message.sender, (address))) { uint64 sourceChainSelector = message.sourceChainSelector; (address from, address to, uint256 tokenId, string memory tokenUri) = abi.decode(message.data, (address, address, uint256, string)); _safeMint(to, tokenId); _setTokenURI(tokenId, tokenUri); emit CrossChainReceived(from, to, tokenId, sourceChainSelector, i_currentChainSelector); } function withdraw(address _beneficiary) public onlyOwner { uint256 amount = address(this).balance; if (amount == 0) revert NothingToWithdraw(); (bool sent,) = _beneficiary.call{value: amount}(""); if (!sent) revert FailedToWithdrawEth(msg.sender, _beneficiary, amount); } function withdrawToken(address _beneficiary, address _token) public onlyOwner { uint256 amount = IERC20(_token).balanceOf(address(this)); if (amount == 0) revert NothingToWithdraw(); IERC20(_token).safeTransfer(_beneficiary, amount); } function tokenURI(uint256 tokenId) public view override(ERC721, ERC721URIStorage) returns (string memory) { return super.tokenURI(tokenId); } function getCCIPRouter() public view returns (address) { return address(i_ccipRouter); } function supportsInterface(bytes4 interfaceId) public view override(ERC721, ERC721URIStorage) returns (bool) { return interfaceId == type(IAny2EVMMessageReceiver).interfaceId || super.supportsInterface(interfaceId); }}
代碼演練
CrosschainNFT 是一種 ERC-721 契約,整合 Chainlink CCIP 以在區塊鏈之間轉移 NFT。 它會在來源鏈上燒錄 NFT,並使用相同的 tokenId 和 tokenURI 在目的地上重新燒錄。 該合約透過 enableChain 維護已核准目的鏈的註冊表,依賴 Chainlink Router (IRouterClient) 進行跨鏈訊息傳輸,並支援以原生瓦斯代幣或 LINK 支付費用。
主要功能
- 啟用鏈
允許合約擁有者註冊目標區塊鏈。 它會在 s_chains 映射中儲存對應的 NFT 合約位址和 CCIP 參數,將鏈白名單列為有效的傳輸目標。 當設定完成時,會發出 ChainEnabled 事件。
- CrossChainTransferFrom
執行 NFT 跨鏈傳輸。 它首先檢查目的地鏈是否啟用,然後擷取 NFT 元資料 (tokenURI),並在來源鏈上燒錄令牌。 接下來,它會建立一個包含轉帳詳細資訊的 CCIP 訊息,計算所需費用,並以 LINK 或本地瓦斯支付。 一旦訊息透過路由器傳送,就會發佈 CrossChainSent 事件來記錄傳輸。
現在,CrosschainNFT.sol 的核心流程已經清楚,讓我們進入下一步。
編譯智慧型契約
要編譯您的智慧型契約,請執行
npx hardhat build
部署智慧契約
在本節中,我們將設定必要的變數,然後在 Ethereum Sepolia(源鏈)和 Kairos Testnet(目的鏈)上部署「CrosschainNFT.sol」契約。
使用加密金鑰庫
Hardhat 3 的優點之一,是能夠將私鑰和 RPC URL 等敏感值儲存在加密的 keystore 中,而非純文字檔案中。 在本指南中,我們將為 Sepolia 和 Kairos 的 PRIVATE_KEY 和 RPC URL 加密。
** 新增您的私人密碼匙**
npx hardhat keystore set PRIVATE_KEY
第一次執行此指令時,Hardhat 會提示您為 keystore 建立密碼。 每次新增或更新值時,您都需要這個密碼。
** 為每個網路加入 RPC URL**
npx hardhat keystore set KAIROS_RPC_URLnpx hardhat keystore set SEPOLIA_RPC_URL
�最後,編輯您的 hardhat.config.ts 檔案以載入這些加密值,並設定兩個網路。
import type { HardhatUserConfig } from "hardhat/config";import hardhatToolboxMochaEthersPlugin from "@nomicfoundation/hardhat-toolbox-mocha-ethers";import { configVariable } from "hardhat/config";const config: HardhatUserConfig = { plugins: [hardhatToolboxMochaEthersPlugin], solidity: { profiles: { default: { version: "0.8.28", }, production: { version: "0.8.28", settings: { optimizer: { enabled: true, runs: 200, }, }, }, }, }, networks: { hardhatMainnet: { type: "edr-simulated", chainType: "l1", }, hardhatOp: { type: "edr-simulated", chainType: "op", }, kairosTestnet: { type: "http", chainType: "l1", url: configVariable("KAIROS_RPC_URL"), accounts: [configVariable("PRIVATE_KEY")], }, ethereumSepolia: { type: "http", chainType: "l1", url: configVariable("SEPOLIA_RPC_URL"), accounts: [configVariable("PRIVATE_KEY")], }, },};export default config;
下一步是將 CrosschainNFT 智慧型契約分別部署到 Ethereum Sepolia 和 Kairos Testnet。
將 CrosschainNFT.sol 部署至 Ethereum Sepolia
部署前,請從 Chainlink CCIP Directory 取得下列 Ethereum Sepolia 的值:
- 鏈條選擇器
- CCIP 路由器位址
- LINK 記憶體位址
您的部署腳本將需要這些值。 接下來,導覽到專案中的 ignition/modules 資料夾,建立一個名為:deployEthereumSepolia.ts 的新檔案,並將下列程式碼貼入其中:
// This setup uses Hardhat Ignition to manage smart contract deployments.// Learn more about it at https://hardhat.org/ignitionimport { buildModule } from "@nomicfoundation/hardhat-ignition/modules";const ETHEREUM_SEPOLIA_ROUTER_ADDRESS = `0x0BF3dE8c5D3e8A2B34D2BEeB17ABfCeBaf363A59`;const ETHEREUM_SEPOLIA_LINK_TOKEN_ADDRESS = `0x779877A7B0D9E8603169DdbD7836e478b4624789`;const ETHEREUM_SEPOLIA_CHAIN_SELECTOR = `16015286601757825753`;const CrosschainNFTSepoliaModule = buildModule("CrosschainNFTSepoliaModule", (m) => { const crosschainNFTSepolia = m.contract("CrosschainNFT", [ETHEREUM_SEPOLIA_ROUTER_ADDRESS, ETHEREUM_SEPOLIA_LINK_TOKEN_ADDRESS, ETHEREUM_SEPOLIA_CHAIN_SELECTOR], { }); return { crosschainNFTSepolia };});export default CrosschainNFTSepoliaModule;
執行部��署指令碼:
npx hardhat ignition deploy ignition/modules/deployEthereumSepolia.ts --network ethereumSepolia
將 CrosschainNFT.sol 部署至 Kairos Testnet
部署前,請從 Chainlink CCIP Directory 取得下列 Kairos Testnet 的值:
- 鏈條選擇器
- CCIP 路由器位址
- LINK 記憶體位址
您的部署腳本將需要這些值。 接下來,導覽到專案中的 ignition/modules 資料夾,建立一個名為:deployKairosTestnet.ts 的新檔案,並將下列程式碼貼入其中:
// This setup uses Hardhat Ignition to manage smart contract deployments.// Learn more about it at https://hardhat.org/ignitionimport { buildModule } from "@nomicfoundation/hardhat-ignition/modules";const KAIROS_TESTNET_ROUTER_ADDRESS = `0x41477416677843fCE577748D2e762B6638492755`;const KAIROS_TESTNET_LINK_TOKEN_ADDRESS = `0xAF3243f975afe2269Da8Ffa835CA3A8F8B6A5A36`;const KAIROS_TESTNET_CHAIN_SELECTOR = `2624132734533621656`;const CrosschainNFTKairosModule = buildModule("CrosschainNFTKairosModule", (m) => { const crosschainNFTKairos = m.contract("CrosschainNFT", [KAIROS_TESTNET_ROUTER_ADDRESS, KAIROS_TESTNET_LINK_TOKEN_ADDRESS, KAIROS_TESTNET_CHAIN_SELECTOR], { }); return { crosschainNFTKairos };});export default CrosschainNFTKairosModule;
執行部署指令碼:
npx hardhat ignition deploy ignition/modules/deployKairosTestnet.ts --network kairosTestnet
與智慧契約互動
在本節中,我們將分別執行 enableChain、mint 和 crosschainTransfer 函式,與��已部署的 CrosschainNFT 智慧合約互動。
步驟 1:在 Ethereum Sepolia 上,呼叫 enableChain
在呼叫 enableChain 前,請準備下列值:
- Sepolia合約地址:部署在Ethereum Sepolia上的CrosschainNFT.sol合約地址。
- Kairos 合約位址:部署在 Kairos Testnet 上的 CrosschainNFT.sol 合約位址。
- 鏈選擇器:2624132734533621656(Kairos Testnet 的 CCIP 鏈選擇器)。
- CCIP extraArgs:0x97a657c900000000000000000000000000000000000000000007A120 (這是 extraArgs 的預設編碼值,gasLimit 設定為 500,000)。
接下來,在 scripts 資料夾中建立一個新的 TypeScript 檔案,將其命名為:enableChainSepolia.ts 並將下列程式碼貼入其中:
// scripts/enableChainSepolia.tsimport { network } from "hardhat";async function main() { const connection = await network.connect({ network: "ethereumSepolia" }); const { ethers } = connection; const [signer] = await ethers.getSigners(); console.log(`Using account: ${signer.address}`); // Get the contract factory by name const CrosschainNFT = await ethers.getContractFactory("CrosschainNFT", signer); // Contract addresses and parameters const crosschainNFTAddressEthereumSepolia = `0xb1fe42BBd7842703820C7480c22409b872319B22`; const crosschainNFTAddressKairosTestnet = `0x8c464Bb9Bf364F68b898ed0708b8f5F66EF6Cfb1`; const chainSelectorKairosTestnet = `2624132734533621656`; const ccipExtraArgs = `0x97a657c9000000000000000000000000000000000000000000000000000000000007A120`; // Attach to the deployed contract const crosschainNFTSepolia = CrosschainNFT.attach(crosschainNFTAddressEthereumSepolia); console.log(`Enabling chain for Kairos Testnet...`); const tx = await crosschainNFTSepolia.enableChain( chainSelectorKairosTestnet, crosschainNFTAddressKairosTestnet, ccipExtraArgs ); console.log(`Transaction hash: ${tx.hash}`); console.log(`Waiting for confirmation...`); const receipt = await tx.wait(); console.log(`Transaction confirmed in block: ${receipt?.blockNumber}`); console.log(`Chain enabled successfully!`);}main().catch((error) => { console.error(error); process.exitCode = 1;});
執行以下指令來呼叫函式:
npx hardhat run scripts/enableChainSepolia.ts --network ethereumSepolia
步驟 2:在 Kairos Testnet 上,呼叫 enableChain
在呼叫 enableChain 前,請準備下列值:
- Kairos 契約位址:部署在 Kairos Testnet 上的 CrosschainNFT.sol 契約位址
- Sepolia 契約位址:部署在 Ethereum Sepolia 上的 CrosschainNFT.sol 契約位址
- ** 鏈選擇器**:16015286601757825753 (Kairos Testnet 的 CCIP 鏈選擇器)
- CCIP extraArgs:0x97a657c900000000000000000000000000000000000000000007A120 (這是 extraArgs 的預設編碼值,gasLimit 設定為 500,000)
接下來,在 scripts 資料夾中建立新的 TypeScript 檔案,將其命名為:enableChainKairos.ts 並將下列程式碼貼入其中:
// scripts/enableChainKairos.tsimport { network } from "hardhat";async function main() { const connection = await network.connect({ network: "kairosTestnet" }); const { ethers } = connection; const [signer] = await ethers.getSigners(); console.log(`Using account: ${signer.address}`); // Get the contract factory by name const CrosschainNFT = await ethers.getContractFactory("CrosschainNFT", signer); // Contract addresses and parameters const crosschainNFTAddressKairosTestnet = `0x8c464Bb9Bf364F68b898ed0708b8f5F66EF6Cfb1`; const crosschainNFTAddressEthereumSepolia = `0xb1fe42BBd7842703820C7480c22409b872319B22`; const chainSelectorEthereumSepolia = `16015286601757825753`; const ccipExtraArgs = `0x97a657c9000000000000000000000000000000000000000000000000000000000007A120`; // Attach to the deployed contract on Kairos const crosschainNFTKairos = CrosschainNFT.attach(crosschainNFTAddressKairosTestnet); console.log(`Enabling chain for Ethereum Sepolia...`); const tx = await crosschainNFTKairos.enableChain( chainSelectorEthereumSepolia, crosschainNFTAddressEthereumSepolia, ccipExtraArgs ); console.log(`Transaction hash: ${tx.hash}`); console.log(`Waiting for confirmation...`); const receipt = await tx.wait(); console.log(`Transaction confirmed in block: ${receipt?.blockNumber}`); console.log(`Chain enabled successfully!`);}main().catch((error) => { console.error(error); process.exitCode = 1;});
執行以下指令來呼叫函式:
npx hardhat run scripts/enableChainKairos.ts --network KairosTestnet
步驟 3:在 Ethereum Sepolia 上使用 LINK 為契約注資
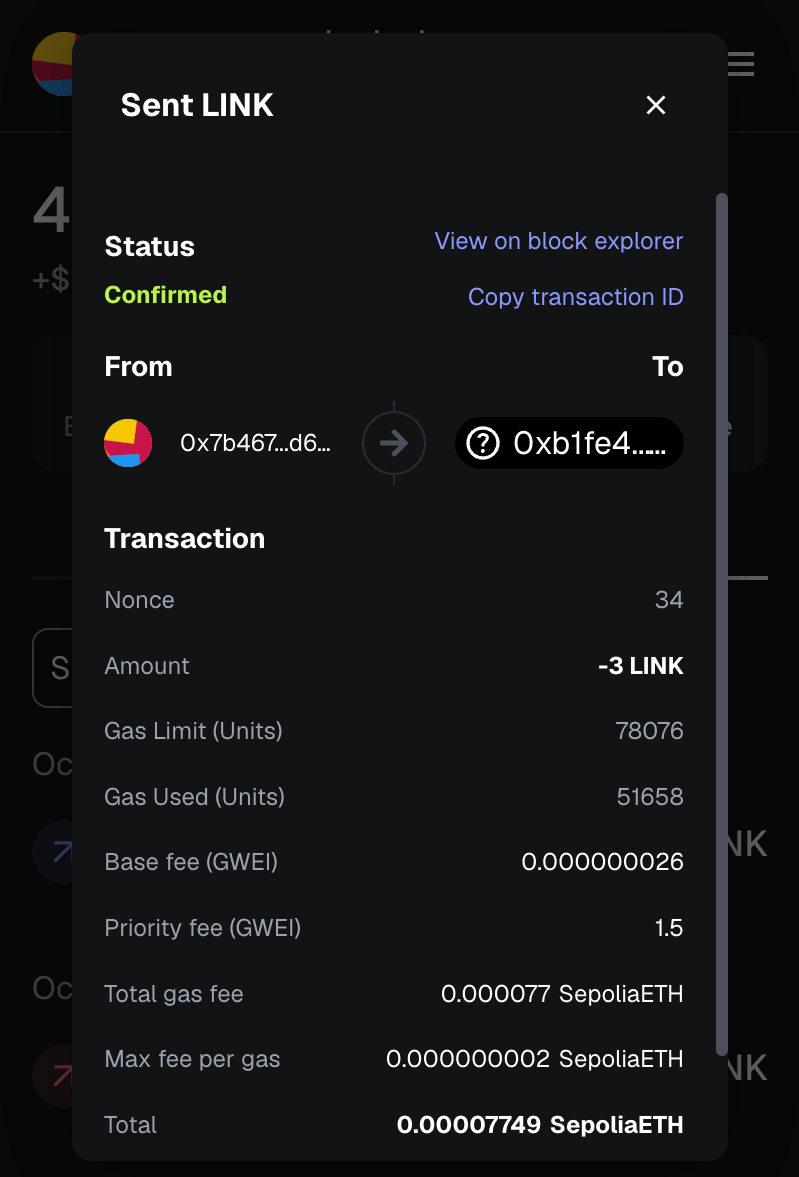
為了支付 CCIP 費用,請使用 LINK 為部署在 Ethereum Sepolia (crosschainNFTAddressEthereumSepolia) 上的 CrosschainNFT 合約提供資金。 您可以從提供的 龍頭 取得測試 LINK。 在本指南中,發送 3 個 LINK 即可。
步驟 4:在 Ethereum Sepolia 上鑄造新的 CrosschainNFT
接下來,在部署到 Ethereum Sepolia 的 CrosschainNFT 合約上建立新的 NFT。
在 scripts 資料夾中建立一個新的 TypeScript 檔案,命名為 mint.ts 並貼上下列程式碼:
// scripts/mint.tsimport { network } from "hardhat";async function main() { // Connect to the network const connection = await network.connect({ network: "ethereumSepolia" });if (connection.networkName !== "ethereumSepolia") { console.error(`Must be called from Ethereum Sepolia`); process.exitCode = 1; return; } const { ethers } = connection; const [signer] = await ethers.getSigners(); console.log(`Using account: ${signer.address}`); // Get the contract factory const CrosschainNFT = await ethers.getContractFactory("CrosschainNFT", signer); const crosschainNFTAddressEthereumSepolia = `0xb1fe42BBd7842703820C7480c22409b872319B22` // Attach to the deployed contract const crosschainNFT = CrosschainNFT.attach(crosschainNFTAddressEthereumSepolia); console.log(`Minting NFT...`); const tx = await crosschainNFT.mint(); console.log(`Transaction hash: ${tx.hash}`); console.log(`Waiting for confirmation...`); const receipt = await tx.wait(); console.log(`Transaction confirmed in block: ${receipt?.blockNumber}`); console.log(`NFT minted successfully!`);}main().catch((error) => { console.error(error); process.exitCode = 1;});
這個腳本會處理造幣過程,並為跨鏈轉移準備 NFT。
執行以下指令來呼叫函式:
npx hardhat run scripts/mint.ts --network ethereumSepolia
步驟 5:跨鏈傳輸 NFT
在 Ethereum Sepolia 上,您將呼叫 crossChainTransferFrom 函式,將您的 NFT 傳送至 Kairos Testnet。
Pepare 以下值:
- from:您在 Ethereum Sepolia 上的 EOA 位址
- 至:收件人在 Kairos Testnet 上的 EOA 地址(也可以是您自己的地址)
- tokenId:您要轉移的 NFT 的 ID
- destinationChainSelector:2624132734533621656(Kairos Testnet 的 CCIP 鏈選擇器)
- payFeesIn:1(表示 CCIP 費用將以 LINK 方式支付)
執行傳輸指令碼
在 scripts 資料夾中建立新的 TypeScript 檔案,將其命名為 crossChainTransferNFT.ts 並將下列程式碼貼入其中:
// scripts/crossChainTransferNFT.tsimport { network } from "hardhat";async function main() { // Connect to the network const connection = await network.connect({ network: "ethereumSepolia" }); // Check if we're on the correct network if (connection.networkName !== "ethereumSepolia") { console.error(`Must be called from Ethereum Sepolia`); process.exitCode = 1; return; } const { ethers } = connection; const [signer] = await ethers.getSigners(); console.log(`Using account: ${signer.address}`); // Get the contract factory const CrosschainNFT = await ethers.getContractFactory("CrosschainNFT", signer); const crosschainNFTAddressEthereumSepolia = `0xb1fe42BBd7842703820C7480c22409b872319B22`; // Transfer parameters const from = `0x7b467A6962bE0ac80784F131049A25CDE27d62Fb`; const to = `0x7b467A6962bE0ac80784F131049A25CDE27d62Fb`; const tokenId = 0; // Put NFT token id here const destinationChainSelector = "2624132734533621656"; // Kairos Testnet const payFeesIn = 1; // 0 - Native, 1 - LINK // Attach to the deployed contract const crosschainNFT = CrosschainNFT.attach(crosschainNFTAddressEthereumSepolia); const tx = await crosschainNFT.crossChainTransferFrom( from, to, tokenId, destinationChainSelector, payFeesIn ); console.log(`Transaction hash: ${tx.hash}`); console.log(`Waiting for confirmation...`); const receipt = await tx.wait(); console.log(`Transaction confirmed in block: ${receipt?.blockNumber}`); console.log(`Cross-chain transfer initiated successfully!`); console.log(`Note: The NFT will arrive on Kairos Testnet after CCIP processes the message.`);}main().catch((error) => { console.error(error); process.exitCode = 1;});
然後用以下方式執行腳本:
npx hardhat run scripts/crossChainTransferNFT.ts --network ethereumSepolia
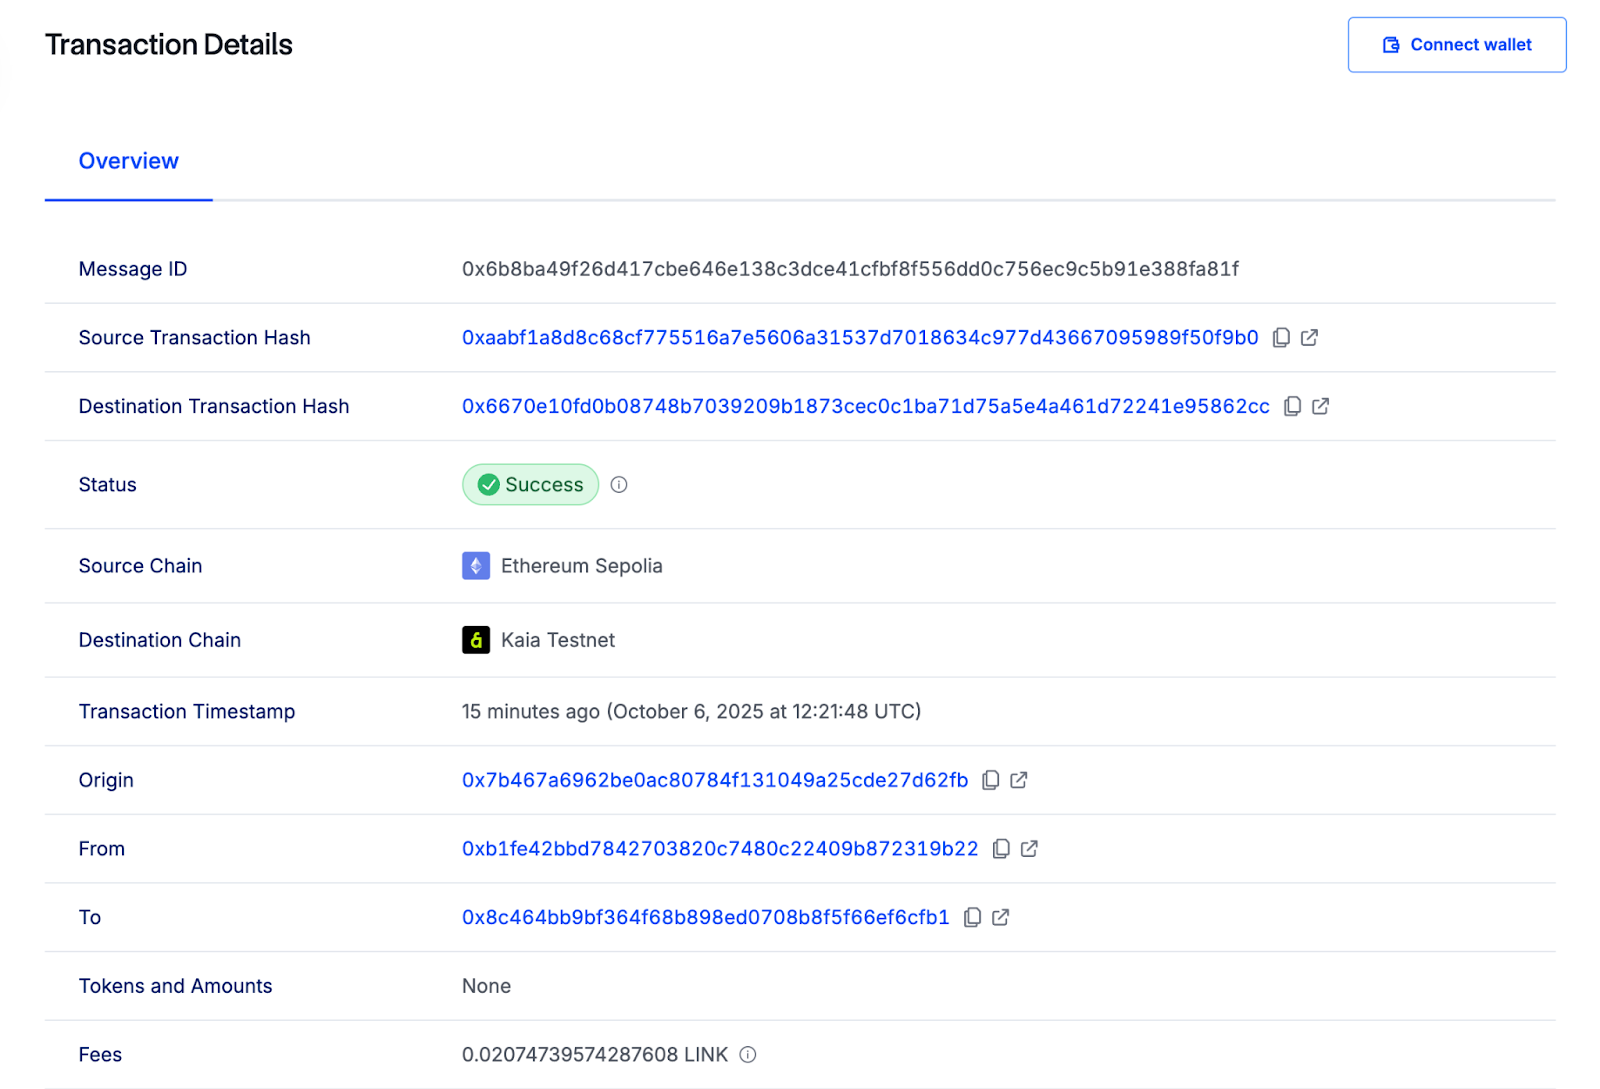
驗證轉移
您可以在CCIP Explorer上監控跨鏈轉移,並在Kaiascan上確認交易。
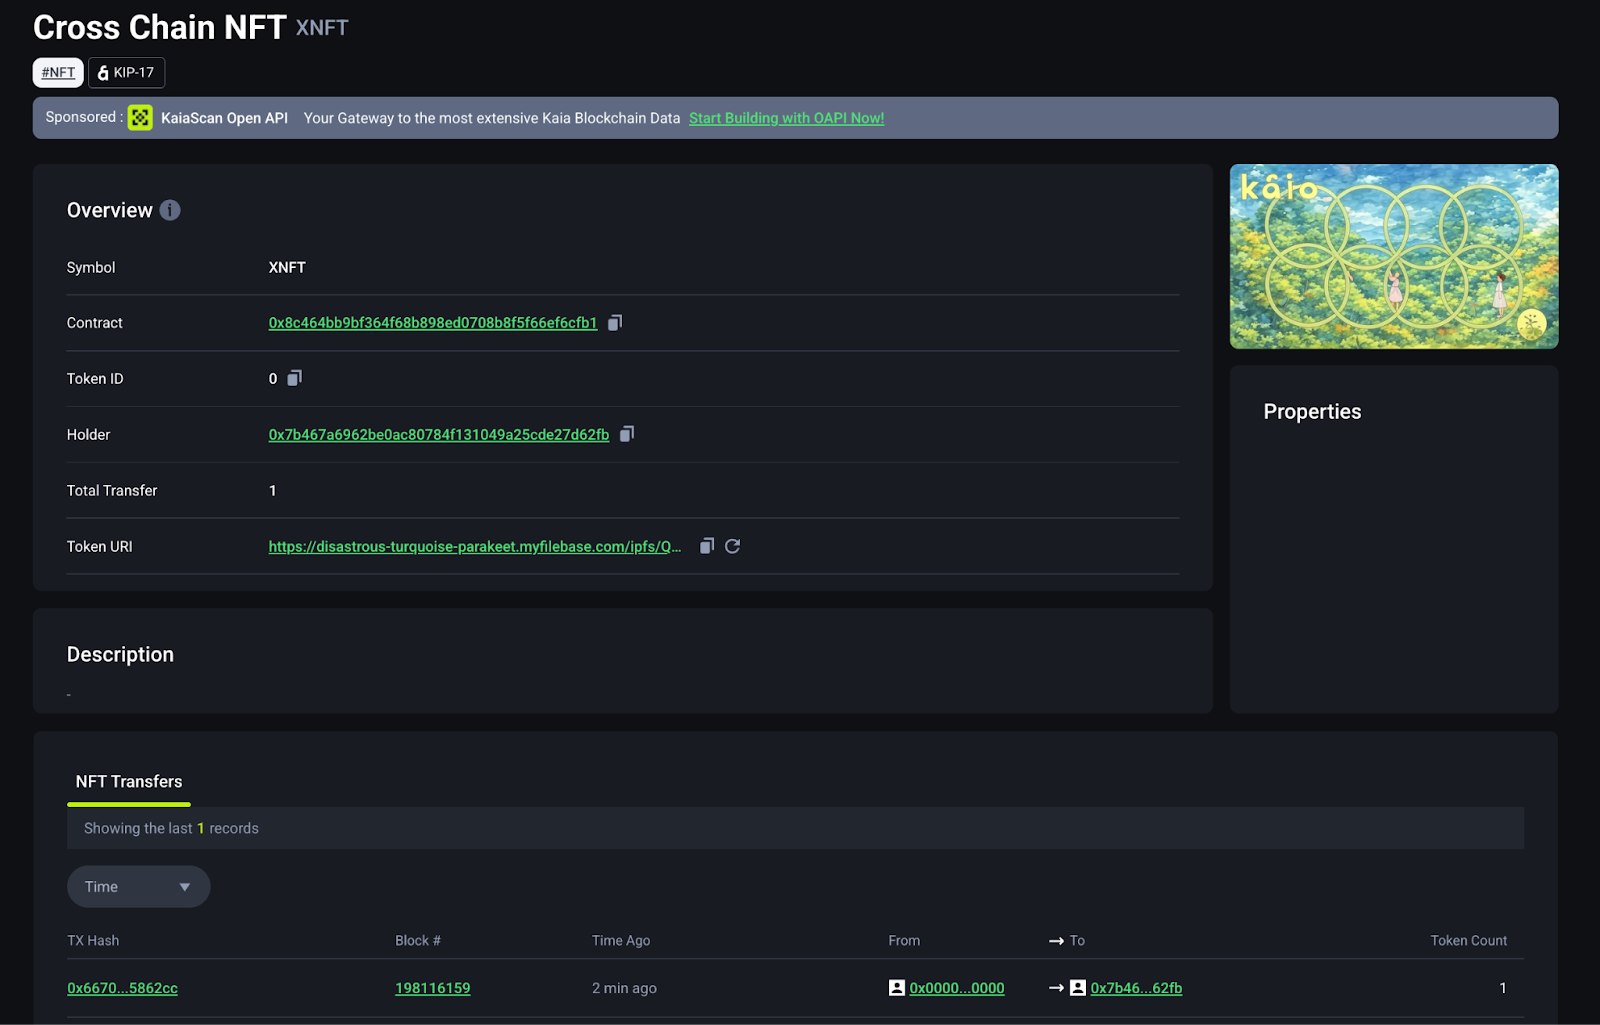
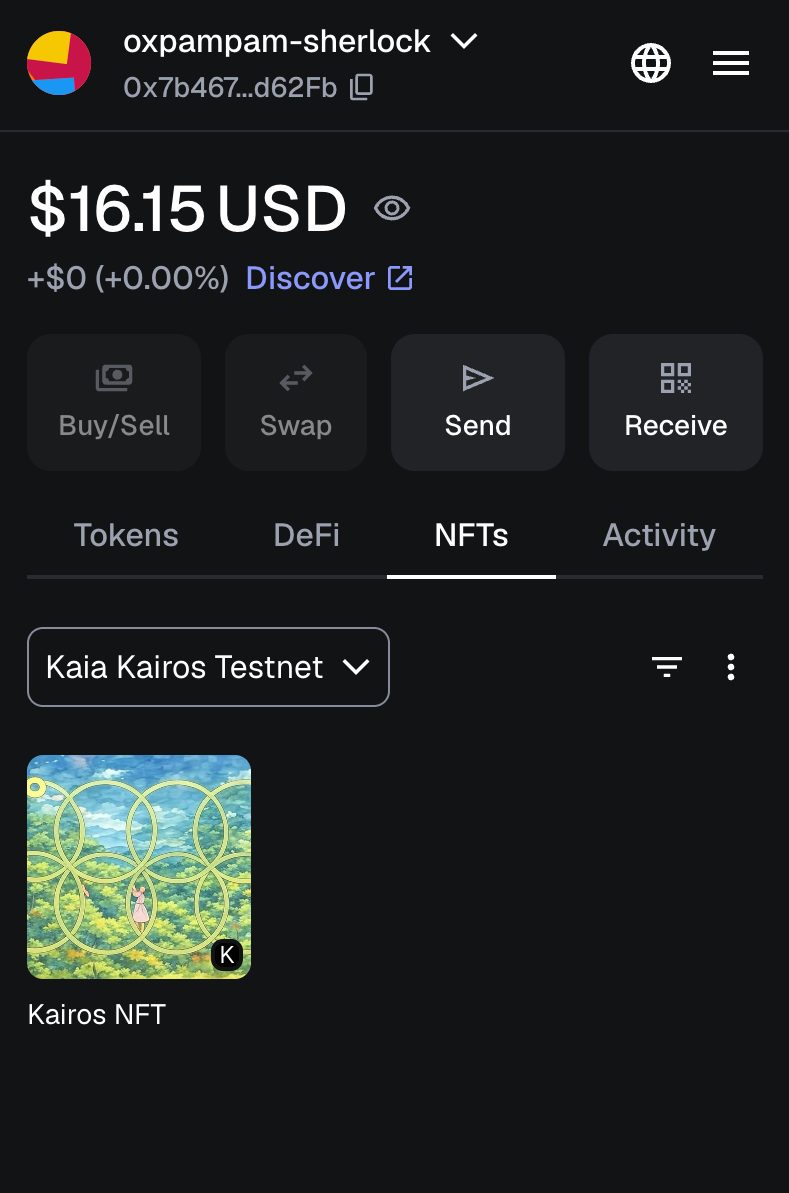
一旦 NFT 到達 Kairos Testnet,請將它加入您的 MetaMask 錢包:
- 在 MetaMask 中開啟 NFT 索引標籤。
- 按一下匯入 NFT。
- 在 Kairos Testnet 上輸入 CrosschainNFT 合約位址和您收到的 tokenId (例如 0)。
您的NFT現在會出現在您的MetaMask錢包中。
總結
在本教程中,您學會了如何使用 Chainlink CCIP 在 Kaia Kairos Testnet 和 Ethereum Sepolia 之間使用燒幣模式傳輸 NFT。
若要深入瞭解 CCIP 並探索其他使用案例,請造訪官方 Chainlink CCIP Documentation。