Tích hợp Web3
Trong phần này, chúng tôi sẽ tích hợp chức năng Web3 vào dự án Cocos Creator bằng cách tạo hợp đồng mã thông báo, viết tập lệnh để tương tác với hợp đồng và tận dụng Mini Dapp SDK để kết nối ví, đúc mã thông báo và truy xuất số dư. Cuối cùng, dApp của bạn sẽ tương tác liền mạch với blockchain, cho phép tương tác Web3 diễn ra suôn sẻ trong trò chơi của bạn.
Tạo và triển khai hợp đồng thông minh KIP7
Đầu tiên, chúng ta sẽ sử dụng Kaia Contract Wizard để tạo hợp đồng thông minh.
Bước 1: Sử dụng Kaia Contract Wizard
- Điều hướng đến Kaia Contract Wizard.
- Chọn KIP7 (tiêu chuẩn mã thông báo của Kaia, tương tự như ERC20).
- Cấu hình mã thông báo của bạn:
- Tên: ExampleTestToken (hoặc tên khác!)
- Biểu tượng: ET (mã token của bạn)
- Đúc trước: 100 (nguồn cung cấp token ban đầu)
- Tính năng: Kiểm tra ✅ Có thể đúc
Trong hướng dẫn này, chúng tôi sẽ điều chỉnh hàm mint để không chỉ có trình sửa đổi onlyOwner. Để thực hiện điều này, chúng ta phải xóa lệnh import ownable.sol và lệnh kế thừa Ownable. Mã đã chỉnh sửa bây giờ sẽ trông như thế này:
// SPDX-License-Identifier: MITpragma solidity ^0.8.4;import "@kaiachain/contracts/KIP/token/KIP7/KIP7.sol";contract ExampleTokens is KIP7 { constructor() KIP7("ExampleTokens", "ET") { _mint(msg.sender, 100 * 10 ** decimals()); } function supportsInterface(bytes4 interfaceId) public view virtual override returns (bool) { return super.supportsInterface(interfaceId); } function mint(uint256 amount) public { _mint(msg.sender, amount); }}
Chúng tôi đã xóa trình sửa đổi onlyOwner để cho phép bất kỳ ai gọi hàm mint ngoài người triển khai hoặc chủ sở hữu hợp đồng ban đầu.
Bước 2: Triển khai thông qua Remix IDE
- Sao chép và dán mã ở trên vào tệp ET.sol mới tạo trên Remix IDE.
- Trong Remix IDE:
- Nhấp vào nút Biên dịch hợp đồng.
- Kích hoạt Plugin Kaia trong trình quản lý plugin.
- Trong mục Môi trường của tab Plugin Kaia, chọn Nhà cung cấp được tiêm - Ví Kaia.
- Tìm hợp đồng của bạn (ExampleTokens) trong danh sách thả xuống Hợp đồng.
- Nhấp vào Triển khai để khởi chạy mã thông báo của bạn!
- Khi Ví Kaia của bạn hiện lên:
- Xem lại thông tin chi tiết triển khai.
- Nhấp vào Xác nhận để triển khai lên Kaia Kairos Testnet.
Sao chép và lưu địa chỉ hợp đồng đã triển khai. Bạn sẽ cần đến nó sau trong phần hướng dẫn.
Tạo tập tin Script
Để tích hợp chức năng Web3, chúng ta cần tạo các tệp tập lệnh để xử lý t�ương tác blockchain và quản lý UI.
1. Tạo một thư mục Scripts
- Điều hướng đến thư mục assets của dự án.
- Nhấp chuột phải và chọn Tạo → Thư mục
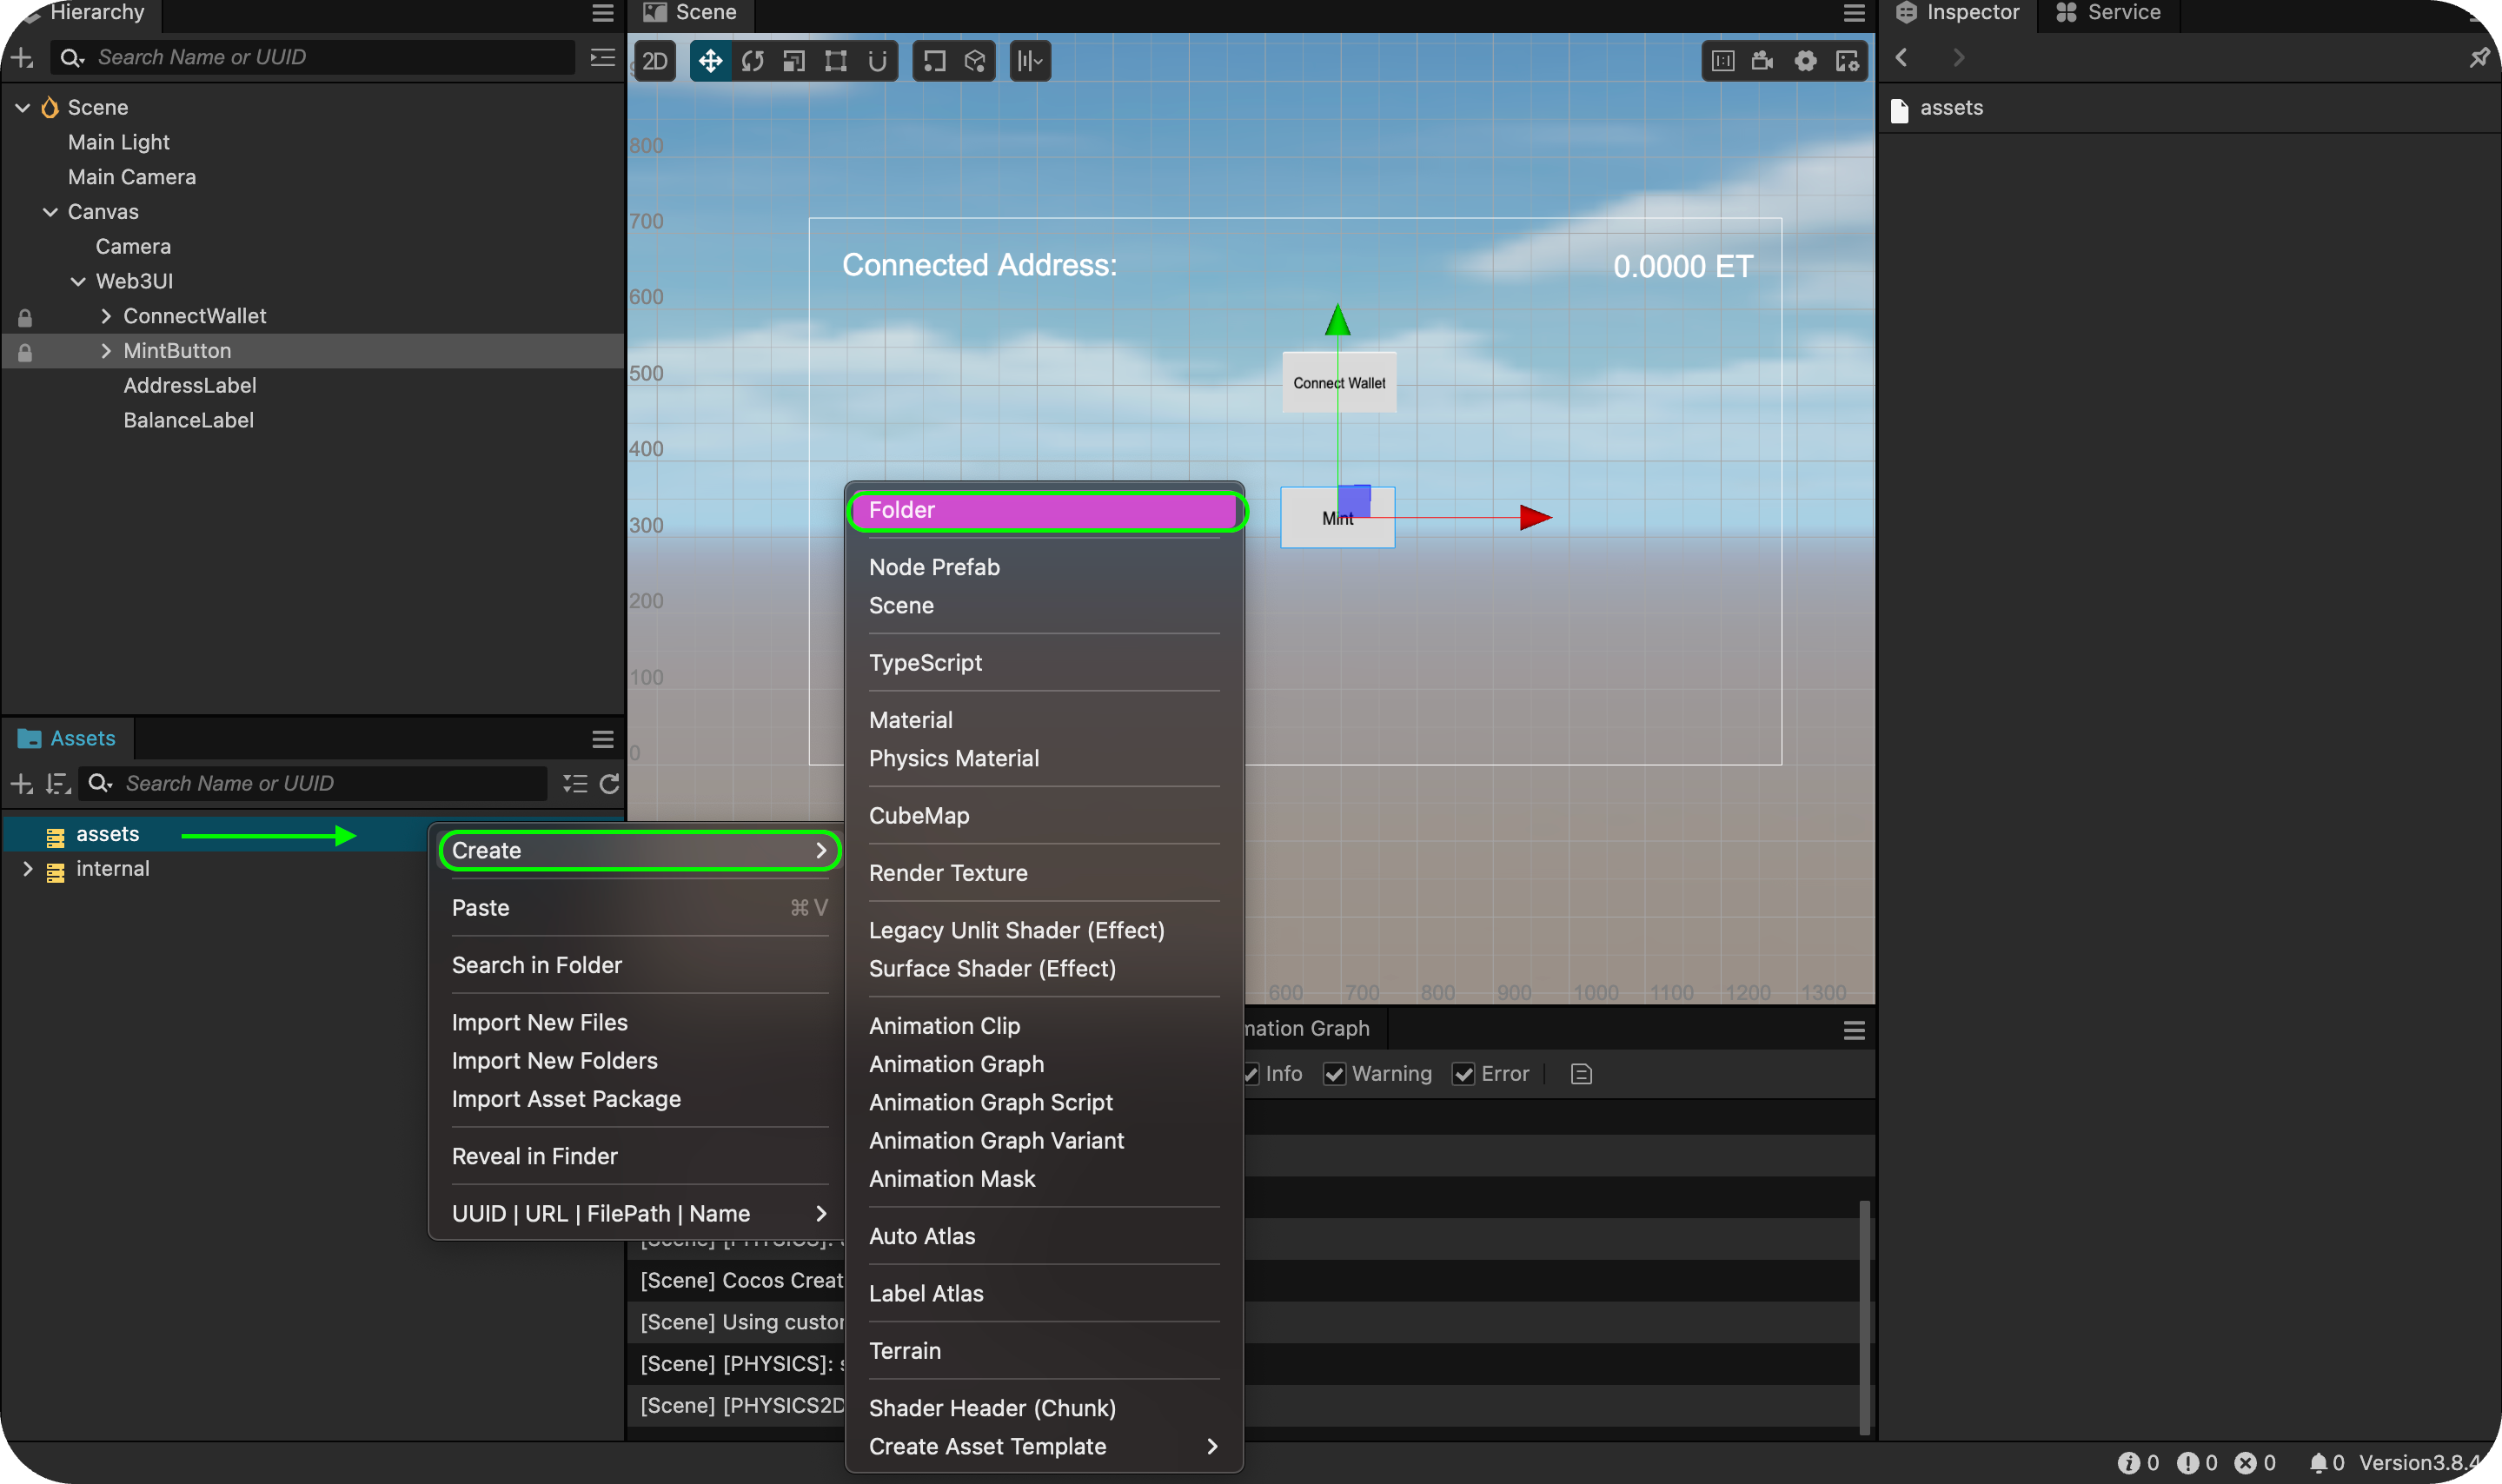
- Đặt tên là script.
2. Tạo tập tin Web3 Script
Bên trong thư mục scripts, tạo hai tệp TypeScript:
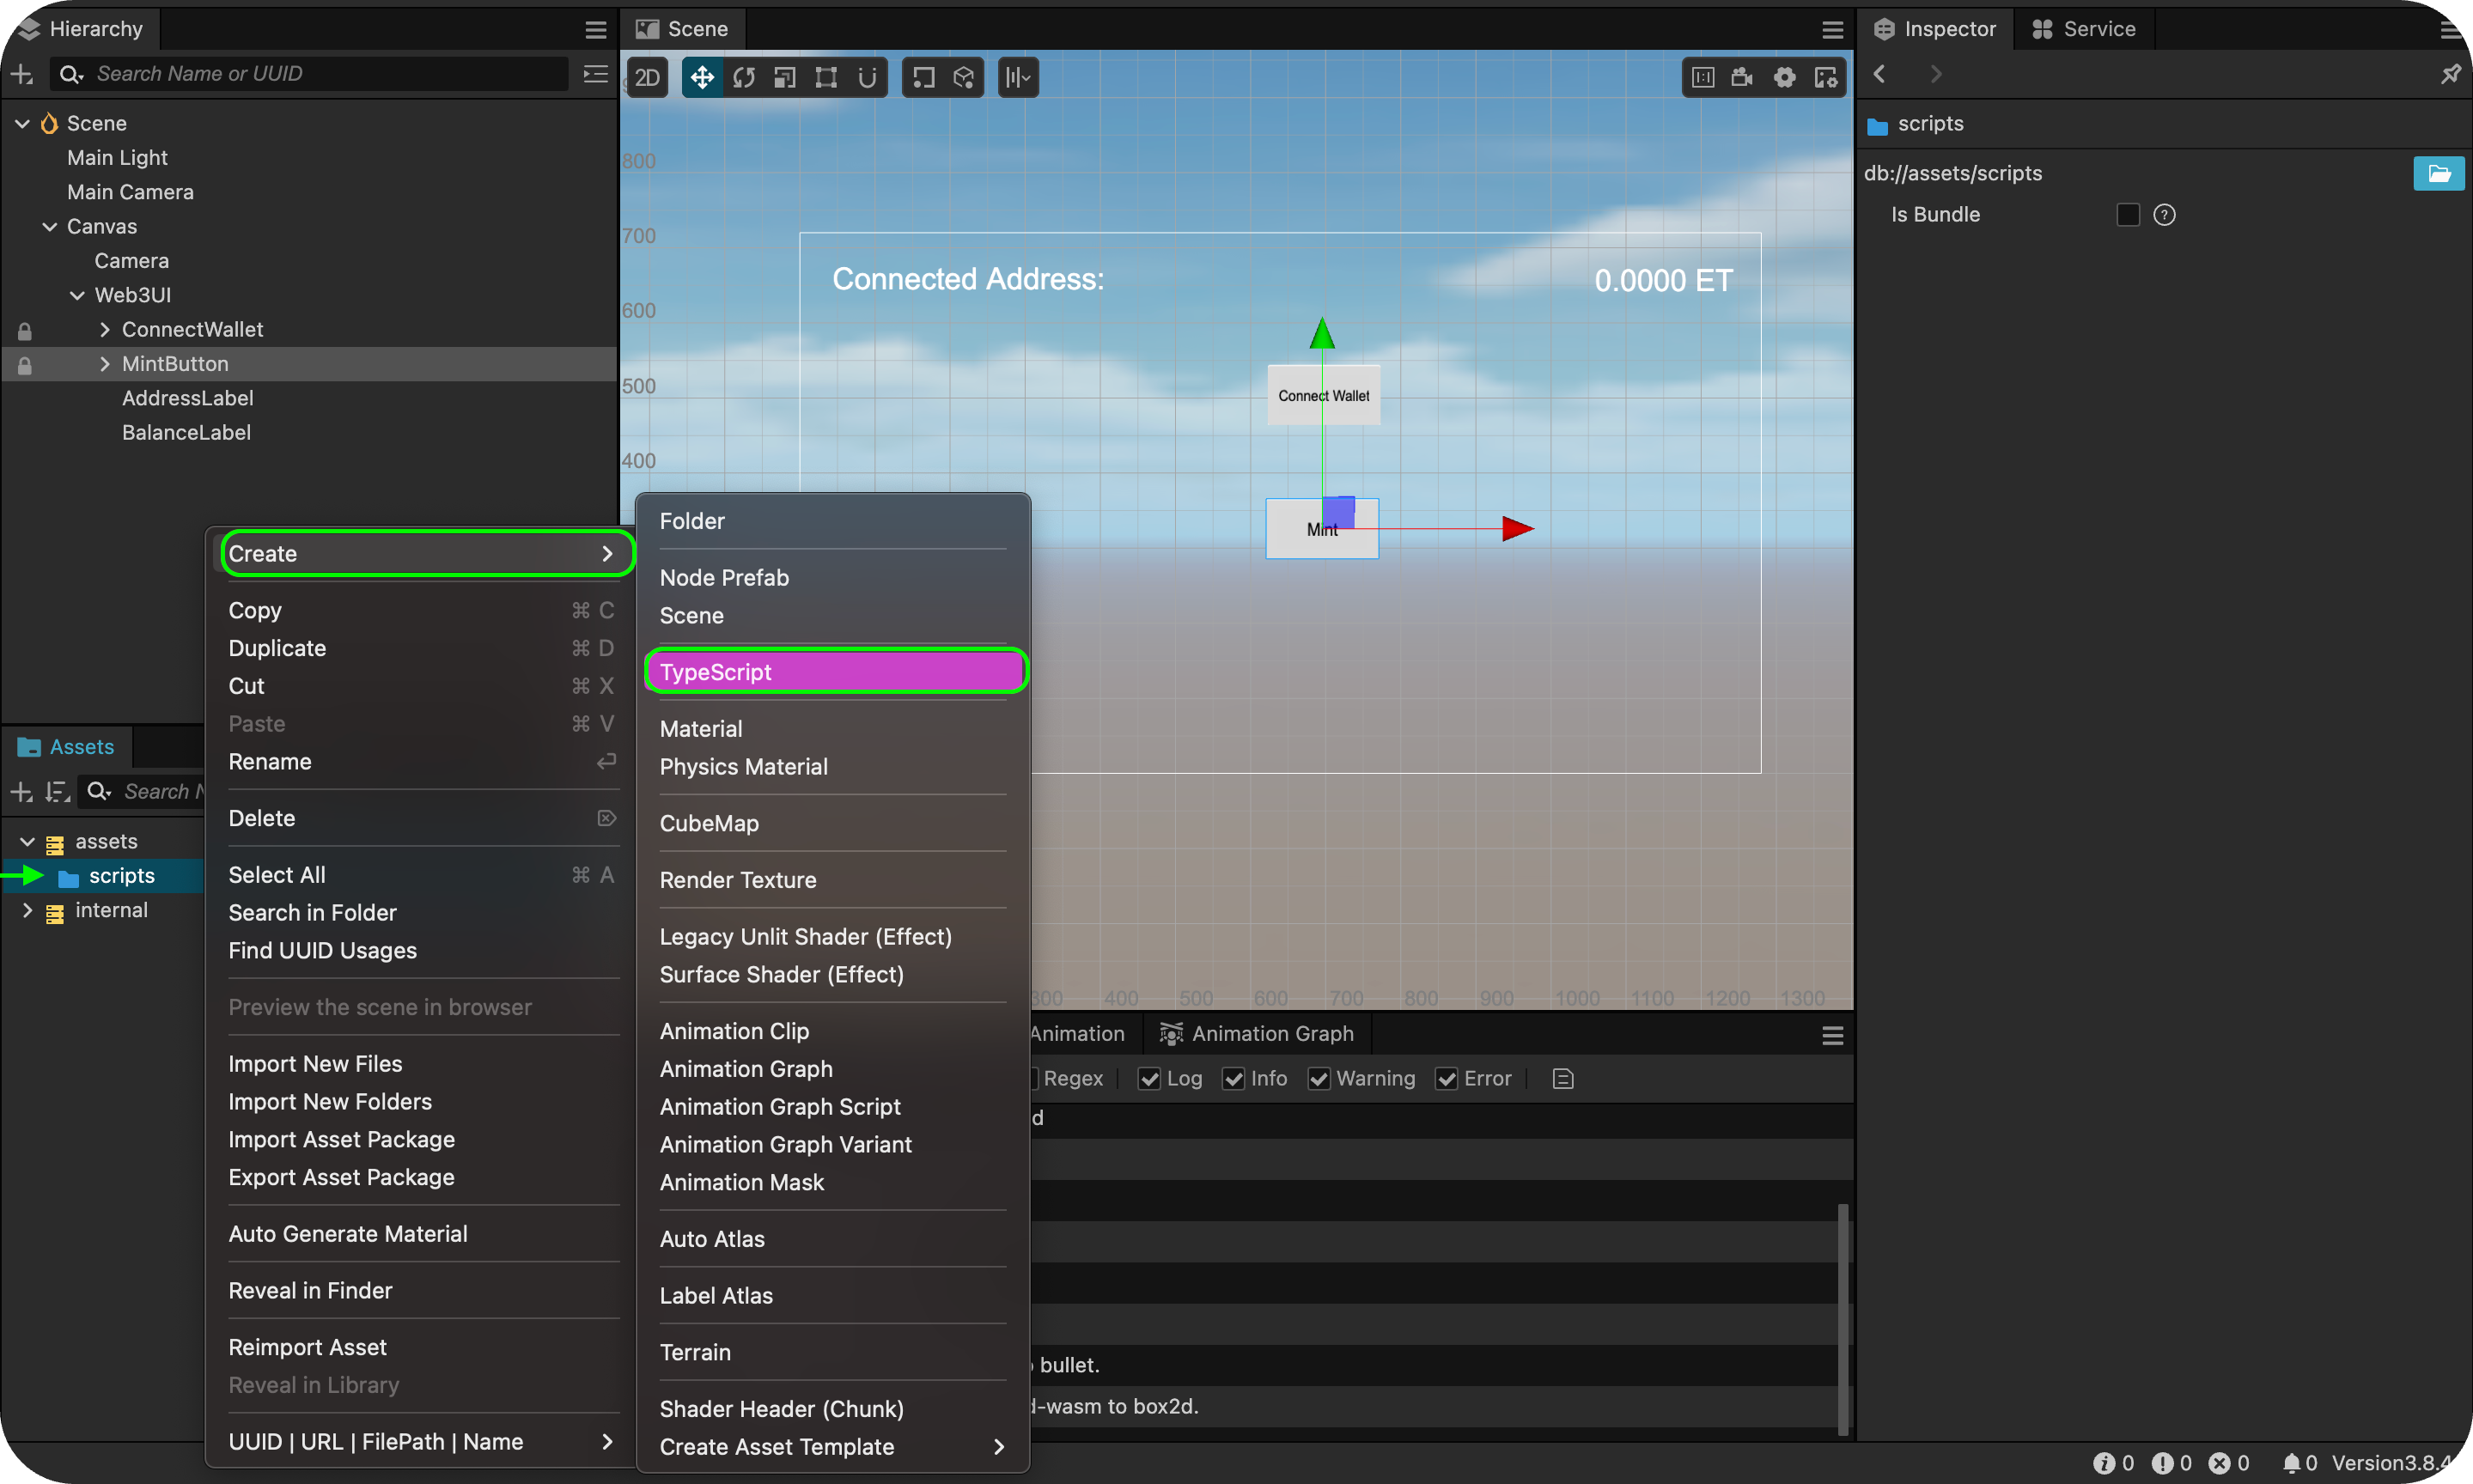
- Web3Manager.ts - Xử lý các tương tác blockchain.
- UIManager.ts - Quản lý các thành phần UI và tương tác của người dùng.
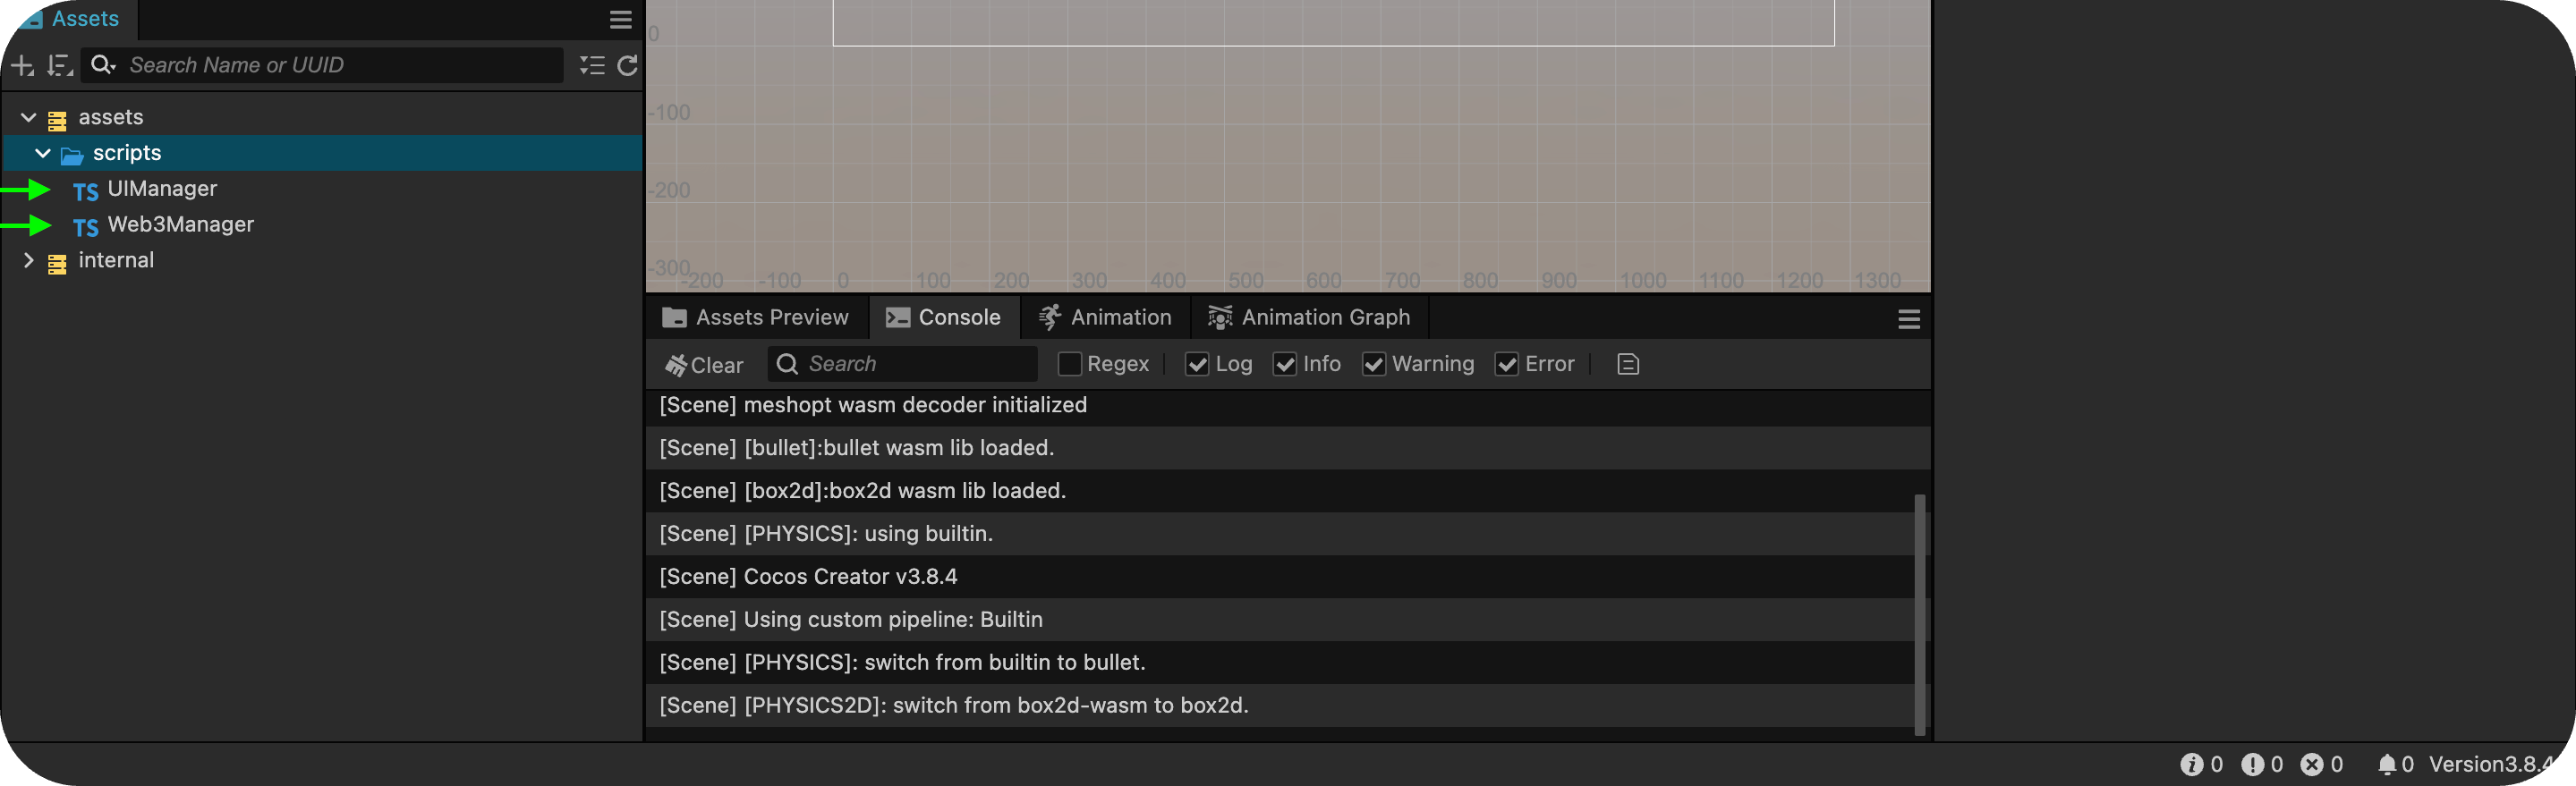
Cấu trúc dự án của bạn bây giờ sẽ trông như thế này:
assets/ scripts/ Web3Manager.ts UIManager.ts
Web3Manager.ts - Xử lý tương tác Blockchain
Tập lệnh Web3Manager chịu trách nhiệm cho mọi chức năng liên quan đến blockchain.
Đặc điểm chính
- Khởi tạo SDK - Thiết lập Mini Dapp SDK.
- Kết nối ví - Cho phép người dùng kết nối ví của họ.
- Đúc mã thông báo - Cho phép chức năng đúc mã thông báo.
- Truy xuất số dư - Truy xuất số dư mã thông báo của người dùng.
Triển khai mã:
import { _decorator, Component, Node, director, EventTarget, sys } from 'cc'const { ccclass, property } = _decorator// Global event bus for Web3 eventsexport const web3Events = new EventTarget()@ccclass('Web3Manager')export class Web3Manager extends Component { private static instance: Web3Manager = null private sdk: any = null private connectedAddress: string = '' // Configuration private readonly CONTRACT_ADDRESS = '0xbe9b8eB864F7E363ee834054e4391fb9b4e69B90' // REPLACE CONTRACT ADDRESS private readonly CHAIN_ID = '1001' private readonly CLIENT_ID = 'PASTE CLIENT ID' onLoad() { if (Web3Manager.instance === null) { Web3Manager.instance = this director.addPersistRootNode(this.node) this.initializeSDK() this.tryRestoreSession() } else { this.node.destroy() } } private async initializeSDK(): Promise<boolean> { try { // @ts-ignore this.sdk = await window.DappPortalSDK.init({ clientId: this.CLIENT_ID, chainId: this.CHAIN_ID, }) console.log('SDK initialized successfully') web3Events.emit('sdkInitialized') return true } catch (error) { console.error('SDK initialization error:', error) web3Events.emit('sdkInitError', error.message) return false } } private async tryRestoreSession() { const savedAddress = sys.localStorage.getItem('connectedAddress') if (savedAddress) { this.connectedAddress = savedAddress web3Events.emit('walletConnected', this.connectedAddress) this.getBalance() } } public async connectWallet(): Promise<void> { try { if (!this.sdk) { const initialized = await this.initializeSDK() if (!initialized) return } const provider = this.sdk.getWalletProvider() const accounts = await provider.request({ method: 'kaia_requestAccounts', }) if (accounts && accounts.length > 0) { this.connectedAddress = accounts[0] sys.localStorage.setItem('connectedAddress', this.connectedAddress) web3Events.emit('walletConnected', this.connectedAddress) this.getBalance() } } catch (error) { console.error('Wallet connection error:', error) web3Events.emit('walletError', error.message) } } public async mintToken(amount: number): Promise<void> { try { if (!this.connectedAddress) { throw new Error('Wallet not connected') } const provider = this.sdk.getWalletProvider() const mintSignature = '0xa0712d68' // @ts-ignore const amountHex = amount.toString(16).padStart(64, '0') const data = mintSignature + amountHex const tx = { from: this.connectedAddress, to: this.CONTRACT_ADDRESS, value: '0x0', data: data, gas: '0x4C4B40', } const txHash = await provider.request({ method: 'kaia_sendTransaction', params: [tx], }) // After getting txHash, immediately update balance web3Events.emit('mintSuccess', txHash) await this.getBalance() // Get updated balance right after minting } catch (error) { console.error('Minting error:', error) web3Events.emit('mintError', error.message) } } public async getBalance(): Promise<void> { try { if (!this.connectedAddress) { throw new Error('Wallet not connected') } const provider = this.sdk.getWalletProvider() const balanceSignature = '0x70a08231' // @ts-ignore const addressParam = this.connectedAddress.substring(2).padStart(64, '0') const data = balanceSignature + addressParam const result = await provider.request({ method: 'kaia_call', params: [ { from: this.connectedAddress, to: this.CONTRACT_ADDRESS, data: data, }, 'latest', ], }) const balance = parseInt(result, 16) web3Events.emit('balanceReceived', balance.toString()) } catch (error) { console.error('Balance fetch error:', error) web3Events.emit('balanceError', error.message) } } public getConnectedAddress(): string { return this.connectedAddress || '' }}
Chức năng chính
- initialSDK() - Khởi tạo Mini Dapp SDK.
- connectWallet() - Xử lý kết nối ví.
- mintToken(số lượng) - Đúc token.
- getBalance() - Lấy số dư mã thông báo.
Trước khi chạy tập lệnh, hãy đảm bảo bạn:
- Thay thế YOUR_CLIENT_ID trong Web3Manager.ts.
- Cập nhật ĐỊA CHỈ HỢP ĐỒNG nếu cần.
- Cập nhật CHAIN_ID cho mạng chính xác.
UIManager.ts - Xử lý tương tác UI
Tập lệnh UIManager quản lý tất cả các thành phần UI và tương tác của người dùng.
Triển khai mã:
import { _decorator, Component, Node, Label, Button } from 'cc'import { Web3Manager, web3Events } from './Web3Manager'const { ccclass, property } = _decorator@ccclass('UIManager')export class UIManager extends Component { @property(Label) addressLabel: Label = null @property(Label) balanceLabel: Label = null @property(Button) connectButton: Button = null @property(Button) mintButton: Button = null private web3Manager: Web3Manager = null start() { this.web3Manager = this.getComponent(Web3Manager) this.updateUIState(false) this.setupEventListeners() this.setupButtonHandlers() } private setupEventListeners() { web3Events.on('sdkInitialized', this.onSDKInitialized, this) web3Events.on('walletConnected', this.onWalletConnected, this) web3Events.on('balanceReceived', this.onBalanceReceived, this) web3Events.on('mintSuccess', this.onMintSuccess, this) web3Events.on('walletError', this.onError, this) web3Events.on('mintError', this.onError, this) web3Events.on('balanceError', this.onError, this) } private setupButtonHandlers() { this.connectButton.node.on('click', this.onConnectClick, this) this.mintButton.node.on('click', this.onMintClick, this) } onDestroy() { web3Events.off('sdkInitialized', this.onSDKInitialized, this) web3Events.off('walletConnected', this.onWalletConnected, this) web3Events.off('balanceReceived', this.onBalanceReceived, this) web3Events.off('mintSuccess', this.onMintSuccess, this) web3Events.off('walletError', this.onError, this) web3Events.off('mintError', this.onError, this) web3Events.off('balanceError', this.onError, this) } private updateUIState(isConnected: boolean) { if (this.connectButton) { this.connectButton.node.active = !isConnected } if (this.mintButton) { this.mintButton.interactable = isConnected } if (this.addressLabel) { this.addressLabel.node.active = isConnected } if (this.balanceLabel) { this.balanceLabel.node.active = isConnected } } async onConnectClick() { await this.web3Manager.connectWallet() } async onMintClick() { await this.web3Manager.mintToken(1) // Mint 1 token as example } onSDKInitialized() { console.log('SDK initialized') } onWalletConnected(address: string) { this.updateUIState(true) if (this.addressLabel) { this.addressLabel.string = `Connected: ${address.substring( 0, 6 )}...${address.substring(address.length - 4)}` } } onBalanceReceived(balance: string) { if (this.balanceLabel) { this.balanceLabel.string = `Balance: ${balance}` console.log('Balance updated:', balance) // Add this to debug } } onMintSuccess(txHash: string) { console.log(`Mint successful! TX: ${txHash}`) // The balance update will happen automatically because we called getBalance() in mintToken } onError(error: string) { console.error('Error:', error) }}
Đính kèm tập lệnh vào các nút và kết nối các thành phần UI
1. Đính kèm tập lệnh vào nút Web3UI
- Chọn nút Web3UI.
- Trong Thanh tra, nhấp vào Thêm thành phần.
- Tìm kiếm và chọn Web3Manager.
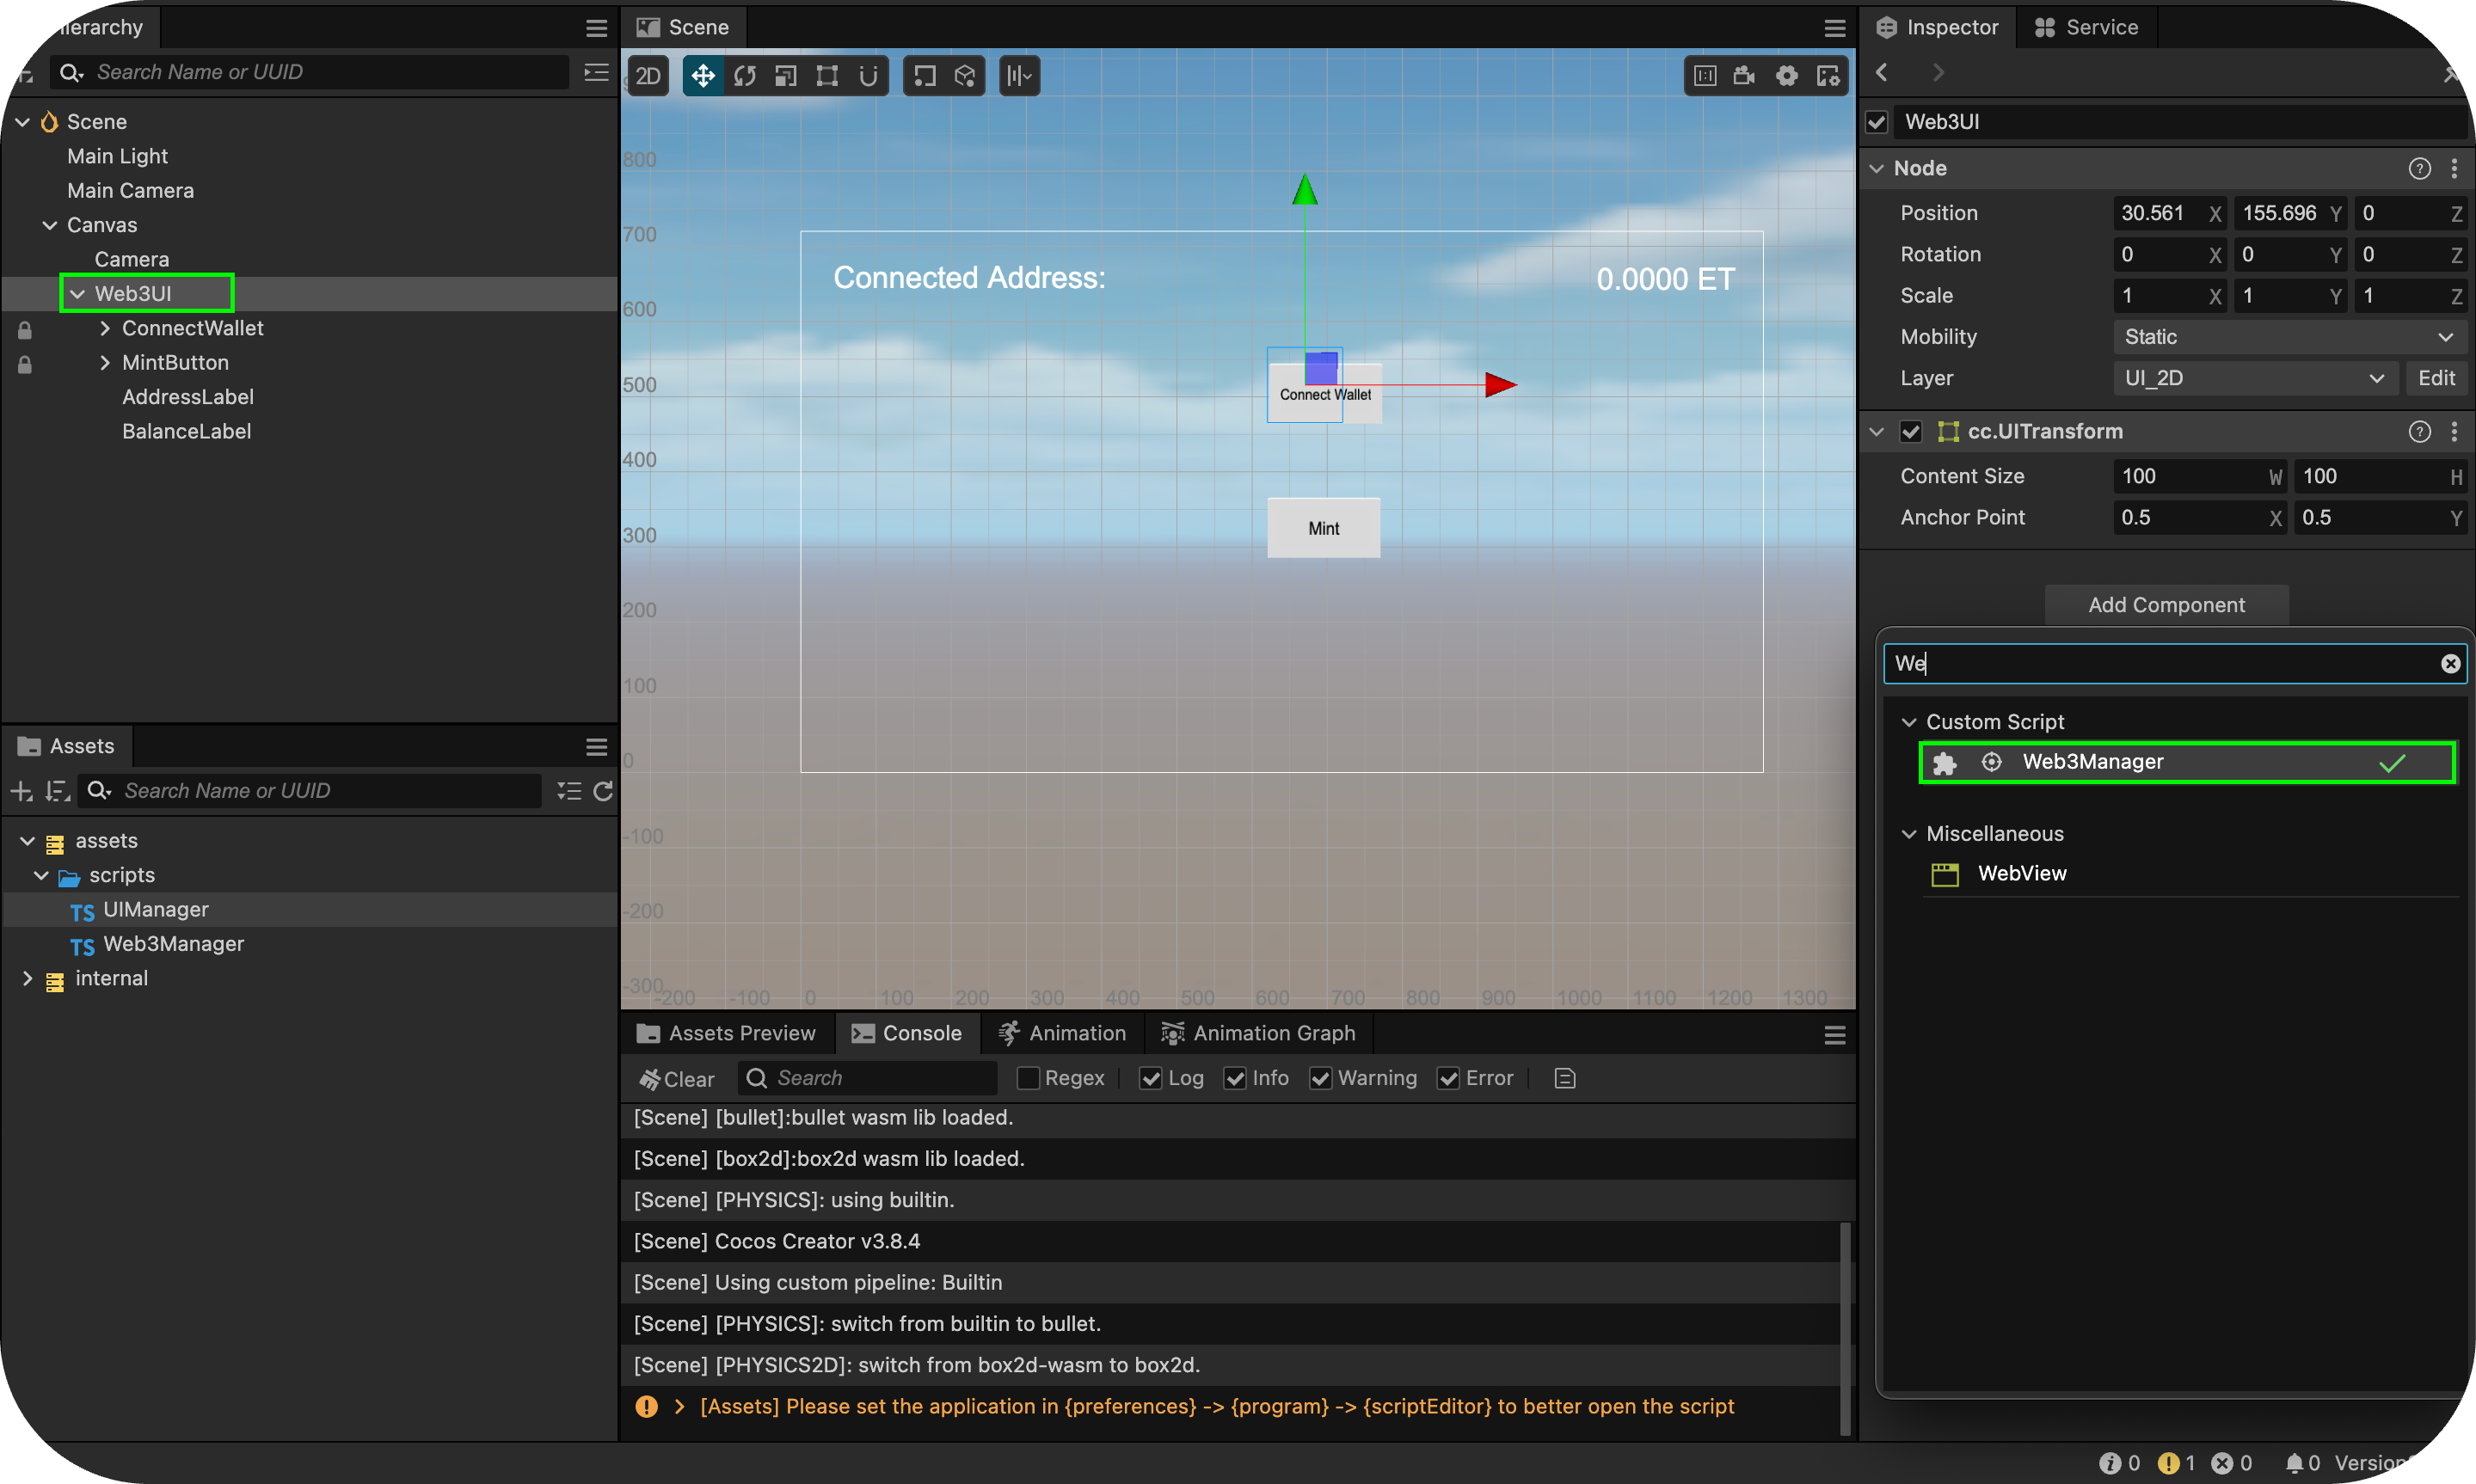
- Lặp lại các bước trên để thêm UIManager.

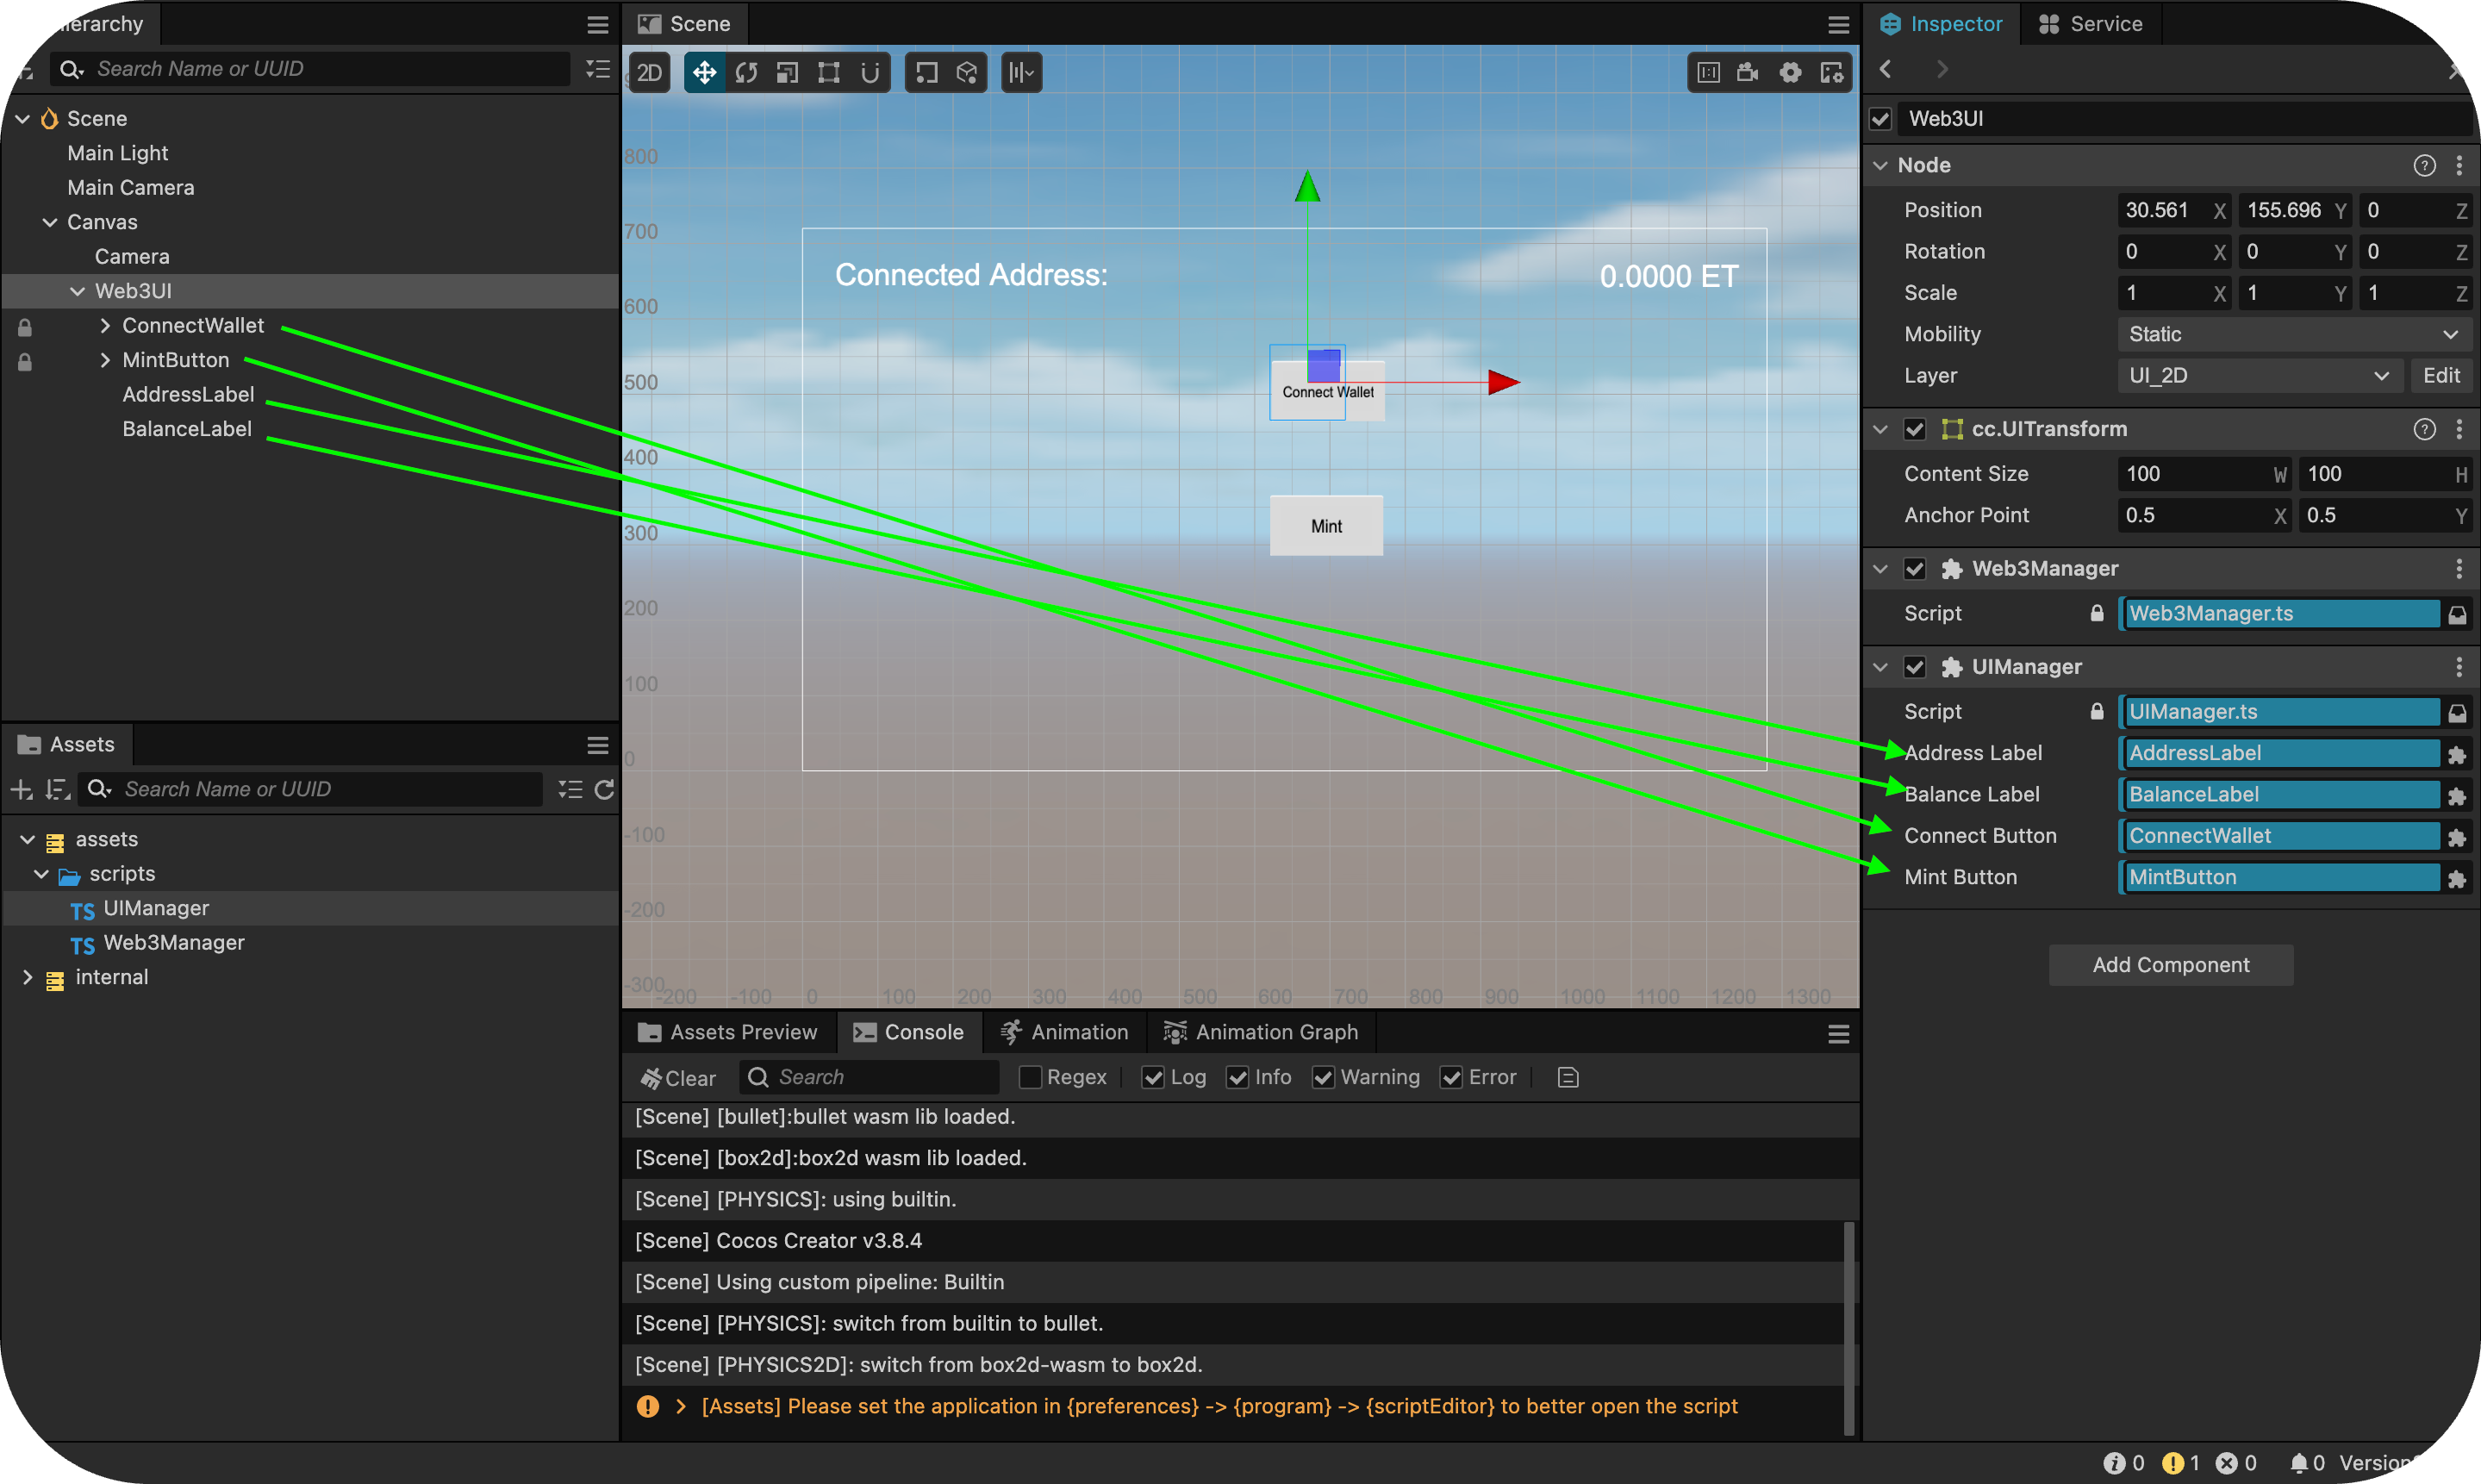
2. Kết nối các thành phần UI
- Khi đã chọn Web3UI, hãy chuyển đến Thanh tra.
- Kéo và thả các thành phần UI tương ứng từ Phân cấp vào các trường tương ứng của chúng:
- Địa chỉNhãn
- Nhãn cân bằng
- Nút kết nối ví
- Nút bạc hà