リウン
はじめに
Reown は、安全で、ユーザーフレンドリーで、洞察力に富んだウォレットとアプリのUXを作成するビルダーを支援します。 より速く立ち上げ、よりスマートに拡大するためのあらゆるツールを提供する。 Reown AppKit on Unity**を使えば、オンチェーンエコシステムをゲームに簡単に接続でき、プレイヤーにとって自然な感覚でスムーズなウォレットインタラクションを実現できます。
このチュートリアルでは、Reown AppKitをKaiaベースのUnityゲームに統合する方法を順を追って説明します。
前提条件
- 最新バージョンのUnity (Unity 2022.3以上)
- A メタマスク 財布
- KAIA蛇口](https://faucet.kaia.io/)のテストネットKAIA (カイロスを使用している場合)
- プロジェクトIDの設定

スタート
このガイドでは、KaiaのReown AppKitを使用してUnityゲームにウォレット機能を統合する方法をご紹介します。 最後には、選手が以下のことを行えるようなセットアップができるようになる:
- 財布の接続と切断
- 自国通貨残高とトークン残高の両方を確認できる
- ゲーム内で直接ソウルバウンドトークン(SBT)を要求する。
私たちはこれをKaiaメインネット上で構築します(教育目的)が、同じコードは開発とテストのためにKairosテストネット上でシームレスに動作します。
新しいUnity3Dプロジェクトを作成する
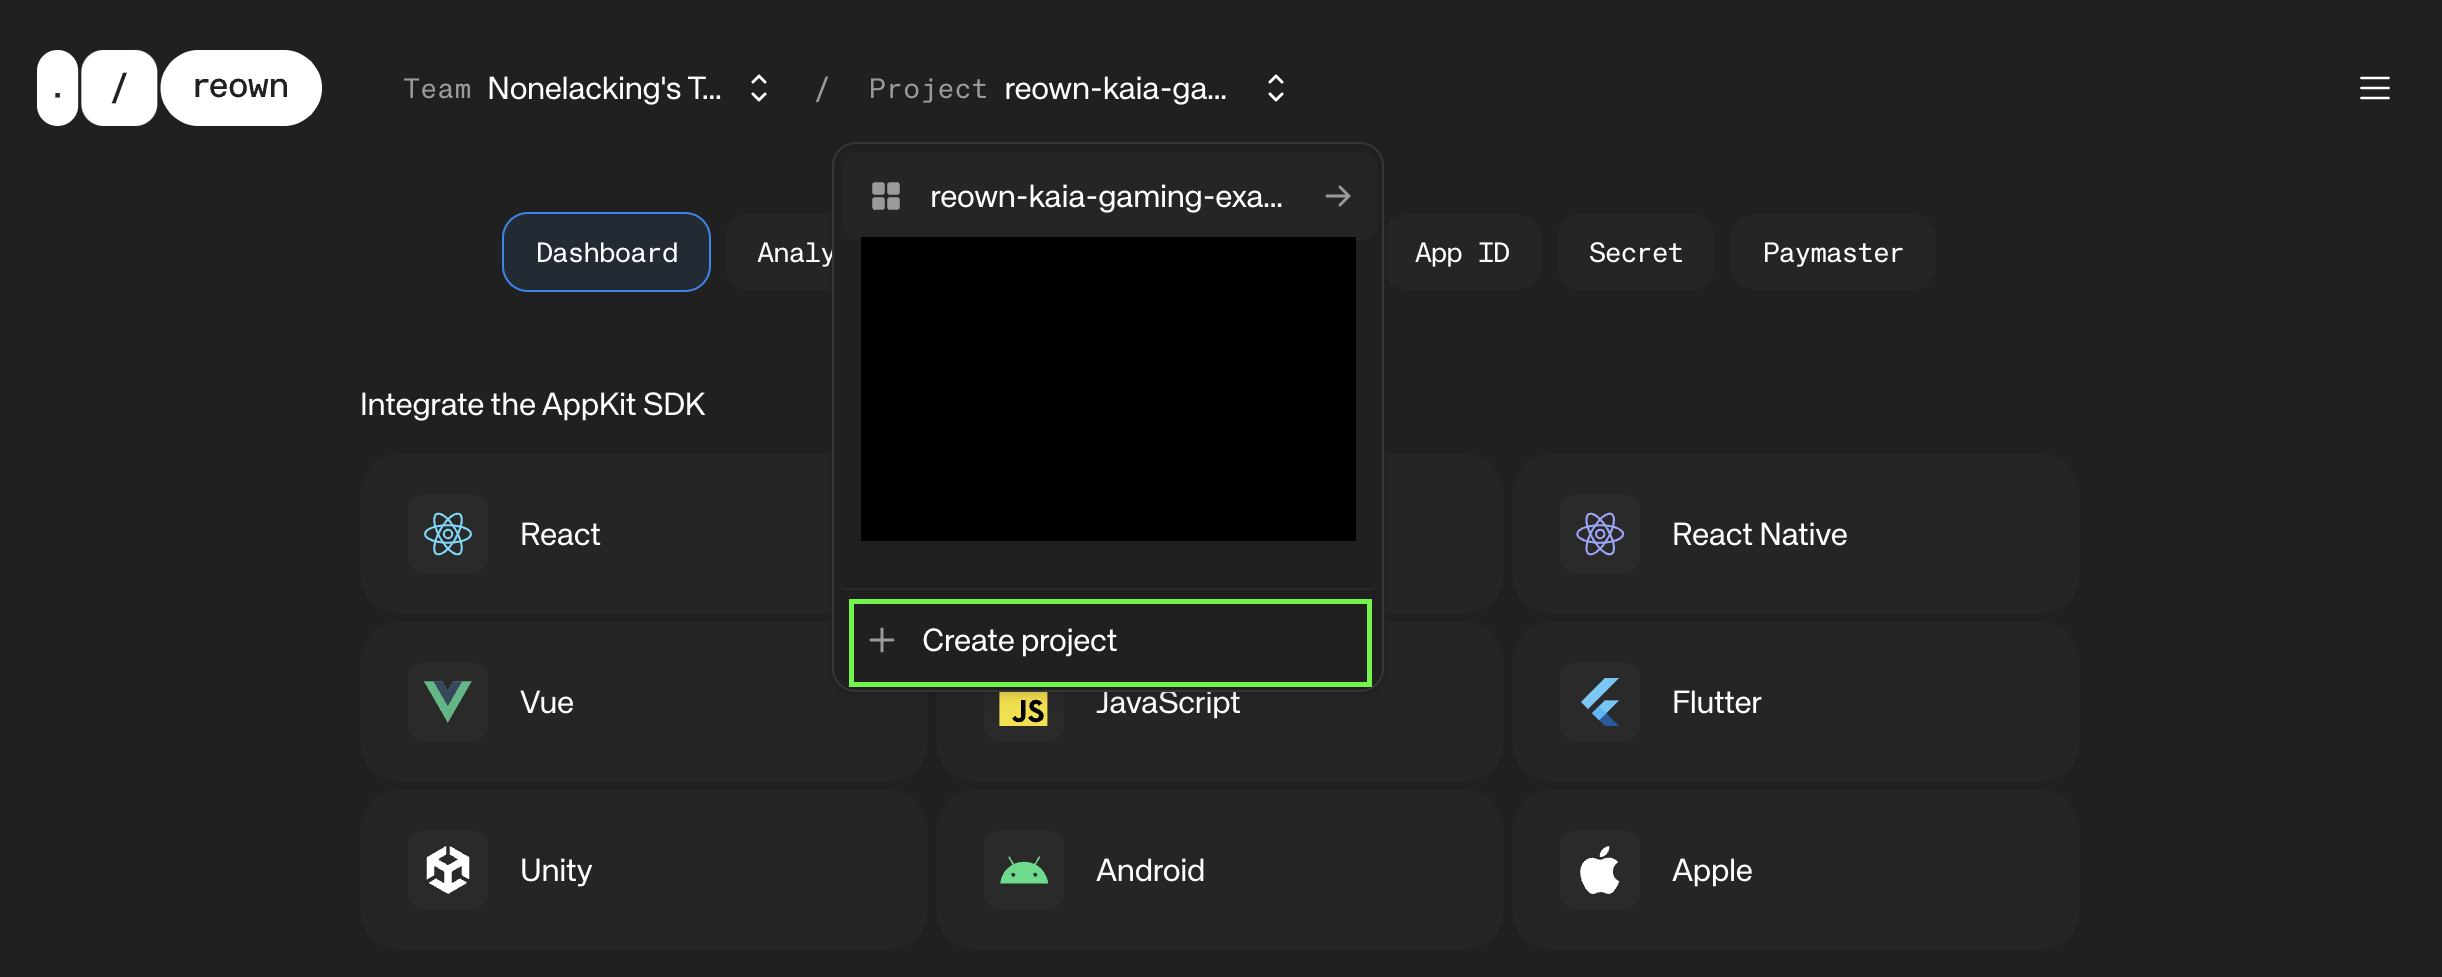
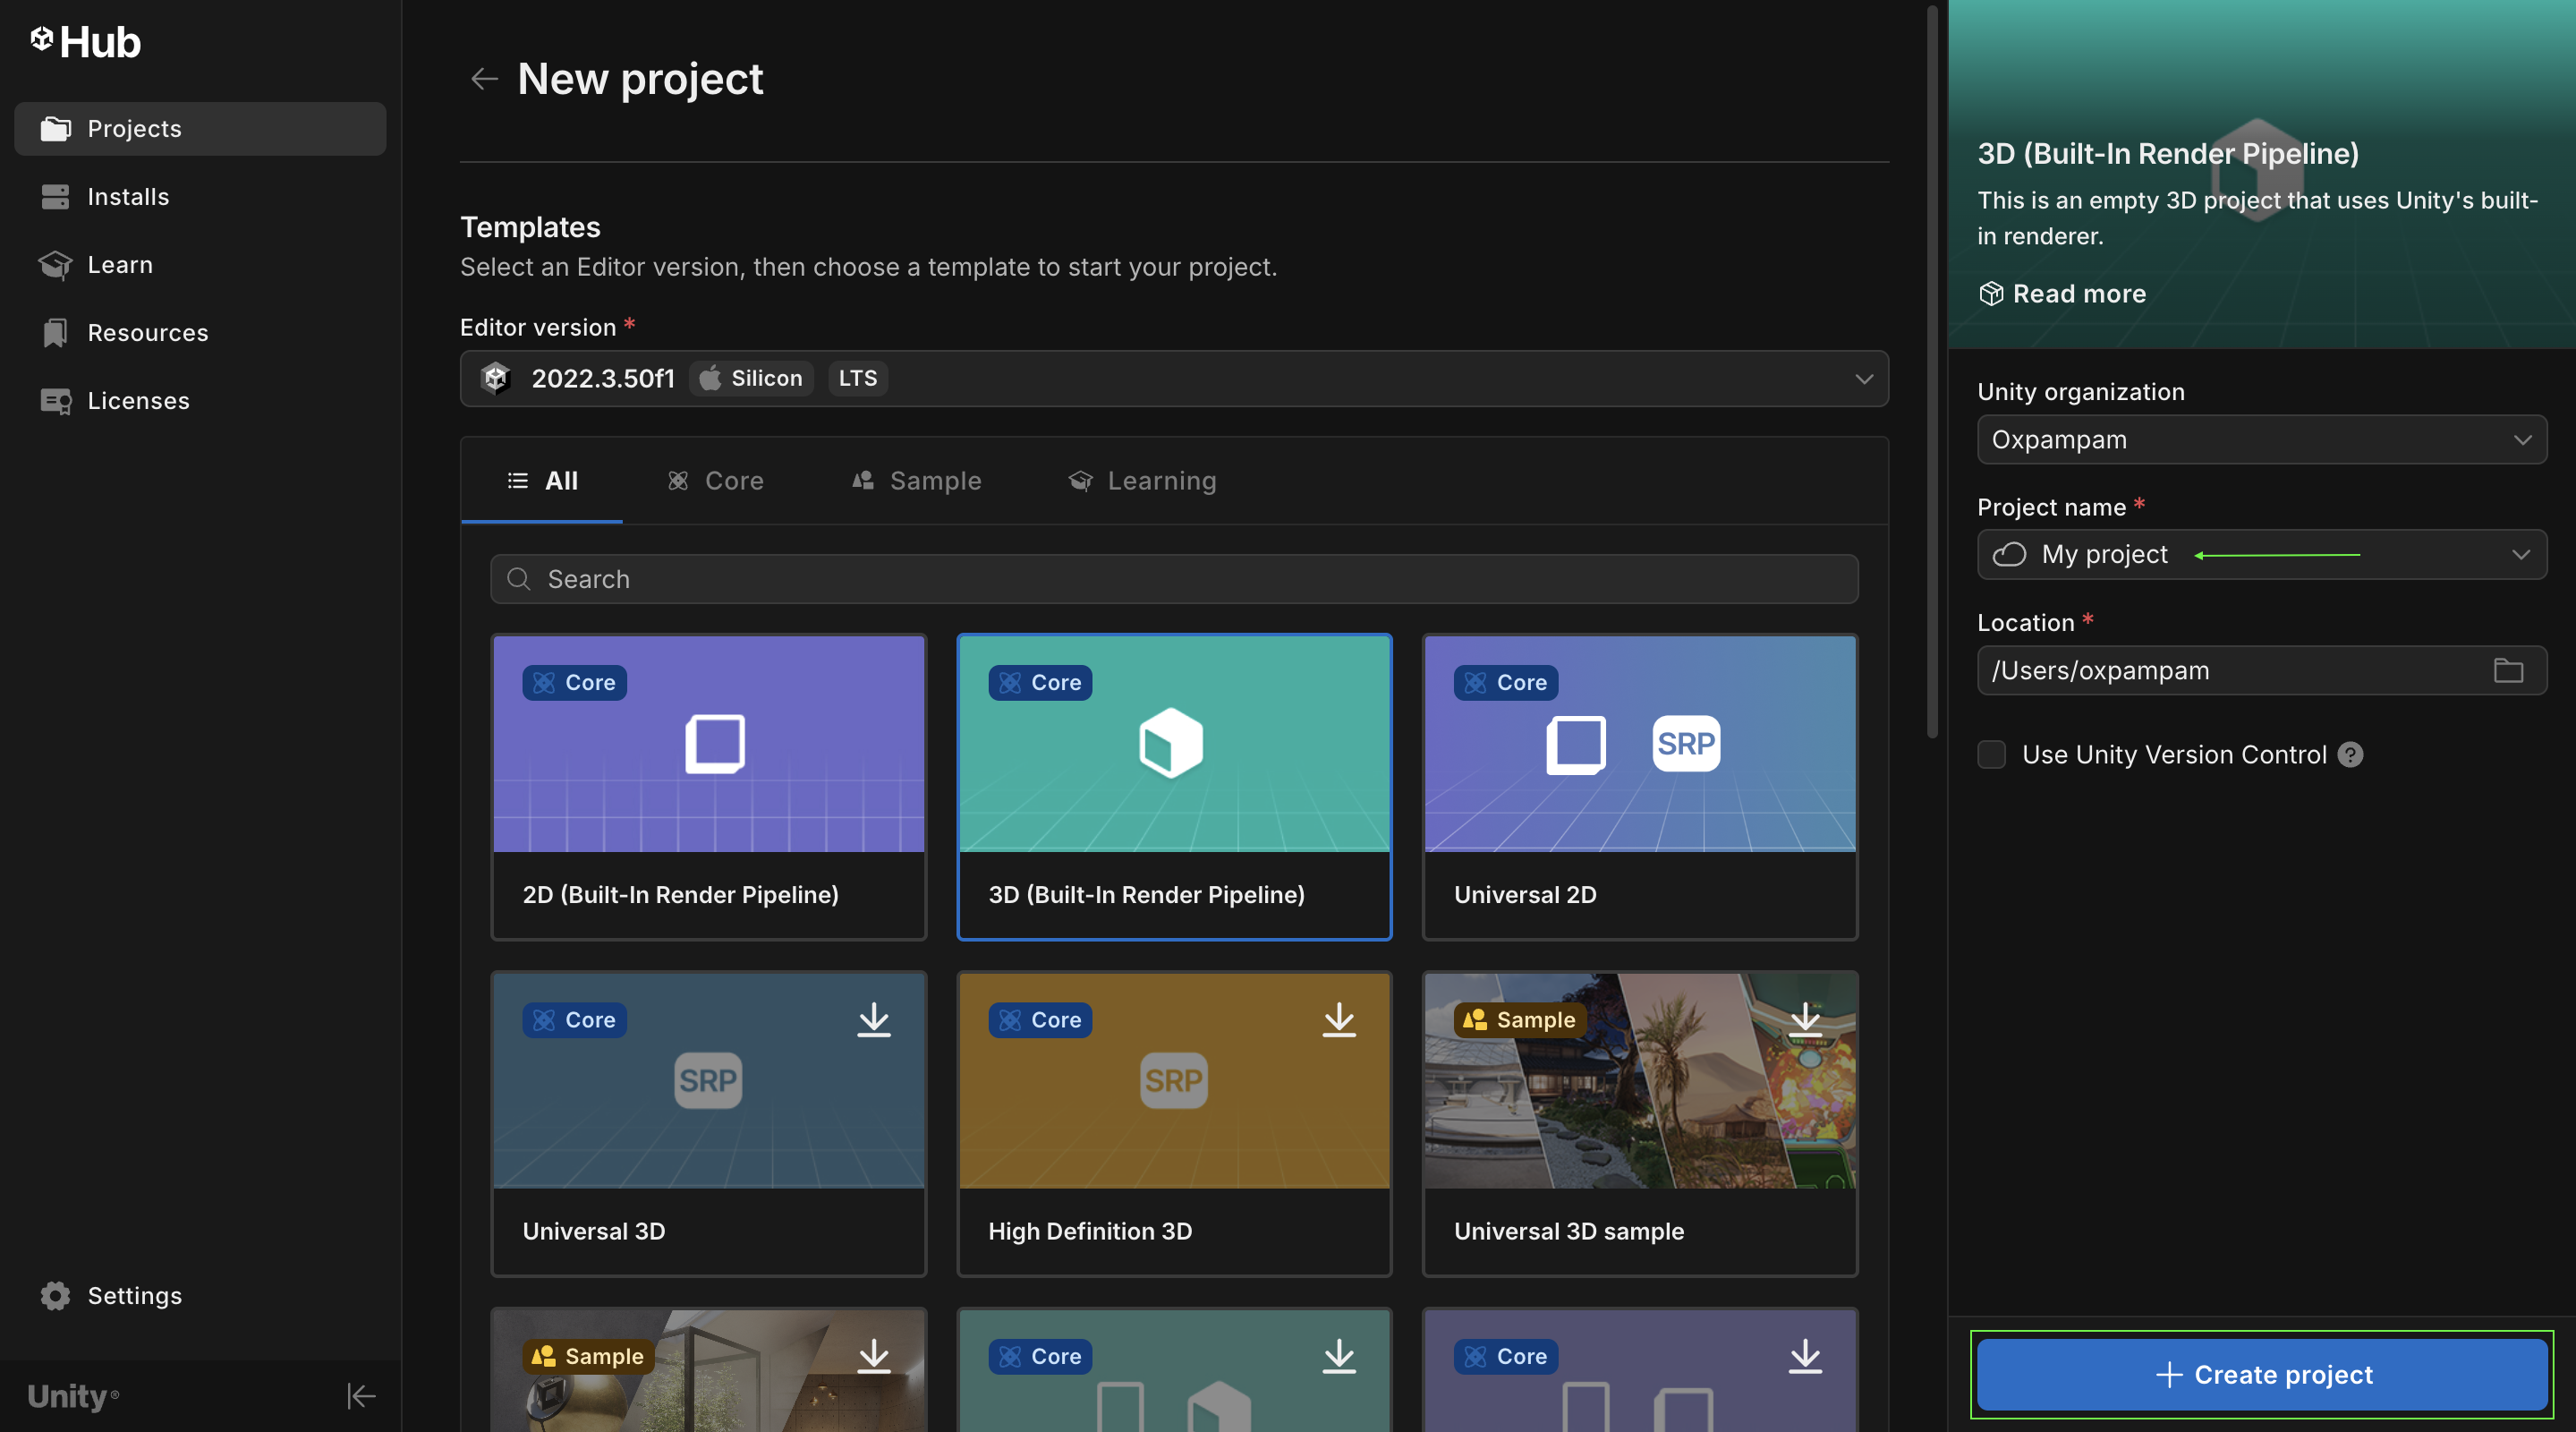
新しいプロジェクトを作成するには、以下のようにする:
- プロジェクト**タブに移動します、
- 新規プロジェクト**ボタンをクリックしてください。
- すべてのテンプレートを選択します。 3Dテンプレート**を使用します、
- Create**プロジェクトをクリックする。
UnityにReown AppKitをインストールする
オープンUPMによるパッケージ・マネージャー
- Unityのメニューバー上部にあるサービスメニューから「一般設定」を開きます。
- 新しいスコープ付きレジストリを以下の内容で追加する:
- 名前OpenUPM
- URL:https://package.openupm.com
- 対象範囲:com.reownおよびcom.nethereum
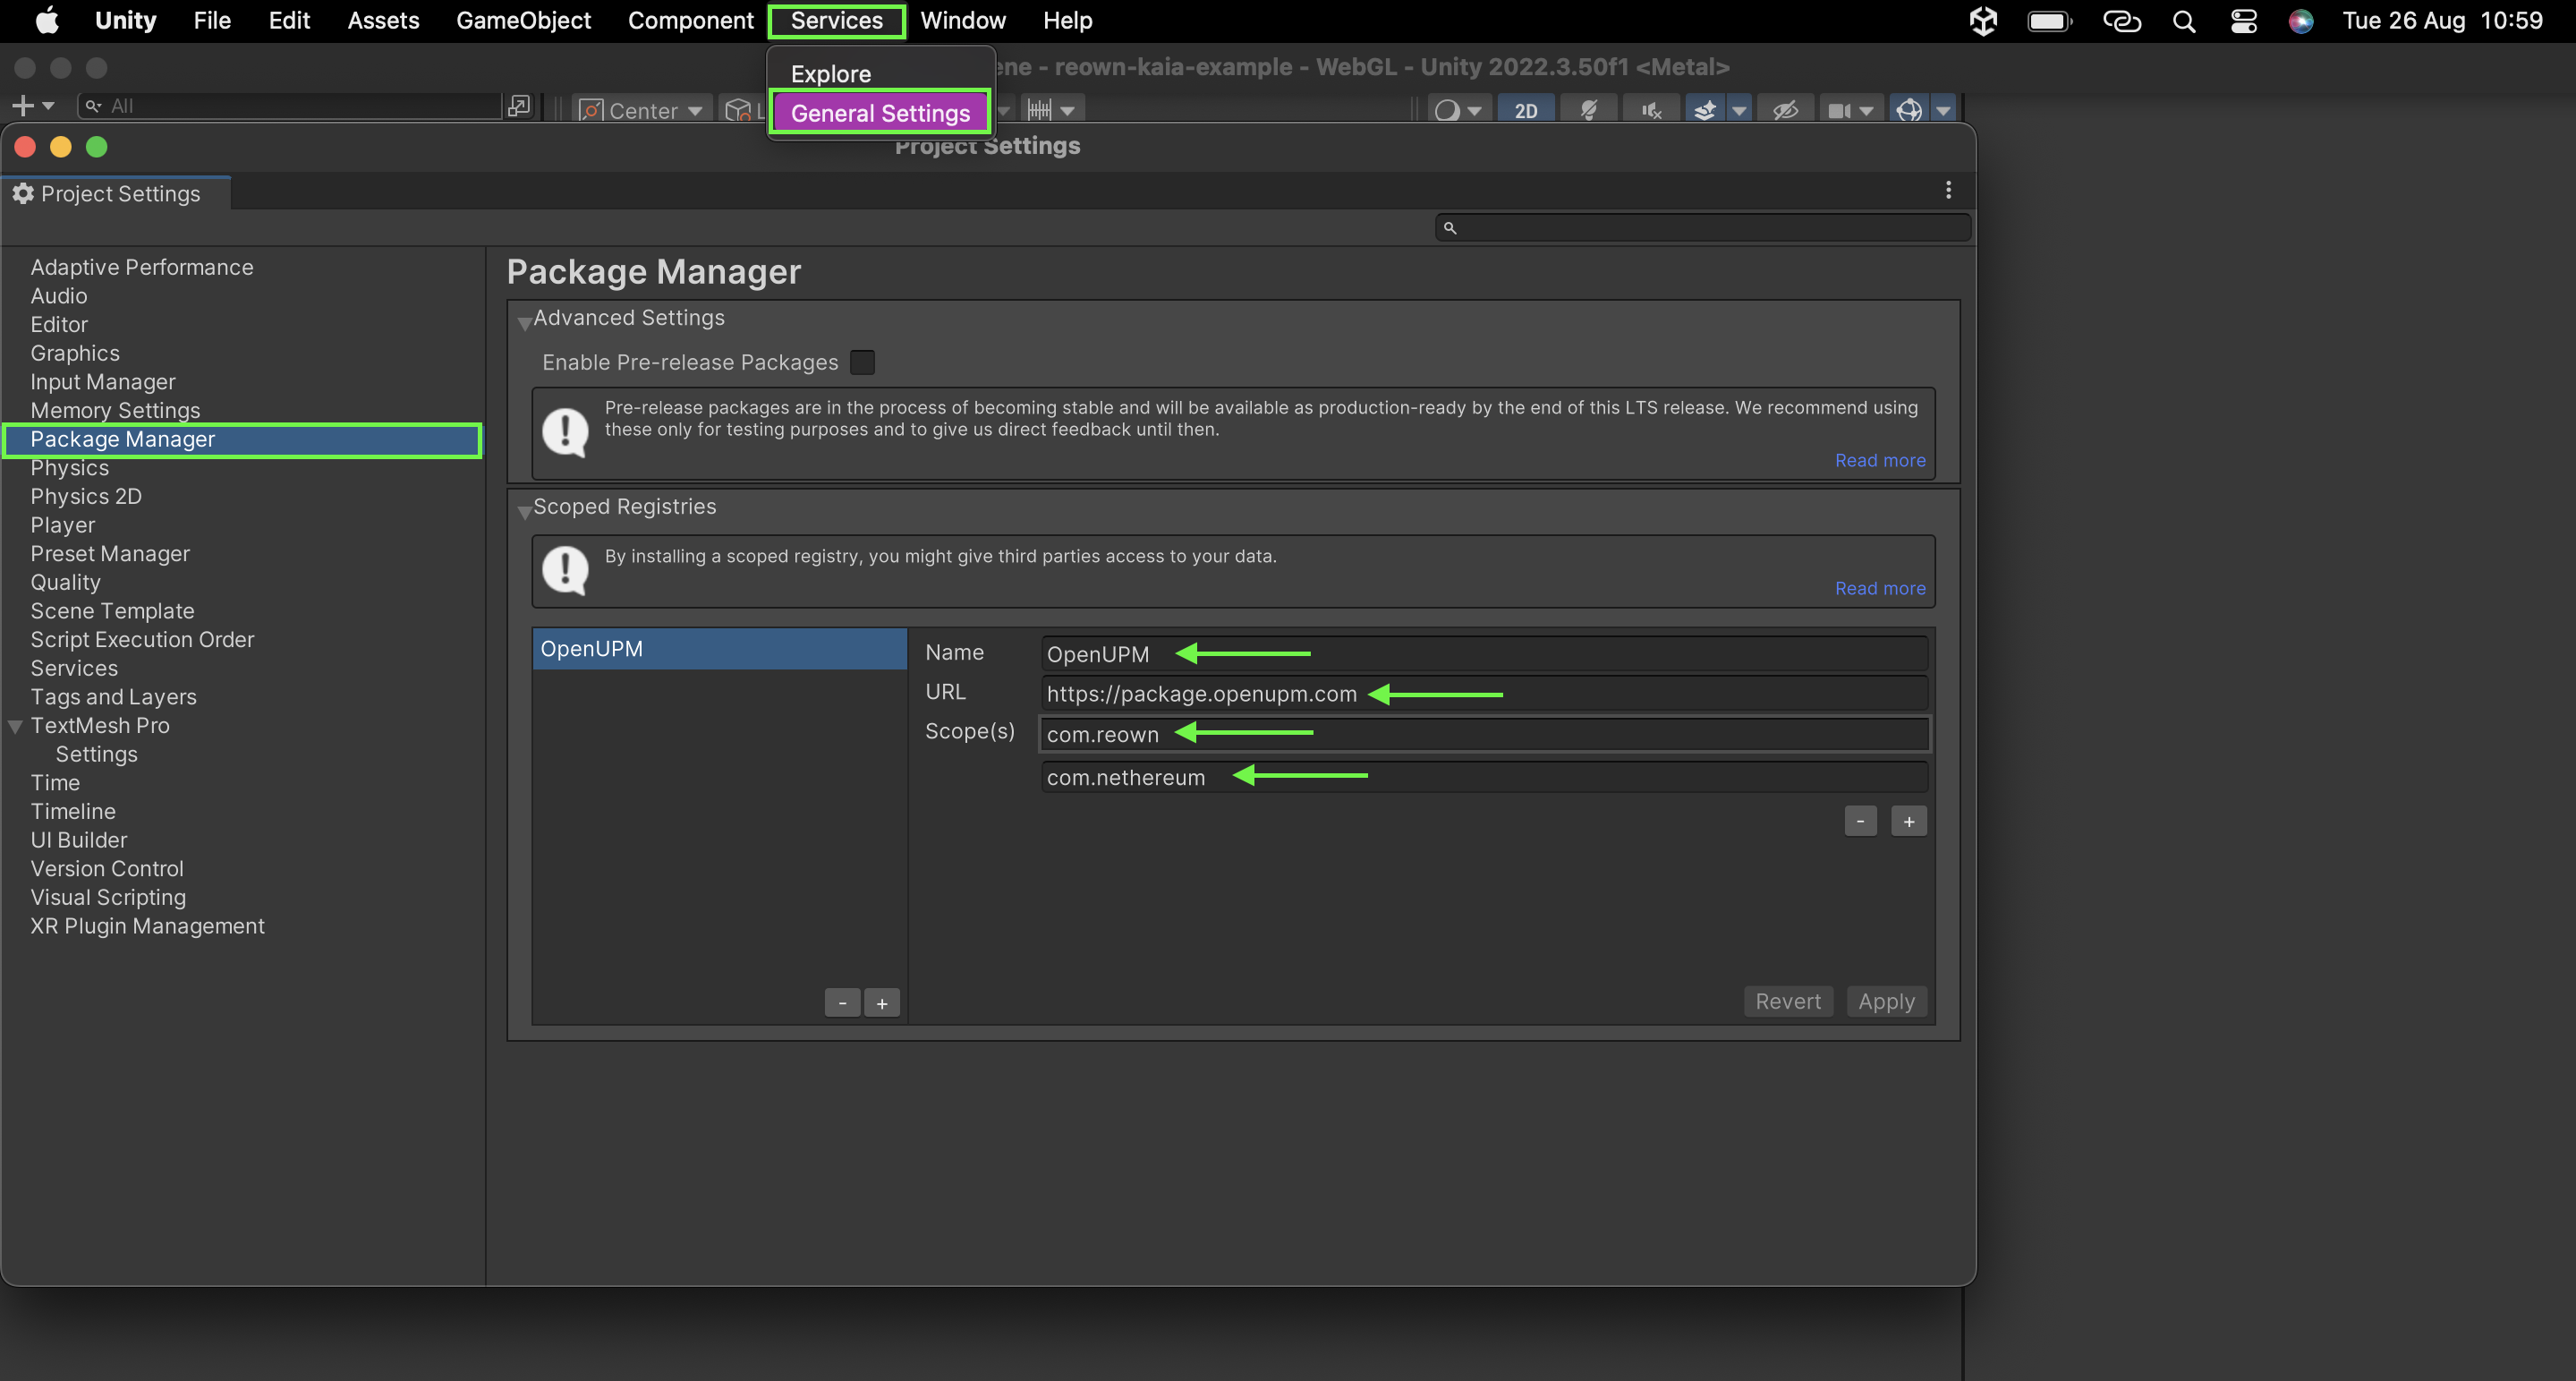
- プラス➕ボタンを押し、次に保存ボタンを押します。
- Unityの上部にあるWindowsメニューからPackage Managerを開きます。
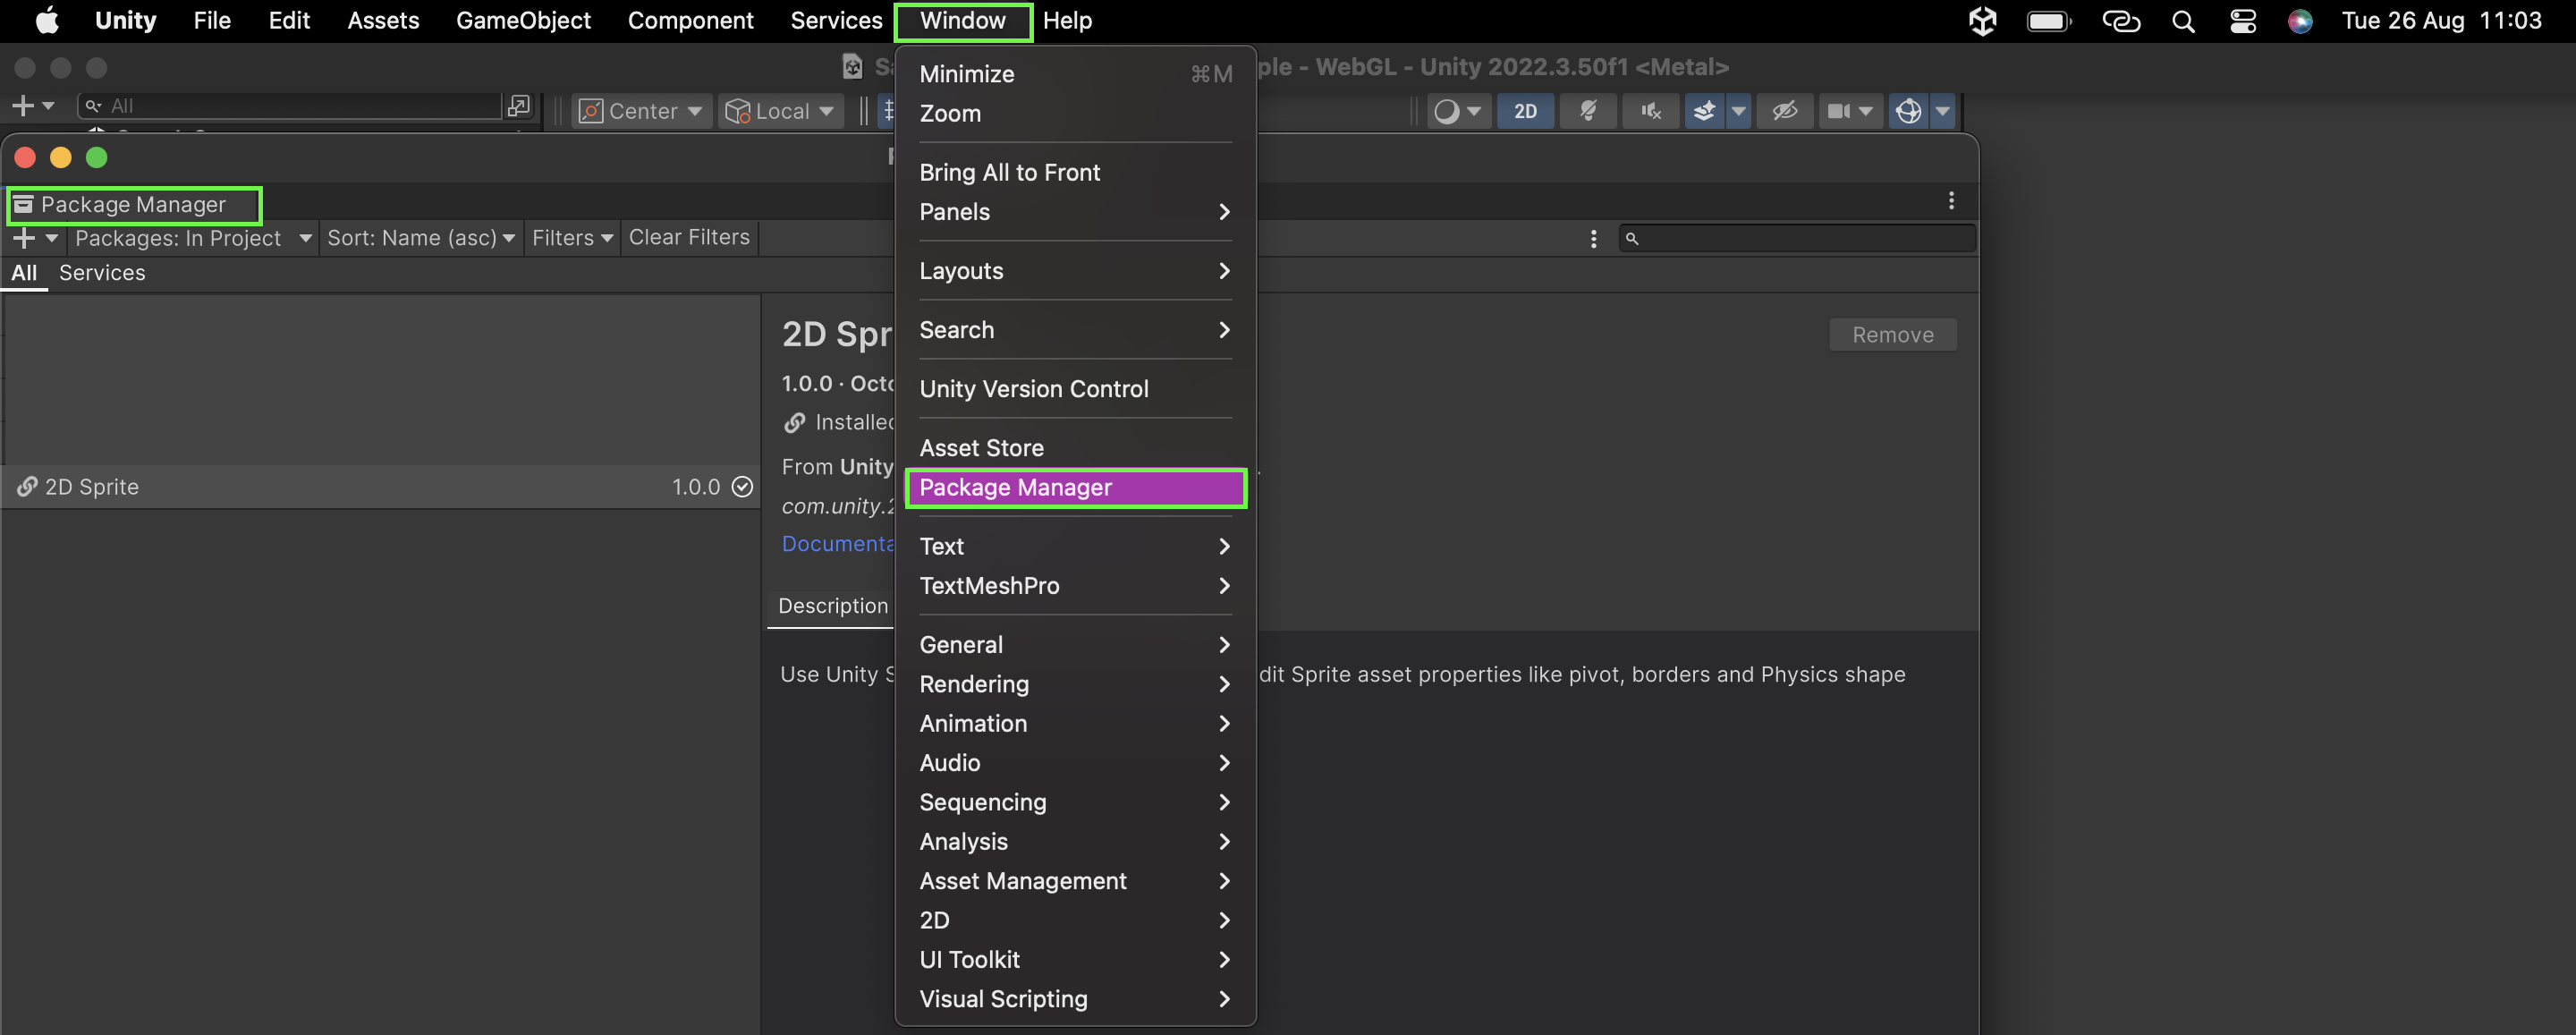
- ツールバーから add ➕メニューを開き、Add package by name…を選択します。
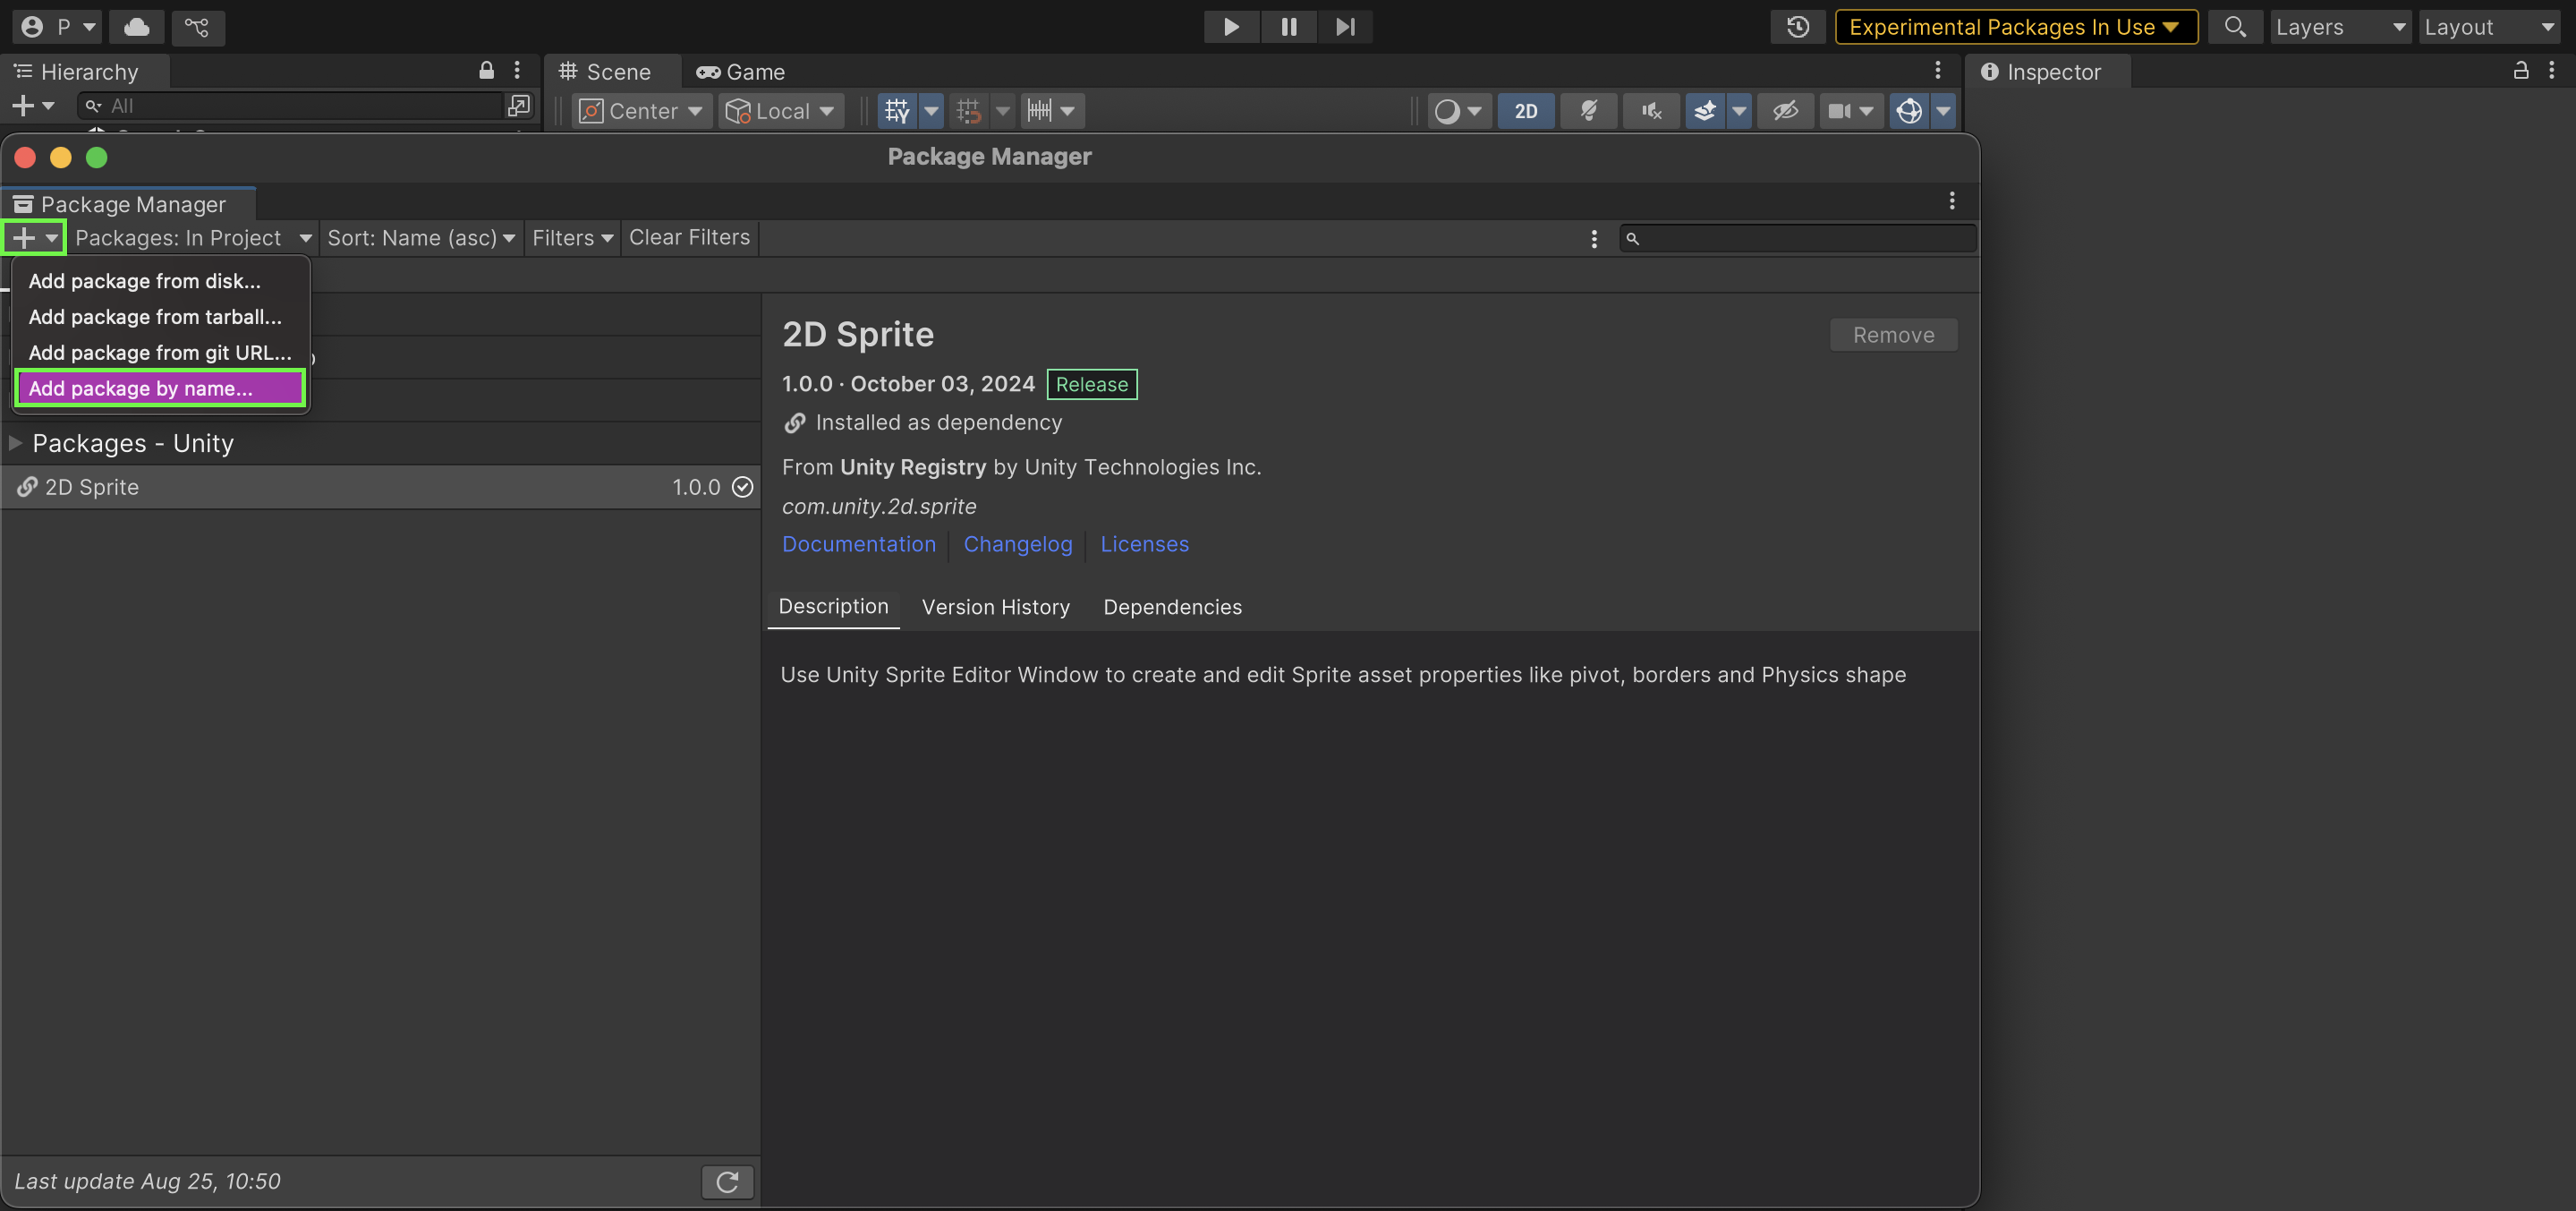
- 以下のパッケージ名を1つずつ入力する:
- com.nethereum.unity
- com.reown.core
- com.reown.core.crypto
- com.reown.core.common
- ネットワーク
- com.reown.core.storage
- com.reown.sign
- com.reown.sign.unity
- com.reown.sign.nethereum
- com.reown.sign.nethereum.unity
- com.reown.appkit.unity
- com.reown.unity.dependencies
- 追加**ボタンを押す

アプリシーンの設定
Web3の機能のためにシーンを準備する必要がある:
シーンの読み込み
- Assets > Scenesで、SampleSceneをダブルクリックします。 これが、私たちのクレームSBTの全機能の住処となる。
Reown AppKit Prefabの追加
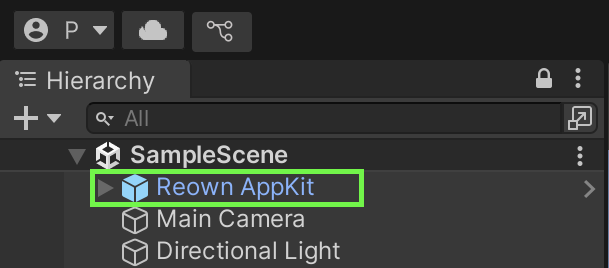
- プロジェクト > パッケージ > Reown.AppKit.Unity > Prefabs に移動します。
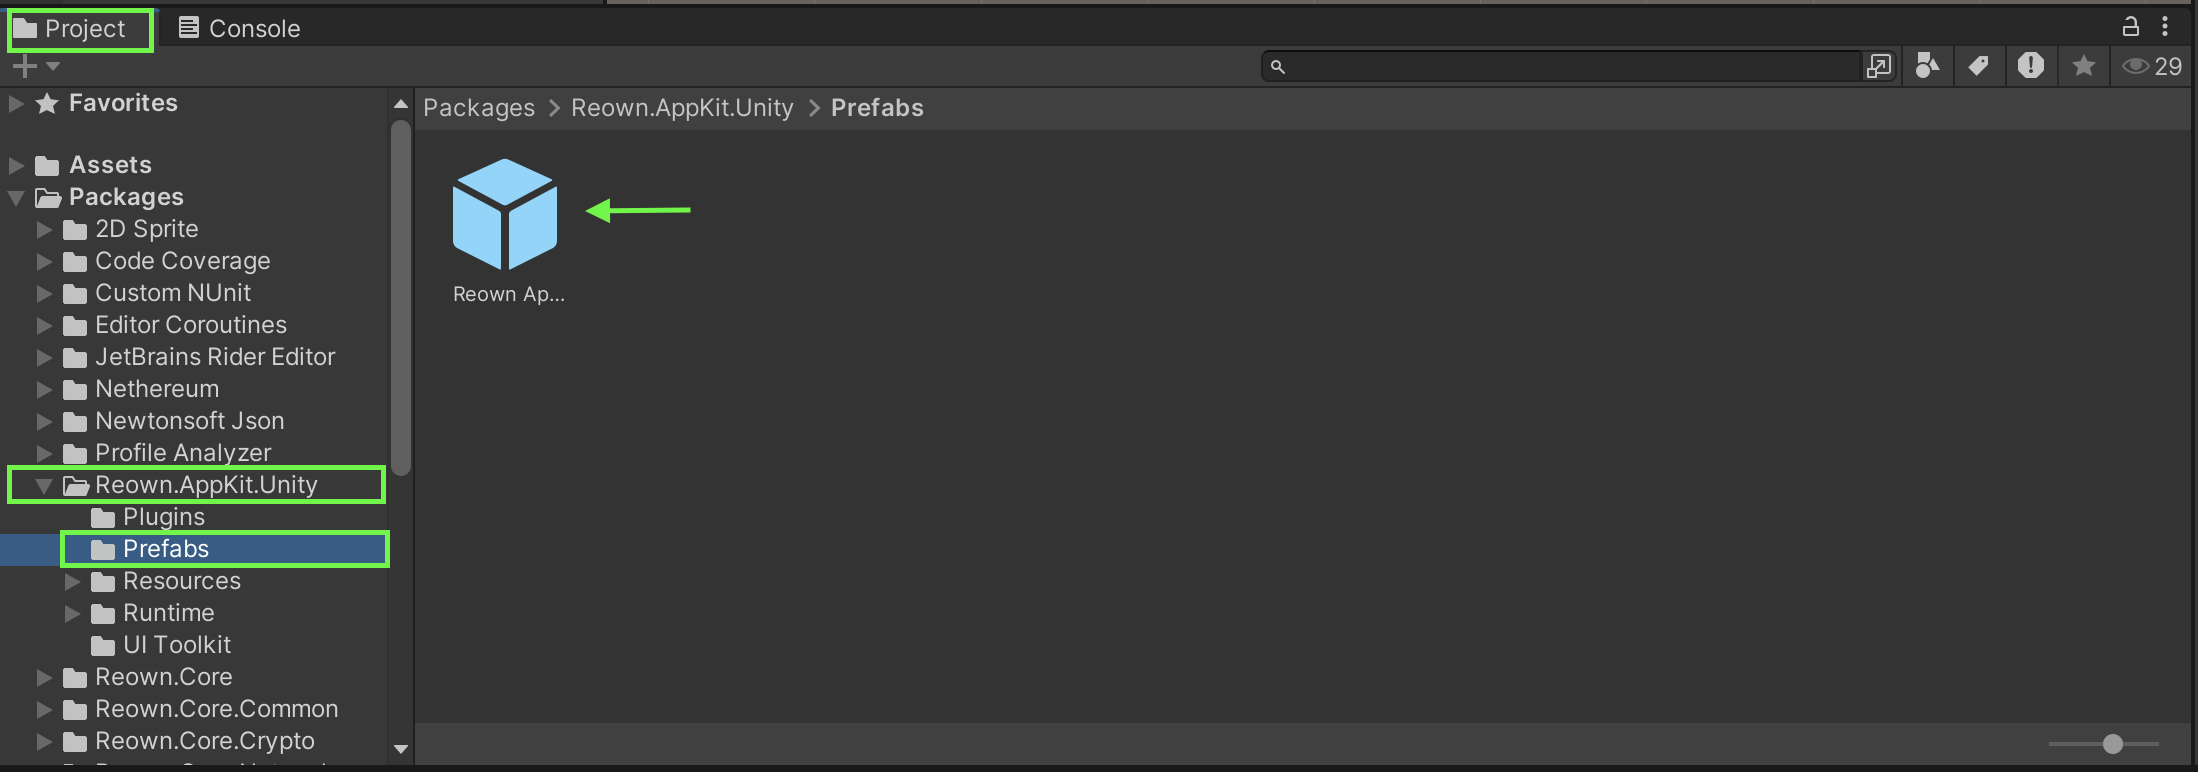
- Reown AppKit Prefab��をシーン階層にドラッグします。
UIキャンバスの作成
- シーン階層で右クリック
- GameObject > UI > Canvasに移動する。
- 名前をキャンバスに変更する
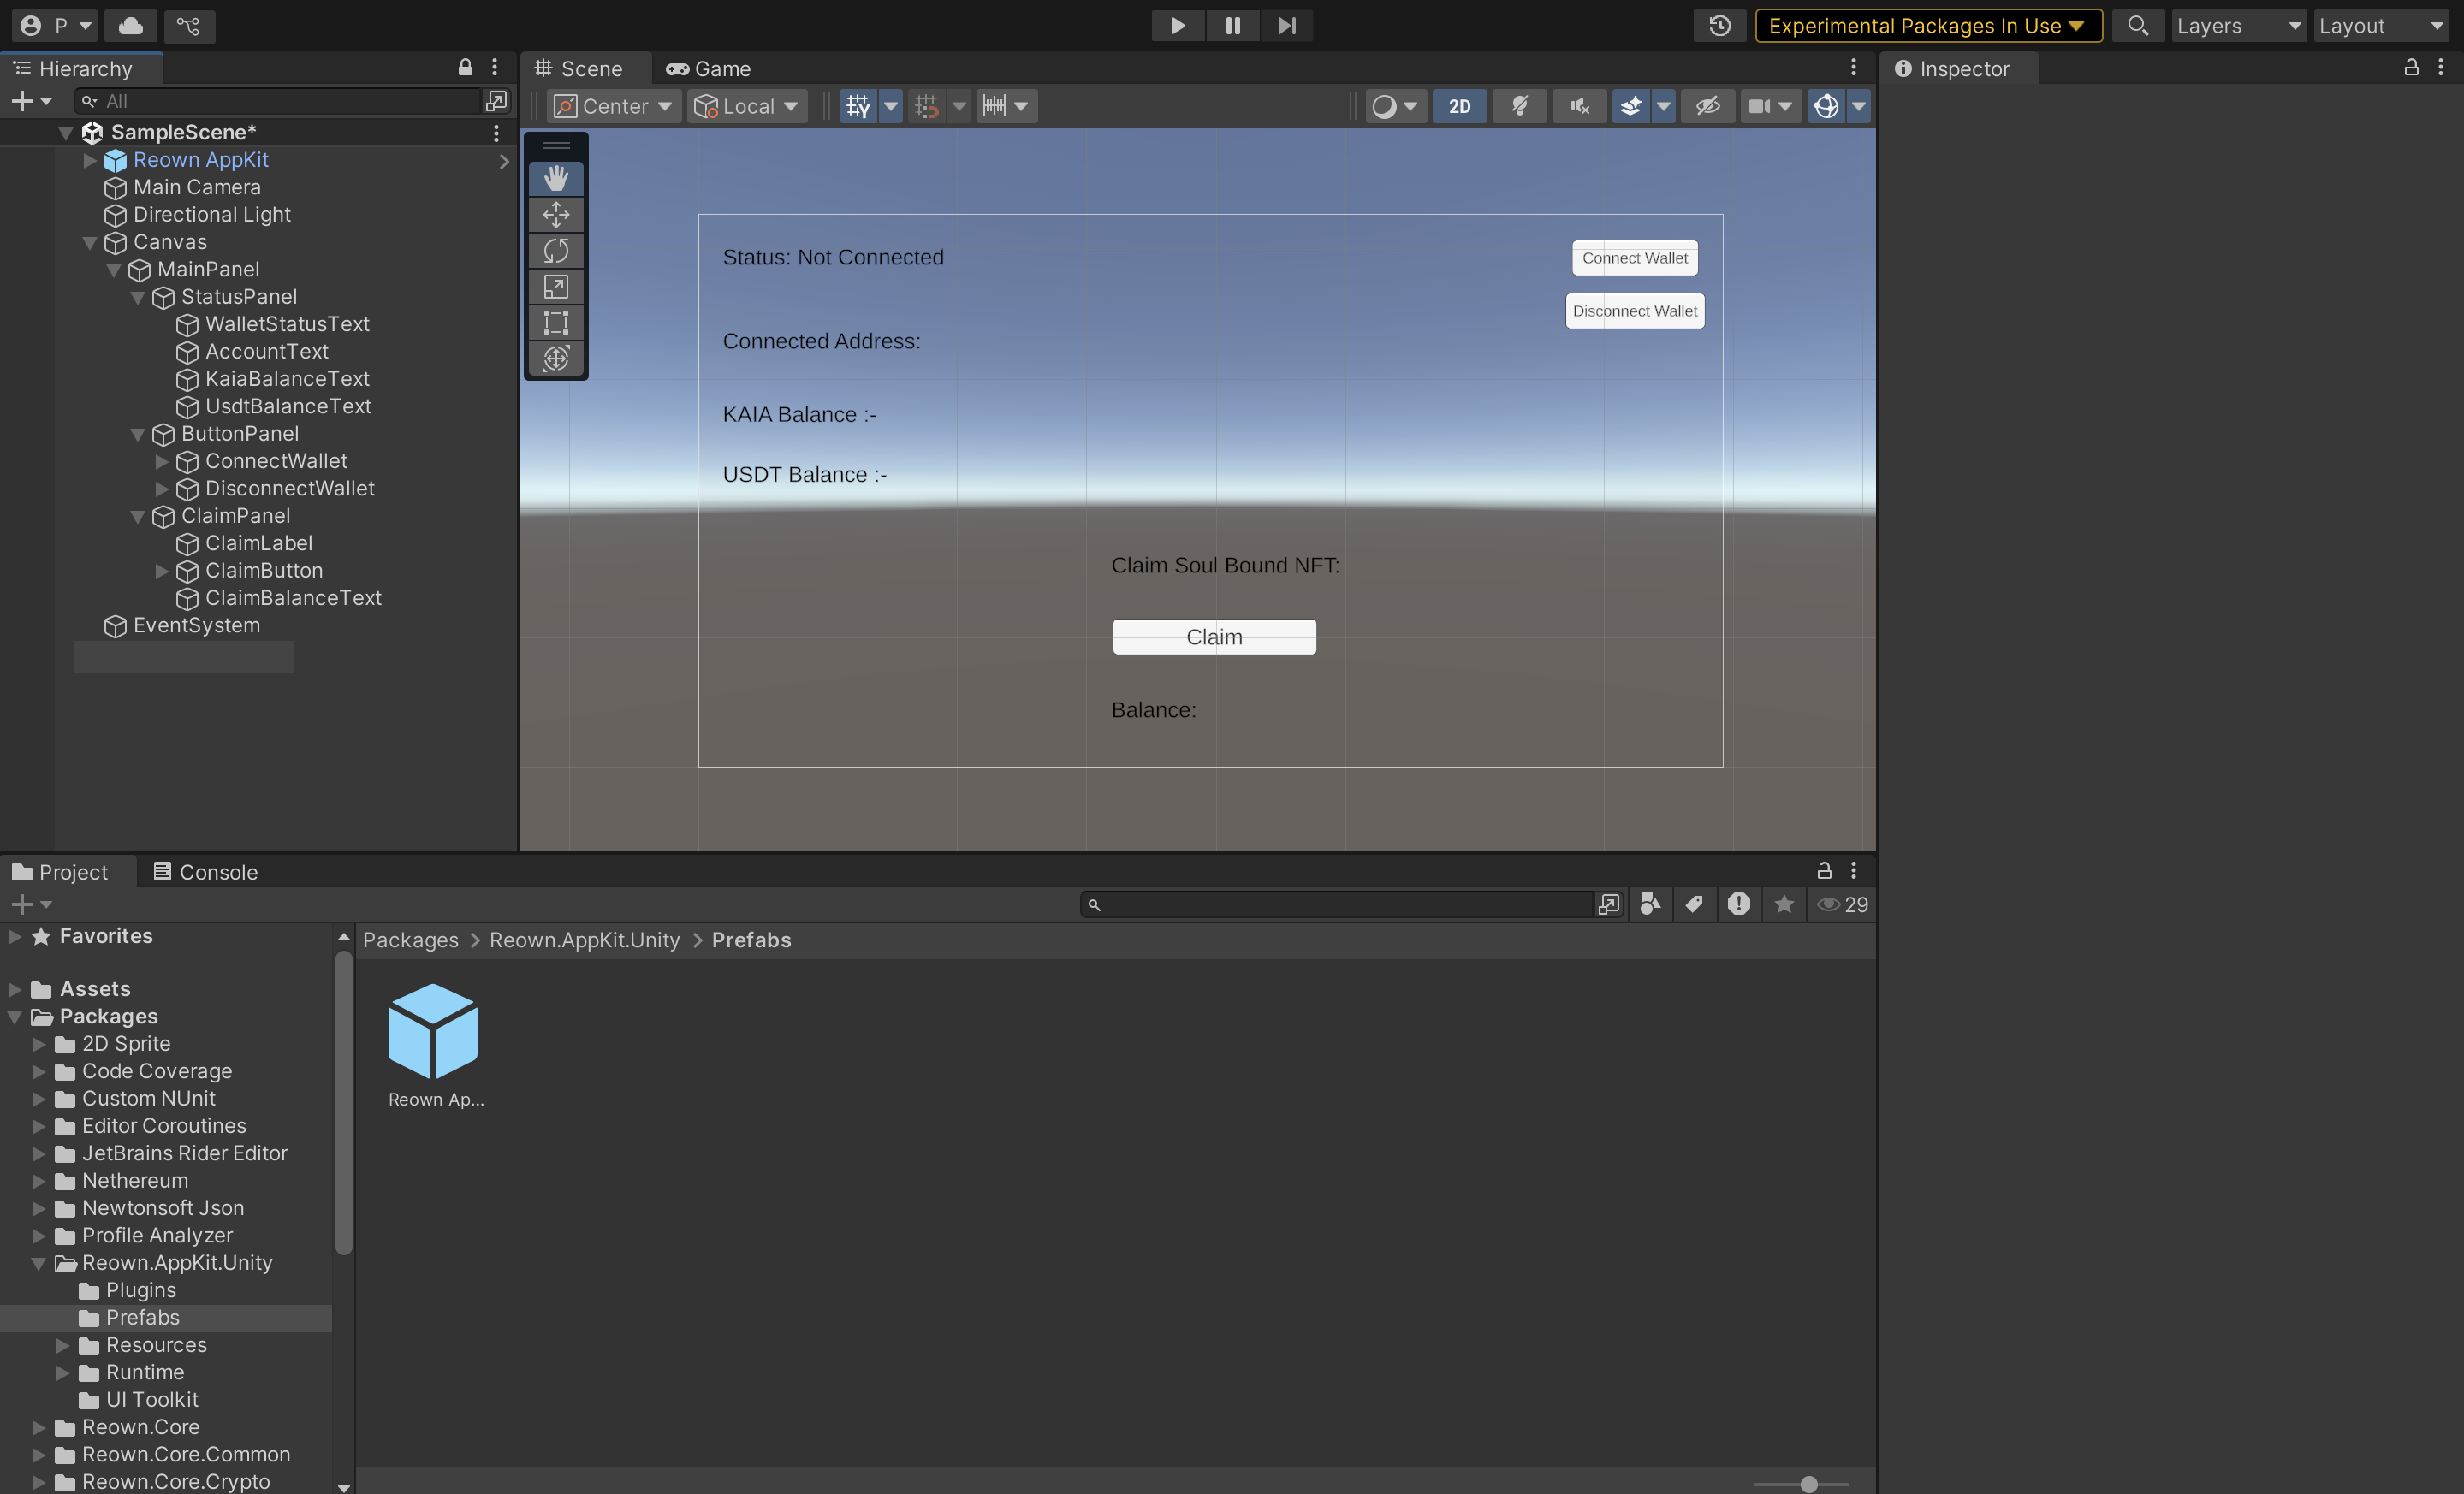
アプリ・インターフェースの構築
このセクションでは、ソウル・バウンド・トークンのクレーム機能のためのユーザー・インターフェイス・コンポーネントを作成する。 そのために、メインパネルと、それに対応するサブコンポーネントを持つ3つのサブパネルを作成します。
**メインパネル
- ステータスパネル:ウォレットの接続情報とトークンの残高を表示します。
- ボタンパネル:ウォレットボタンの接続と切断。
- ClaimPanel:SBTトークンの請求とSBT残高の表示
MainPanel**を作成する、
- キャンバス上で右クリックし、UI → Panelをクリックし、名前をMainPanelに変更する。
サブパネルを作成する、
- MainPanelを右クリックし、UI → Panelをクリック�し、StatusPanelに名前を変更します。
- 上記のステップを繰り返して、ButtonPanelとClaimPanelをそれぞれMainPanelに作成します。
それでは、各サブパネルにコンポーネントを作成しよう。
StatusPanel**コンポーネントを作成する、
- StatusPanelを右クリックし、UI → Text - TestMeshProをクリックし、テキストオブジェクトの名前をWalletStatusTextに変更します。
- 必ずテキストオブジェクトを塗りつぶすこと。 例えば、"Status:未接続"
- StatusPanelを右クリックし、UI → Text - TestMeshProをクリックし、テキストオブジェクトの名前をAccountTextに変更する。
- 必ずテキストオブジェクトを塗りつぶすこと。 例えば、"Connected Address:"
- StatusPanelを右クリックし、UI → Text - TextMeshProをクリックし、テキストオブジェクトの名前をKaiaBalanceTextに変更します。
- 必ずテキストオブジェクトを塗りつぶすこと。 例えば、"KAIA Balance :-"
- StatusPanelを右クリックし、UI → Text - TextMeshProをクリックし、テキストオブジェクトの名前をUsdtBalanceTextに変更します。
- 必ずテキストオブジェクトを塗りつぶすこと。 例えば、「USDT残高:-」。
ButtonPanel**コンポーネントを作成する、
- ButtonPanelを右クリックし、UI → Button - TextMeshProをクリックし、テキストオブジェクトの名前をConnectWalletに変更します。
- 必ずテキストオブジェクトを塗りつぶすこと。 例えば、"コネクト・ウォレット"
- ButtonPanelを右クリックし、UI → Button - TextMeshProをクリックし、テキストオブジェクトの名��前をDisconnectWalletに変更します。
- 必ずテキストオブジェクトを塗りつぶすこと。 例えば、"Disconnect Wallet"
ClaimPanel**コンポーネントを作成する、
- ClaimPanelを右クリックし、UI → Text - TextMeshProをクリックし、テキストオブジェクトの名前をClaimLabelに変更する。
- 必ずテキストオブジェクトを塗りつぶすこと。 例えば、"Claim Soul Bound NFT:"。
- ClaimPanelを右クリックし、UI → Button - TextMeshProをクリックし、テキストオブジェクトの名前をClaimButtonに変更する。
- 必ずテキストオブジェクトを塗りつぶすこと。 例えば、"Claim"
- ClaimPanel を右クリックし、UI → Text - TextMeshPro をクリックし、テキストオブジェクトの名前を ClaimBalanceText に変更します。
- 必ずテキストオブジェクトを塗りつぶすこと。 例えば、"Balance:"
すべてのコンポーネントを作成したら、移動ツールを使ってシーンにきれいに配置します。
Soul Bound Tokenスマートコントラクトの作成とデプロイ
このセクションでは、以下のサンプルコードを参考にする:
// SPDX-License-Identifier: MITpragma solidity ^0.8.7;import "@kaiachain/contracts/KIP/token/KIP17/KIP17.sol";import "@kaiachain/contracts/utils/Counters.sol";import "@kaiachain/contracts/access/Ownable.sol";contract SoulBoundToken is KIP17, Ownable { using Counters for Counters.Counter; Counters.Counter private _tokenIdCounter; constructor() KIP17("SoulBoundToken", "SBT") {} function safeMint(address to) public onlyOwner { uint256 tokenId = _tokenIdCounter.current(); _tokenIdCounter.increment(); _safeMint(to, tokenId); } function _beforeTokenTransfer(address from, address to, uint256) pure override internal { require(from == address(0) || to == address(0), "This a Soulbound token. It cannot be transferred."); } function _burn(uint256 tokenId) internal override(KIP17) { super._burn(tokenId); }}
Remix IDE経由でのデプロイ
- 上記のコードをRemix IDE上で新規作成したファイル
SBT.solにコピー&ペースト�する。 - リミックスIDEで:
- コンパイル契約ボタンをクリックする。
- Deploy & run transactionsタブに移動する。
- Environment]で[Injected Provider - MetaMask]を選択する。
- 契約ドロップダウンで契約(SoulBoundToken)を検索します。
- Deploy をクリックしてトークンを起動します!
- メタマスクが現れたら
- 配備の詳細を確認する。
- Confirm]をクリックしてKaia Mainnetにデプロイします。
展開された契約アドレスをコピーして保存する。 チュートリアルの後半で必要になる。
SBTManagerスクリプトの実装
このステップでは、ウォレットの接続と切断、ネイティブ通貨(KAIA)とトークン残高(USDT)の取得、SBTクレーム機能�の有効化など、ウォレットの中核となるやり取りを管理するスクリプトを作成します。
そのためには
- AssetsフォルダにScriptsフォルダを作成します。
- 新しく作成した Scripts フォルダに SBTManager スクリプトを作成します。
- 以下のコードをコピーして、新しく作成したスクリプトファイルに貼り付けます:
using UnityEngine;using UnityEngine.UI;using TMPro;using Reown.AppKit.Unity;using System.Threading.Tasks;using System.Numerics;public class SBTManager : MonoBehaviour{ [Header("Contract Configuration")] public string tokenContractAddress = "0xd077a400968890eacc75cdc901f0356c943e4fdb"; public string sbtContractAddress = "0x0bFF901145a0685E6d7661af7122f829459dA9A0"; [Header("UI References")] public TextMeshProUGUI statusText; public TextMeshProUGUI accountText; public TextMeshProUGUI kaiaBalanceText; public TextMeshProUGUI tokenBalanceText; public TextMeshProUGUI sbtBalanceText; [Header("Buttons")] public Button connectButton; public Button disconnectButton; public Button mintSBTButton; // Token ABI for balance checking private const string TOKEN_ABI = "[{\"constant\":true,\"inputs\":[{\"name\":\"_owner\",\"type\":\"address\"}],\"name\":\"balanceOf\",\"outputs\":[{\"name\":\"balance\",\"type\":\"uint256\"}],\"type\":\"function\"},{\"constant\":true,\"inputs\":[],\"name\":\"decimals\",\"outputs\":[{\"name\":\"\",\"type\":\"uint8\"}],\"type\":\"function\"}]"; // SBT Mint ABI private const string MINT_ABI = "[{\"inputs\":[{\"internalType\":\"address\",\"name\":\"to\",\"type\":\"address\"}],\"name\":\"safeMint\",\"outputs\":[],\"stateMutability\":\"nonpayable\",\"type\":\"function\"}]"; // NFT Balance ABI private const string NFT_BALANCE_ABI = "[{\"inputs\":[{\"internalType\":\"address\",\"name\":\"owner\",\"type\":\"address\"}],\"name\":\"balanceOf\",\"outputs\":[{\"internalType\":\"uint256\",\"name\":\"\",\"type\":\"uint256\"}],\"stateMutability\":\"view\",\"type\":\"function\"}]"; private async void Start() { await InitializeWallet(); SetupUI(); InitializeDisconnectedState(); } private async Task InitializeWallet() { var config = new AppKitConfig { // Replace with your actual Reown project ID. projectId = "PASTE PROJECT ID", metadata = new Metadata( "Kaia SBT Demo", "Demo app for Kaia blockchain SBT minting", "https://your-domain.com", "https://your-domain.com/icon.png" ), supportedChains = new[] { // Kaia Mainnet new Chain(ChainConstants.Namespaces.Evm, chainReference: "8217", name: "Kaia Mainnet", nativeCurrency: new Currency("KAIA", "KAIA", 18), blockExplorer: new BlockExplorer("Kaiascan", "https://kaiascan.io/"), rpcUrl: "https://alpha-hardworking-orb.kaia-mainnet.quiknode.pro/", isTestnet: false, imageUrl: "https://prnt.sc/P5TR6Zpr0Y1S" ), // Kaia Kairos testnet new Chain(ChainConstants.Namespaces.Evm, chainReference: "1001", name: "Kaia Kairos", nativeCurrency: new Currency("KAIA", "KAIA", 18), blockExplorer: new BlockExplorer("Kaiascan", "https://kairos.kaiascan.io/"), rpcUrl: "https://responsive-green-emerald.kaia-kairos.quiknode.pro/", isTestnet: true, imageUrl: "https://prnt.sc/P5TR6Zpr0Y1S" ) } }; await AppKit.InitializeAsync(config); AppKit.AccountConnected += OnAccountConnected; AppKit.AccountDisconnected += OnAccountDisconnected; Debug.Log("Kaia SBT Wallet initialized successfully!"); } /* SetupUI attaches button click events to their corresponding wallet actions: - Connect button → ConnectWallet() - Disconnect button → DisconnectWallet() - Mint SBT button → ClaimSBT() */ private void SetupUI() { if (connectButton != null) connectButton.onClick.AddListener(ConnectWallet); if (disconnectButton != null) disconnectButton.onClick.AddListener(DisconnectWallet); if (mintSBTButton != null) mintSBTButton.onClick.AddListener(ClaimSBT); } private void InitializeDisconnectedState() { UpdateStatus("Ready - Click Connect to link wallet"); UpdateAccount("No wallet connected"); UpdateKaiaBalance("0 KAIA"); UpdateTokenBalance("0 Tokens"); UpdateSBTBalance("0 SBTs"); SetButtonStates(connectEnabled: true, disconnectEnabled: false, mintEnabled: false); } #region Wallet Connection public void ConnectWallet() { Debug.Log("Opening wallet connection..."); UpdateStatus("Opening wallet selection..."); AppKit.OpenModal(); } public async void DisconnectWallet() { Debug.Log("Disconnecting wallet..."); UpdateStatus("Disconnected..."); try { await AppKit.DisconnectAsync(); // The OnAccountDisconnected event should handle UI updates, // but we can force it here as a fallback InitializeDisconnectedState(); } catch (System.Exception e) { Debug.LogError($"Disconnect error: {e.Message}"); UpdateStatus($"Disconnect failed: {e.Message}"); } } public void ClaimSBT() { _ = MintSBT(); } #endregion #region Balance Checking public async Task CheckKaiaBalance() { try { var account = await AppKit.GetAccountAsync(); if (account == null) return; BigInteger balance = await AppKit.Evm.GetBalanceAsync(account.Address); decimal kaia = (decimal)balance / (decimal)BigInteger.Pow(10, 18); UpdateKaiaBalance($"{kaia:F4} KAIA"); Debug.Log($"KAIA balance: {kaia:F4}"); } catch (System.Exception e) { Debug.LogError($"Error getting KAIA balance: {e.Message}"); UpdateKaiaBalance("Error"); } } public async Task CheckTokenBalance() { try { var account = await AppKit.GetAccountAsync(); if (account == null) return; var balance = await AppKit.Evm.ReadContractAsync<BigInteger>( tokenContractAddress, TOKEN_ABI, "balanceOf", new object[] { account.Address } ); var decimals = await AppKit.Evm.ReadContractAsync<BigInteger>( tokenContractAddress, TOKEN_ABI, "decimals" ); decimal tokens = (decimal)balance / (decimal)BigInteger.Pow(10, (int)decimals); UpdateTokenBalance($"{tokens:F4} USDT"); Debug.Log($"Token balance: {tokens:F4}"); } catch (System.Exception e) { Debug.LogError($"Error getting token balance: {e.Message}"); UpdateTokenBalance("Error"); } } public async Task CheckSBTBalance() { try { var account = await AppKit.GetAccountAsync(); if (account == null) return; var balance = await AppKit.Evm.ReadContractAsync<BigInteger>( sbtContractAddress, NFT_BALANCE_ABI, "balanceOf", new object[] { account.Address } ); UpdateSBTBalance($"{balance} SBTs"); Debug.Log($"SBT balance: {balance}"); } catch (System.Exception e) { Debug.LogError($"Error getting SBT balance: {e.Message}"); UpdateSBTBalance("Error"); } } #endregion #region SBT Minting public async Task MintSBT() { try { var account = await AppKit.GetAccountAsync(); if (account == null) { UpdateStatus("No wallet connected!"); return; } UpdateStatus("Minting SBT..."); string txHash = await AppKit.Evm.WriteContractAsync( sbtContractAddress, MINT_ABI, "safeMint", account.Address ); UpdateStatus($"SBT minted! TX: {txHash.Substring(0, 10)}... Waiting for confirmation..."); Debug.Log($"SBT mint transaction: {txHash}"); // Check updated SBT balance await CheckSBTBalance(); UpdateStatus($"SBT successfully minted! TX: {txHash.Substring(0, 10)}..."); } catch (System.Exception e) { UpdateStatus($"Mint failed: {e.Message}"); Debug.LogError($"SBT mint error: {e}"); } } #endregion #region Event Handlers private async void OnAccountConnected(object sender, System.EventArgs e) { var account = await AppKit.GetAccountAsync(); if (account != null) { Debug.Log($"Wallet connected: {account.Address}"); UpdateStatus("Wallet connected"); UpdateAccount(account.Address); // Check all balances await CheckKaiaBalance(); await CheckTokenBalance(); await CheckSBTBalance(); SetButtonStates(connectEnabled: false, disconnectEnabled: true, mintEnabled: true); } } private void OnAccountDisconnected(object sender, System.EventArgs e) { Debug.Log("Wallet disconnected"); InitializeDisconnectedState(); } #endregion #region UI Updates private void UpdateStatus(string message) { if (statusText != null) statusText.text = message; Debug.Log($"Status: {message}"); } private void UpdateAccount(string address) { if (accountText != null) { if (address.Length > 10) accountText.text = $"{address.Substring(0, 6)}...{address.Substring(address.Length - 4)}"; else accountText.text = address; } } private void UpdateKaiaBalance(string balance) { if (kaiaBalanceText != null) kaiaBalanceText.text = balance; } private void UpdateTokenBalance(string balance) { if (tokenBalanceText != null) tokenBalanceText.text = balance; } private void UpdateSBTBalance(string balance) { if (sbtBalanceText != null) sbtBalanceText.text = balance; } private void SetButtonStates(bool connectEnabled, bool disconnectEnabled, bool mintEnabled) { if (connectButton != null) connectButton.interactable = connectEnabled; if (disconnectButton != null) disconnectButton.interactable = disconnectEnabled; if (mintSBTButton != null) mintSBTButton.interactable = mintEnabled; } #endregion #region Public Methods for Manual Updates public async void RefreshAllBalances() { UpdateStatus("Refreshing balances..."); await CheckKaiaBalance(); await CheckTokenBalance(); await CheckSBTBalance(); UpdateStatus("Balances updated!"); } #endregion private void OnDestroy() { AppKit.AccountConnected -= OnAccountConnected; AppKit.AccountDisconnected -= OnAccountDisconnected; }}
SBTManager GameObjectのセットアップ
- シーンにManagerオブジェクトを作成する
- 階層ウィンドウ(ルートレベル)を右クリックします。
- 空のオブジェクトを作成」を選択する。
- 名前を「SBTManager」とする。
- スクリプトを添付する
- SBTManager GameObjectを選択する。
- Inspector]で、[Add Component]をクリックします。
- SBTManager」を検索して選択する。
- UI要素を接続する:
- SBTManagerを選択した状態で、Inspectorを見る。
- UI要素を階層から対応するフィールドにドラッグ&ドロップします:
- ステータステキスト
- アカウントテキスト
- その他 …...
- USDTとSBTの契約アドレスをそれぞれ設定する

ボタンとスクリプトの接続
このセクションでは、以下のボタンをSBTManagerスクリプトからそれぞれの関数に接続する:
- ボタンを選択する(ConnectWalletのように)
- インスペクタでOnClick()セクションを探し、➕ボタンをクリックします。
- 階層(Hierarchy)ウィンドウからSBTManagerオブジェクトをNone(object)フィールドにドラッグする。
- 機能なしをクリック → SBTManager → ConnectWallet()
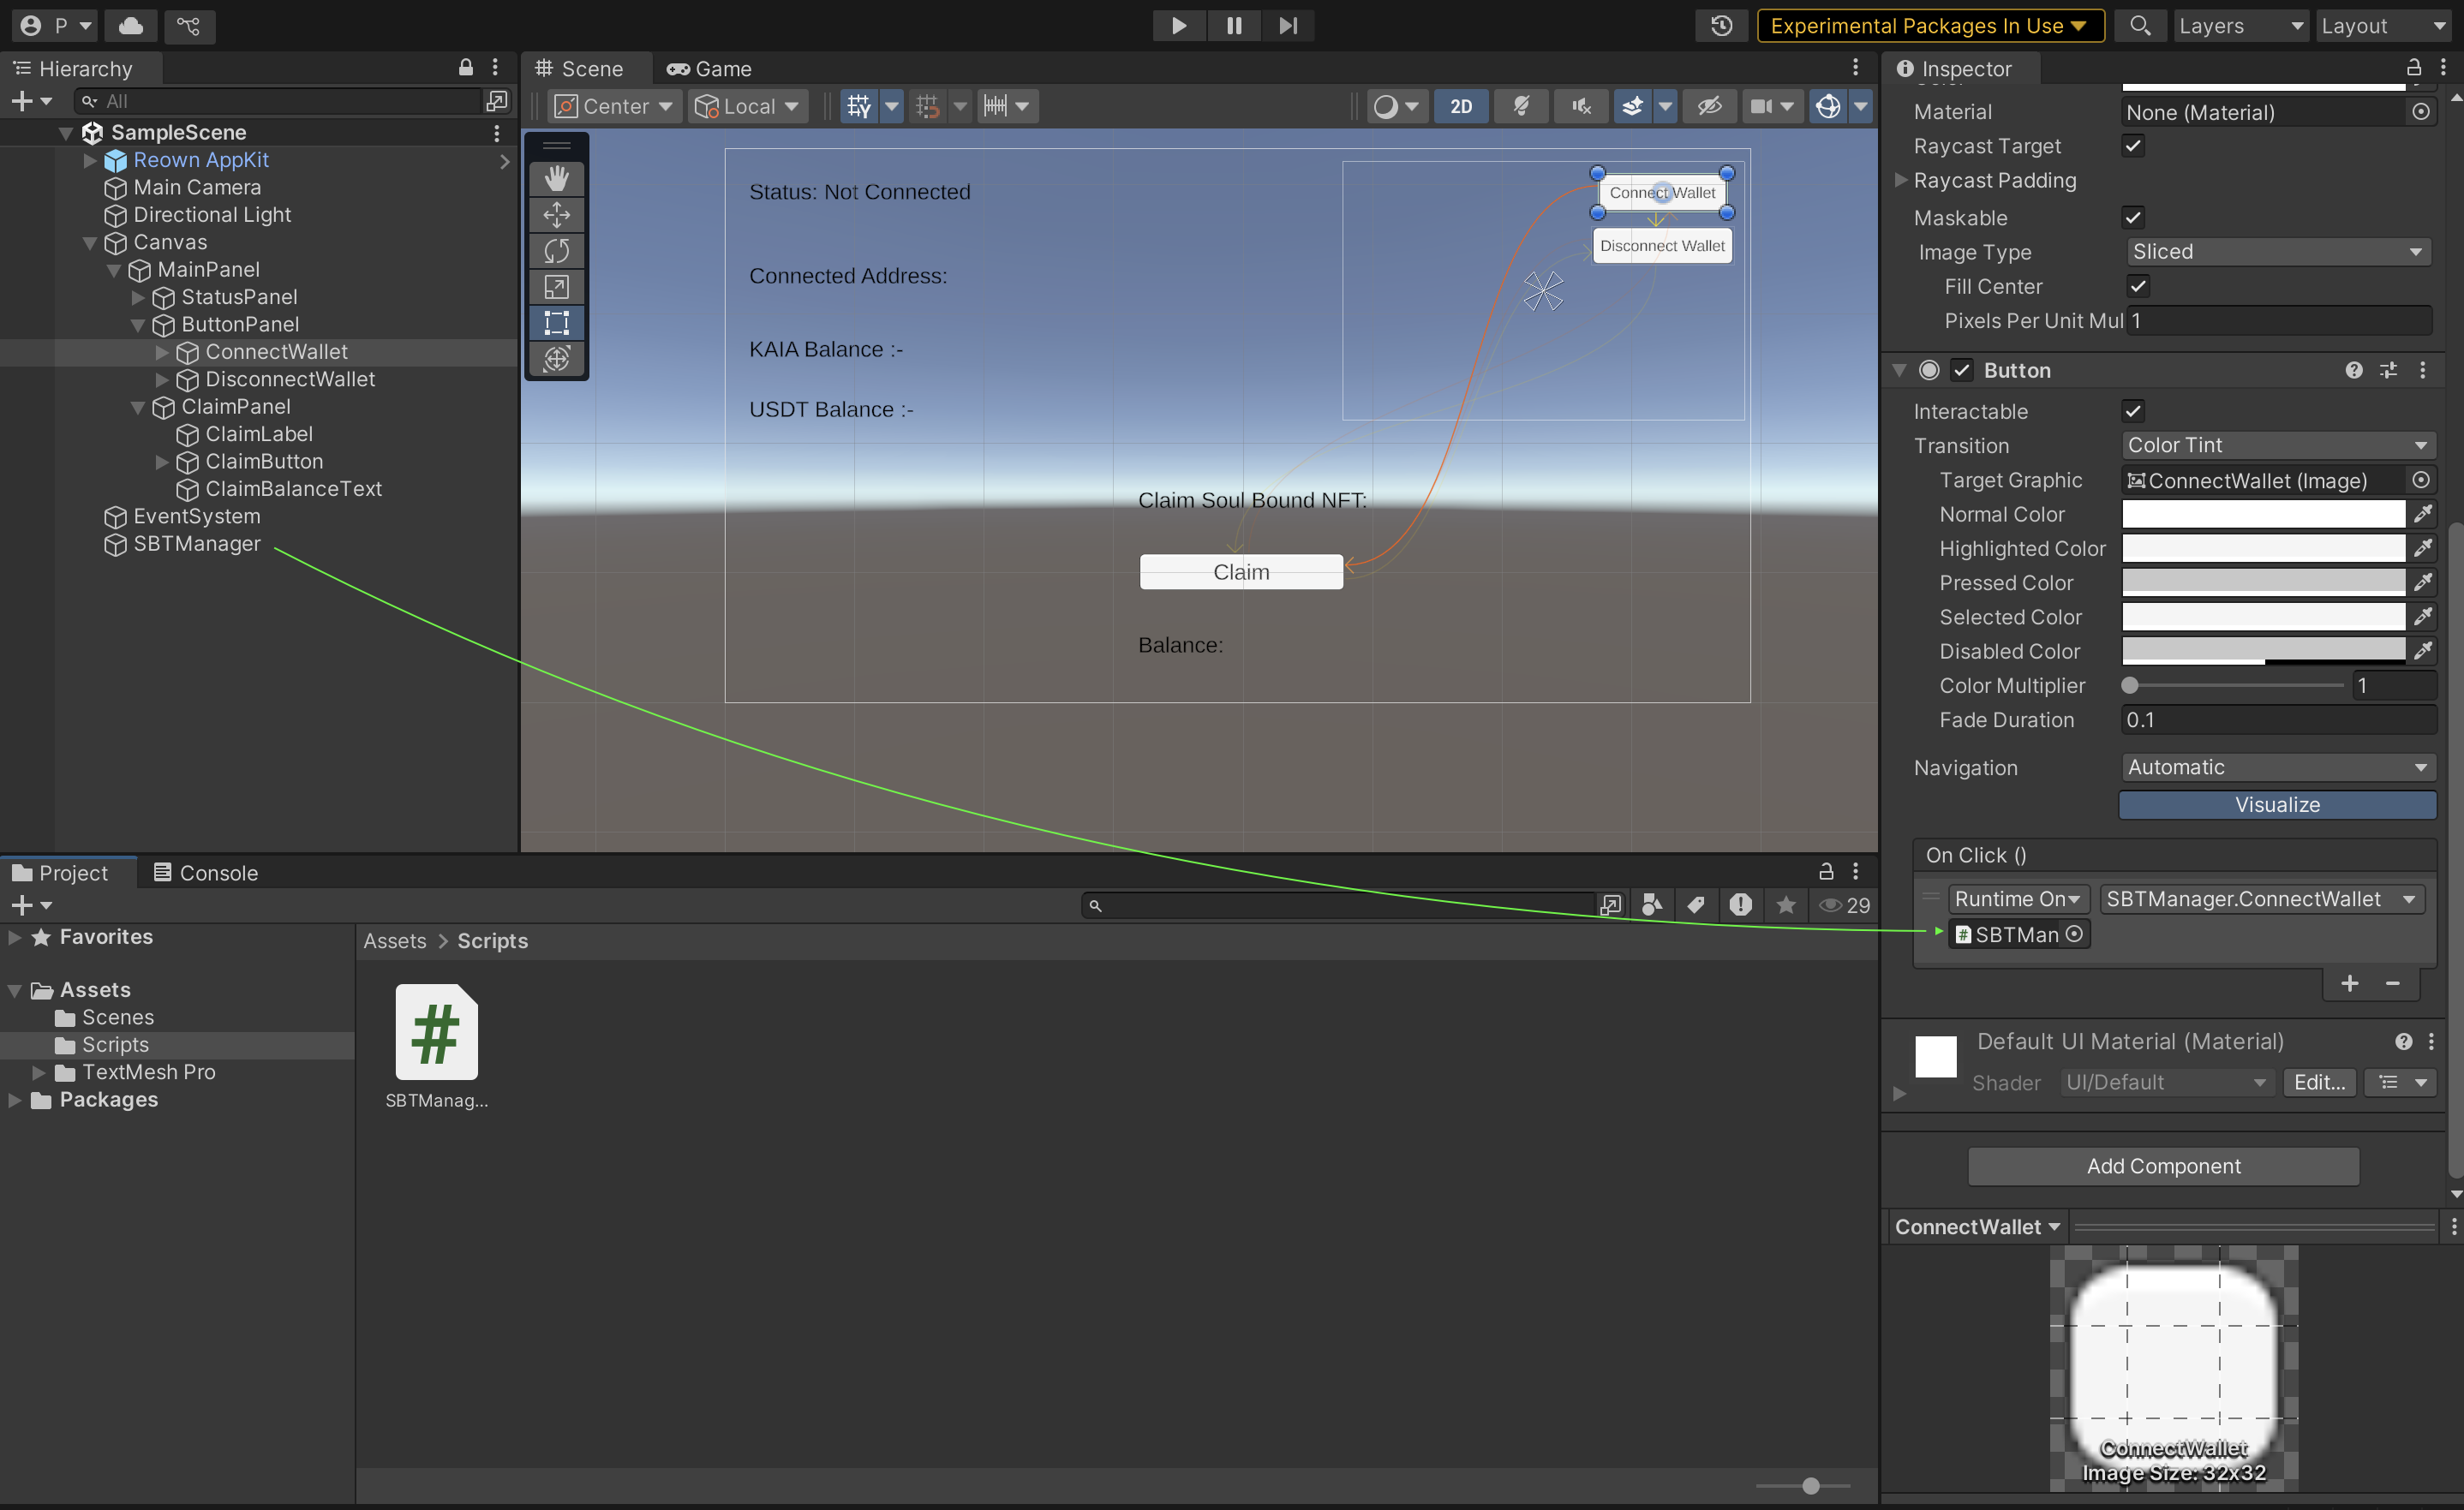
- 以下のボタンについてステップ1~3を繰り返し、機能を次のように変更します:
- DisconnectWallet -> DisconnectWallet()
- ClaimButton -> ClaimSBT()
WebGLビルド設定
このセクションでは、ウェブデプロイメント用にdAppを設定する:
- ファイル → ビルド設定 → WebGL → プラットフォームの切り替え
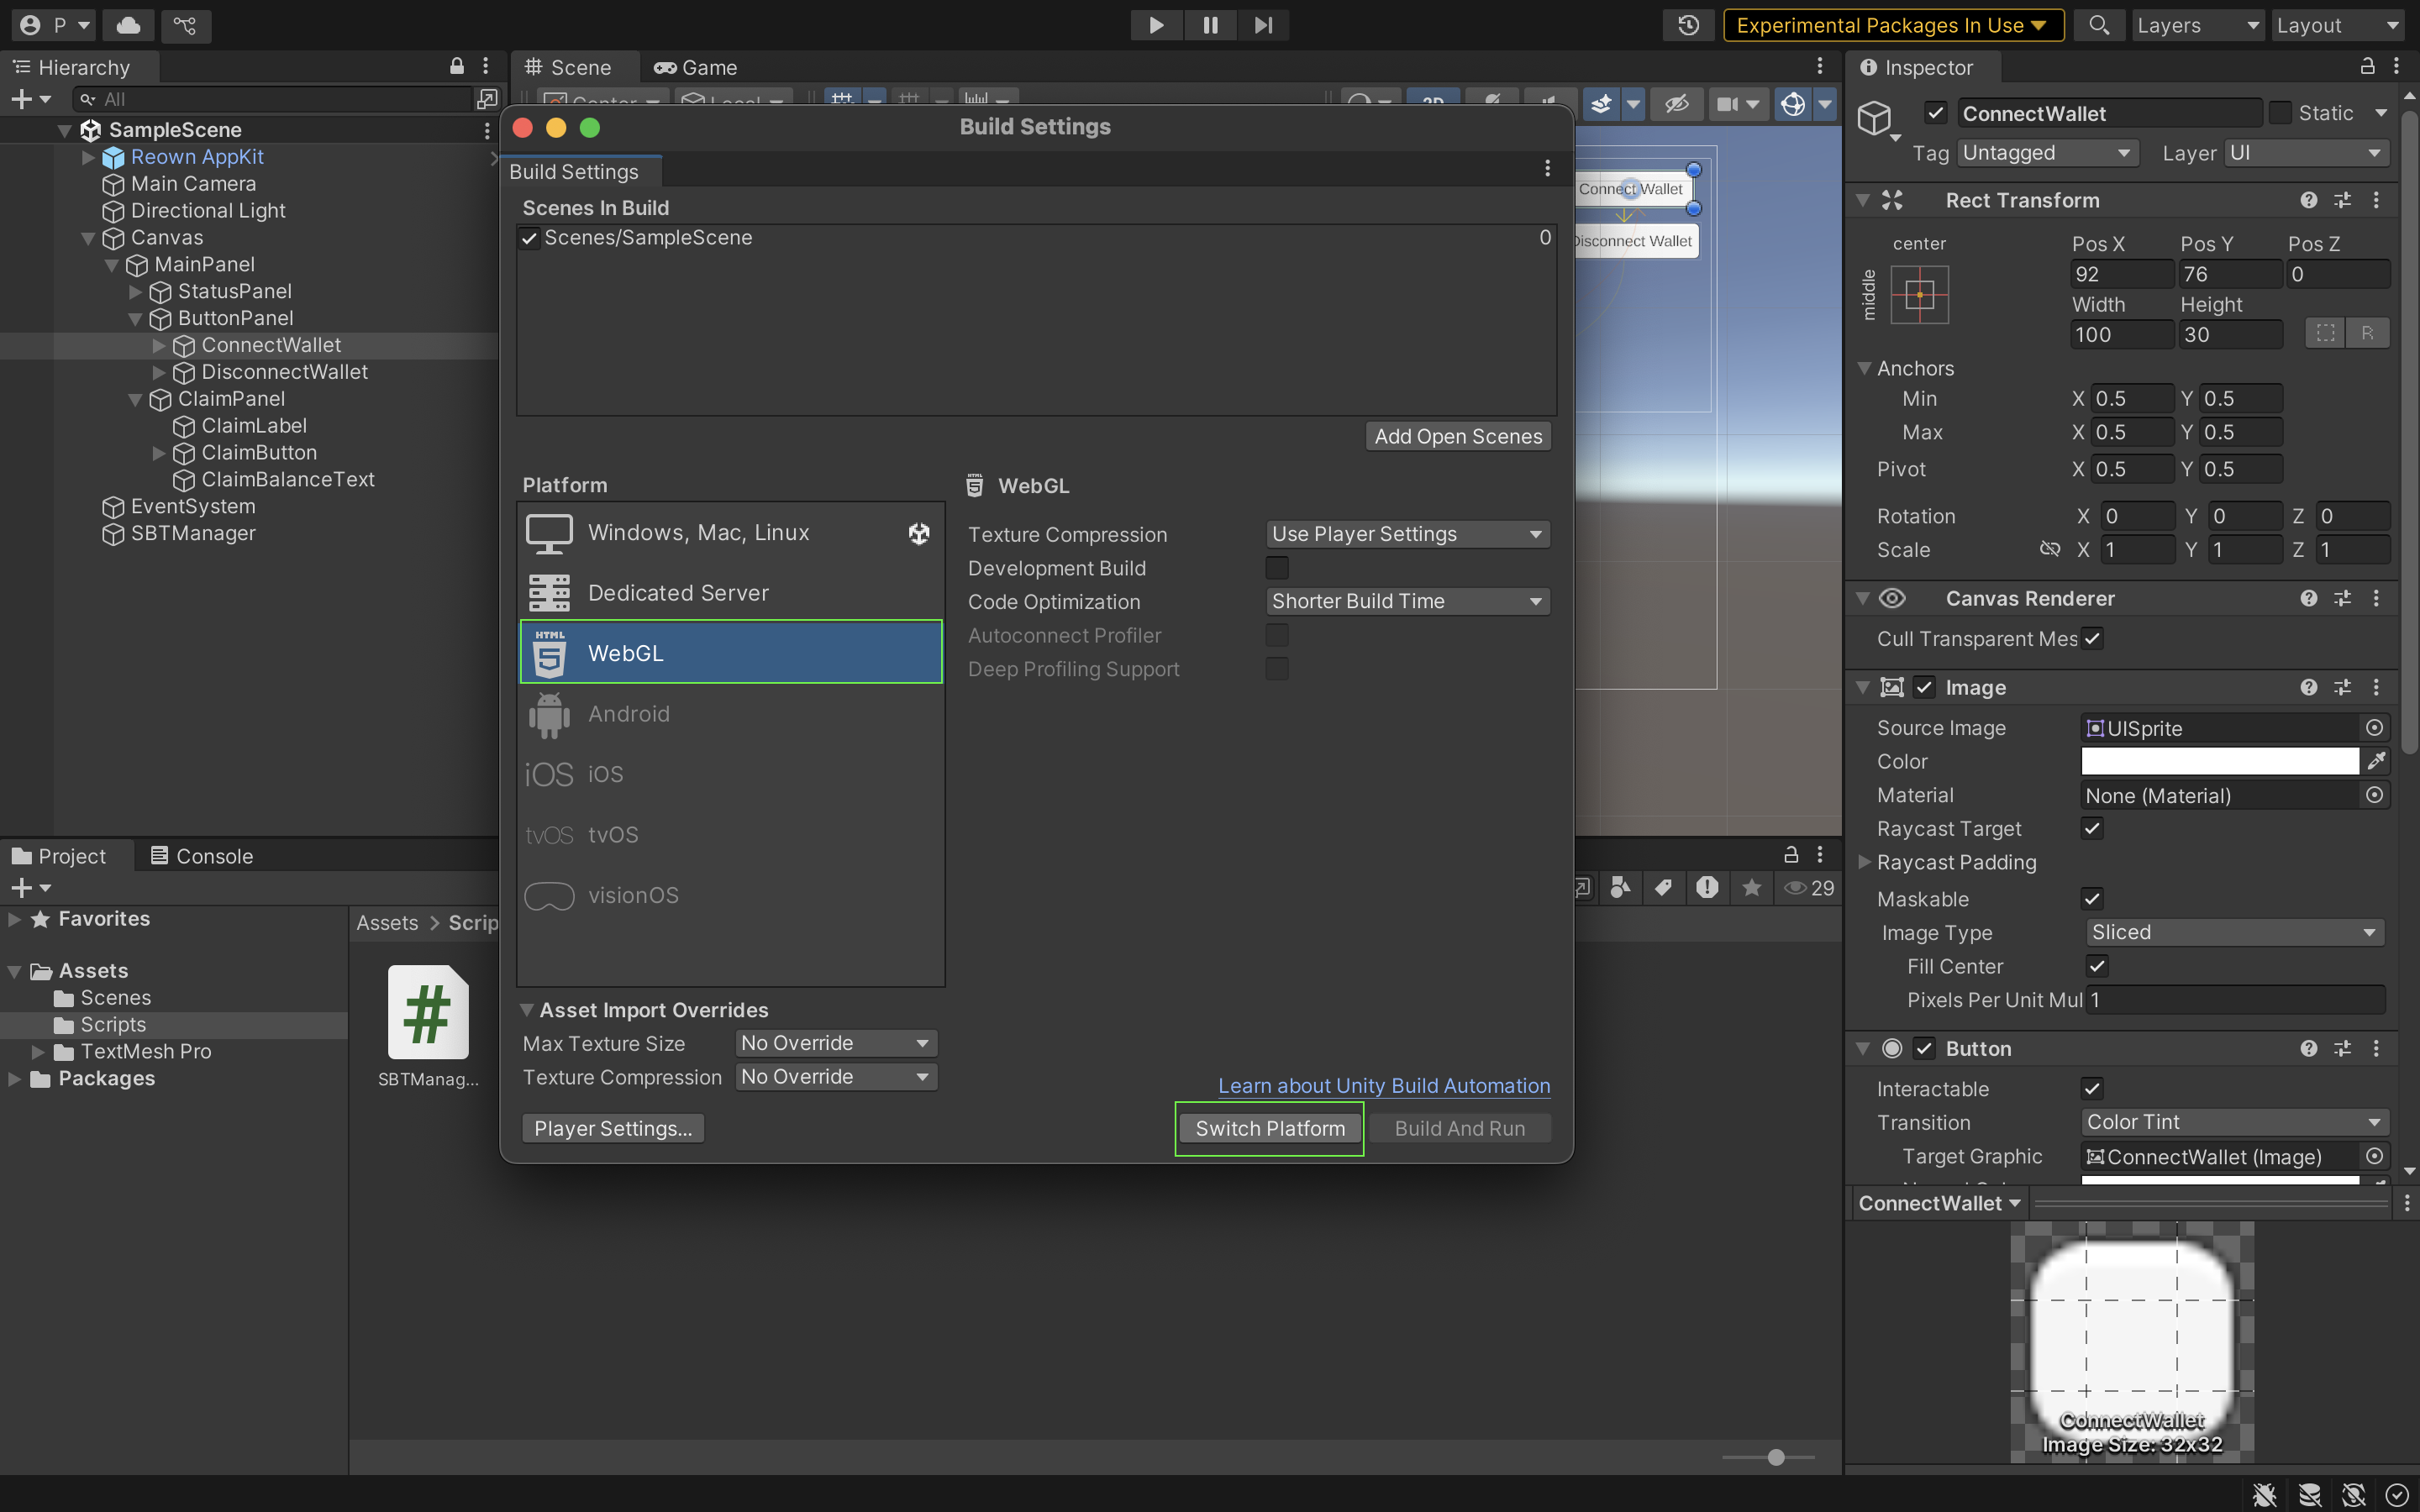
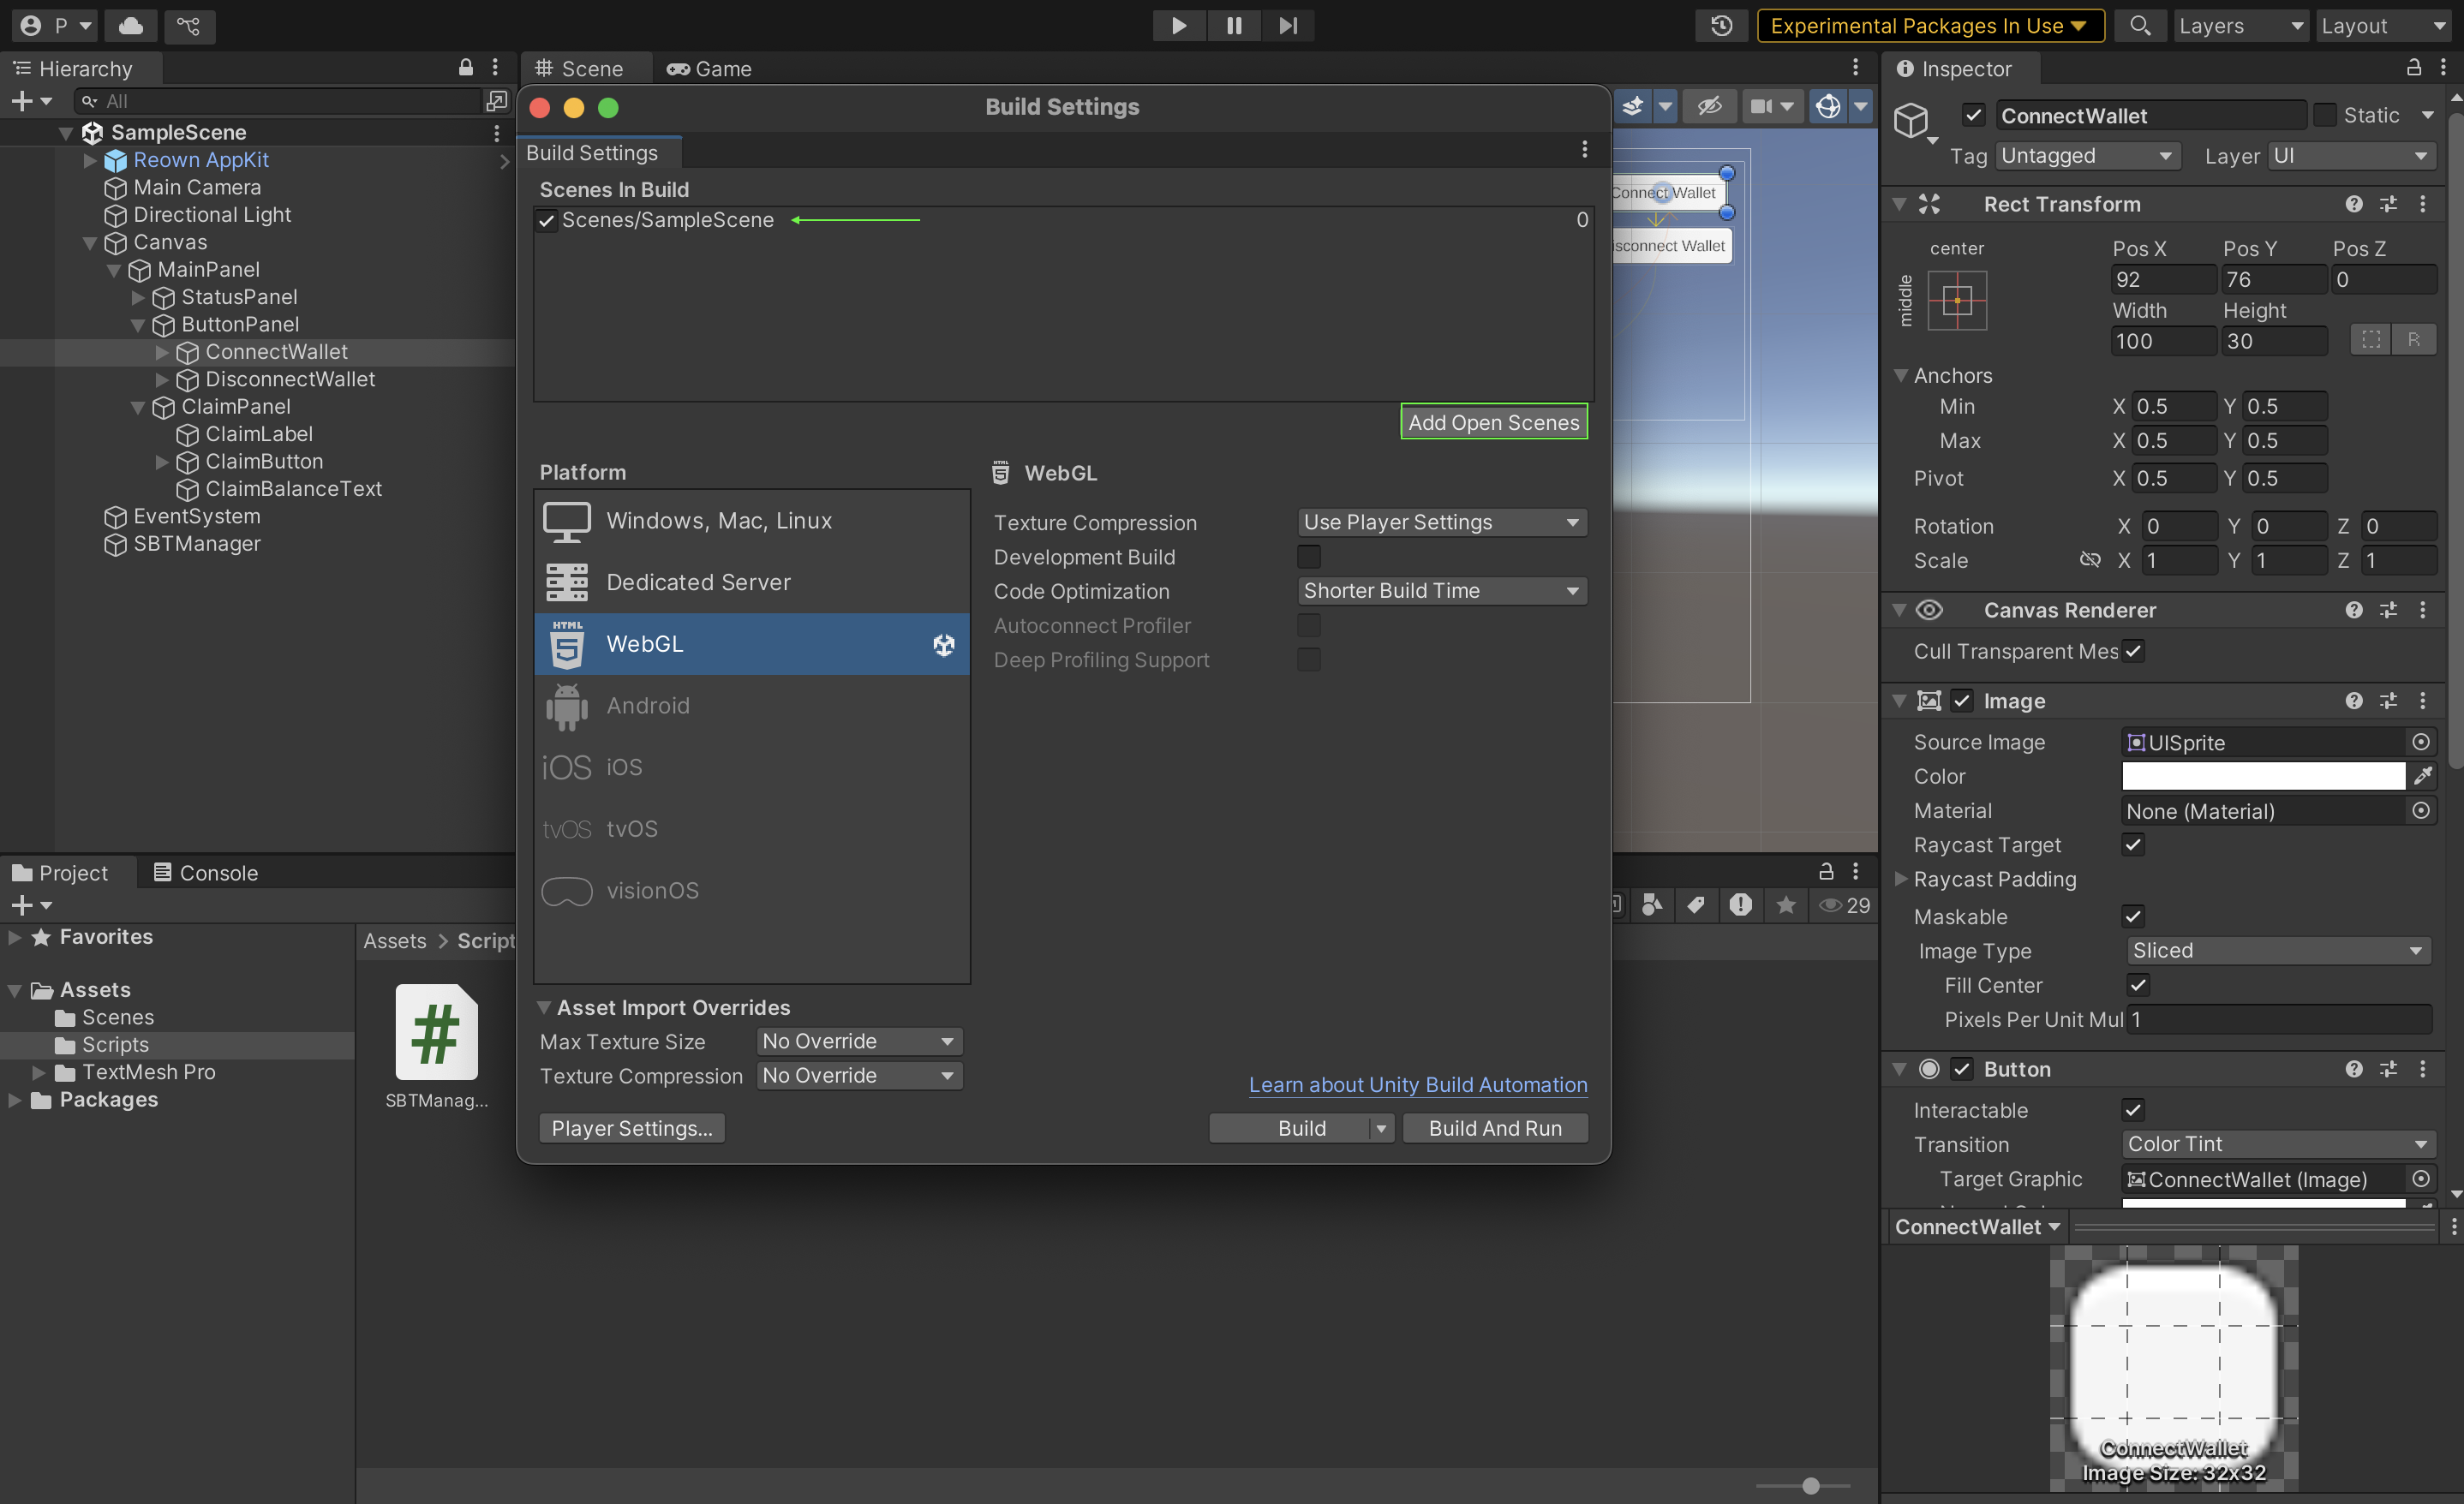
- 同じウィンドウから、Add Open Scenes(右上)をクリックして、SampleSceneをゲーム実行時に最初に表示されるシーンとして追加します。
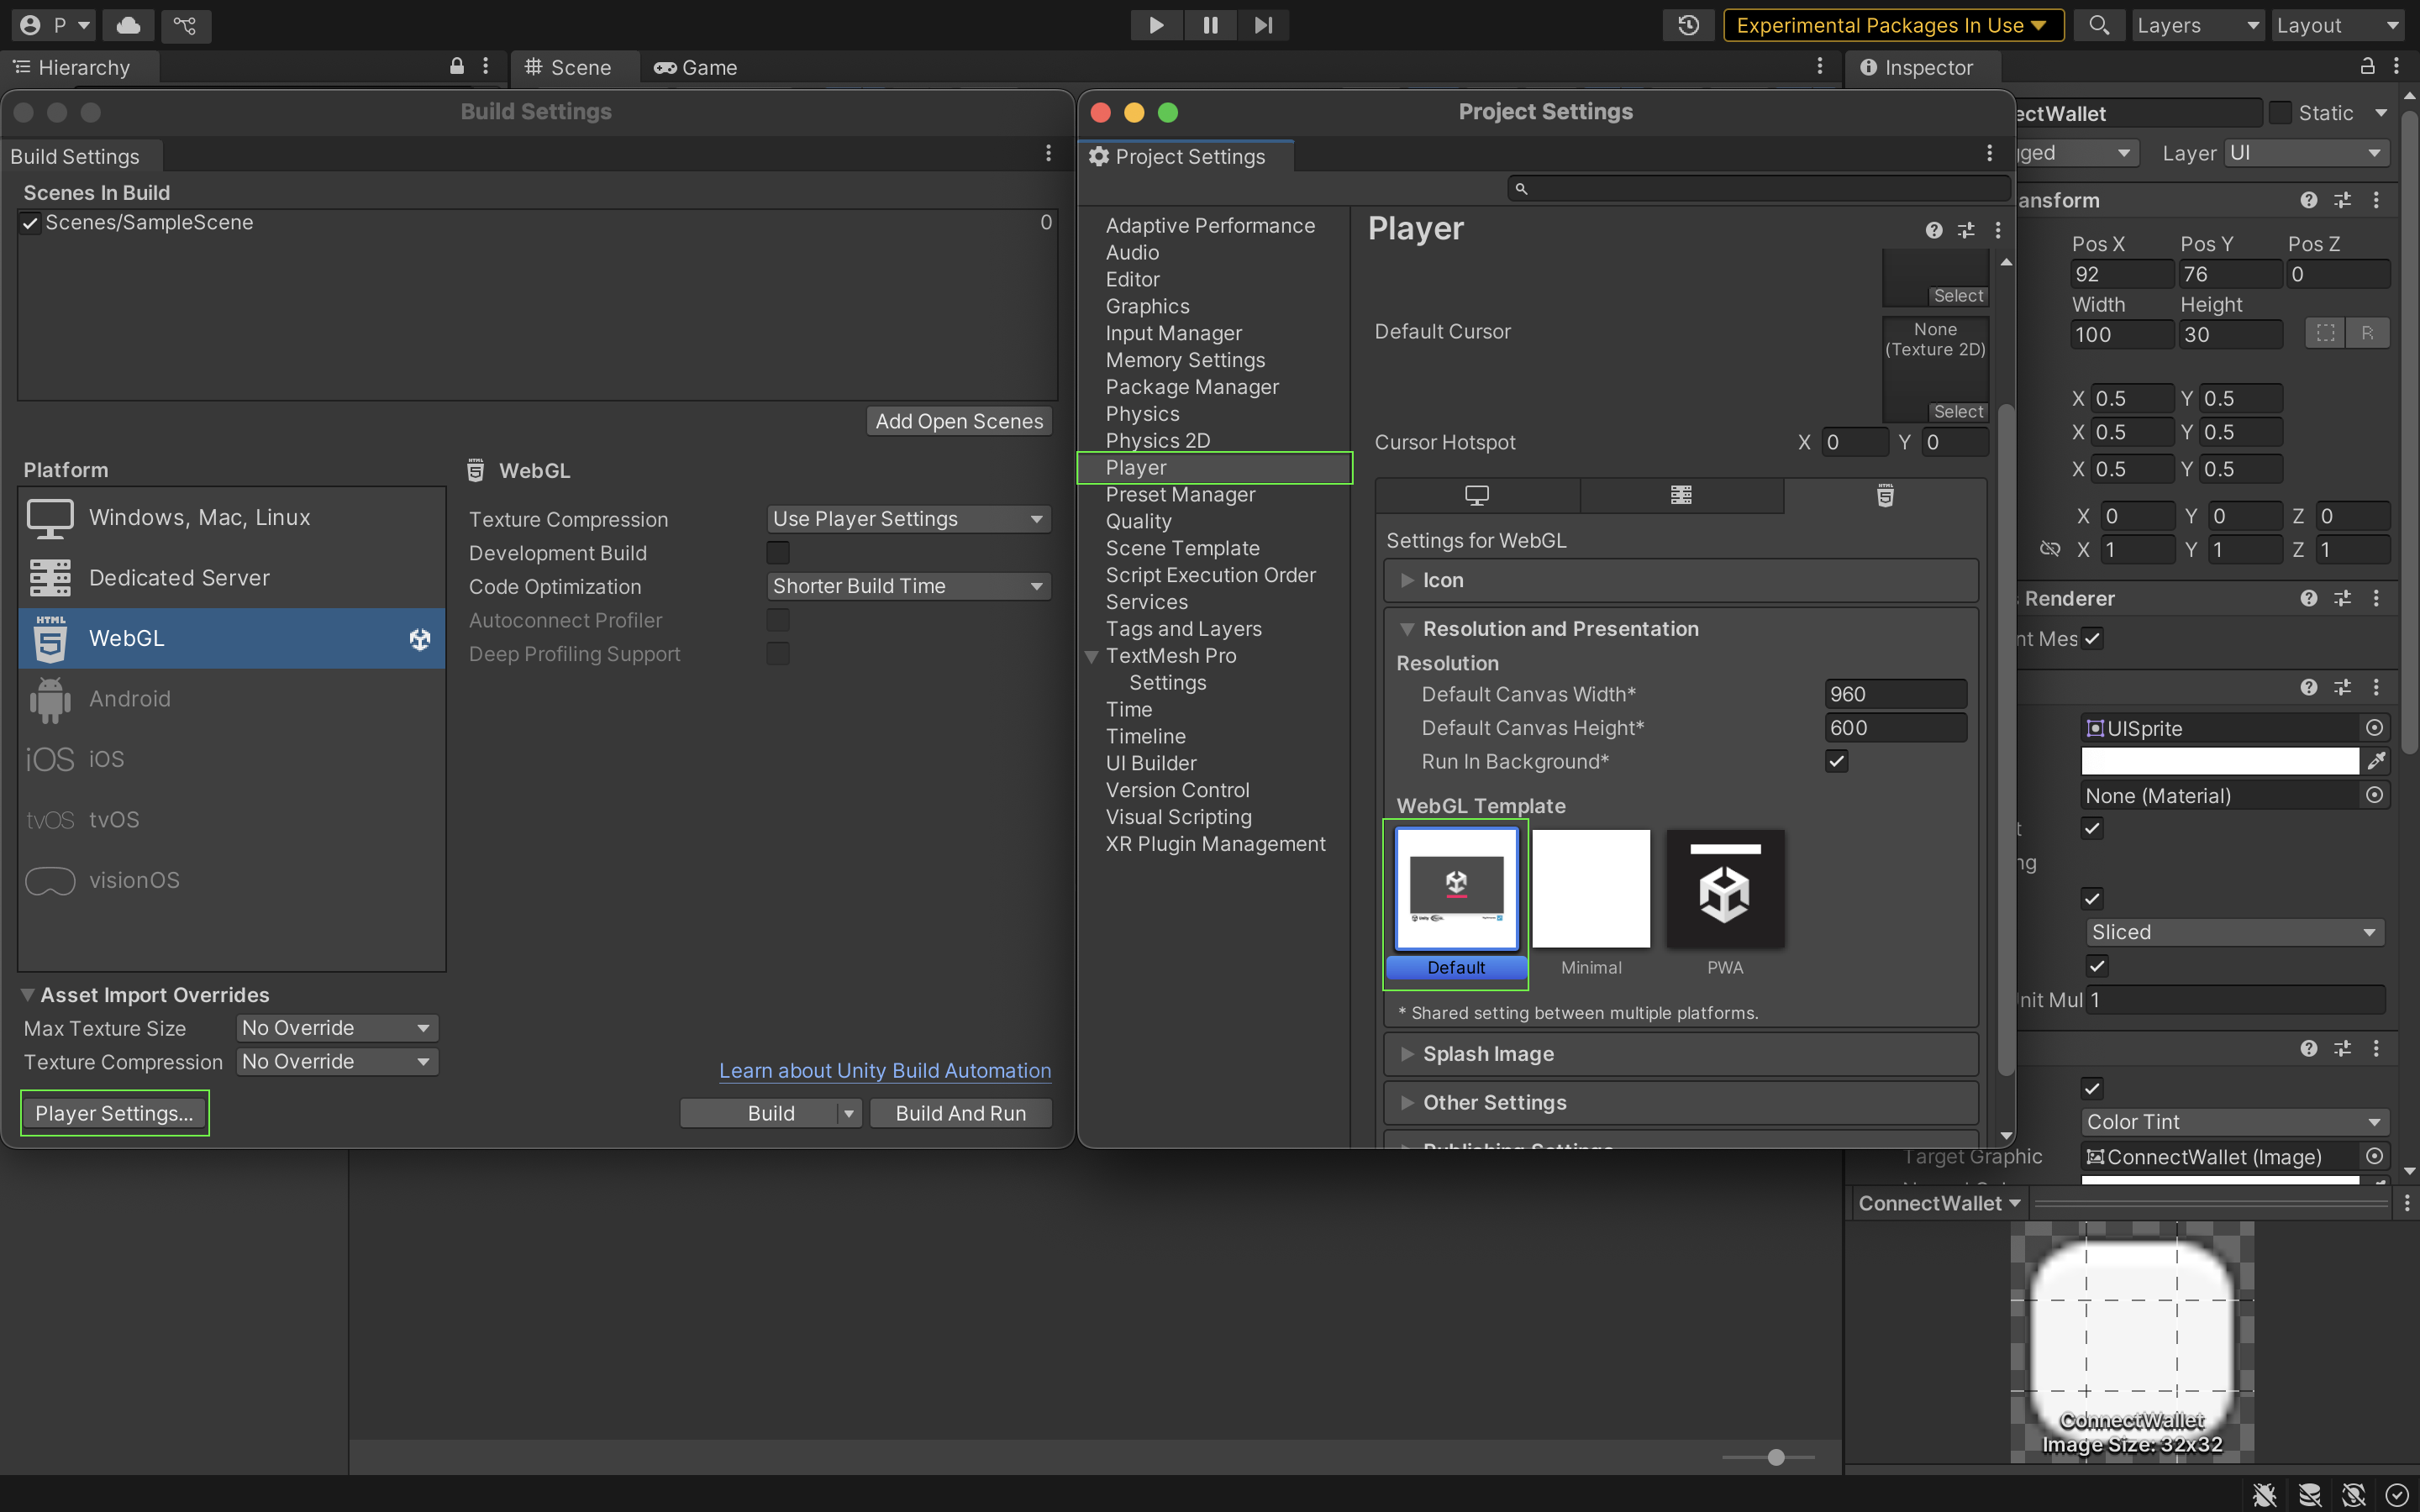
- 同じウィンドウから、プレーヤー設定 → プレーヤー → 解像度とプレゼンテーション をクリックし、WebGLテンプレートの下にある、デフォルトというタイトルのものを選択します。
Unityアプリケーションのテストと実行
このセクションでは、私たちのユニティー・アプリケーションの様々な機能をテストします。 これを実際に見るには、以下の手順に従ってください:
- プロジェクトをビルドして実行します:ファイル → ビルドと実行
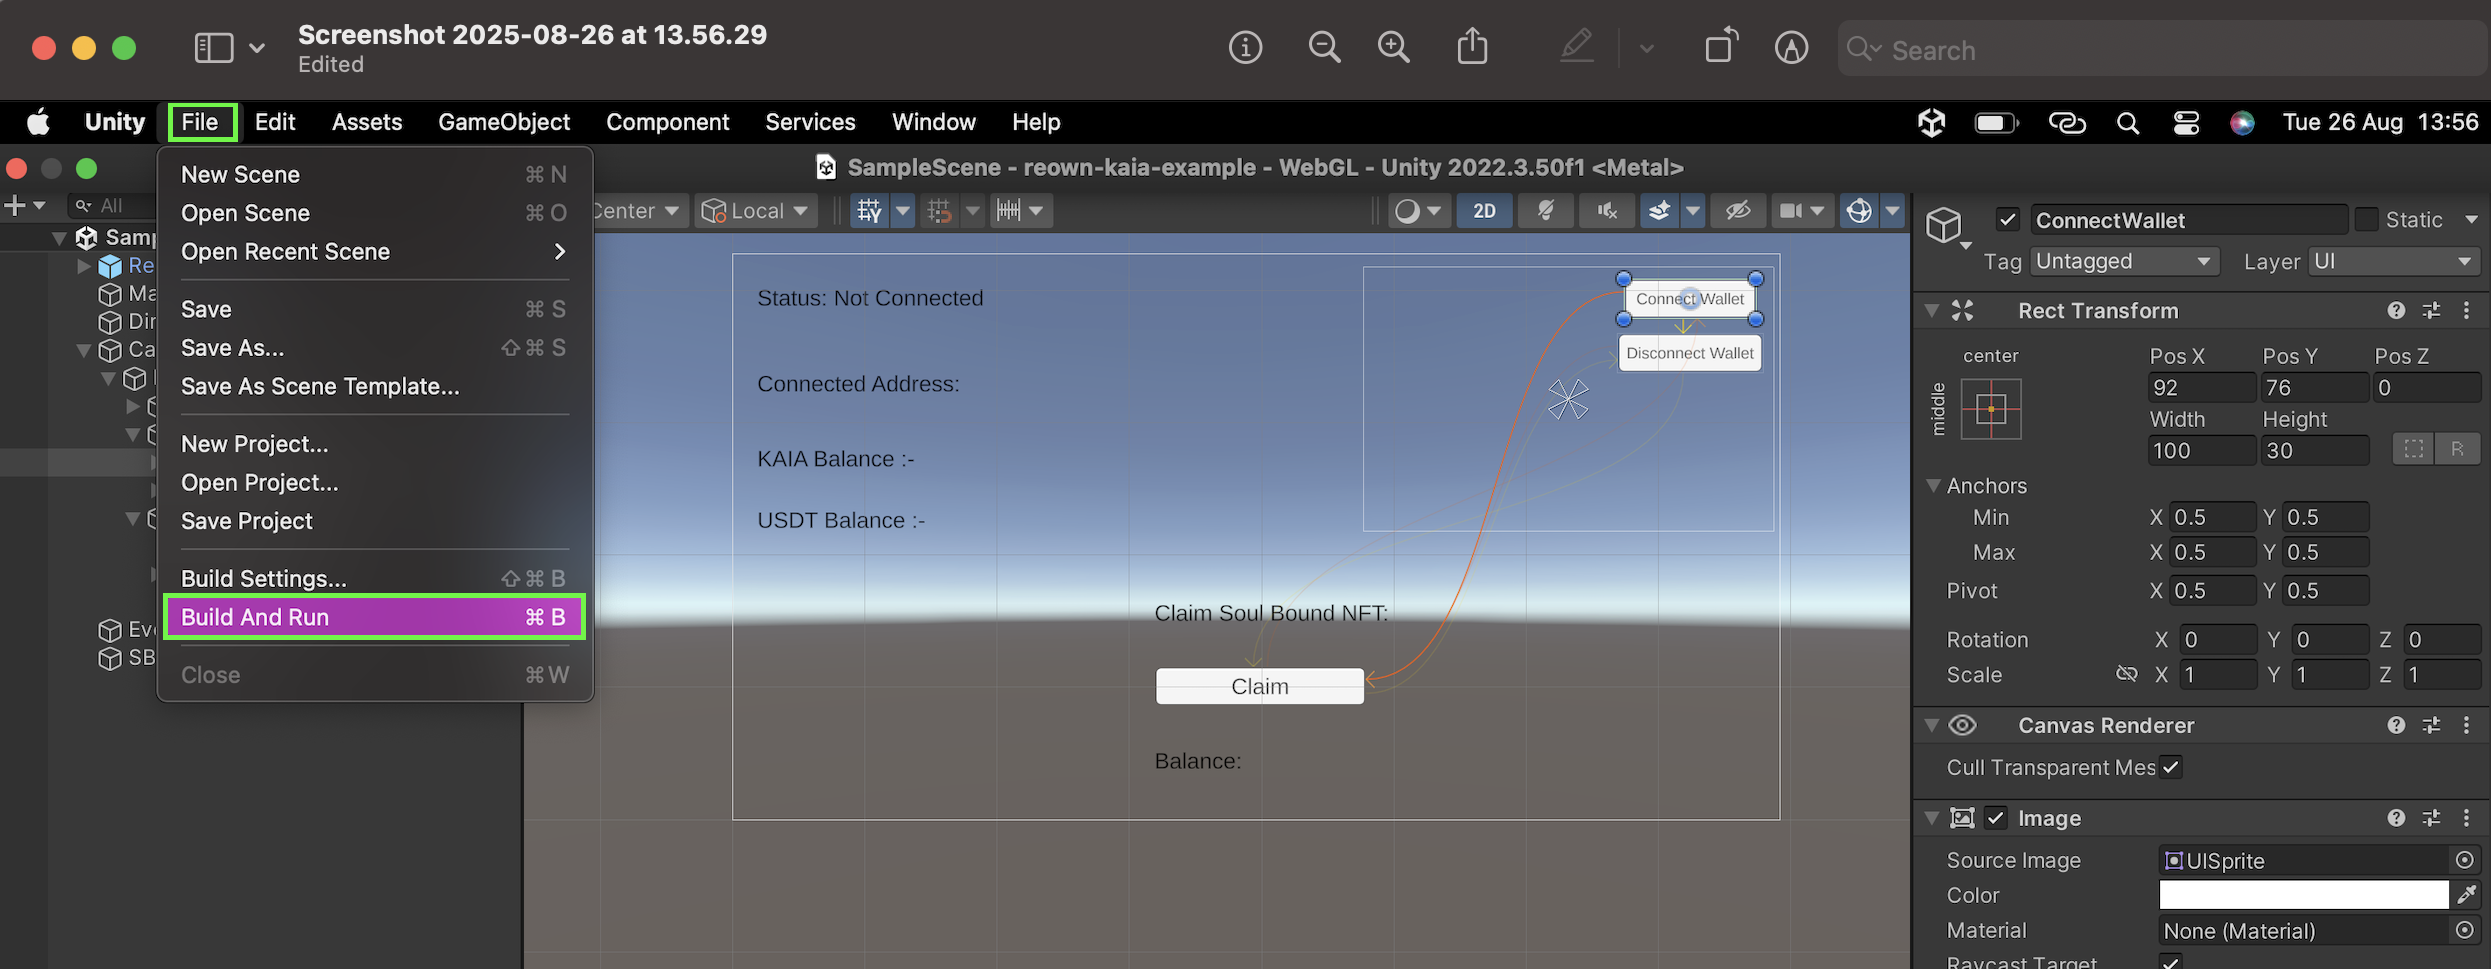
- プロンプトが表示されたら、WebGLビルドを保存します。
- プロジェクトをビルドして実行すると、ブラウザにSampleSceneというタブが開きます。
- Connect WalletをクリックしてMetamaskに接続します。

- 接続したら、アプリのすべての機能をテストする:
- SBTを請求する
- 残高確認
結論
このチュートリアルでは、Reown AppKitパッケージをKaia上のUnityゲームに統合する方法を学びました。 Reown UnityゲーミングSDKの詳細および動作については、Reown AppKit on Unityガイド をご参照ください。