Cài đặt xây dựng WebGL
Trong phần này, chúng ta sẽ cấu hình dApp cho web! Thao tác này sẽ cấu hình Unity để tương thích với Web3 và tạo mẫu tùy chỉnh để tích hợp Kaia.
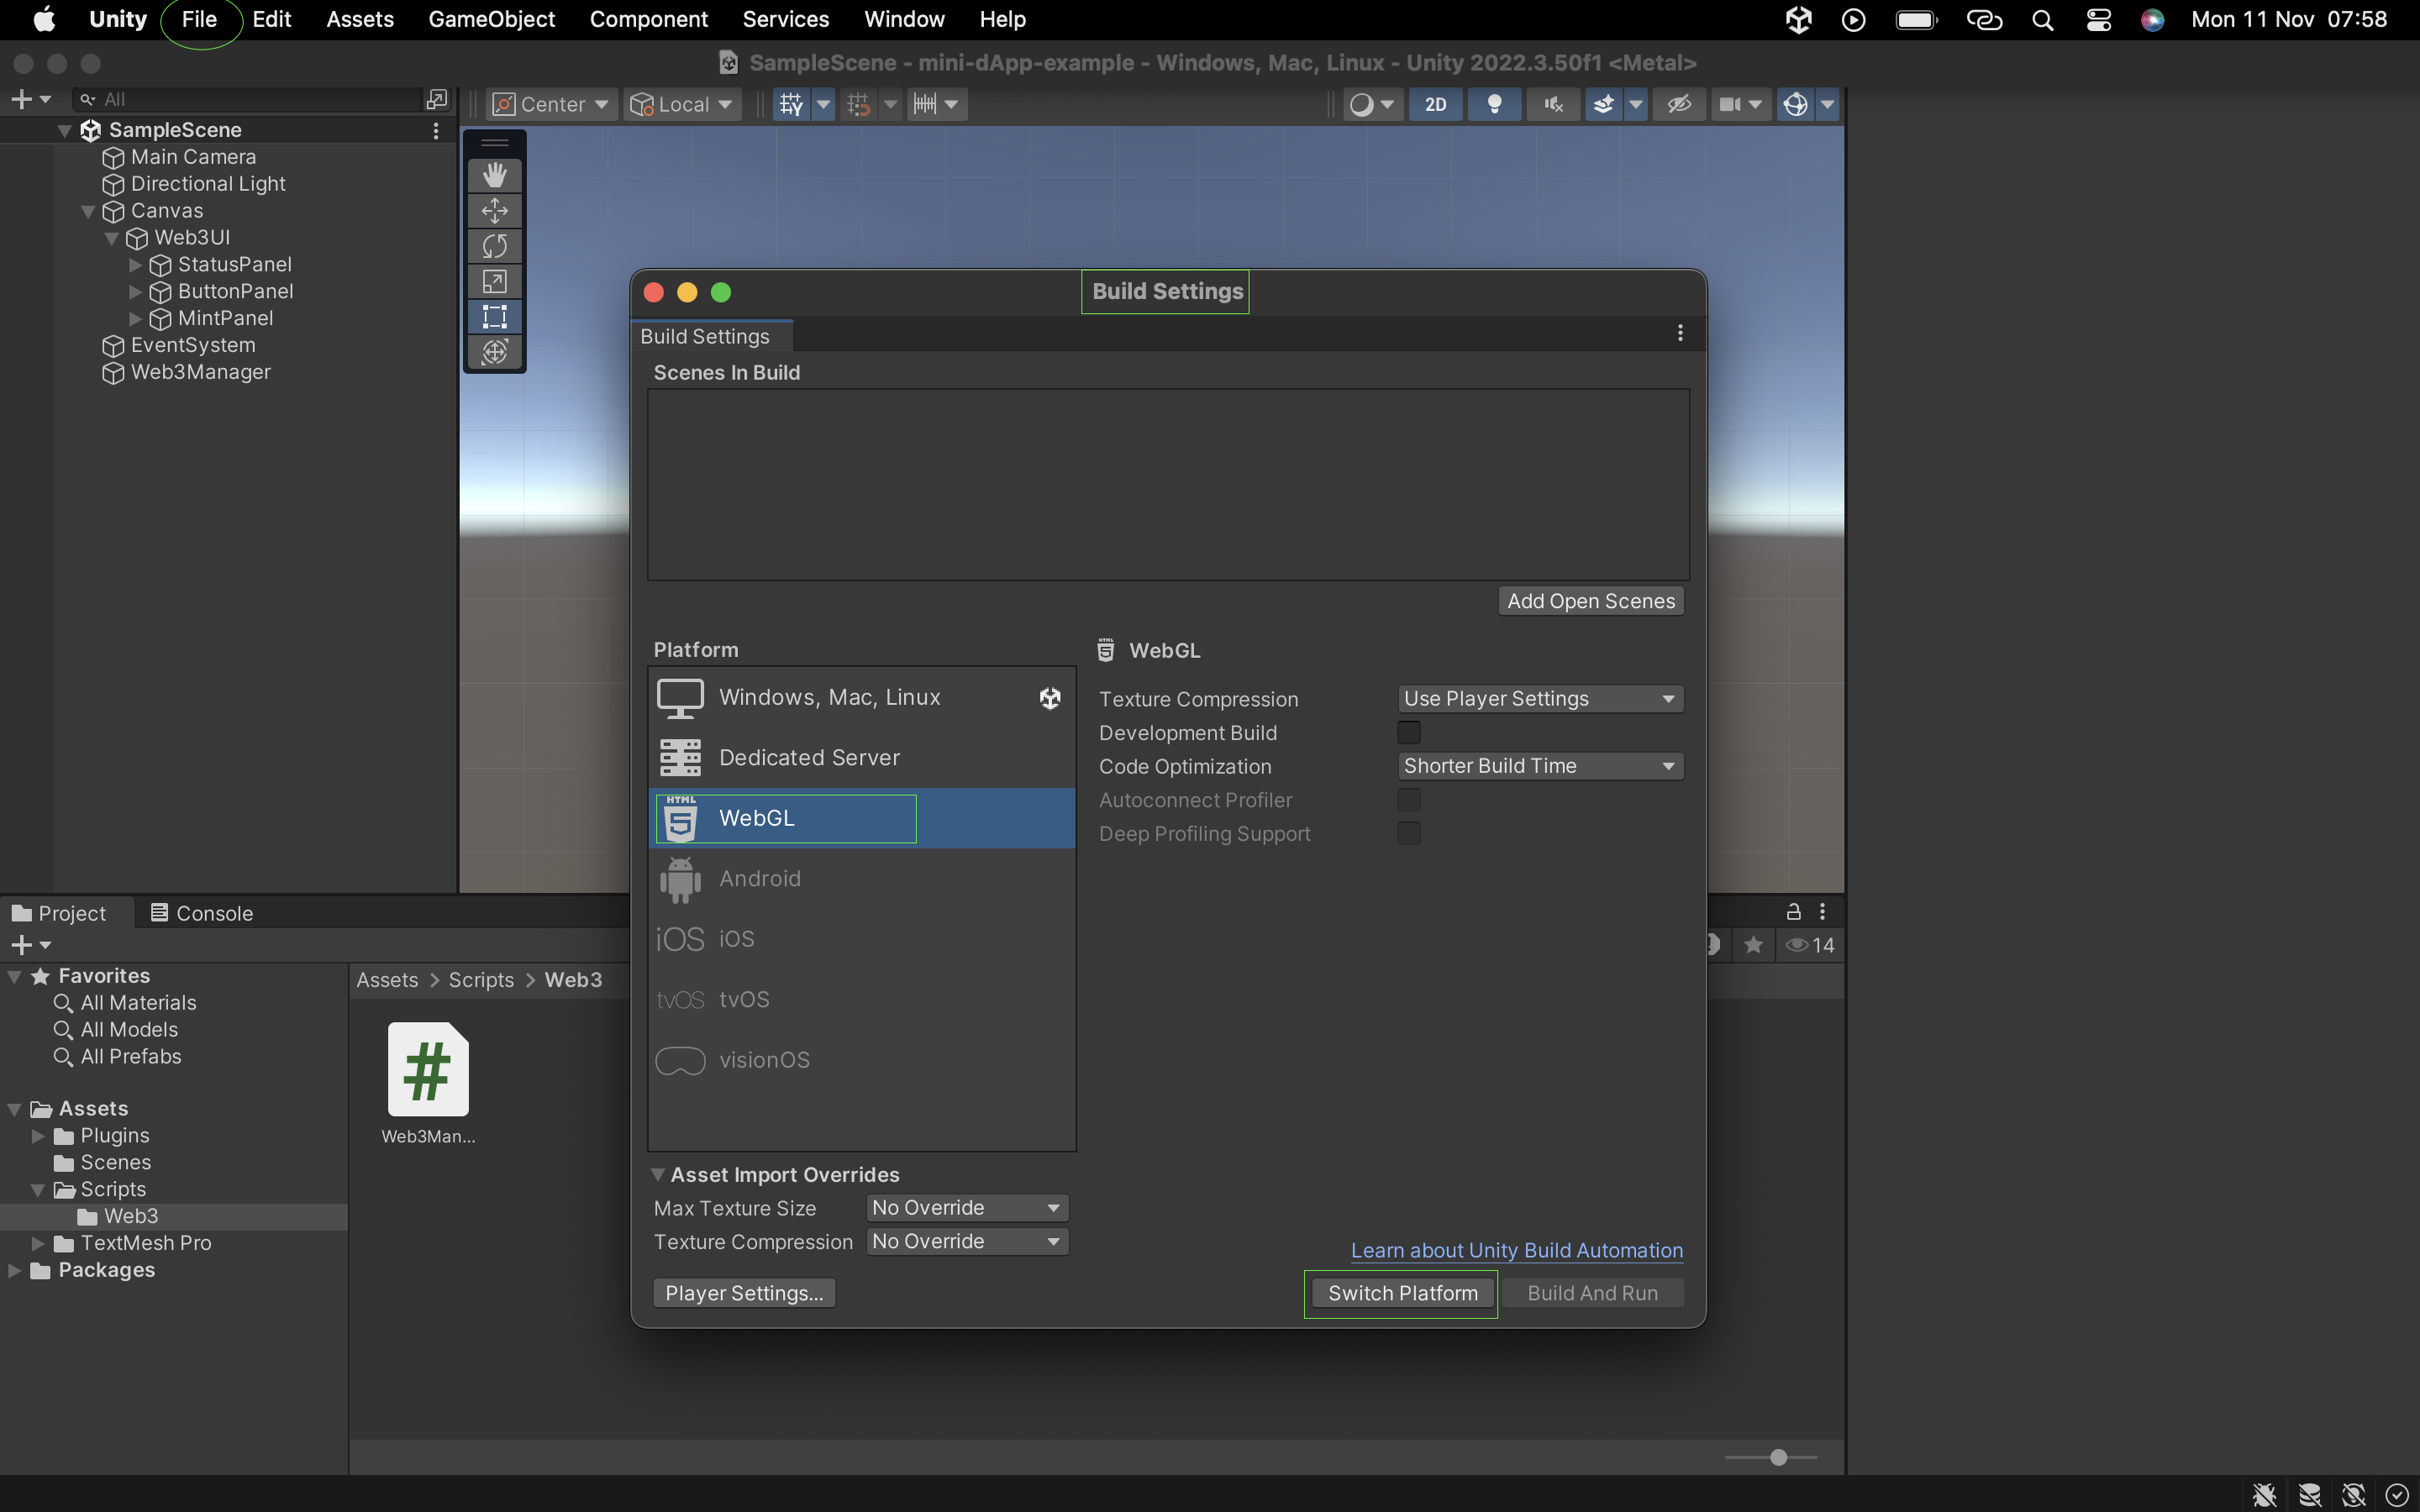
Bước 1: Chuyển sang nền tảng WebGL
- Điều hướng đến Tệp → Cài đặt bản dựng.
- Chọn WebGL và nhấp vào "Chuyển nền tảng".
Quá trình này có thể mất vài phút nếu đây là lần đầu tiên bạn chuyển đổi.
Bước 2: Tạo mẫu WebGL tùy chỉnh
Chúng tôi cần một mẫu tùy chỉnh để tích hợp các khả năng của Web3. Đây là cấu trúc thư mục của chúng tôi:
Assets/└── WebGLTemplates/ └── KaiaTemplate/ ├── index.html └── scripts/ └── dapp_portal_sdk.js
Tại sao lại là mẫu tùy chỉnh?
Mẫu Unity mặc định không hỗ trợ Web3. Mẫu tùy chỉnh của chúng tôi sẽ:
- Tải các thư viện Web3 cần thiết.
- Bật tích hợp Ví Kaia.
- Xử lý tương tác blockchain đúng cách.
Bước 3: Thiết lập index.html
Sao chép và dán mã bên dưới vào tệp index.html của bạn:
<!DOCTYPE html><html lang="en-us"> <head> <meta charset="utf-8"> <meta name="viewport" content="width=device-width, initial-scale=1.0"> <title>Unity WebGL Player</title> <script src="scripts/dapp_portal_sdk.js"></script> <style> body { margin: 0; padding: 0; } #unity-container { width: 100%; height: 100%; position: absolute; } #unity-canvas { width: 100%; height: 100%; background: #231F20; } #unity-loading-bar { display: none; } #unity-progress-bar-empty { width: 141px; height: 18px; margin-top: 10px; background: url('Build/minidapp.progress-bar-empty-dark.png') no-repeat center; } #unity-progress-bar-full { width: 0%; height: 18px; margin-top: 10px; background: url('Build/minidapp.progress-bar-full-dark.png') no-repeat center; } </style> </head> <body> <div id="unity-container"> <canvas id="unity-canvas"></canvas> <div id="unity-loading-bar"> <div id="unity-progress-bar-empty"> <div id="unity-progress-bar-full"></div> </div> </div> </div> <script src="Build/minidapp.loader.js"></script> <script> var sdk = null; var connectedAddress = null; var myGameInstance = null; var Module = { onRuntimeInitialized: function() { console.log("Runtime initialized"); }, env: { MintToken: function(amount) { window.MintToken(amount); }, GetBalance: function() { window.GetBalance(); }, ConnectWallet: function() { window.ConnectWallet(); }, DisconnectWallet: function() { window.DisconnectWallet(); }, GetConnectedAddress: function() { var address = window.GetConnectedAddress(); var bufferSize = lengthBytesUTF8(address) + 1; var buffer = _malloc(bufferSize); stringToUTF8(address, buffer, bufferSize); return buffer; } } }; async function initializeSDK() { try { sdk = await DappPortalSDK.init({ clientId: 'PASTE CLIENT ID', chainId: '1001' }); console.log("SDK initialized"); return true; } catch (error) { console.error("SDK init error:", error); return false; } } window.ConnectWallet = async function() { try { if (!sdk) { const initialized = await initializeSDK(); if (!initialized) return null; } const provider = sdk.getWalletProvider(); const accounts = await provider.request({ method: 'kaia_requestAccounts' }); if (accounts && accounts.length > 0) { connectedAddress = accounts[0]; myGameInstance.SendMessage('Web3Manager', 'OnWalletConnected', connectedAddress); } } catch (error) { myGameInstance.SendMessage('Web3Manager', 'OnWalletError', error.message); } } window.DisconnectWallet = async function() { try { if (!sdk) { console.error("SDK not initialized"); return; } const provider = sdk.getWalletProvider(); await provider.disconnect(); // Reset connected address connectedAddress = null; myGameInstance.SendMessage('Web3Manager', 'OnWalletDisconnected'); console.log("Wallet disconnected successfully"); } catch (error) { console.error("Disconnect error:", error); myGameInstance.SendMessage('Web3Manager', 'OnWalletError', "Disconnect failed: " + error.message); } } window.GetConnectedAddress = function() { return connectedAddress || ''; } window.MintToken = async function(amount) { try { const provider = sdk.getWalletProvider(); const mintSignature = '0xa0712d68'; const amountHex = amount.toString(16).padStart(64, '0'); const data = mintSignature + amountHex; const tx = { from: connectedAddress, to: '0x099D7feC4f799d1749adA8815eB21375E13E0Ddb', value: '0x0', data: data, gas: '0x4C4B40' }; const txHash = await provider.request({ method: 'kaia_sendTransaction', params: [tx] }); myGameInstance.SendMessage('Web3Manager', 'OnMintSuccess', txHash); GetBalance(); // Get updated balance after mint } catch (error) { myGameInstance.SendMessage('Web3Manager', 'OnMintError', error.message); } } window.GetBalance = async function() { try { const provider = sdk.getWalletProvider(); const balanceSignature = '0x70a08231'; const addressParam = connectedAddress.substring(2).padStart(64, '0'); const data = balanceSignature + addressParam; const result = await provider.request({ method: 'kaia_call', params: [{ from: connectedAddress, to: '0x099D7feC4f799d1749adA8815eB21375E13E0Ddb', data: data }, 'latest'] }); const balance = parseInt(result, 16); myGameInstance.SendMessage('Web3Manager', 'OnBalanceReceived', balance.toString()); } catch (error) { myGameInstance.SendMessage('Web3Manager', 'OnBalanceError', error.message); } } createUnityInstance(document.querySelector("#unity-canvas"), { dataUrl: "Build/minidapp.data", frameworkUrl: "Build/minidapp.framework.js", codeUrl: "Build/minidapp.wasm", streamingAssetsUrl: "StreamingAssets", companyName: "DefaultCompany", productName: "minidapp", productVersion: "0.1", }).then((unityInstance) => { myGameInstance = unityInstance; }); </script> </body></html>
Bước 4: Thiết lập Mini Dapp SDK
- Truy cập: https://static.kaiawallet.io/js/dapp-portal-sdk.js
- Lưu nội dung vào
scripts/dapp-portal-sdk.jscủa bạn. Sử dụng tệp Mini Dapp SDK cục bộ giúp cải thiện thời gian tải và độ tin cậy.
Ngoài ra, bạn có thể trực tiếp thêm liên kết đến Mini Dapp SDK dưới dạng src trong thẻ script ở index.html.
// <script src="scripts/dapp_portal_sdk.js"></script><script src="https://static.kaiawallet.io/js/dapp-portal-sdk.js"></script>
Bước 5: Cấu hình Unity để sử dụng mẫu tùy chỉnh
- Mở Cài đặt bản dựng.
- Điều hướng đến Cài đặt trình phát.
- Trong mục "Giải quyết và Trình bày":
- Tìm "Mẫu WebGL".
- Chọn "KaiaTemplate".
- Trong "Cài đặt xuất bản", chọn tắt trong trường Định dạng nén.

Bước 6: Xây dựng dApp của bạn
Bây giờ chúng ta hãy tổng hợp lại:
- Mở Cài đặt bản dựng (Tệp → Cài đặt bản dựng).
- Nhấp vào "Xây dựng và chạy".
- Lưu dự án xây dựng theo yêu cầu trên Unity; ví dụ: "minidapp".
- Các tệp xây dựng quan trọng:
minidapp/├── minidapp.loader.js├── minidapp.data├── minidapp.framework.js└── minidapp.wasm
Bước 7: Cấu hình sau khi xây dựng
Sau khi xây dựng dự án của bạn,
- Mở thư mục xây dựng của bạn.
- Lưu ý tất cả tên tệp đã tạo.
- Cập nhật index.html của bạn để khớp với những tên này.
- Lưu thay đổi và xây dựng lại.
- Bây giờ bạn sẽ thấy một tab được mở trong trình duyệt của mình.
Bước 8: Định tuyến bản dựng WebGL tới Localhost:3000
Vì mục đích bảo mật và phát triển, Mini Dapp SDK hiện đang hoạt động trên localhost:3000. Hiện tại, bản dựng Unity WebGL mặc định sử dụng các cổng ngẫu nhiên (như 61445) và để ứng dụng của chúng tôi hoạt động hiệu quả, chúng tôi cần cấu hình bản dựng Unity WebGL để mở trên localhost:3000.
Để thực hiện, hãy làm theo các bước dưới đây:
- Sao chép và dán mã bên dưới vào terminal dự án của bạn
# Install http-server globallynpm install -g http-server
- Điều hướng đến thư mục xây dựng
cd path/to/minidapp
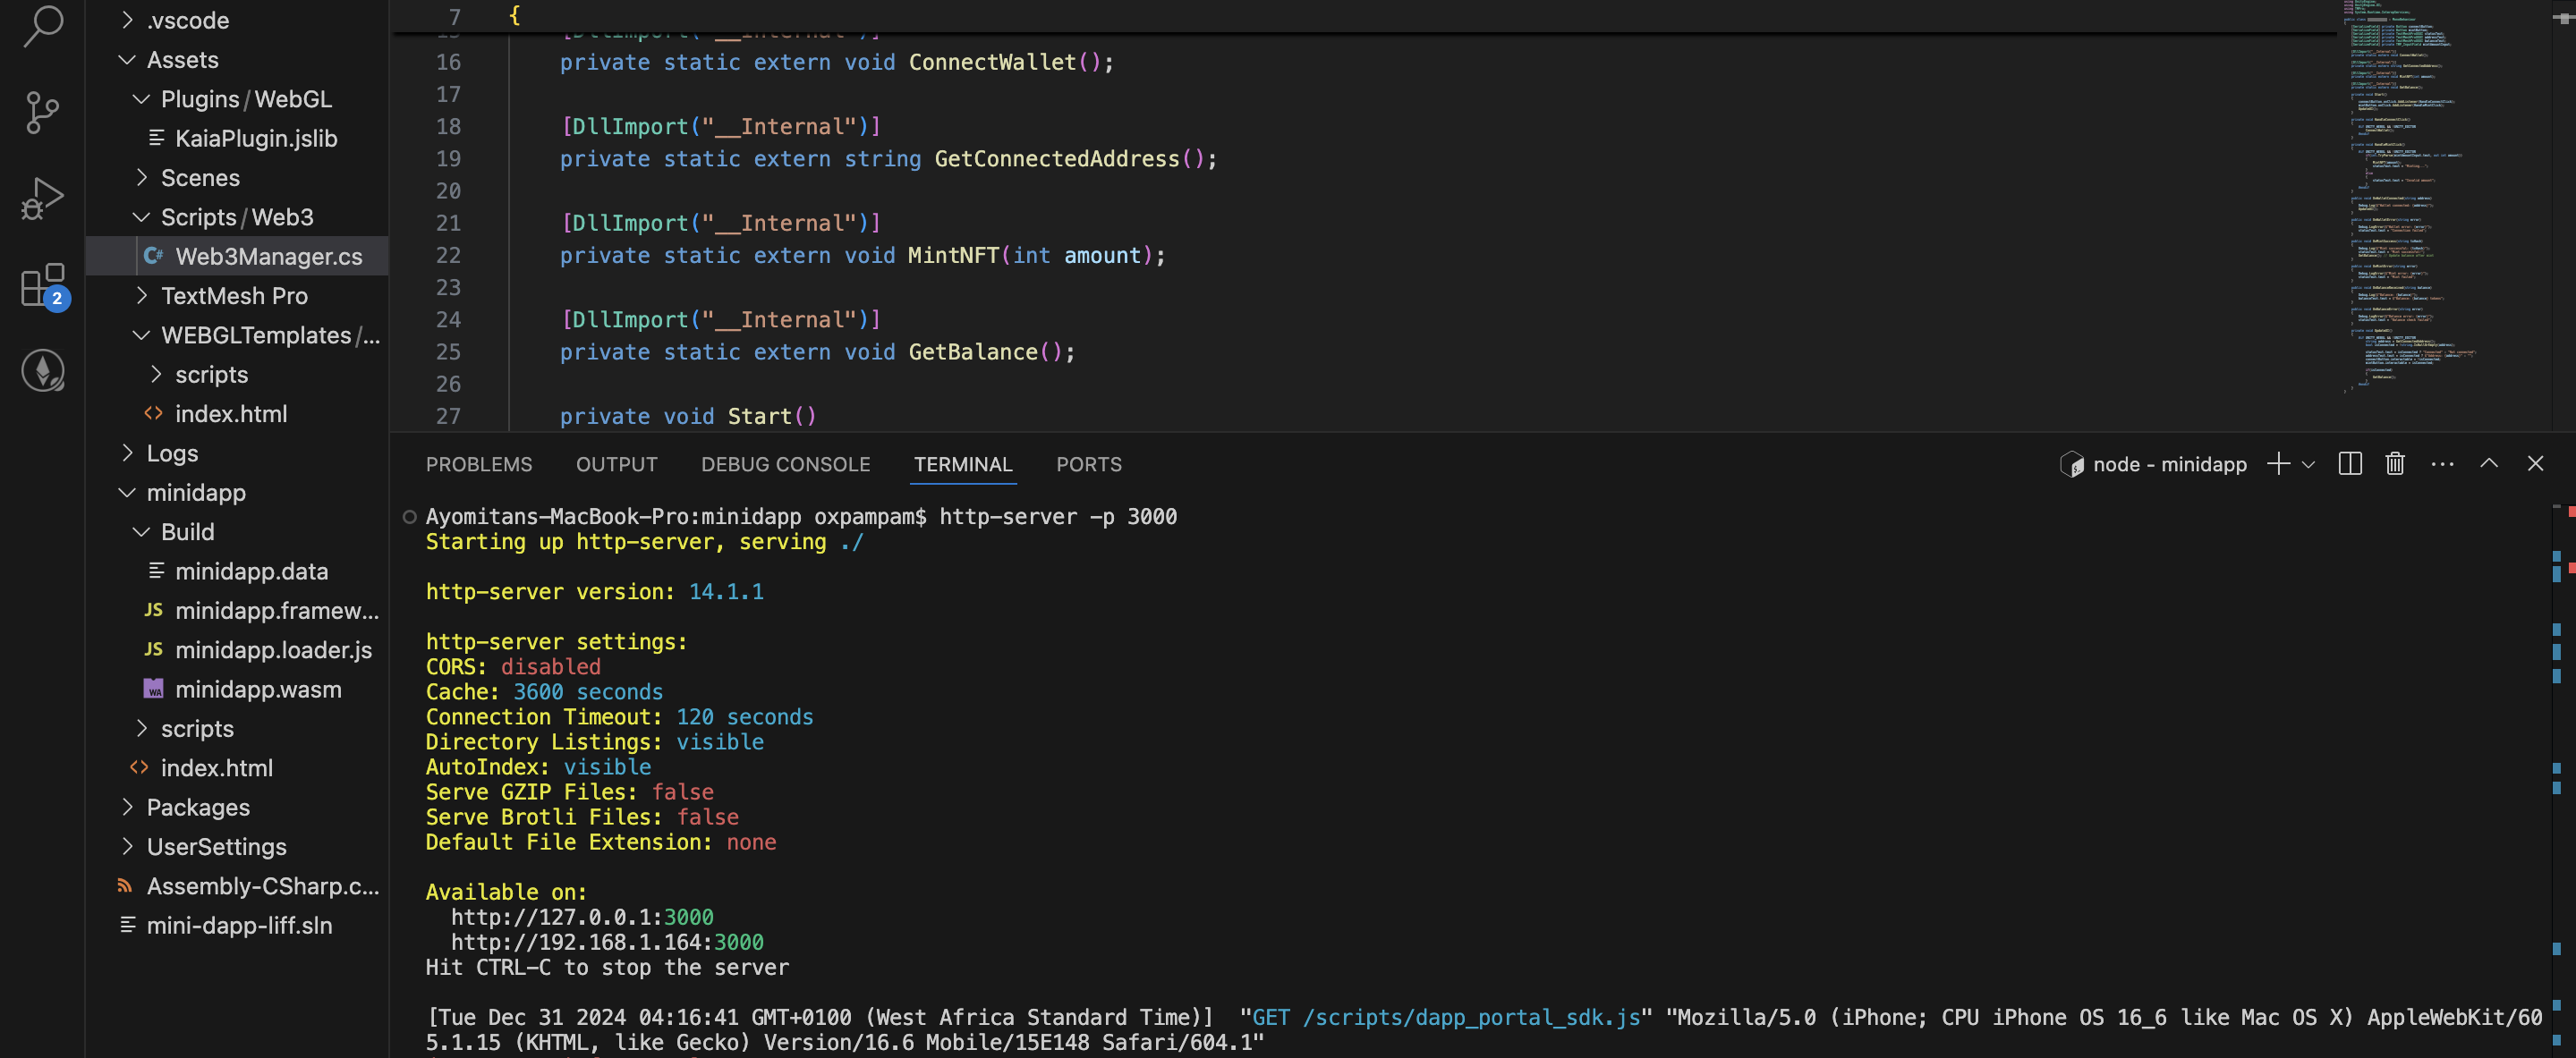
- Khởi động máy chủ trên cổng 3000
http-server -p 3000
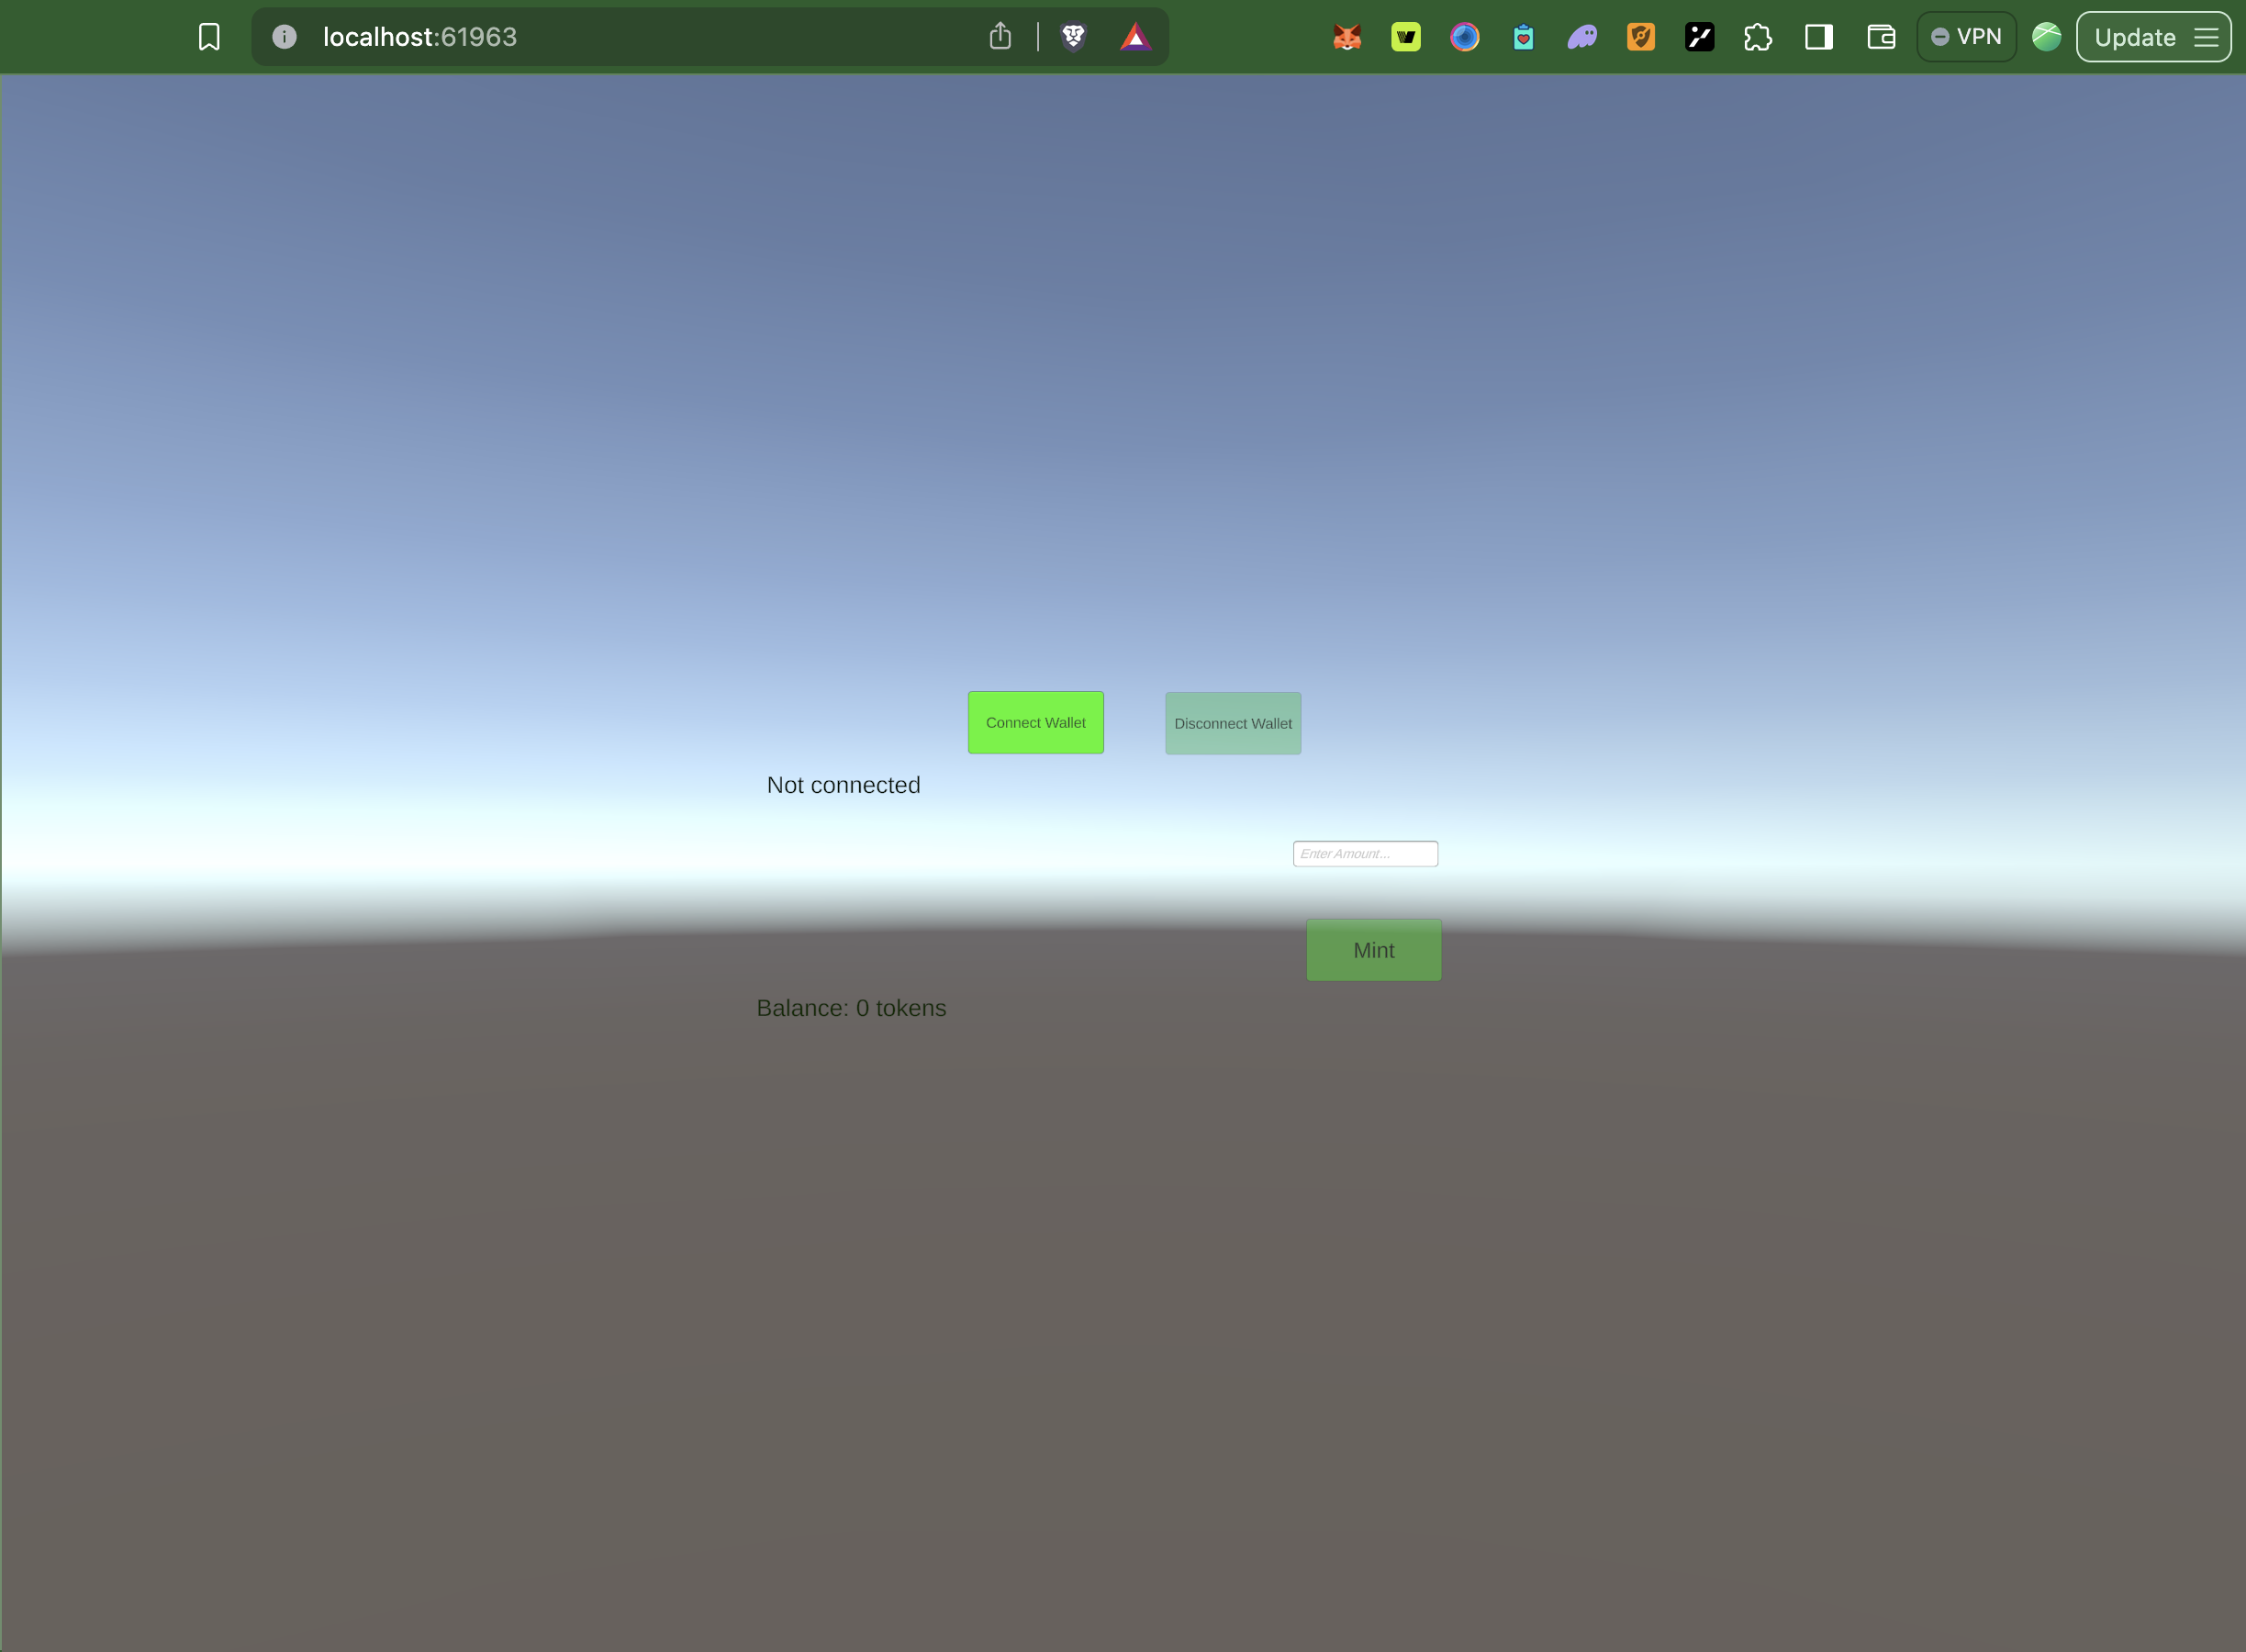
Kiểm tra và chạy ứng dụng
Bây giờ dự án của chúng ta đã chạy, hãy thử nghiệm và tương tác với nó.
- Nhấp vào nút Kết nối ví để kết nối với Ví Dapp Portal.
- Sau khi kết nối, hãy điền thông tin chi tiết (số tiền) để đúc vào địa chỉ đã kết nối.