Build Unity App
Prerequisites
Before we dive in, make sure you have:
- Unity Hub installed on your computer - this is where we'll build our dApp interface
- Basic C# and JavaScript knowledge - nothing too fancy, just the fundamentals
- A LINE Developer account - you can easily create one using your email
- Test Kaia from Kaia Faucet
- Dapp Portal SDK Client ID receiveed from Dapp Portal team.
- Some familiarity with Web3 concepts - if you understand wallets and tokens, you're good to go.
Setting Up Your Unity Environment
Let's set up your development environment. We'll start with the Unity setup.
Step 1: Install and Verify Unity Version
To begin, let's make sure we're all using the same Unity version to avoid any compatibility issues:
- Install Unity Hub if you haven't already.
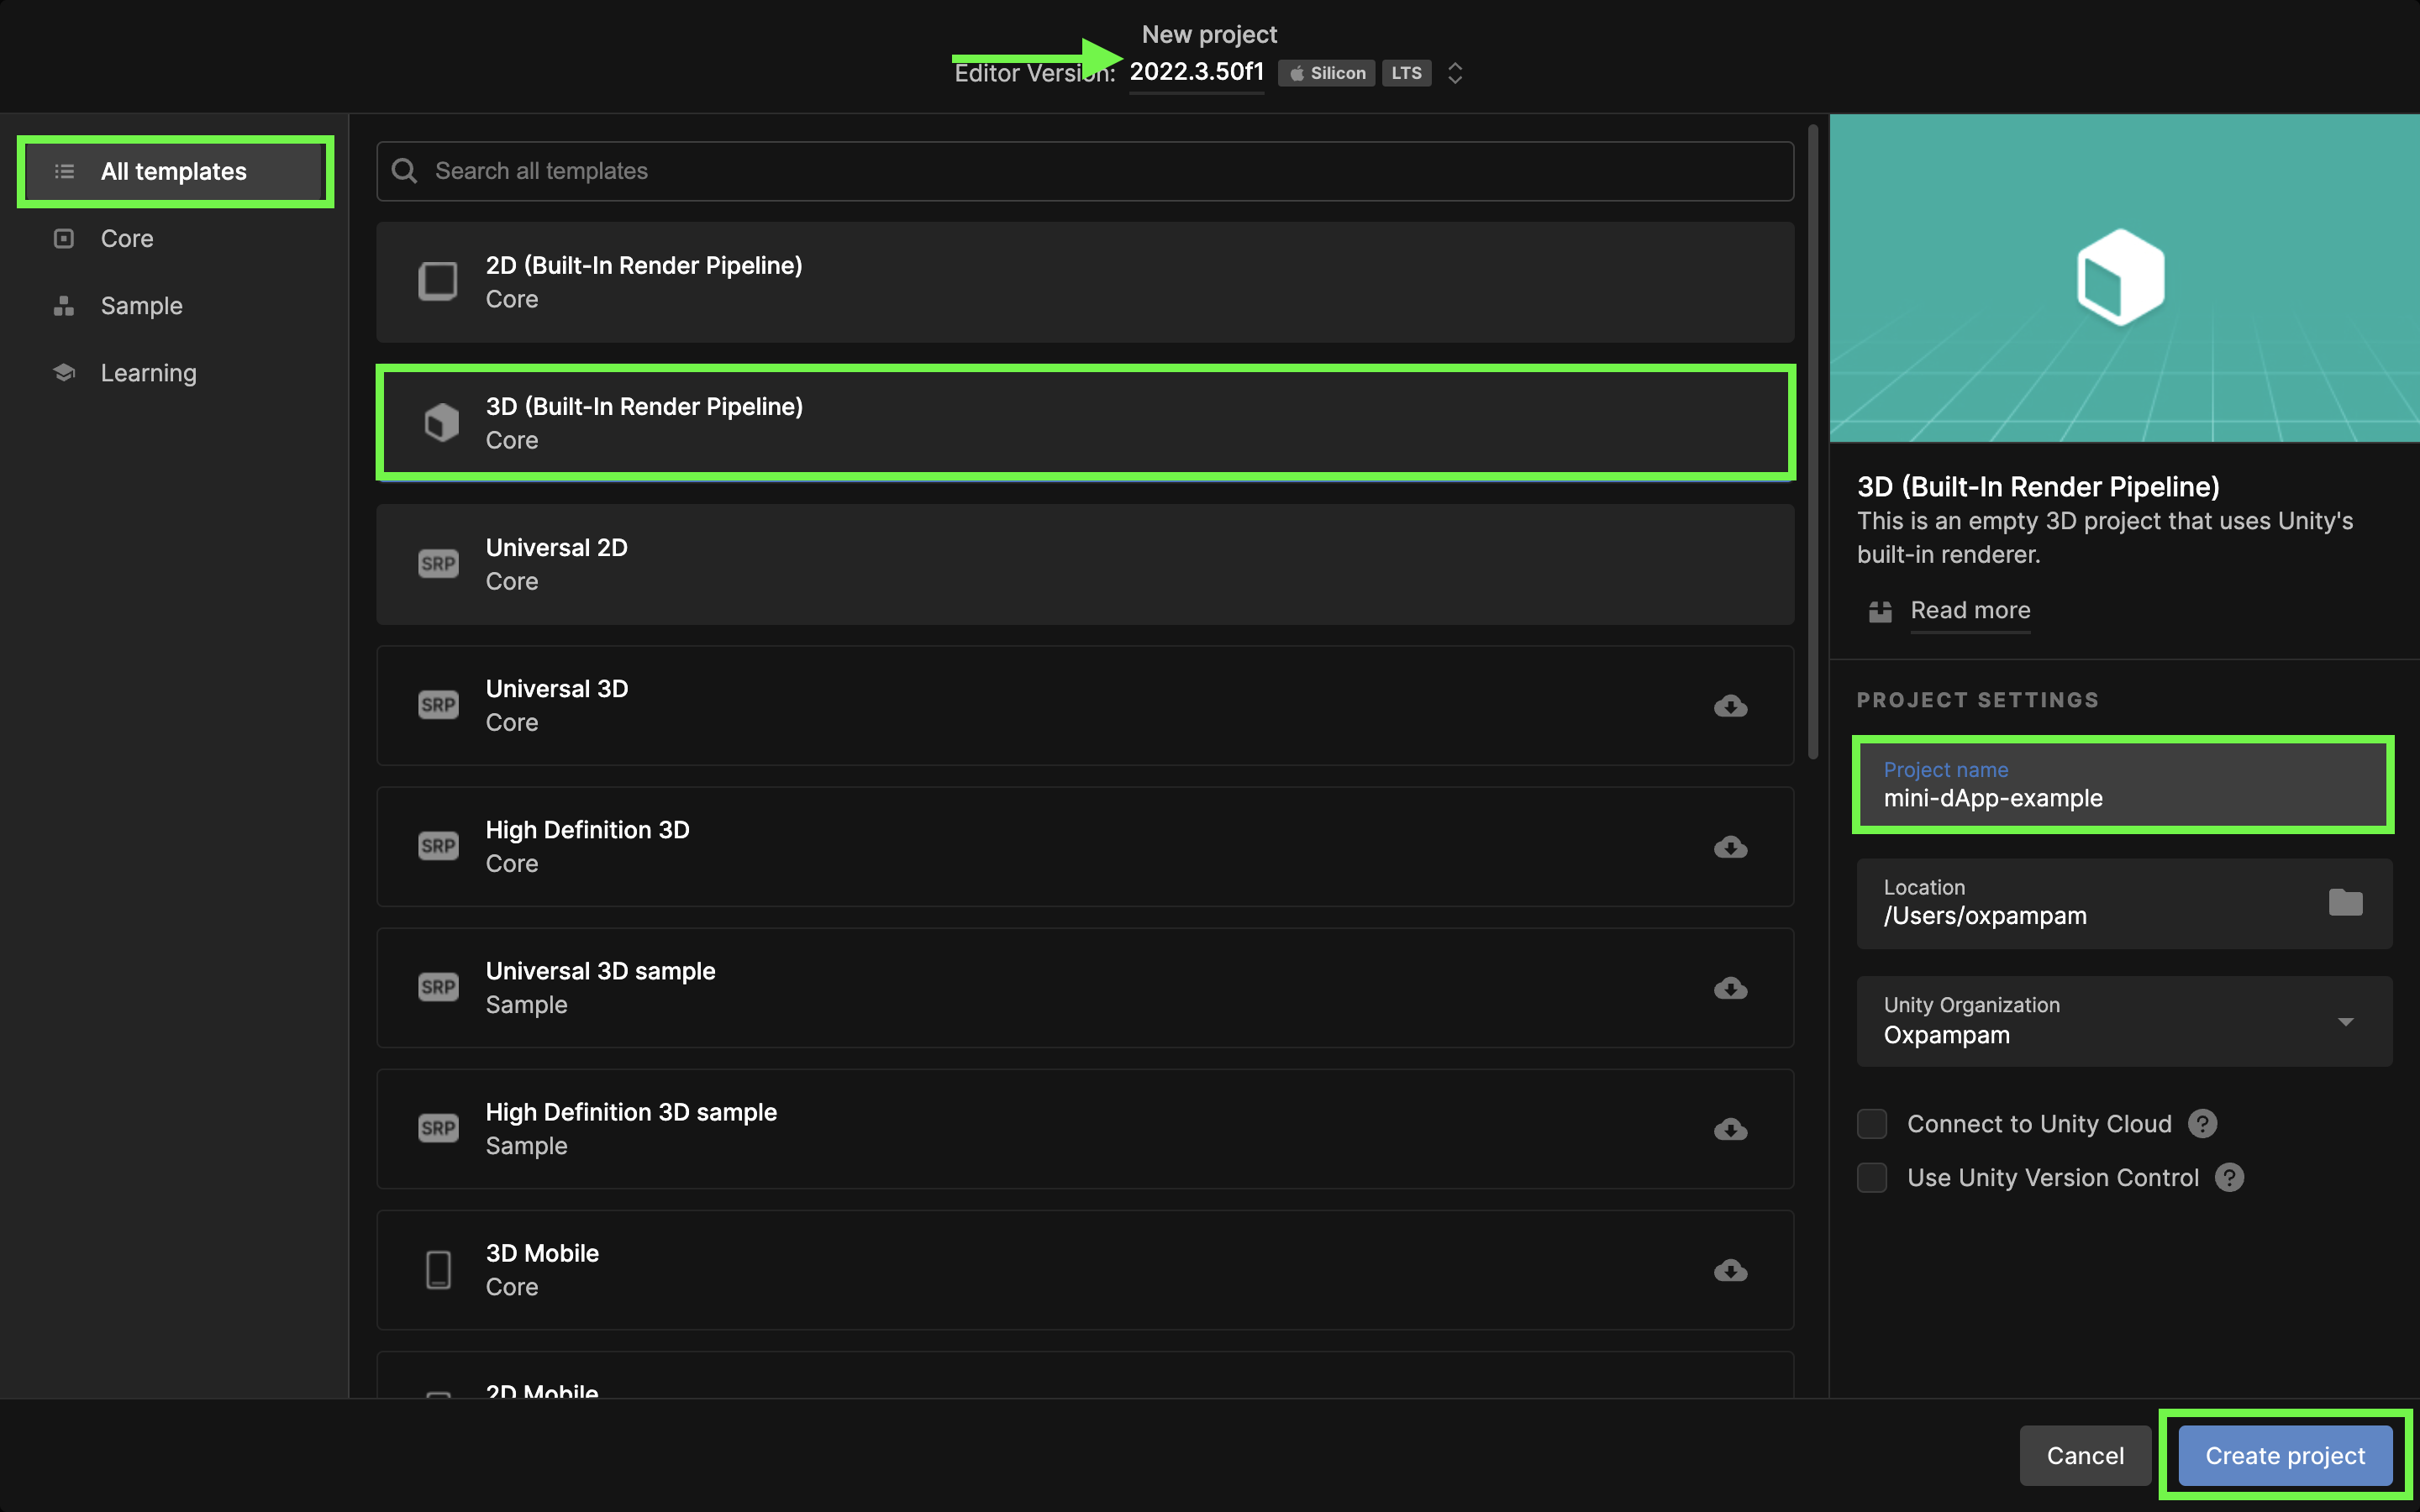
- Install Unity Editor version 2022.3.50f1 specifically.
Step 2: Create Your New Unity Project
- Open Unity Hub and head to the Projects tab.
- Click the inviting "New project" button in the top-right corner.
- Under "All templates", select the 3D (Built-in Render Pipeline) template.
- Give your project a meaningful name (e.g., mini-dApp-example).
- Choose a convenient location for your project files.
- Click Create project.
Creating Your dApp's UI Components
In this section, we will build our dApp's user interface! We'll create a structured UI system with three main panels for status updates, actions, and minting functionality.
Setting Up the Main Canvas
First, let's create our base canvas:
- In the Hierarchy window, right-click on "Sample Scene".
- Navigate to GameObject → UI → Canvas.
Creating the Web3UI Container
- Right-click on your new Canvas.
- Select "Create Empty".
- Rename it to "Web3UI".
Setting Up Main Panels
Inside Web3UI, create three panel objects:
- Right-click on Web3UI and select "Create Empty".
- Create and rename these panels:
- StatusPanel - Your dApp's information display
- ButtonPanel - For user interactions
- MintPanel - For token minting features
Creating Panel Components
StatusPanel Components
This panel shows all your important Web3 information:
- Right click on StatusPanel, click on UI → Text - TextMeshPro and then rename to StatusText. Make sure to fill the “Text Input” field in the Inspector pane e.g. "Status..."
TextMeshPro (TMP) Setup
When you first create a TextMeshPro element (UI - Text - TextMeshPro), Unity automatically prompts you to import TMP Essentials. If you accidentally skip this prompt, you can manually import it through Window > TextMeshPro > Import TMP Essentials.
Why we need this: TextMeshPro requires core resources (shaders, default fonts, and materials) to properly display text in your game. Without these essentials, your text components won't render correctly and you'll see shader/material errors in your project. This is a one-time setup that's necessary for text to work properly.

- Right click on StatusPanel, click on UI → Text - TextMeshPro and then rename to AddressText. Make sure to fill the text object e.g "Address Text..."
- Right click on StatusPanel, click on UI → Text - TextMeshPro and then rename to TokenBalanceText. Make sure to fill the text object e.g "0.0000 ET"
├── StatusText (TextMeshPro)│ └── Default: "Status..."├── AddressText (TextMeshPro)│ └── Default: "Address Text..."└── TokenBalanceText (TextMeshPro) └── Default: "0.0000 ET"
ButtonPanel Components
Your main interaction buttons:
- Right click on ButtonPanel, click on UI → Button - TextMeshPro and then rename it to ConnectWalletButton. Make sure to fill the "Text Input" field in the Inspector pane with "Connect Wallet".
ButtonPanel├── ConnectButton (Button - TextMeshPro)│ └── Text: "Connect Wallet"
MintPanel Components
The token minting interface:
- Right click on MintPanel, click on UI → Input Field → TextMeshPro and then rename to MintAmountInput. Make sure to fill the placeholder object with "Enter Amount…"
- Right click on MintPanel, click on UI → Button → TextMeshPro and then rename to MintButton. Make sure to fill the text object with "Mint"
MintPanel├── MintAmountInput (Input Field - TextMeshPro)│ └── Placeholder: "Enter Amount..."└── MintButton (Button - TextMeshPro) └── Text: "Mint"
After creating all components, your hierarchy should look like this:
Canvas└── Web3UI ├── StatusPanel ├── ButtonPanel └── MintPanel
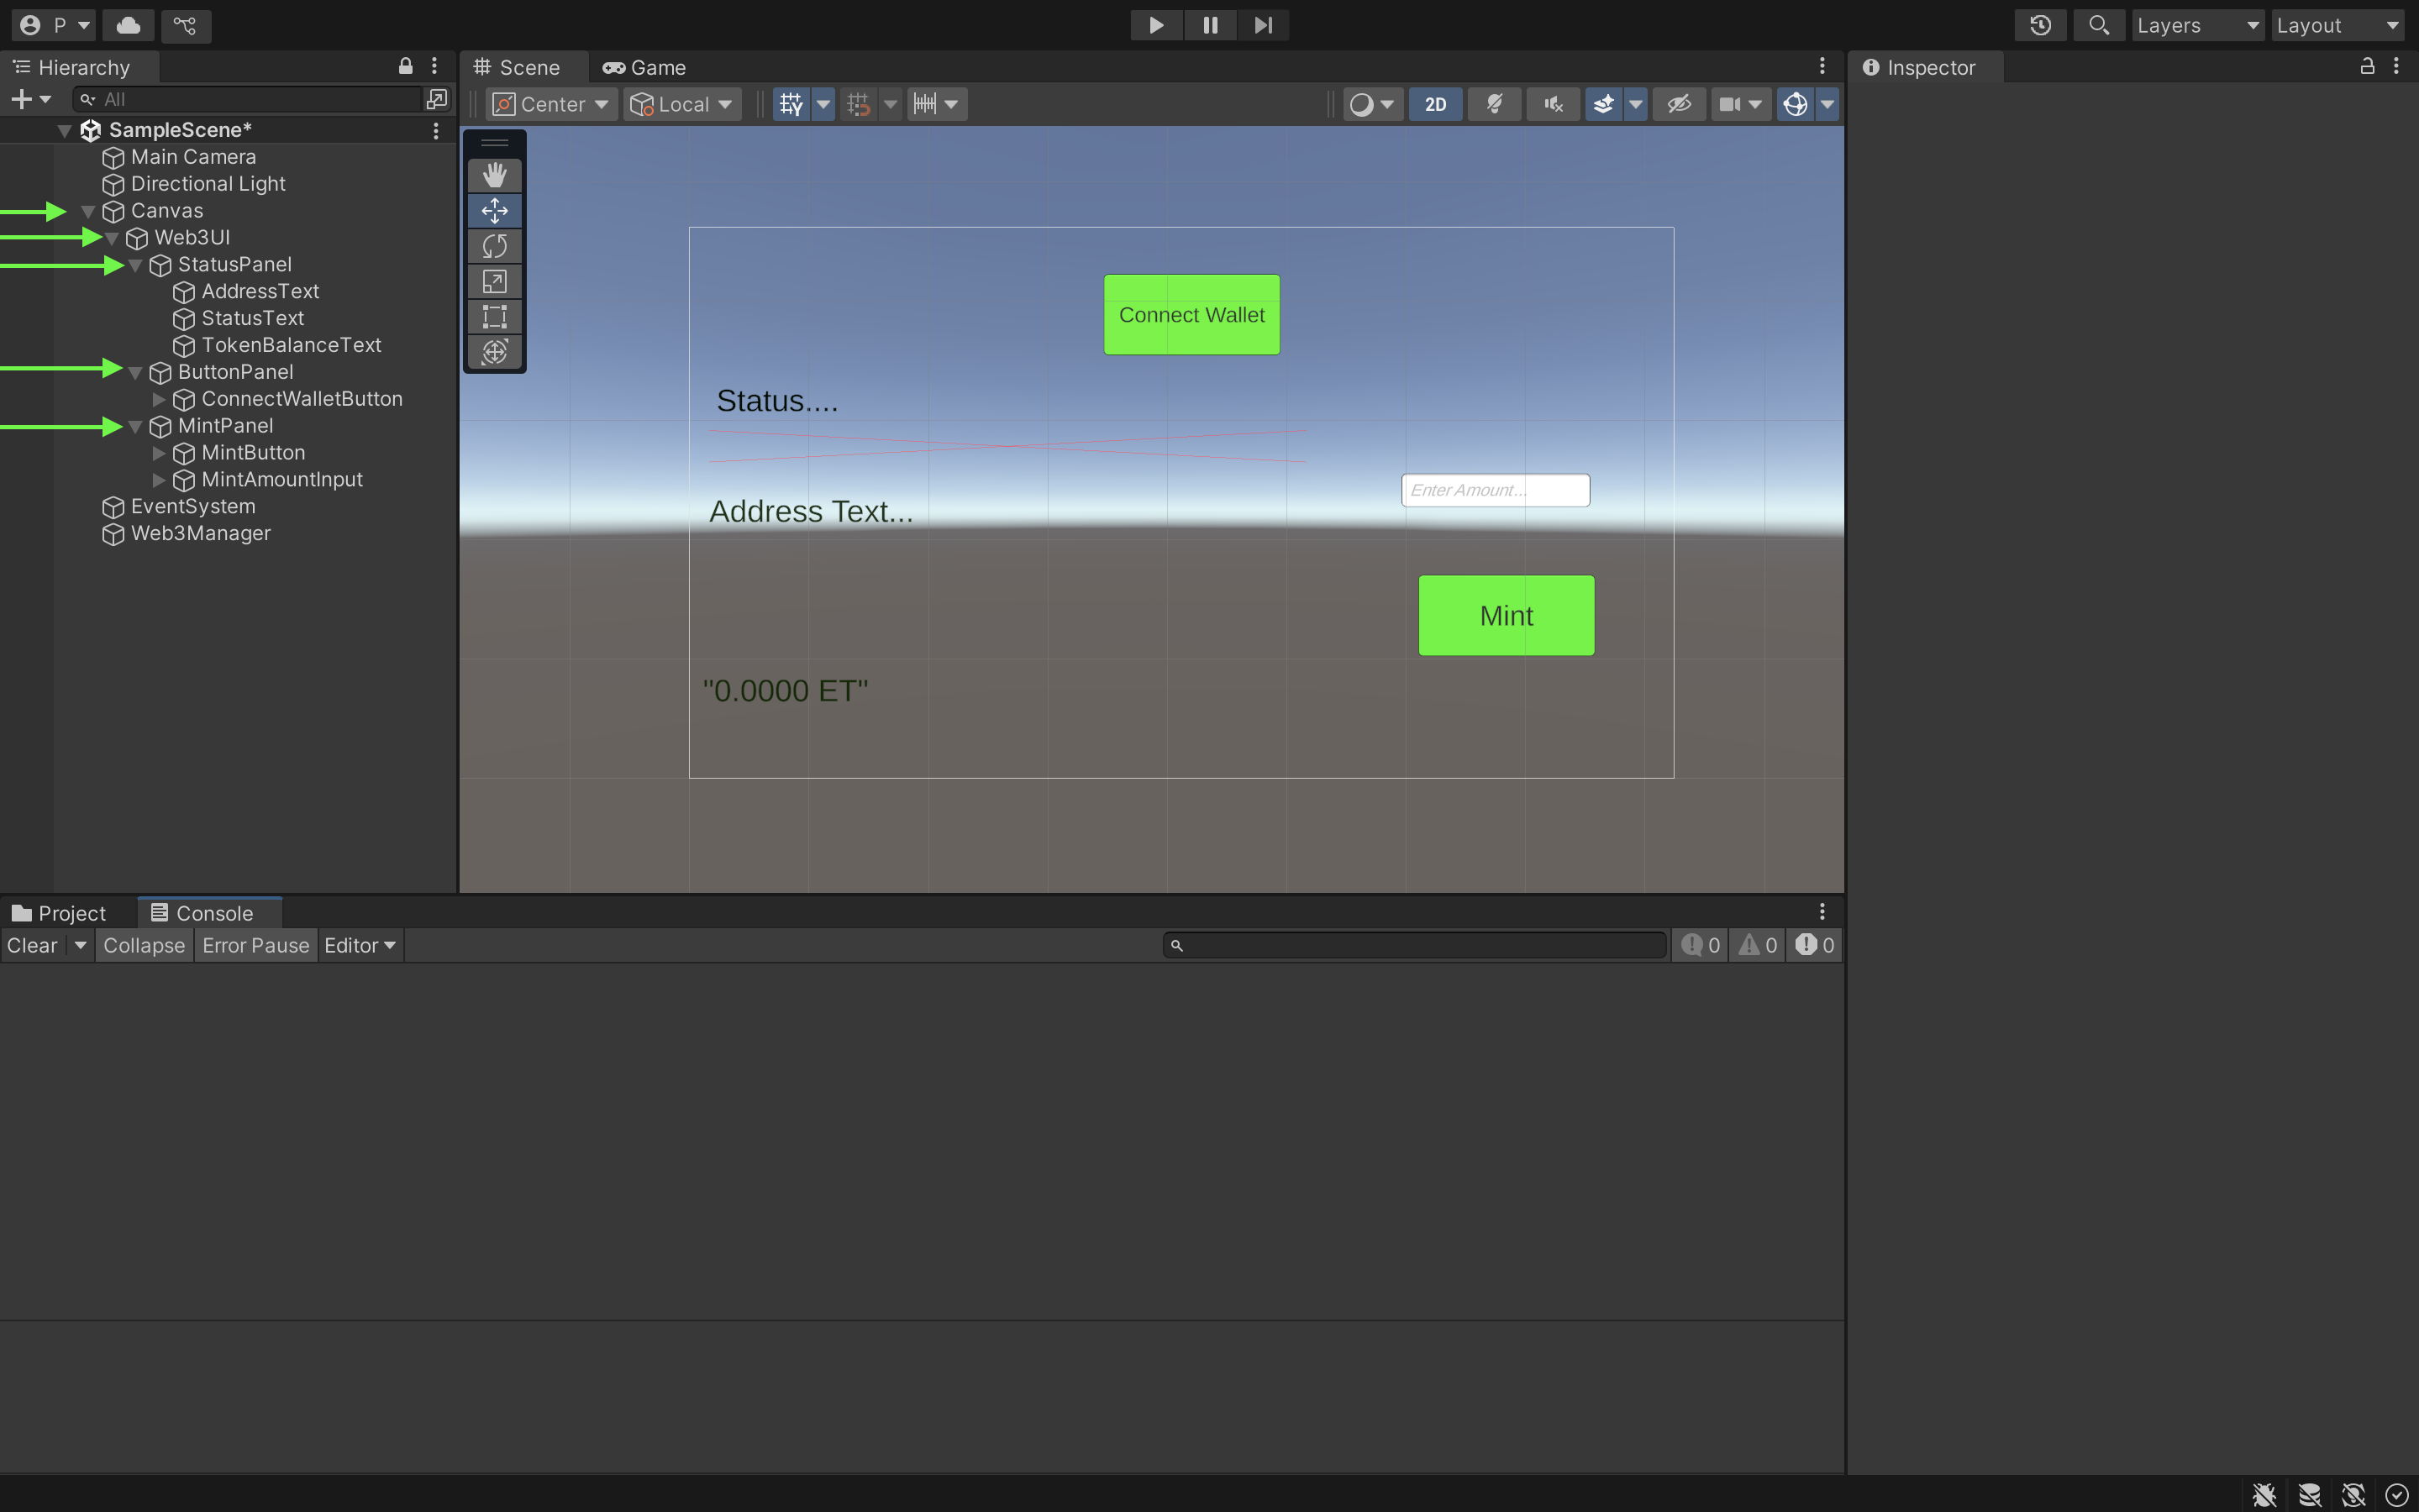
For your component to be well arranged as seen in the image above, you have to manually arrange them with the icon on the right-hand side when you click on each component.
Setting Up Web3 Integration
In this section, we will build up pieces to integrate web3 into our Unity project.
Creating and deploying KIP7 smart contract
First, we'll use Kaia Contract Wizard to generate our smart contract.
Step 1: Using Kaia Contract Wizard
- Navigate to Kaia Contract Wizard.
- Select KIP7 (Kaia's token standard, similar to ERC20).
- Configure your token:
- Name: ExampleTestToken (or something else!)
- Symbol: ET (your token's ticker)
- Premint: 100 (initial token supply)
- Features: Check ✅ Mintable
For this guide, we will tweak the mint function not to have onlyOwner modifier. To do this, we have to remove the ownable.sol import, and Ownable inheritance. The tweaked code should now look like this:
// SPDX-License-Identifier: MITpragma solidity ^0.8.4;import "@kaiachain/contracts/KIP/token/KIP7/KIP7.sol";contract ExampleTokens is KIP7 { constructor() KIP7("ExampleTokens", "ET") { _mint(msg.sender, 100 * 10 ** decimals()); } function supportsInterface(bytes4 interfaceId) public view virtual override returns (bool) { return super.supportsInterface(interfaceId); } function mint(uint256 amount) public { _mint(msg.sender, amount); }}
We removed the onlyOwner modifier to allow anyone to call the mint function other than the original deployer or owner of the contract.
Step 2: Deploying via Remix IDE
- Copy and Paste the code above in a newly created file
ET.solon Remix IDE. - In Remix IDE:
- Click the Compile contract button.
- Activate the Kaia plugin in the plugin manager.
- Under Environment in the Kaia Plugin tab, choose Injected Provider - Kaia Wallet.
- Find your contract (ExampleTokens) in the Contract dropdown.
- Click Deploy to launch your token!
- When your Kaia Wallet pops up:
- Review the deployment details.
- Click Confirm to deploy to Kaia Kairos Testnet.
Copy and save the deployed contract address. You'll need it later in the tutorial.
Building the Unity-Web3 Bridge
Now we'll create the vital connection between Unity and Web3 functionality. This is where we bring blockchain capabilities into your Unity application!
Part 1: Creating the Plugin Bridge (kaiaPlugin.jslib)
First, we'll build our JavaScript bridge that lets Unity talk to Web3:
- Create your plugin directory:
Assets/└── Plugins/ └── WebGL/ └── KaiaPlugin.jslib // We'll create this file
-
Why a .jslib? Think of it as a translator between Unity's C# and the browser's JavaScript - essential for Web3 interactions!
-
The plugin will handle three core functions:
- ConnectWallet() - Handles Kaia Wallet connections
- GetTokenBalance() - Checks token balances
- MintTokens() - Manages token minting
Open this file in VS Code and paste the KaiaPlugin.jslib source code in Appendix A:
Part 2: Creating the C# Manager (Web3Manager.cs)
Next, we'll create our C# script to manage all Web3 operations:
- Create your scripts directory:
Assets/└── Scripts/ └── Web3/ └── Web3Manager.cs // We'll create this file
What does Web3Manager do?
- Acts as the main conductor for all Web3 operations.
- Manages communication with our JavaScript plugin.
- Updates UI elements based on blockchain events.
- Handles all wallet and token operations.
- Connects the
Connect WalletandMintbuttons with their respective functions
- Open this file in VS Code and paste the
Web3Manager.cssource code in Appendix B
Part 3: Setting Up the Web3Manager GameObject
Finally, let's bring it all together in Unity:
- Create the Manager Object:
- Right-click in the Hierarchy window (root level).
- Select "Create Empty Object".
- Name it "Web3Manager".
- Attach Your Script:
- Select the Web3Manager GameObject.
- In Inspector, click Add Component.
- Search for and select "Web3Manager".
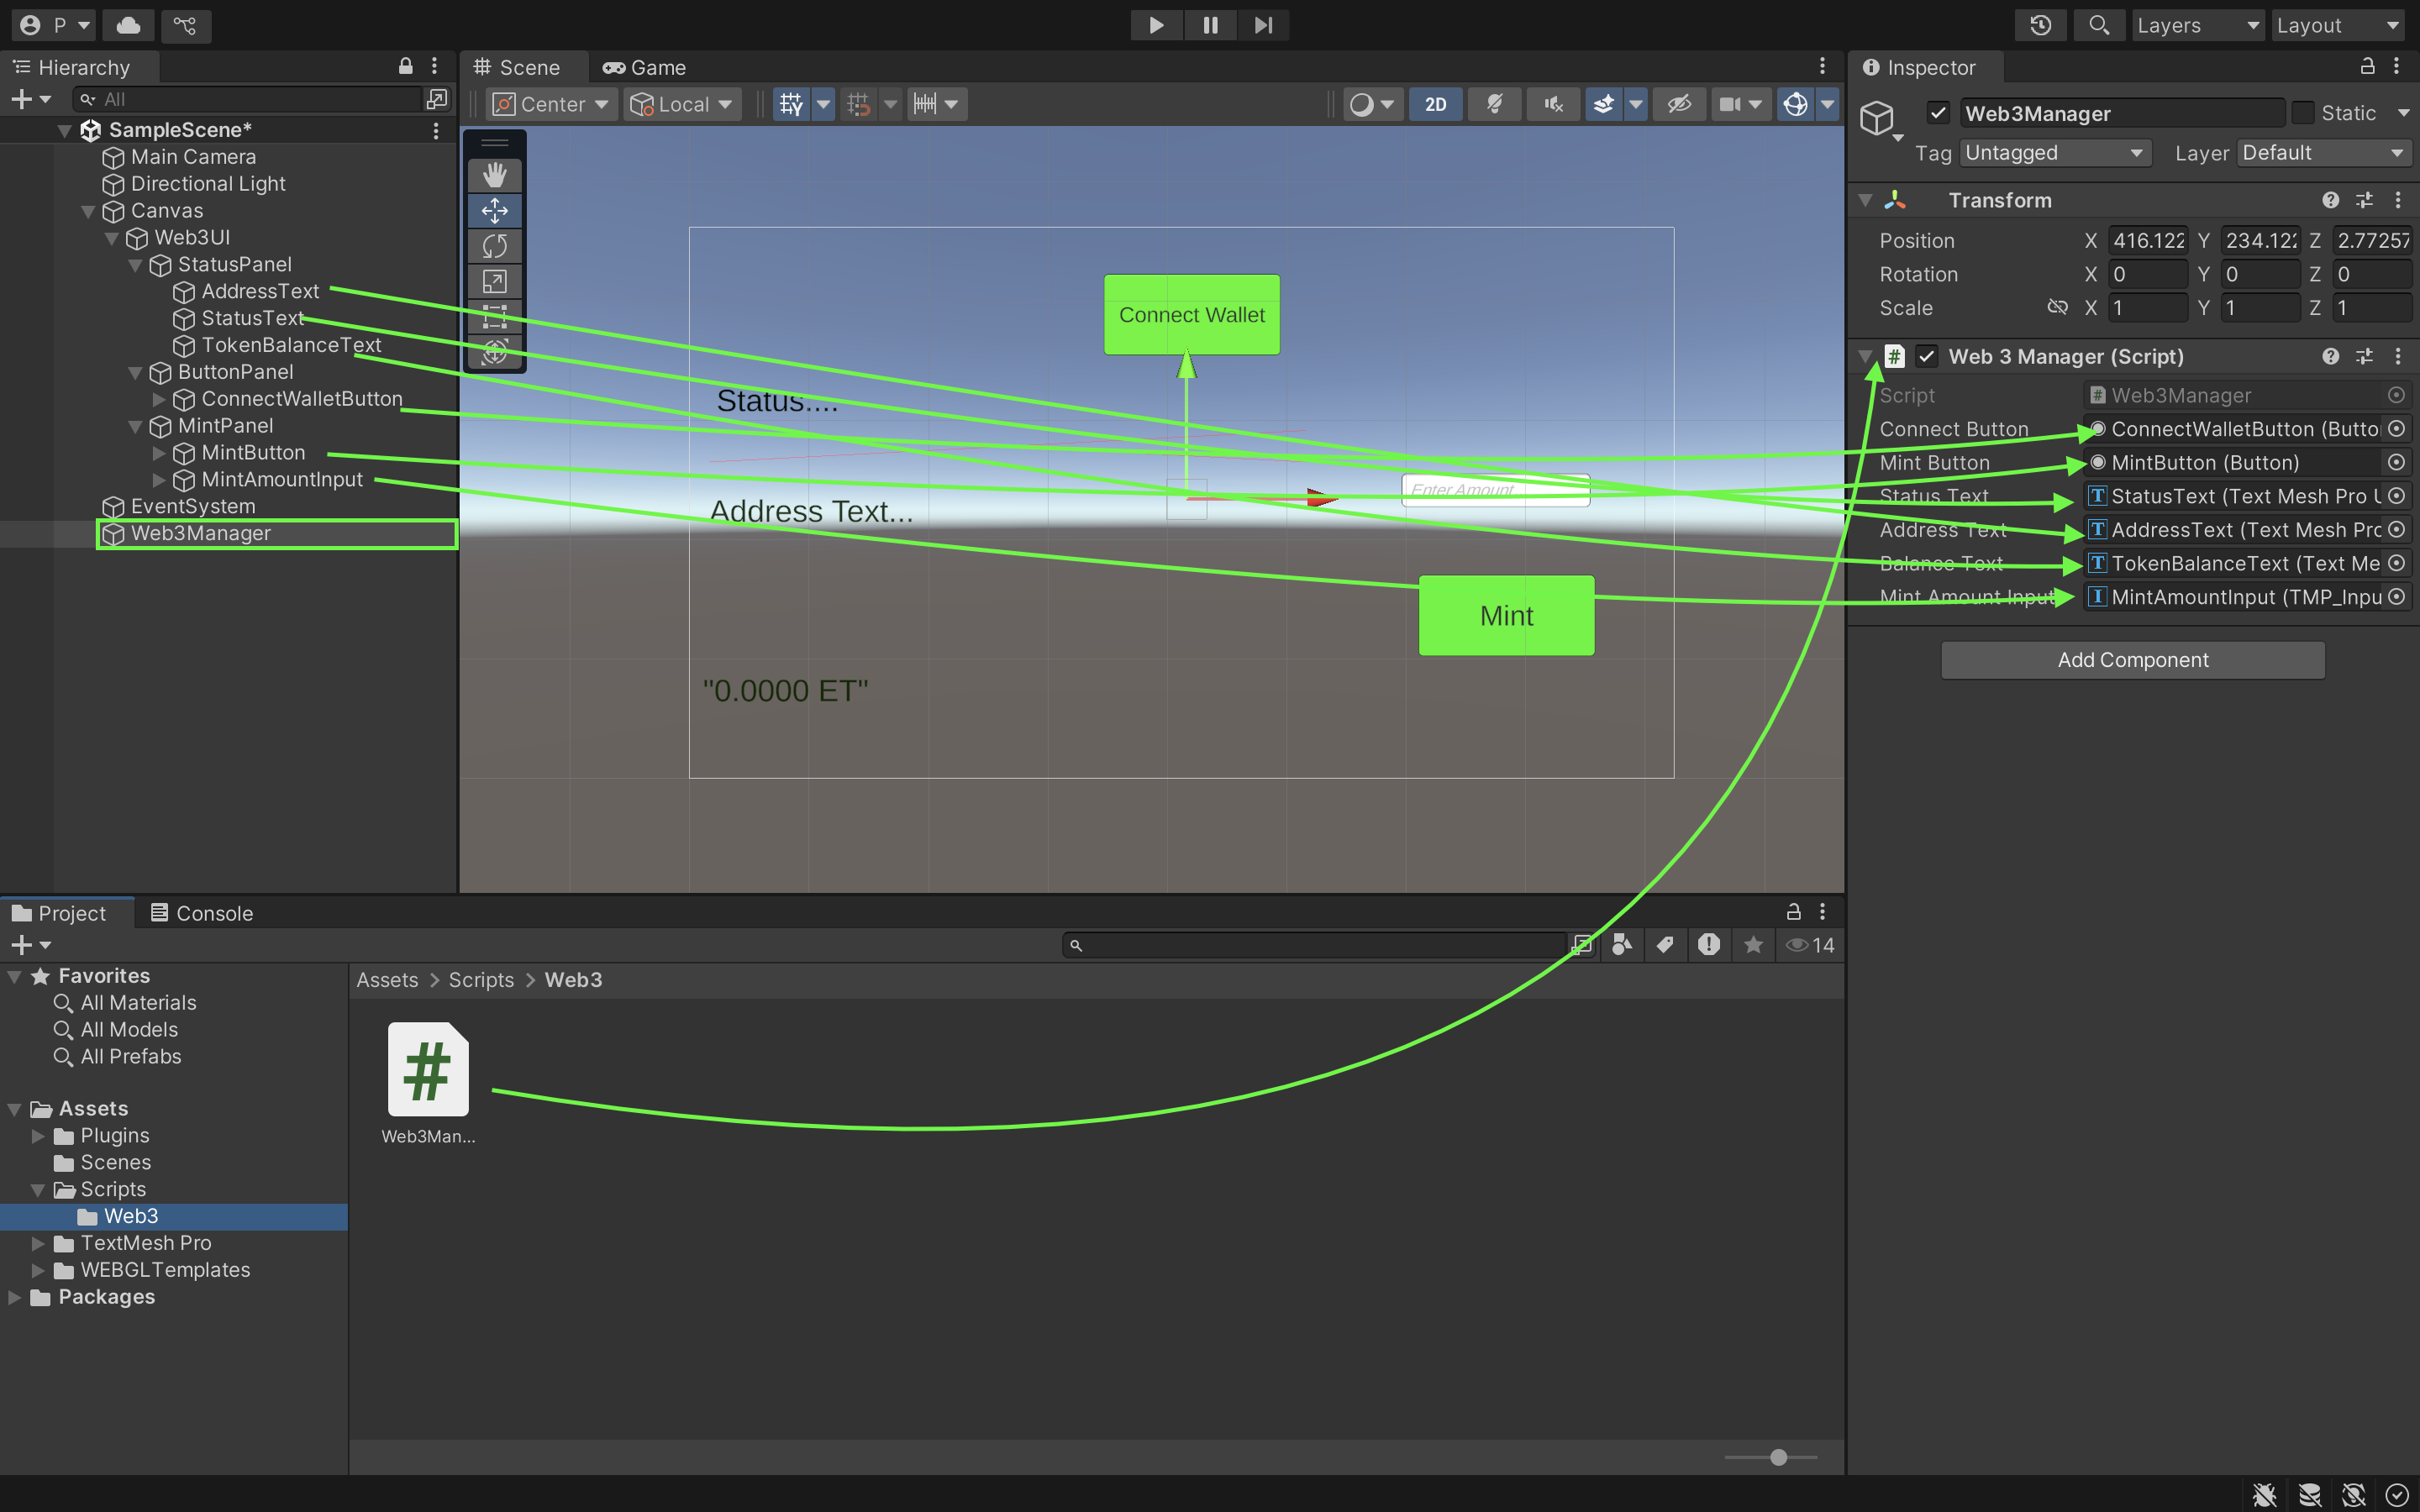
- Connect UI Elements:
- With Web3Manager selected, look in the Inspector.
- Drag and drop your UI elements from the Hierarchy to the corresponding fields:
- StatusText
- AddressText
- TokenBalanceText
- Connect / Mint buttons
- Input fields
Setting Up WebGL Build Settings
In this section, we will configure our dApp for the web! This will configure Unity for Web3 compatibility and create a custom template for Kaia integration.
Step 1: Switch to WebGL Platform
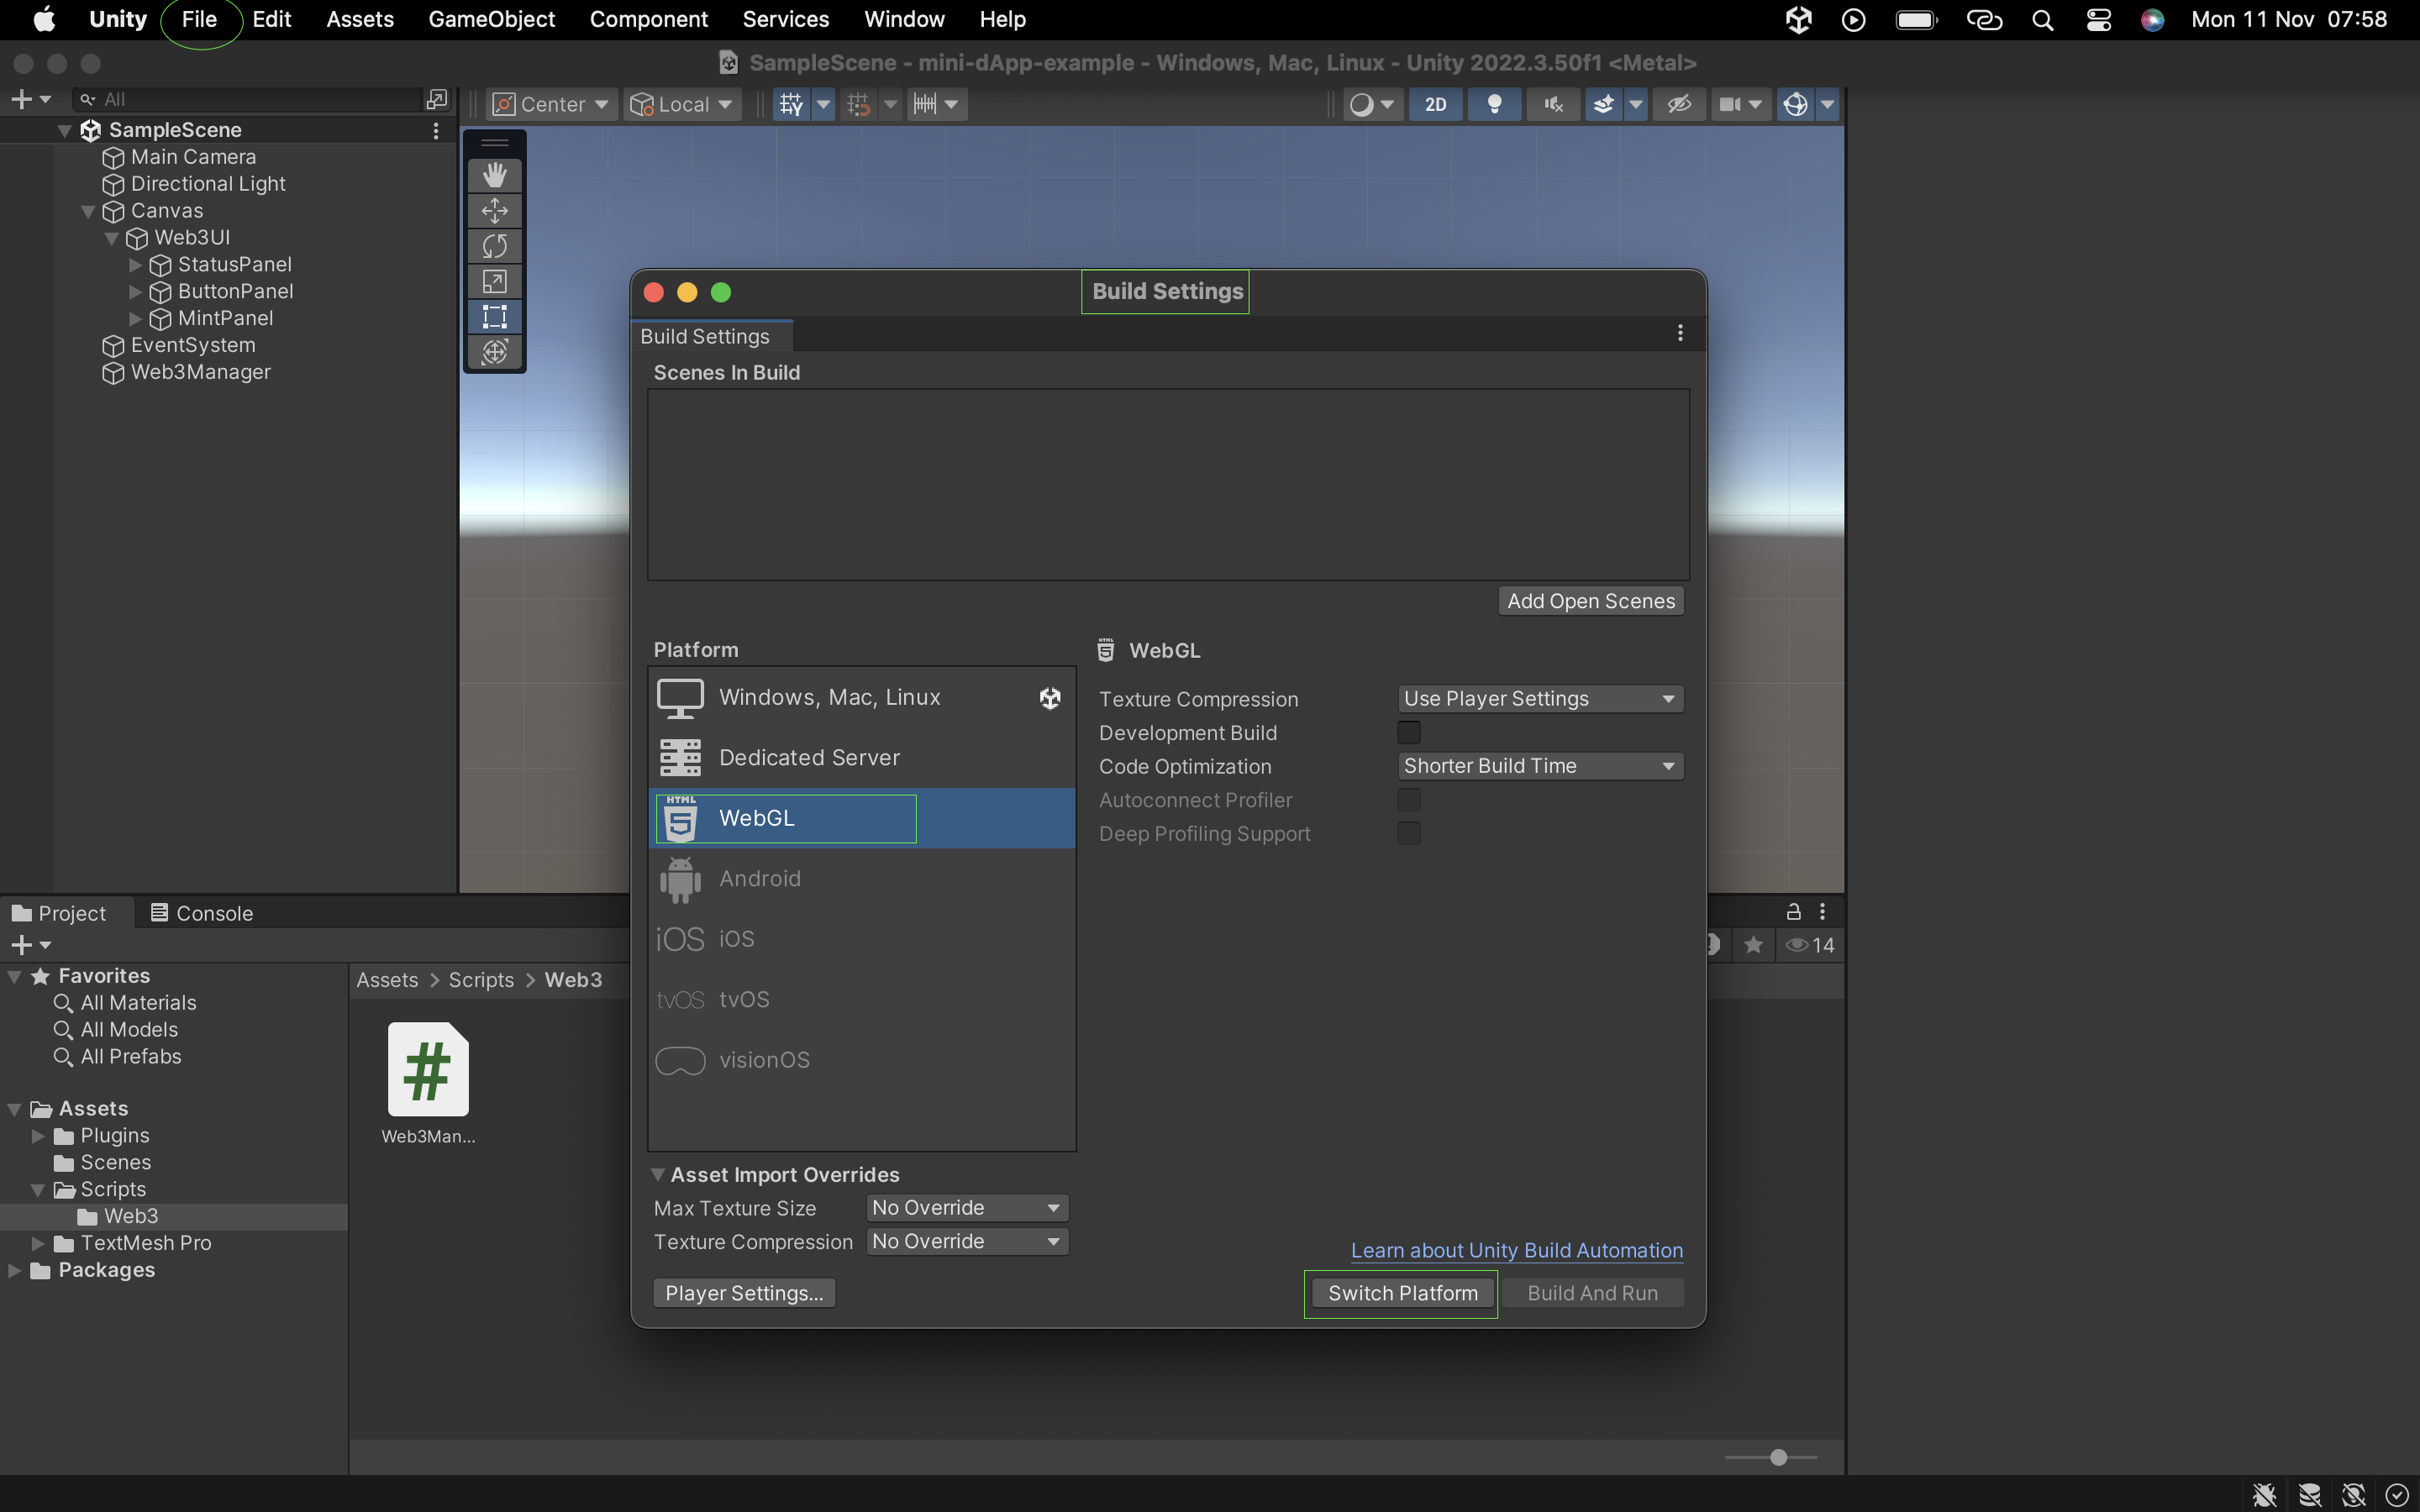
- Navigate to File → Build Settings.
- Select WebGL and click "Switch Platform".
This might take a few minutes if it's your first time switching.
Step 2: Creating a Custom WebGL Template
We need a custom template to integrate Web3 capabilities. Here's our folder structure:
Assets/└── WebGLTemplates/ └── KaiaTemplate/ ├── index.html └── scripts/ └── dapp_portal_sdk.js
Why Custom Template?
The default Unity template doesn't include Web3 support. Our custom template will:
- Load necessary Web3 libraries.
- Enable Kaia Wallet integration.
- Handle blockchain interactions properly.
Step 3: Setting Up index.html
Copy and paste the code below in your index.html file:
<!DOCTYPE html><html lang="en-us"> <head> <meta charset="utf-8"> <meta name="viewport" content="width=device-width, initial-scale=1.0"> <title>Unity WebGL Player</title> <script src="scripts/dapp_portal_sdk.js"></script> <style> body { margin: 0; padding: 0; } #unity-container { width: 100%; height: 100%; position: absolute; } #unity-canvas { width: 100%; height: 100%; background: #231F20; } #unity-loading-bar { display: none; } #unity-progress-bar-empty { width: 141px; height: 18px; margin-top: 10px; background: url('Build/minidapp.progress-bar-empty-dark.png') no-repeat center; } #unity-progress-bar-full { width: 0%; height: 18px; margin-top: 10px; background: url('Build/minidapp.progress-bar-full-dark.png') no-repeat center; } </style> </head> <body> <div id="unity-container"> <canvas id="unity-canvas"></canvas> <div id="unity-loading-bar"> <div id="unity-progress-bar-empty"> <div id="unity-progress-bar-full"></div> </div> </div> </div> <script src="Build/minidapp.loader.js"></script> <script> var sdk = null; var connectedAddress = null; var myGameInstance = null; var Module = { onRuntimeInitialized: function() { console.log("Runtime initialized"); }, env: { MintToken: function(amount) { window.MintToken(amount); }, GetBalance: function() { window.GetBalance(); }, ConnectWallet: function() { window.ConnectWallet(); }, GetConnectedAddress: function() { var address = window.GetConnectedAddress(); var bufferSize = lengthBytesUTF8(address) + 1; var buffer = _malloc(bufferSize); stringToUTF8(address, buffer, bufferSize); return buffer; } } }; async function initializeSDK() { try { sdk = await DappPortalSDK.init({ clientId: 'PASTE CLIENT ID', chainId: '1001' }); console.log("SDK initialized"); return true; } catch (error) { console.error("SDK init error:", error); return false; } } window.ConnectWallet = async function() { try { if (!sdk) { const initialized = await initializeSDK(); if (!initialized) return null; } const provider = sdk.getWalletProvider(); const accounts = await provider.request({ method: 'kaia_requestAccounts' }); if (accounts && accounts.length > 0) { connectedAddress = accounts[0]; myGameInstance.SendMessage('Web3Manager', 'OnWalletConnected', connectedAddress); } } catch (error) { myGameInstance.SendMessage('Web3Manager', 'OnWalletError', error.message); } } window.GetConnectedAddress = function() { return connectedAddress || ''; } window.MintToken = async function(amount) { try { const provider = sdk.getWalletProvider(); const mintSignature = '0xa0712d68'; const amountHex = amount.toString(16).padStart(64, '0'); const data = mintSignature + amountHex; const tx = { from: connectedAddress, to: '0x099D7feC4f799d1749adA8815eB21375E13E0Ddb', value: '0x0', data: data, gas: '0x4C4B40' }; const txHash = await provider.request({ method: 'kaia_sendTransaction', params: [tx] }); myGameInstance.SendMessage('Web3Manager', 'OnMintSuccess', txHash); GetBalance(); // Get updated balance after mint } catch (error) { myGameInstance.SendMessage('Web3Manager', 'OnMintError', error.message); } } window.GetBalance = async function() { try { const provider = sdk.getWalletProvider(); const balanceSignature = '0x70a08231'; const addressParam = connectedAddress.substring(2).padStart(64, '0'); const data = balanceSignature + addressParam; const result = await provider.request({ method: 'kaia_call', params: [{ from: connectedAddress, to: '0x099D7feC4f799d1749adA8815eB21375E13E0Ddb', data: data }, 'latest'] }); const balance = parseInt(result, 16); myGameInstance.SendMessage('Web3Manager', 'OnBalanceReceived', balance.toString()); } catch (error) { myGameInstance.SendMessage('Web3Manager', 'OnBalanceError', error.message); } } createUnityInstance(document.querySelector("#unity-canvas"), { dataUrl: "Build/minidapp.data", frameworkUrl: "Build/minidapp.framework.js", codeUrl: "Build/minidapp.wasm", streamingAssetsUrl: "StreamingAssets", companyName: "DefaultCompany", productName: "minidapp", productVersion: "0.1", }).then((unityInstance) => { myGameInstance = unityInstance; }); </script> </body></html>
Step 4: Setting Up Dapp Portal SDK
- Visit: https://static.kaiawallet.io/js/dapp-portal-sdk.js
- Save the content to your
scripts/dapp_portal_sdk.js. Using a local Dapp Portal SDK file improves load times and reliability.
Alternatively, you can directly add the link to the Dapp Portal SDK as the src in the script tag in your index.html.
// <script src="scripts/dapp_portal_sdk.js"></script><script src="https://static.kaiawallet.io/js/dapp-portal-sdk.js"></script>
Step 5: Configure Unity to Use Custom Template
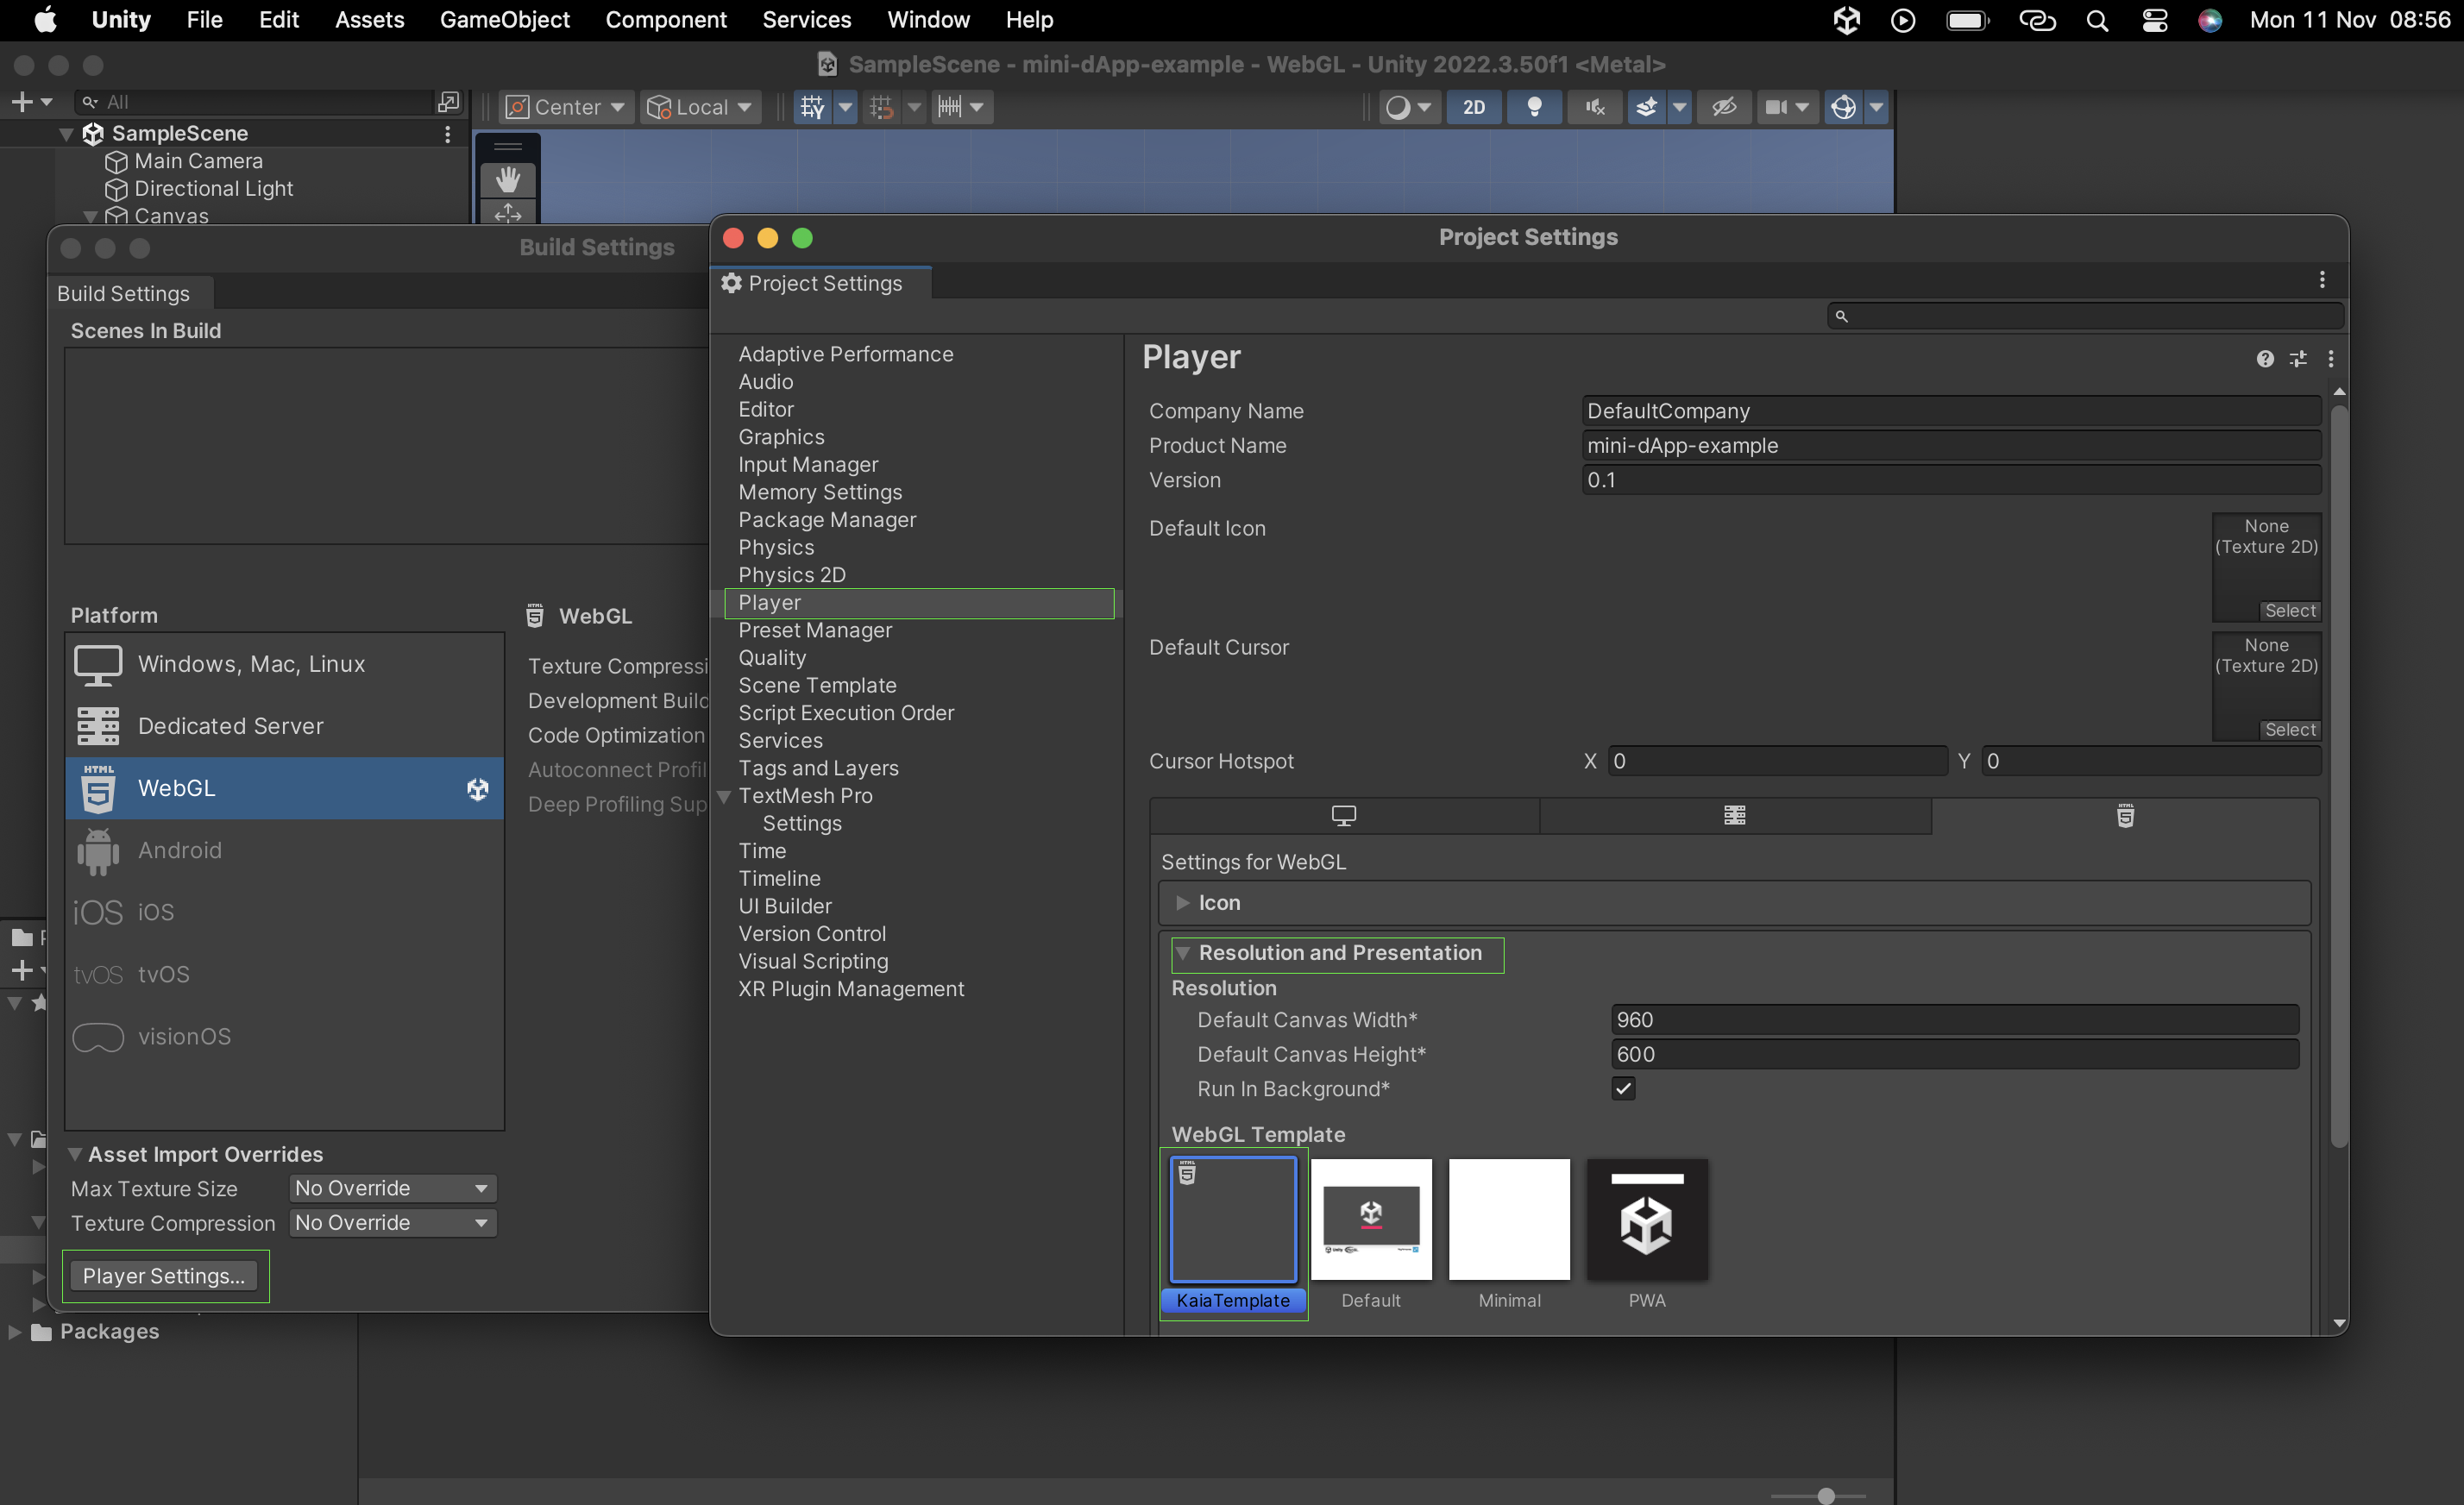
- Open Build Settings.
- Navigate to Player Settings.
- Under "Resolution and Presentation":
- Find "WebGL Template".
- Select "KaiaTemplate".
- Under "Publish Settings" select disabled in the Compression Format field.
Step 6: Building Your dApp
Now Let's bring it all together:
- Open Build Settings (File → Build Settings).
- Click "Build And Run".
- Save the build project as prompted on Unity; e.g "minidapp".
- Important Build Files:
minidapp/├── minidapp.loader.js├── minidapp.data├── minidapp.framework.js└── minidapp.wasm
Step 7: Post-Build Configuration
After building your project,
- Open your build folder.
- Note all generated file names.
- Update your index.html to match these names.
- Save changes and rebuild.
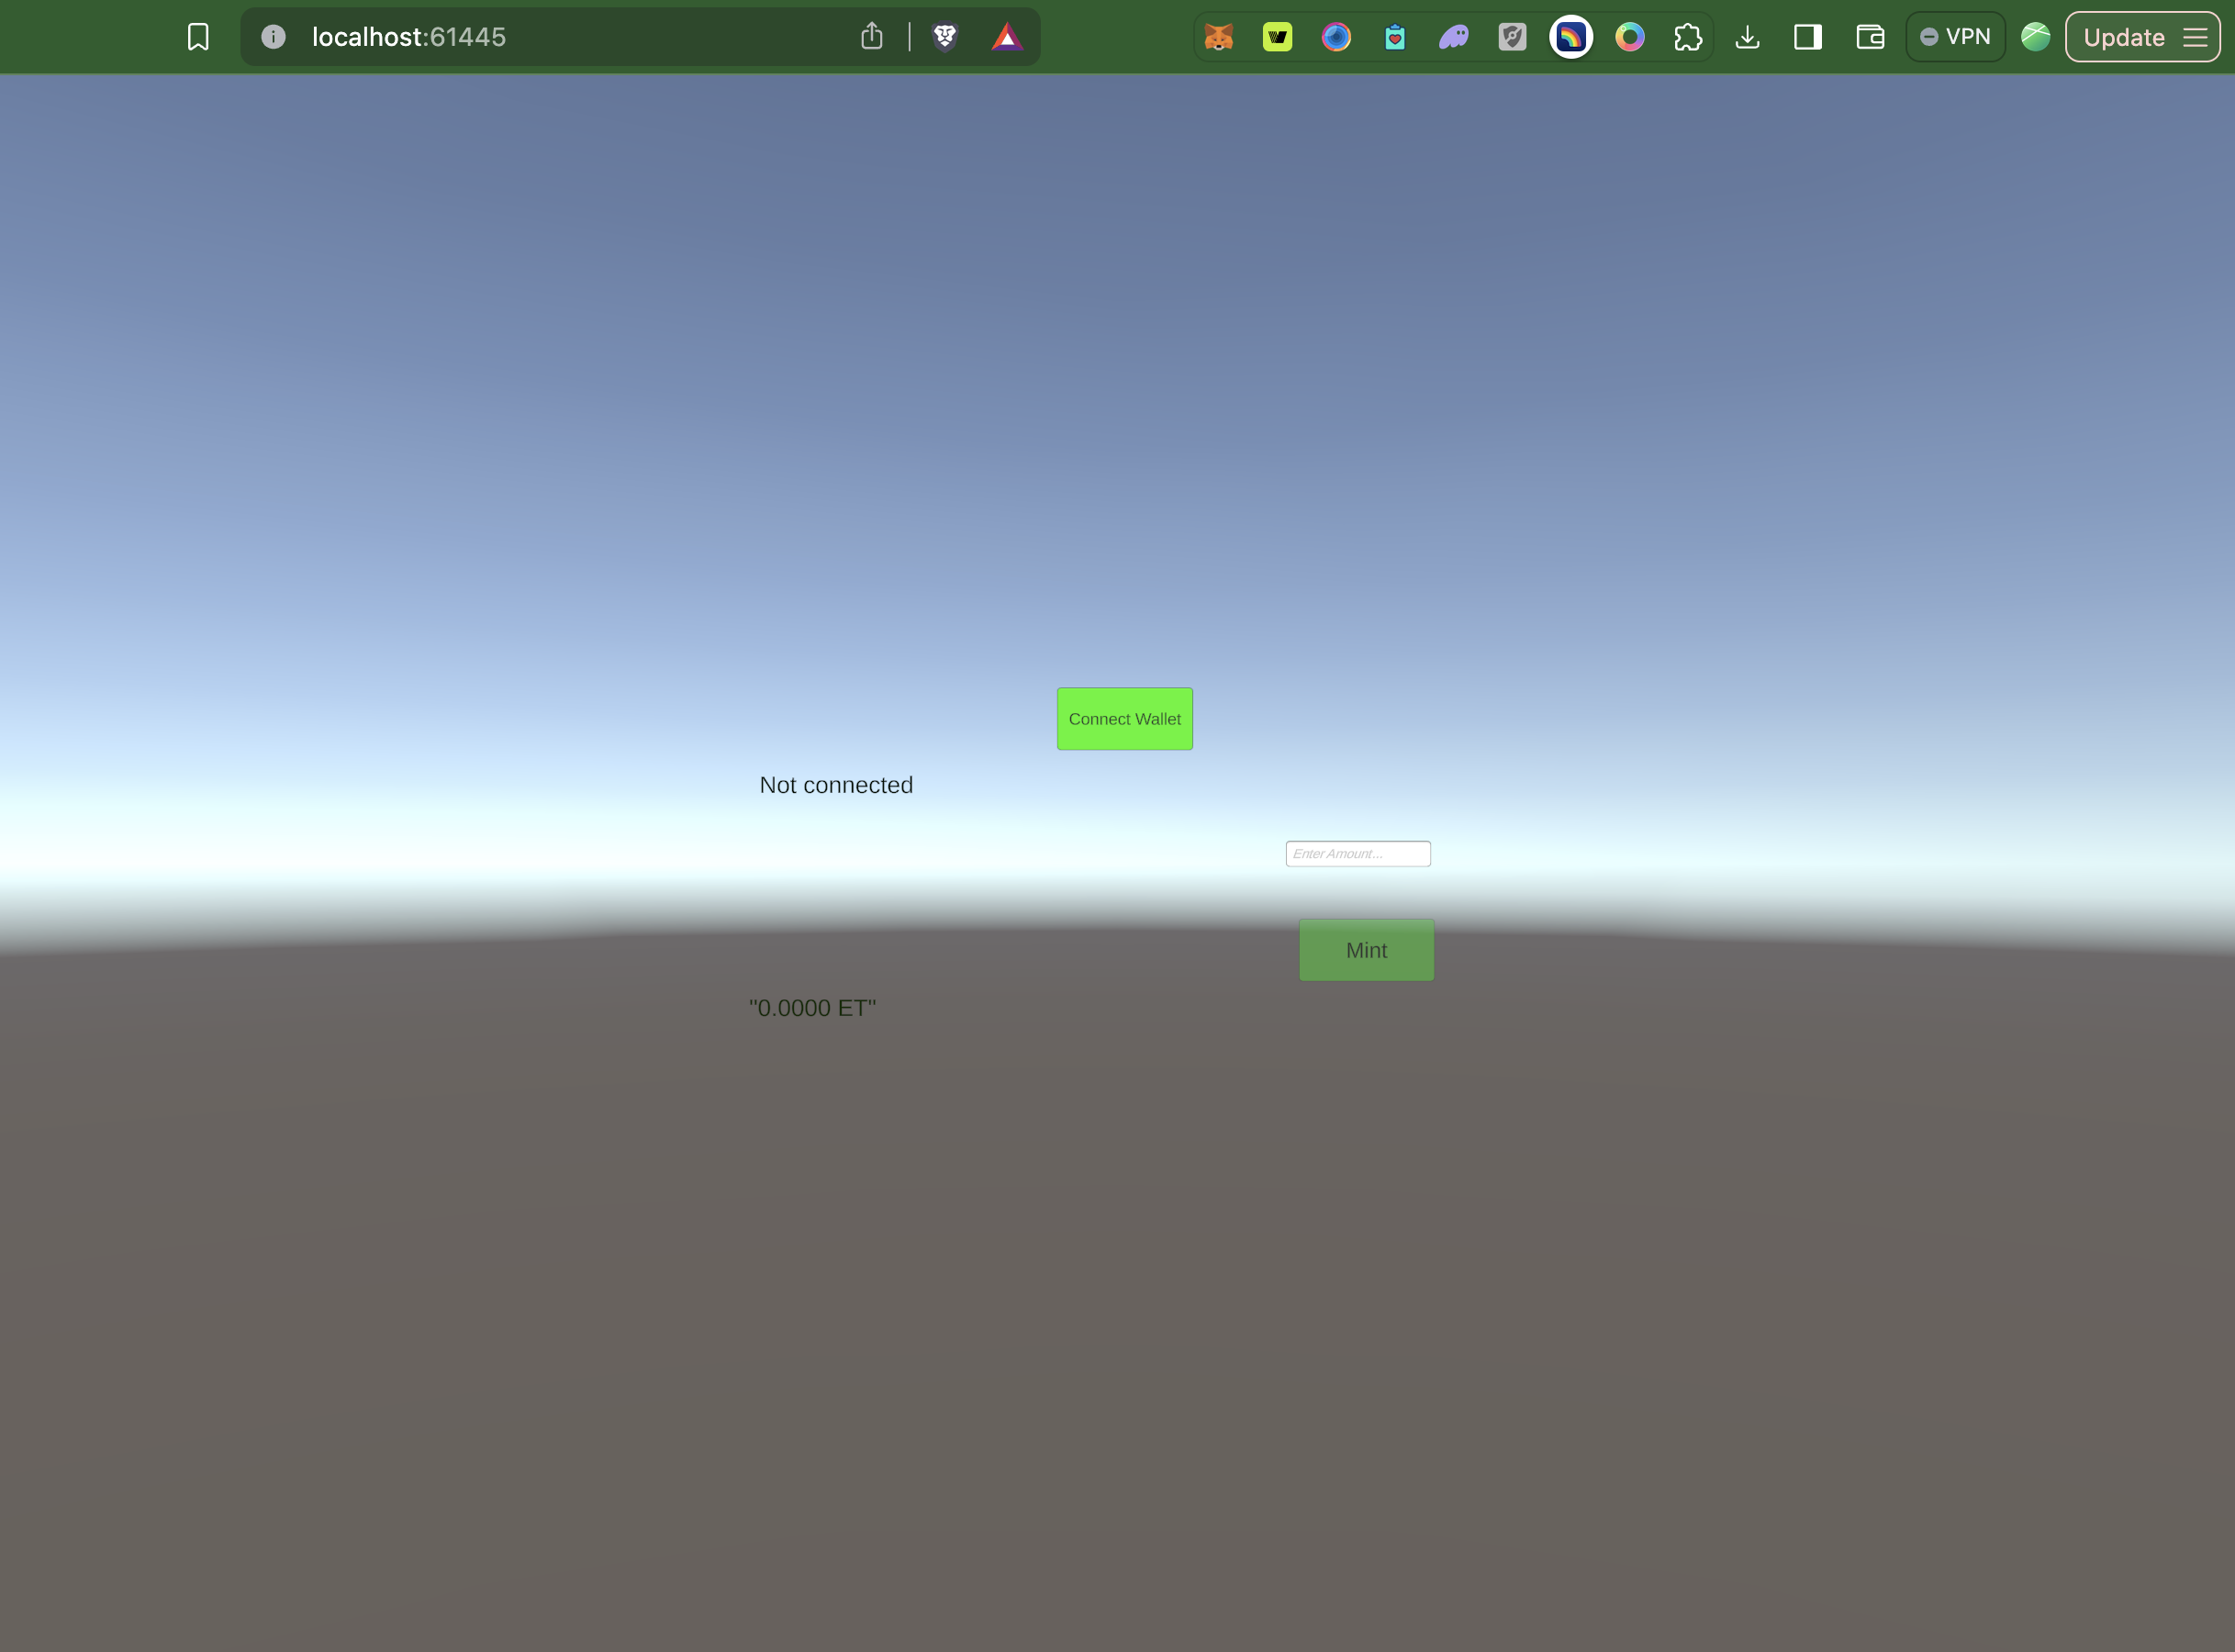
- You should now see a tab opened in your browser.
Step 8: Route WebGL build to Localhost:3000
For security and development purposes, the DApp Portal SDK currently works on localhost:3000. At the moment, the default Unity WebGL builds use random ports (like 61445) and for our app to work efficiently we need to configure our Unity WebGL build to open on localhost:3000.
To do so, follow the steps below:
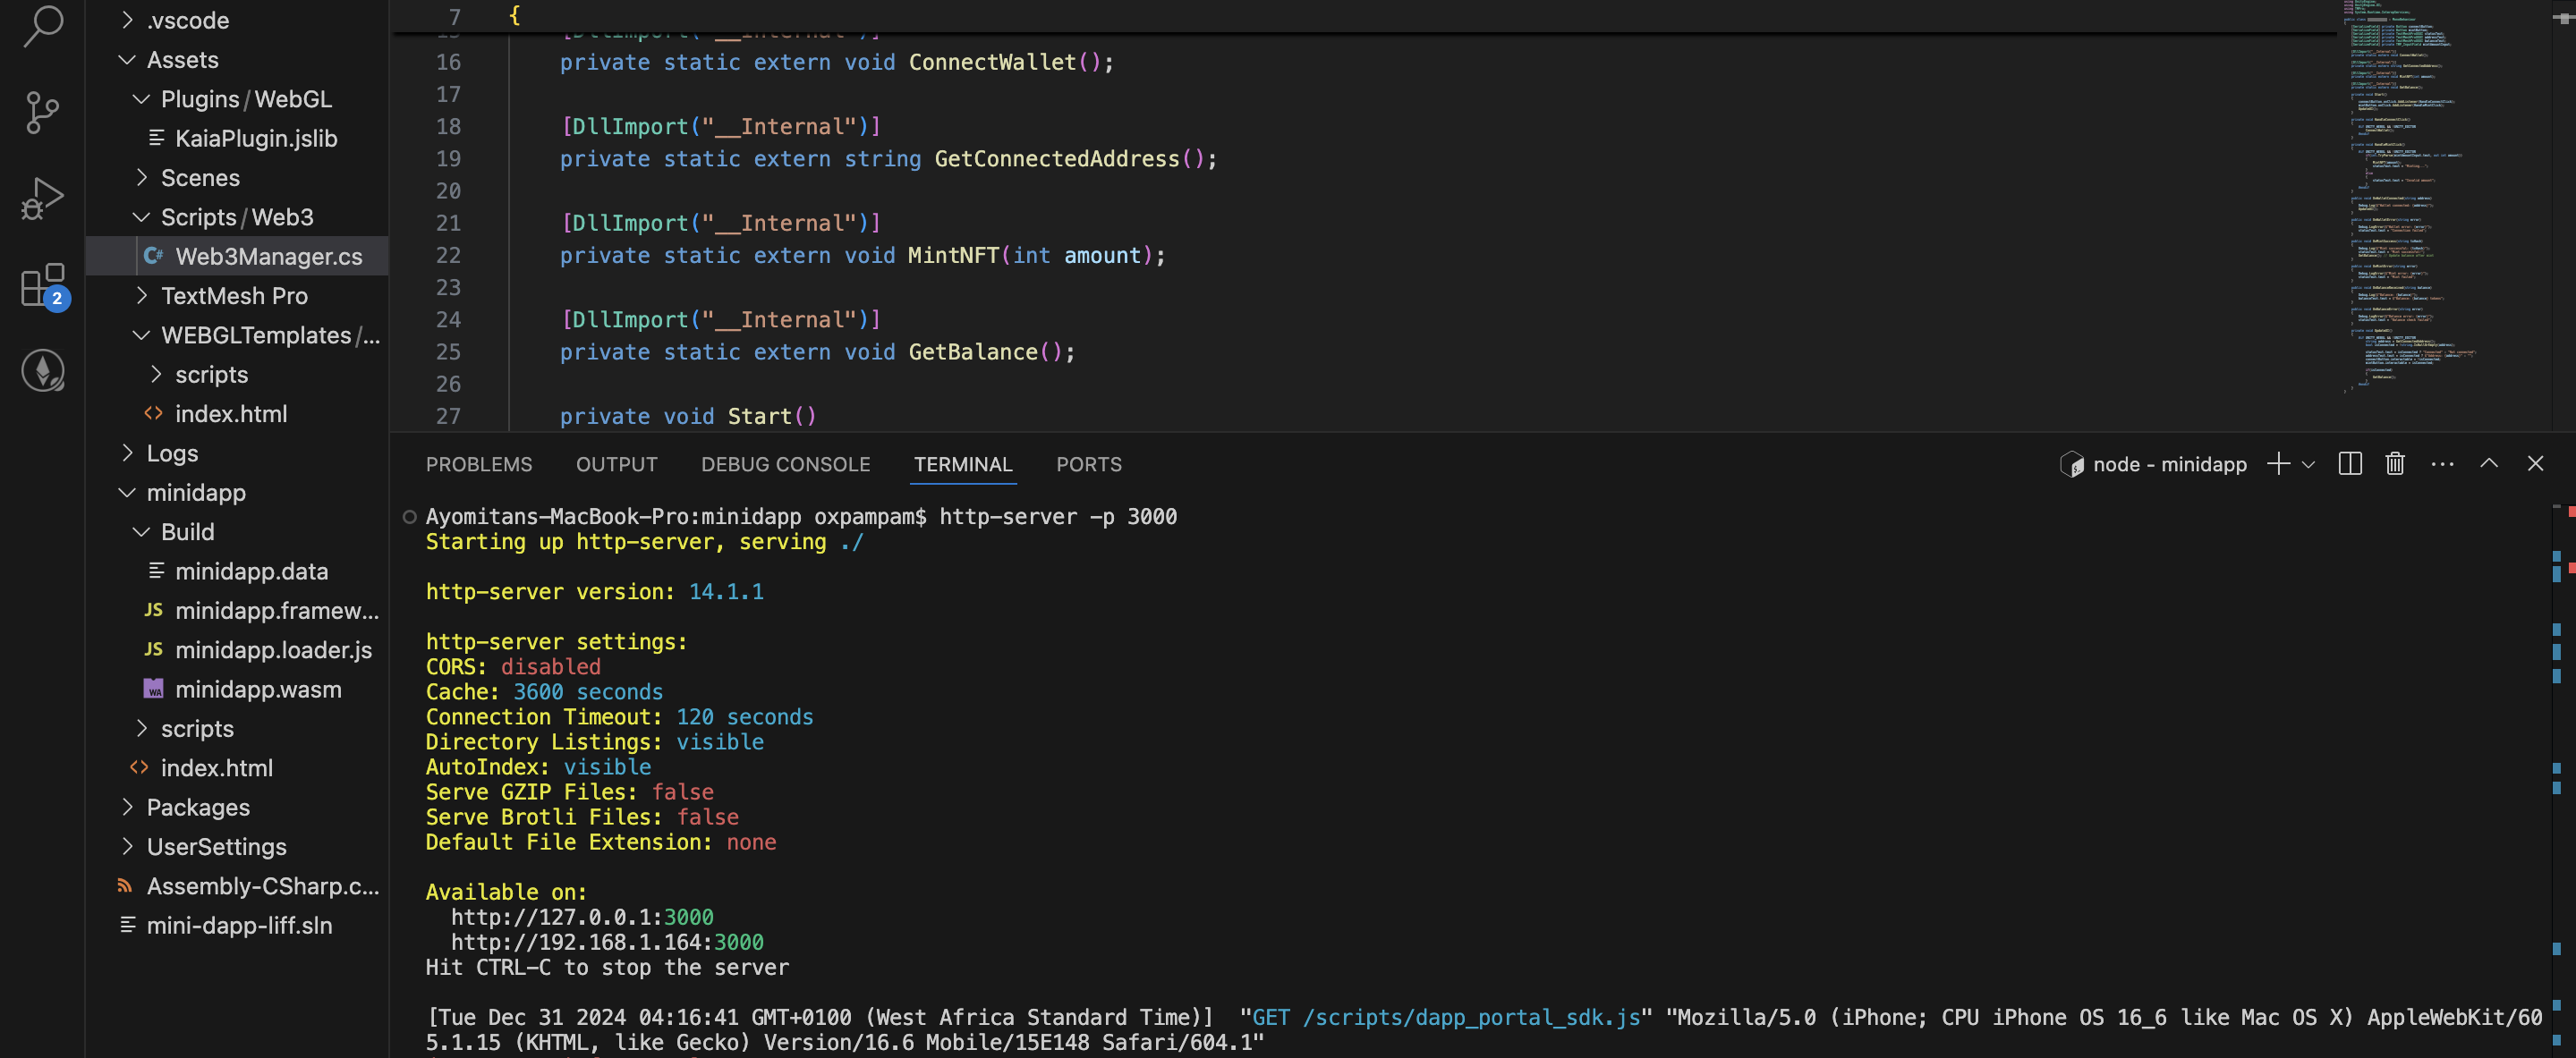
- Copy and Paste the code below in your project terminal
# Install http-server globallynpm install -g http-server
- Navigate to build folder
cd path/to/minidapp
- Start server on port 3000
http-server -p 3000
Testing and running application
Now that we have our project running, let’s test and interact with it.
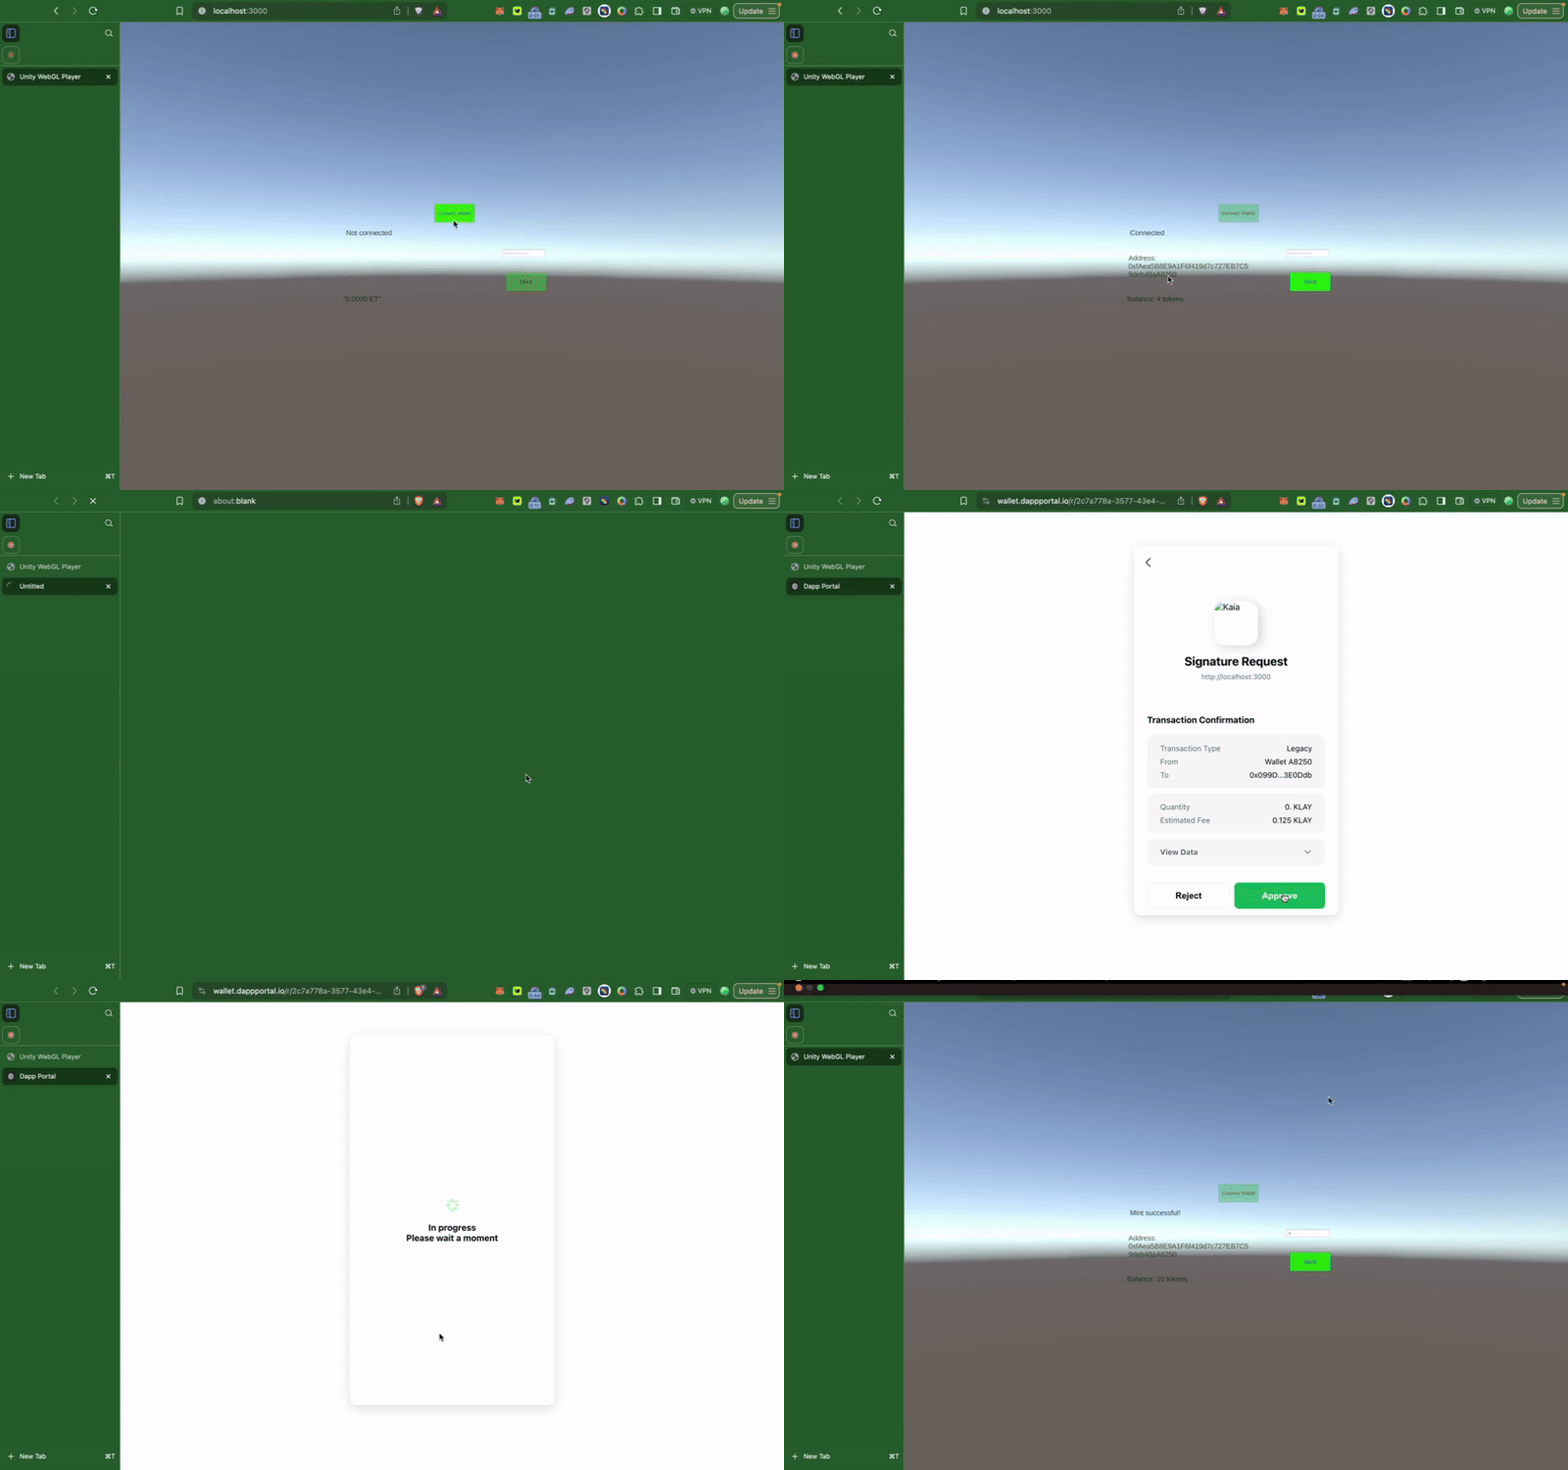
- Click on the Connect Wallet button to connect to Dapp Portal Wallet.
- Once connected, fill in details (amount) to mint to the connected address.
